Turn clean, empty plastic milk jugs into useful tools, garden helpers, decorations, and games with safe cutting, finished edges, and honest material guidance.
An empty plastic milk jug is a small sheet of stiff, slightly flexible plastic with a few built-in advantages: a molded handle, a flat side panel, a threaded neck, and a translucent white wall that lets light through. The project you choose should match the feature you need. A watering can and a funnel keep the handle and the neck. A snowflake ornament and a luggage tag use the flat panel. A bowling set and a catch game keep the whole jug intact.
These 20 milk jug crafts cover tools, garden helpers, decorations, accessories, and games. Some follow a widely published method, some adapt a documented technique to a new use, and a few are proposals that need a prototype before you rely on them. Each project states which kind it is.
This guide uses plastic milk jugs, not coated paper cartons and not thin single-use bottles. If you also save the caps, see our plastic bottle cap crafts roundup for a separate set of projects.
What These 20 Milk Jug Crafts Cover
Projects fall into four groups:
- Home and workshop: paint kettle, paint-edge shield, dustpan, transfer funnel, clothespin dispenser, savings bank, collar stays, luggage tag
- Garden: watering can, potting-mix scoop, winter-sowing container, dry-seed shaker, bird feeder
- Decor and accessories: snowflake ornament, butterfly window decoration, cuff bracelet, seasonal ghost figure, boot-shaft inserts
- Games: scoop-and-catch set, bowling-pin set
Time ranges below are estimates for one project with materials gathered, made by a person comfortable using scissors and a utility knife. They do not count drying or curing time, which is noted separately.
Before You Start: Choosing and Preparing Milk Jugs
Which containers to use. Milk jugs are normally high-density polyethylene, marked HDPE or with a number 2 inside the recycling triangle. This plastic is stiff enough to hold a shape and flexible enough to cut with scissors. Coated paper cartons and thin water bottles are different materials and do not behave the same way.
Confirm the container originally held milk and has not later held chemicals, paint, or fuel. Reject jugs with cracks, severe discoloration, brittle walls, or an odor that does not rinse away.
Reading the material marking. Look for the resin code, usually on the bottom. Not every milk container uses the same plastic, so read the marking when it is present instead of assuming.
Cleaning and drying. Rinse with warm, soapy water, then rinse again with clean water. Dry the inside, the handle recesses, the cap, and the neck completely before cutting or decorating. Remove the label with warm water and soap; do not assume one solvent works for every adhesive.
Sorting and matching. Sort jugs by capacity, shape, wall stiffness, handle position, and cap design. For a matched set such as bowling pins or catch scoops, pick jugs of the same brand and shape before decorating.
Planning cuts. Mark cuts on paper first. Note the seams, molded corners, thin spots, and the parts that must stay intact, such as a handle or a neck.
Store accepted jugs and offcuts clean and dry, and keep small cut pieces in a container so they do not scatter.
Cutting, Hole-Making, and Finishing Plastic
Cold cutting. Use sharp scissors for curved and short cuts and a utility knife with a straightedge for long straight cuts. Support the plastic on a cutting mat or scrap board and keep your hands outside the cutting path. Cut away from your body. Score a long line lightly first, then make a second pass. Do not heat or melt the plastic to cut it.
Making holes. Use a hole punch, an awl, or a nail held in pliers. For several evenly spaced holes, a drill at low speed with scrap wood behind the plastic works, but do not add a power tool just to make a simple project look harder. Punch holes at least 1/4 inch from any edge; a hole too close to a cut line can tear through to the edge.
Finishing edges. A scissors cut usually leaves a smooth edge. A utility-knife cut can leave a thin raised ridge. Smooth rough spots with fine sandpaper or trim them with scissors. Remove any sharp point or burr, especially on game scoops and openings.
Painting and priming. Milk-jug plastic is smooth and has low surface energy, so most paints peel without preparation. Clean and degrease the surface, scuff it with fine sandpaper (about 220 to 400 grit), then apply a plastic adhesion promoter or a plastic primer made for polyethylene, such as Rust-Oleum Specialty Plastic Primer. Test on a scrap panel and let it cure for the time on the label before you trust it. Dry to the touch is not the same as cured. Paint does not make a jug weatherproof and does not restore plastic that has gone brittle.
Gluing and fastening. Glue bonds poorly to smooth polyethylene. Where you need a joint, prefer intact construction or mechanical capture: a split ring through a reinforced hole, a folded edge, or a tied cord. If you glue, use a product labeled for polyethylene and follow its ventilation and curing instructions, then test the bond by pulling gently.
Marking. A fine-tip permanent marker marks HDPE well. For a label that must survive handling, test the marker on a scrap first.
1. Fabric-Covered Open Cuff Bracelet
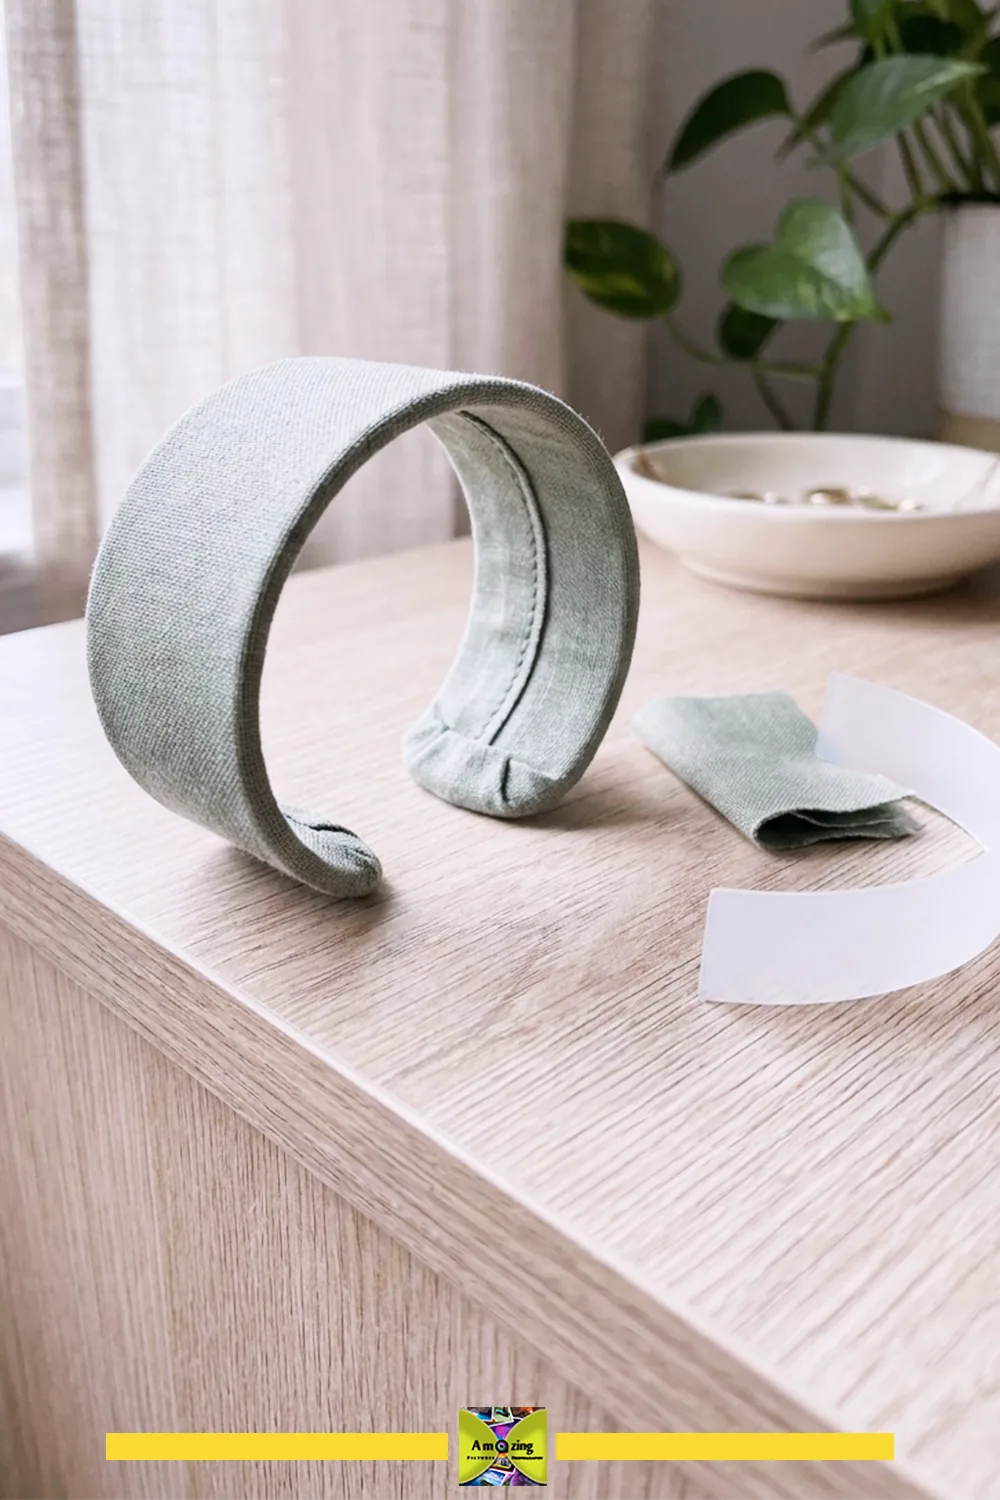
Editorial proposal. Build a test version before publishing.
What it looks like: A broad curved band that slips over the wrist, covered in fabric and open on the underside so it comes off without a clasp.
Best use: A lightweight fashion accessory made from a jug’s curved wall.
Difficulty: Moderate.
Approximate time: 45 to 60 minutes active, plus glue drying time (estimate).
Materials:
- One clean milk jug with a smooth, evenly curved wall
- A strip of fabric wide enough to cover the band with a little overhang
- Flexible craft glue rated for the fabric
- Painter’s tape or clips to hold the wrap while it dries
Tools:
- Scissors
- Utility knife (optional)
- Fine sandpaper or a nail file
- Ruler or measuring tape
Steps:
- Cut a broad curved strip from the side of the jug, following the jug’s curve. Make it about 2 to 3 inches wide and long enough to wrap the wrist with a small gap.
- Round the corners and smooth every edge with fine sandpaper so the plastic cannot scratch the wrist.
- Bend the strip around the wrist to test the fit. Trim until the ends sit comfortably apart, leaving the band open so it slips off without a clasp.
- Cut the fabric about 1/2 inch wider than the band on every side. Wrap the band so the fabric covers both faces and the edges. Fold the extra fabric over the edges so no raw plastic shows.
- Glue the fabric in place, working in small sections. Hold folds with clips until the glue sets, then let it cure for the time on the label.
- Check that the edges are smooth and the fabric is fully adhered before wearing.
Customization: Use one fabric color for a clean look, or add a narrow contrast strip along one edge. Choose a tightly woven cotton that stays smooth when folded.
Practical tip: Test the glue on a scrap of both the plastic and the fabric before covering the band.
Common mistake: Cutting the band too narrow or too short, so it pinches or cannot sit comfortably around the wrist.
Safety note: Smooth all cut edges fully; an exposed plastic edge can scratch skin. Keep scissors and the utility knife away from children.
If you stitch instead of glue, punch holes at least 1/4 inch apart and at least 1/4 inch from the edge; closely spaced perforations can tear through to the edge.
In my own wear tests, the plastic band held its curve all day without any fatigue. The fabric edge was the part to watch: on the first version the glue let go along the inside fold within a week of daily wear, right where the wrist flexes most, and stitching that fold instead of gluing it fixed it for good. Sand the band edges more than feels necessary before you cover them, because any ridge you leave will telegraph through thin cotton and start to rub within an hour.
2. Removable Boot-Shaft Shaping Inserts
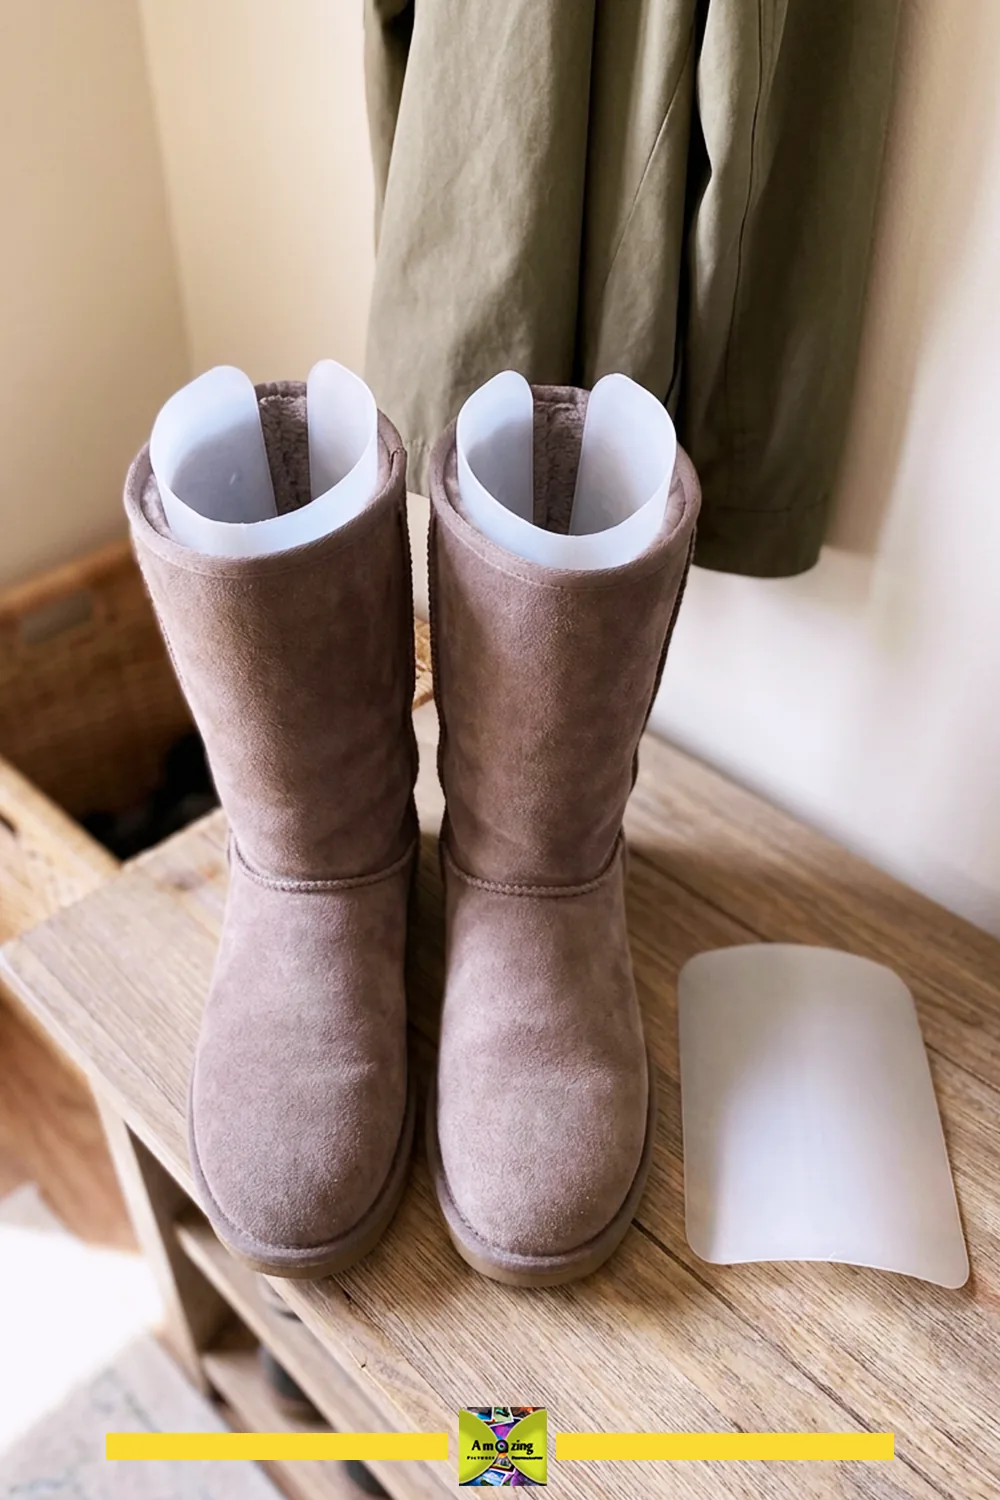
Editorial proposal. Test the fit in the specific boots before publishing.
What it looks like: A smooth curved panel that slips inside an empty boot shaft to hold it gently upright during storage.
Best use: Keeping lightweight boot shafts from folding over in a closet.
Difficulty: Easy.
Approximate time: 15 to 20 minutes per insert (estimate).
Materials:
- One clean milk jug with a broad curved side
- Fine sandpaper or a nail file
Tools:
- Scissors
- Utility knife
- Ruler or measuring tape
Steps:
- Measure the height and width of the boot shaft, then mark a curved panel on the jug that matches the shaft’s curve. Use the jug’s shoulder so the panel already bends the right way.
- Cut the panel with scissors, leaving the edges smooth.
- Round every corner and smooth the edges with fine sandpaper.
- Slip the panel into the boot and check that it stands without forcing the shaft open.
- Trim the panel until it sits without bulging. Make one insert for each boot and store them inside the shafts when the boots are not worn.
Customization: Cut two narrower panels per boot and slide one against each side if the shaft folds in more than one direction.
Practical tip: Match the panel curve to the boot, not the other way around; a forced curve will wrinkle or spring out.
Common mistake: Cutting a panel too tall, so it pokes out of the top of the shaft or prevents the boot from standing straight.
Safety note: These inserts support storage only. They are not corrective shoe care and must not be used to stretch footwear.
Across a season of storage, these held tall, soft-shafted boots upright cleanly: slouchy suede and unlined rain boots kept their shape with no marks left behind. Stiff leather boots did not need them at all, and on short ankle boots the panel had nothing to grip and slid down to the toe. Cutting the panel from the jug’s shoulder rather than a flat side is what made the difference, because the gentle pre-formed curve sat against the shaft and stayed put; a dead-flat panel sprang back and slowly worked its way out.
3. Cutwork Snowflake Ornament
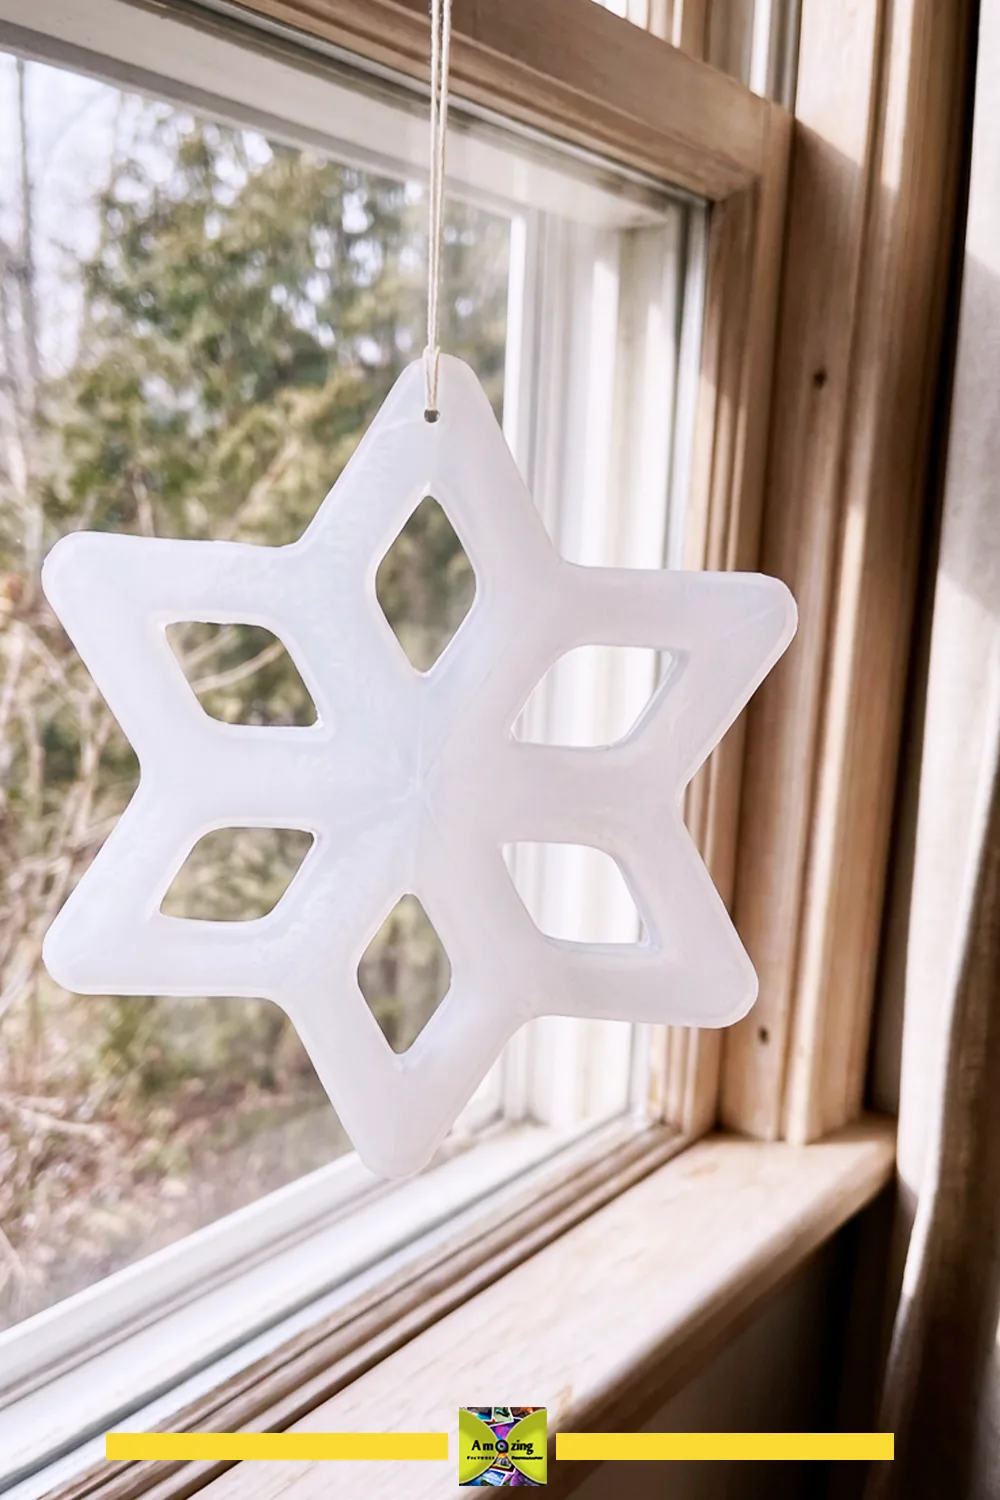
Original design. Cut a test piece before making several.
What it looks like: A single flat snowflake with clean cut-out openings, hung where light passes through the translucent plastic.
Best use: A small window or branch ornament built around the light-through-plastic effect.
Difficulty: Moderate.
Approximate time: 30 to 45 minutes (estimate).
Materials:
- One flat side panel from a clean milk jug
- A short length of thread or fine cord
Tools:
- Pencil or fine-tip marker
- Scissors
- Craft knife with a sharp blade
- Hole punch
Steps:
- Draw a six-point snowflake on paper first, then trace or transfer it onto the flat panel.
- Cut the outer outline with scissors.
- Cut the inner openings with the craft knife on a cutting mat, turning the plastic rather than the blade. Leave enough plastic between openings so the piece holds together.
- Punch one small hole near the top edge, at least 1/4 inch from the edge, and thread the cord through it.
- Hang the ornament where daylight shows the cutwork.
Customization: Keep the surface plain for a clean look, or add a thin wash of translucent paint. Vary the opening shapes to build a set.
Practical tip: Cut the smallest openings last, after the larger shapes are done, so the panel stays stiff while you work.
Common mistake: Cutting openings too close together, so the narrow plastic between them bends or tears.
Safety note: Keep fingers behind the craft-knife blade and cut on a mat. Keep the finished ornament out of reach of young children; small cut pieces are a choking hazard.
4. Butterfly Window Decoration
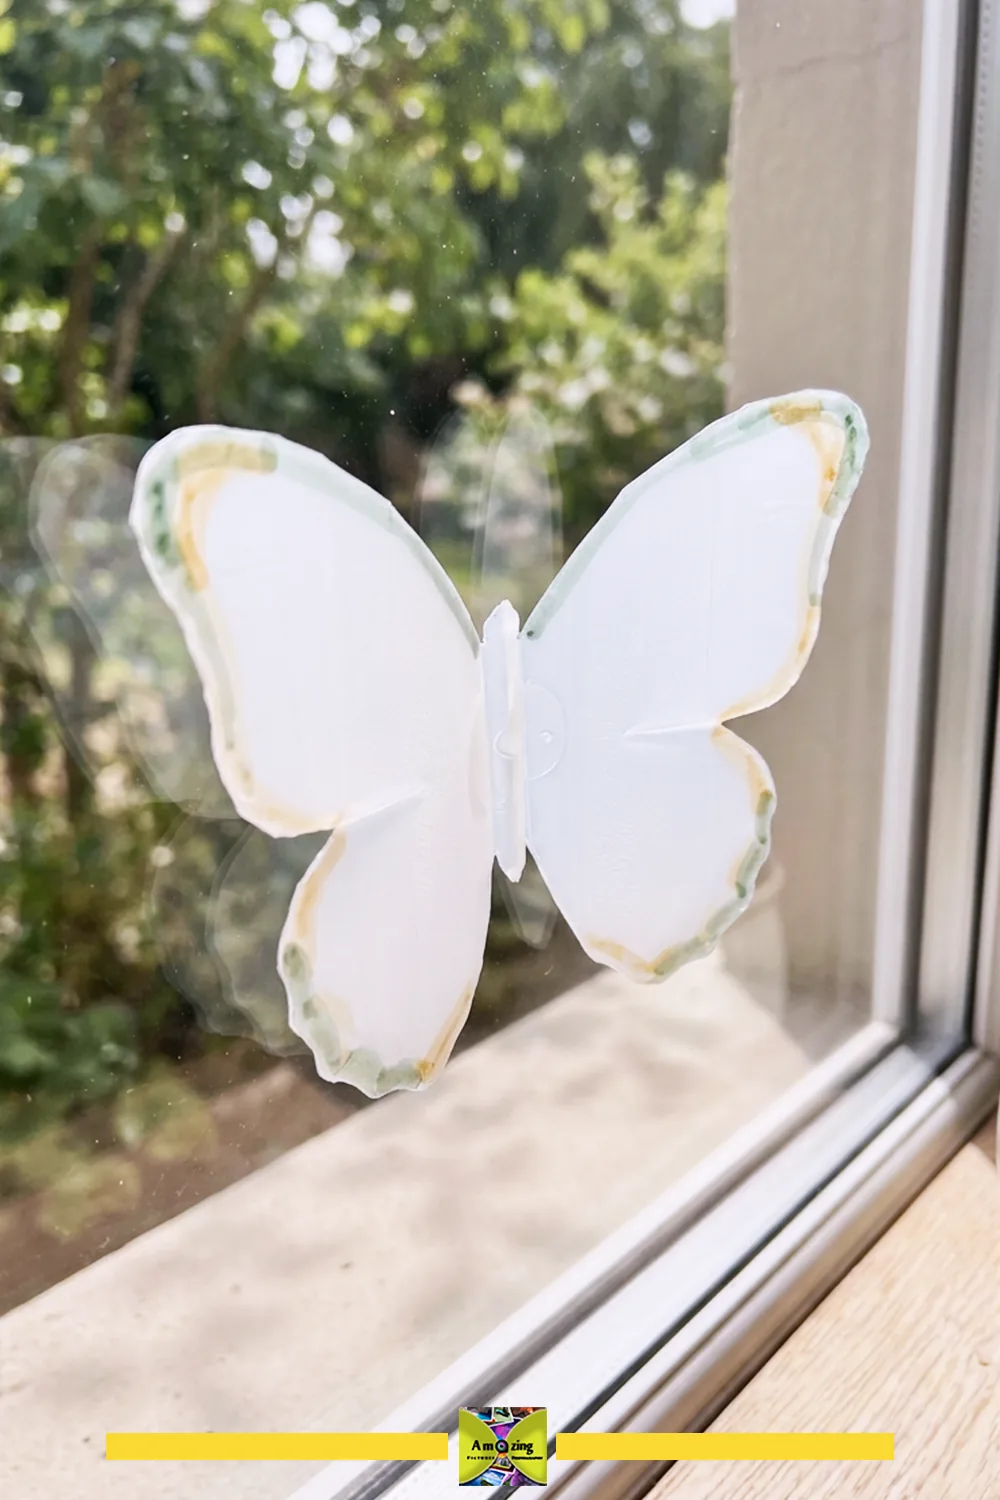
Original design. Confirm the attachment releases cleanly from the window surface.
What it looks like: A butterfly silhouette with restrained translucent color, attached to a window so it can be removed without residue.
Best use: A removable window accent that shows the plastic’s translucency.
Difficulty: Easy.
Approximate time: 20 to 30 minutes, plus paint drying time (estimate).
Materials:
- One flat side panel from a clean milk jug
- Translucent paint or fine-tip permanent markers in one or two colors
- A removable adhesive made for glass, or small removable clear dots
Tools:
- Pencil or marker
- Scissors
Steps:
- Draw a butterfly with two matching wings on paper, then trace it onto the flat panel.
- Cut the outline with scissors and smooth the edges.
- Add restrained translucent color with markers or a thin paint wash. Let it dry fully.
- Fix the butterfly to the window with a removable adhesive made for glass, placed so the adhesive is not visible.
- Check after a day that it stays in place, and remove it cleanly when you want to take it down.
Customization: Keep the wings mostly clear so light passes through, with color only at the edges. Make a few in different sizes.
Practical tip: Fold the wing pair at the body line so the silhouette reads clearly from a distance.
Common mistake: Using a permanent adhesive that leaves residue or damages the window film when removed.
Safety note: This is a window decoration, not a bird-collision deterrent. Test any adhesive on a small corner of the glass first.
5. Small Water-Based Paint Kettle
Tutorial-supported method. The cut follows a published paint-pot design.
What it looks like: A jug cut so the handle stays intact and the lower part forms a shallow reservoir with a straight wipe edge.
Best use: Holding a small working amount of water-based paint for trim and touch-up work.
Difficulty: Easy.
Approximate time: 10 to 15 minutes (estimate).
Materials:
- One clean, dry milk jug
- Water-based paint only
Tools:
- Marker
- Scissors or utility knife
- Fine sandpaper (optional)
Steps:
- Mark a cut line across the side opposite the handle, about a third of the way up from the base, following the approach in the Fine Homebuilding milk-jug paint pot.
- Cut along the line with scissors or a utility knife. Leave the base as the reservoir and the handle above it for gripping.
- Round any sharp corner and smooth the cut edge with fine sandpaper.
- Pour a small amount of water-based paint into the reservoir and test that it sits level on a flat surface.
- Rest a brush in the handle opening between dips, and wipe excess paint on the straight cut edge.
Customization: Use a half-gallon jug for detail work and a gallon jug for wider trim. Label the jug “water-based paint only.”
Practical tip: Test with water first to confirm the reservoir does not leak before adding paint.
Common mistake: Cutting the opening too low, so the reservoir is shallow and the paint slops over the edge.
Safety note: Use water-based paint only. Do not use this jug for solvents or oil-based products. Rinse the kettle or let leftover paint dry and peel, then dispose of residue according to the paint label and local rules.
6. Gentle Watering Can
Tutorial-supported method. Keep holes small and make them cold.
What it looks like: An intact jug with a mechanically perforated cap that pours a fine, gentle spray.
Best use: Watering seedlings and houseplants with a soft flow.
Difficulty: Easy.
Approximate time: 10 minutes (estimate).
Materials:
- One clean milk jug with its cap
Tools:
- Awl or a small nail held in pliers
- Scrap wood to support the cap
Steps:
- Set the cap on a scrap board and pierce several small holes from the inside face outward with the awl or nail. Never make holes with heat.
- Space the holes so the cap stays rigid, and keep them away from the rim.
- Screw the cap on and add water to a level you can lift comfortably.
- Tip the jug and check the flow. Fewer and smaller holes give a finer spray; larger or more holes give a faster, coarser pour.
- If the flow stops and starts, add one small air hole near the top of the handle area so air can enter and the water pours steadily.
Customization: Keep one cap with fine holes for seedlings and a second cap with larger holes for established plants.
Practical tip: Mark each cap with its hole size so you can pick the right spray without testing.
Common mistake: Piercing holes too large, which turns the gentle spray into a hard stream that disturbs soil.
Safety note: Make holes by pressing, not by heating. A heated tool melts the plastic and can release fumes and burn fingers.
7. Lightweight Dustpan
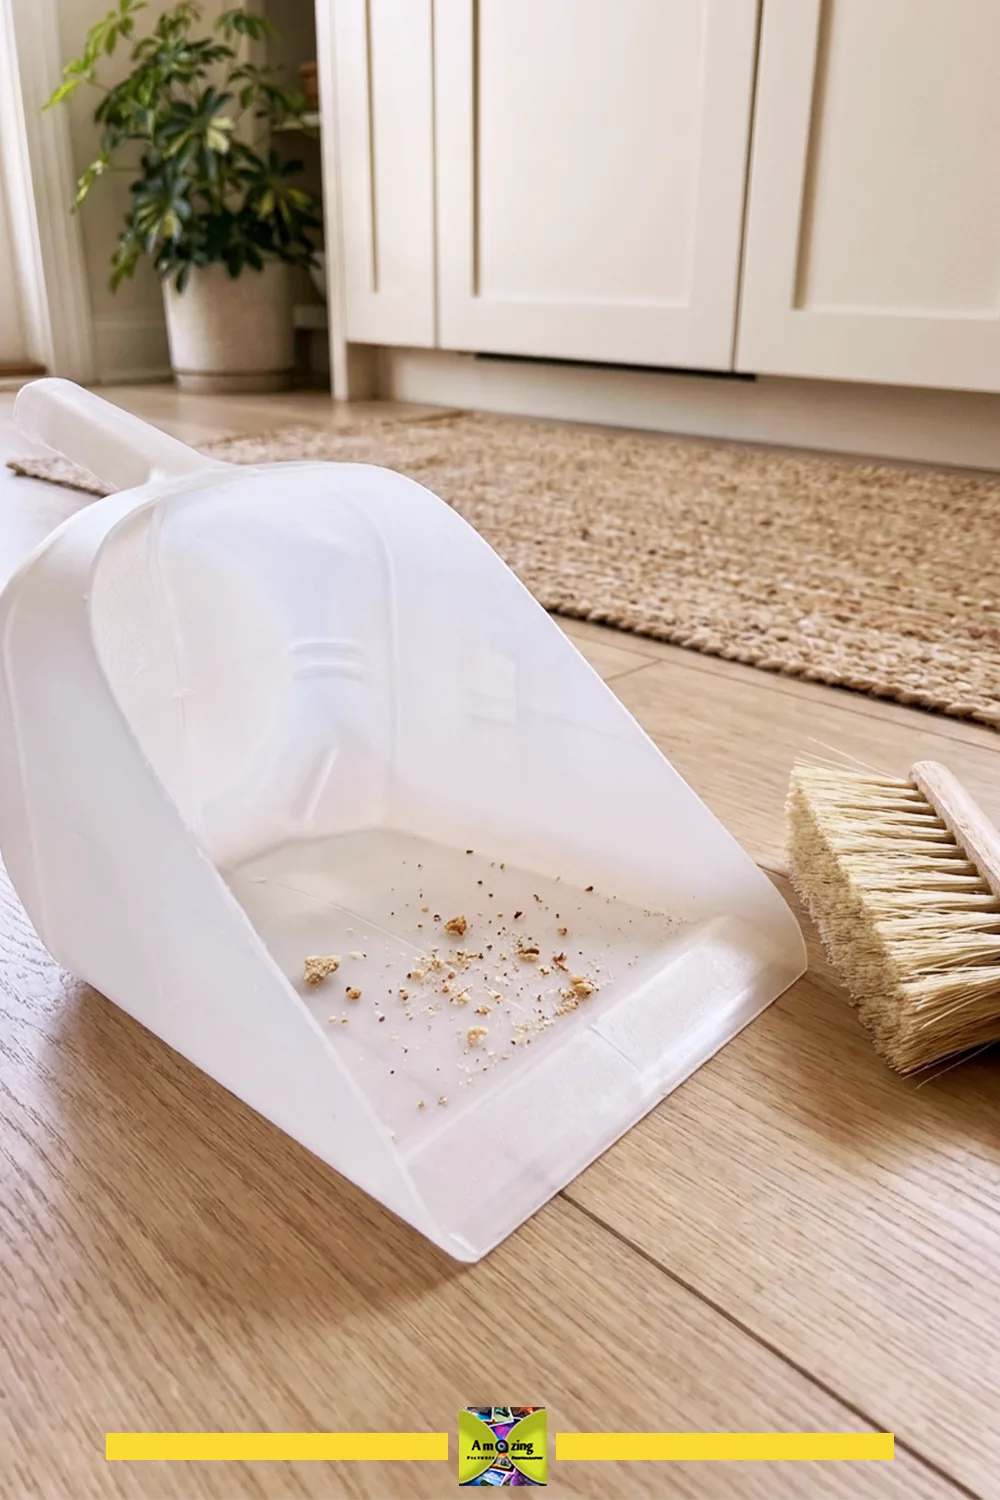
Tutorial-supported method. Choose a jug with a straight lower edge.
What it looks like: A jug cut on a diagonal so a broad, reasonably straight edge meets the floor and the neck forms a handle.
Best use: Sweeping ordinary dry household debris into a small pan.
Difficulty: Easy.
Approximate time: 10 to 15 minutes (estimate).
Materials:
- One clean milk jug with a broad, flat bottom edge
Tools:
- Marker
- Scissors or utility knife
- Fine sandpaper (optional)
Steps:
- Mark a diagonal line from a low point near the base up toward the neck, keeping the neck and one side intact as the handle and the back wall.
- Cut along the line with scissors. A utility knife can trim the floor edge straighter.
- Check that the collecting edge lies flat against the floor. A curved or heavily textured lip leaves debris behind, so choose the straightest bottom edge the jug has.
- Smooth the cut edge so it does not scrape flooring.
- Sweep dry dust and crumbs into the pan and tip them into the bin.
Customization: Leave a short back wall so the debris does not spill over the top when you carry it.
Practical tip: Press the pan flat and look for daylight under the front edge; any gap means the edge is not straight enough for fine dust.
Common mistake: Using a jug with a molded, textured base, which rides above the floor and misses fine debris.
Safety note: Limit use to dry household debris. A cut edge can scratch a delicate floor, and wet or sharp debris is not a good fit.
8. Small Paint-Edge Shield
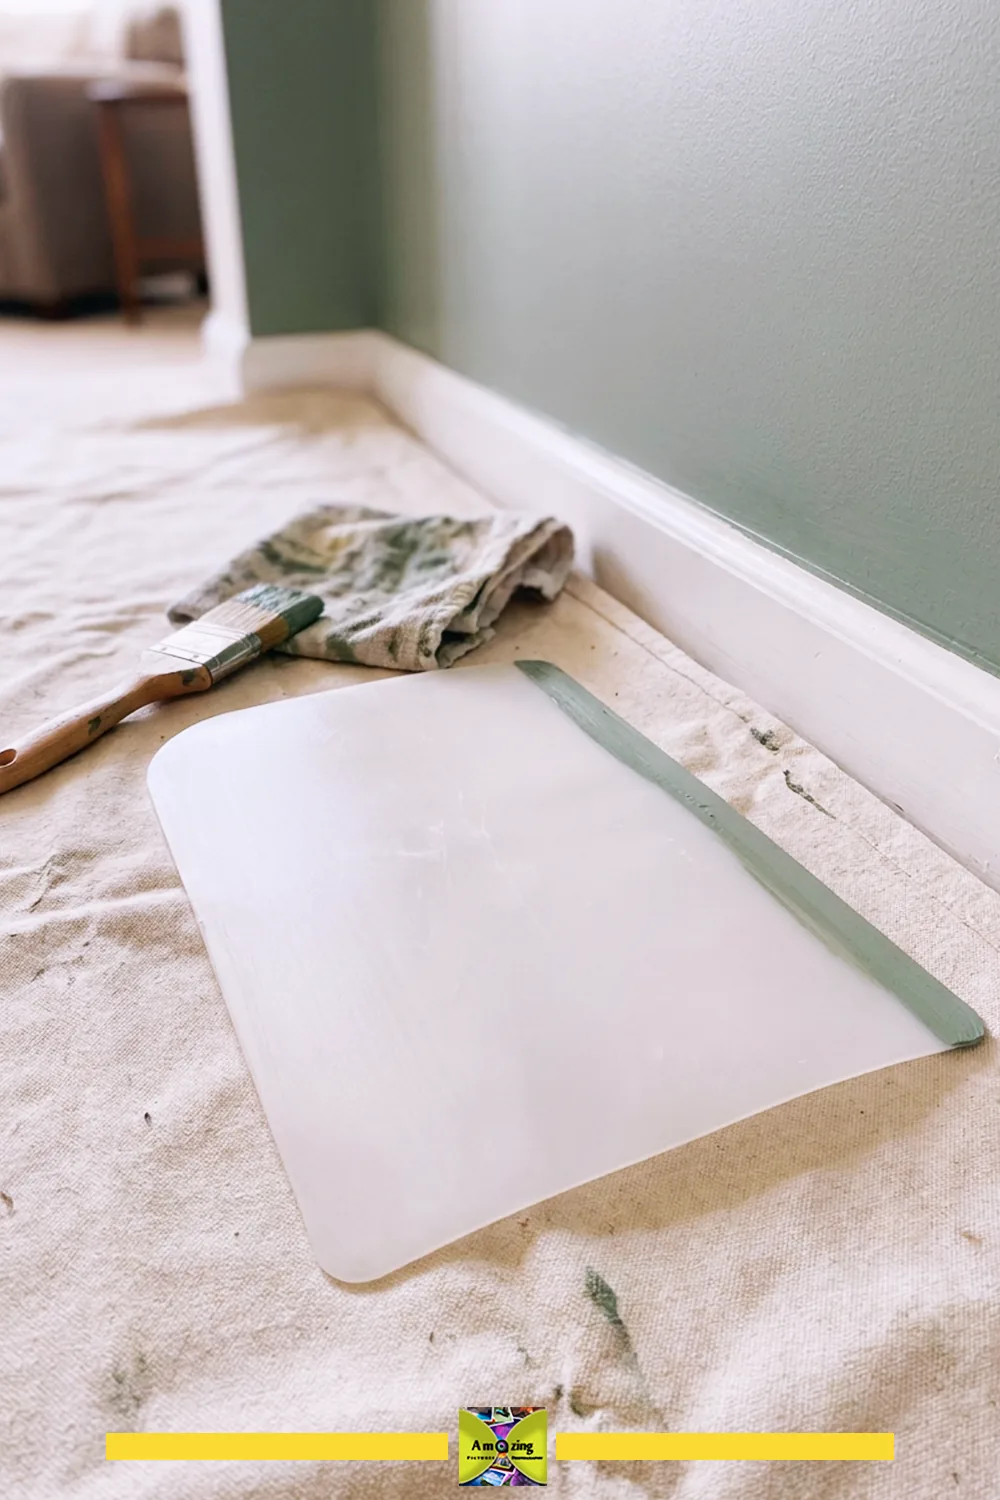
Editorial proposal. Test whether the panel lies flat and wipes clean before publishing.
What it looks like: A straight, smooth panel held against a trim or edge while painting to keep the wet paint off the adjoining surface.
Best use: A temporary hand-held barrier during light cut-in work.
Difficulty: Easy.
Approximate time: 10 minutes (estimate).
Materials:
- One flat side panel from a clean milk jug
Tools:
- Scissors or utility knife
- Straightedge
Steps:
- Cut the largest flat rectangle the side panel allows, keeping one long edge straight.
- Check that the panel lies flat with no curl along the working edge.
- Hold the shield against the surface you want to protect and paint along the edge.
- Wipe the shield after each pass so wet paint does not transfer to the surface you are protecting.
- Discard or replace the shield when paint builds up or the edge no longer wipes clean.
Customization: Cut a longer shield from a taller jug for runs along baseboards.
Practical tip: Wipe toward the painted side, never toward the clean surface.
Common mistake: Assuming the shield will produce a crisp line. It blocks overshoot but will not replace masking tape on an uneven surface.
Safety note: Use only with water-based paint. A solvent-based paint can soften or damage the plastic.
9. Easy-Access Bird Feeder
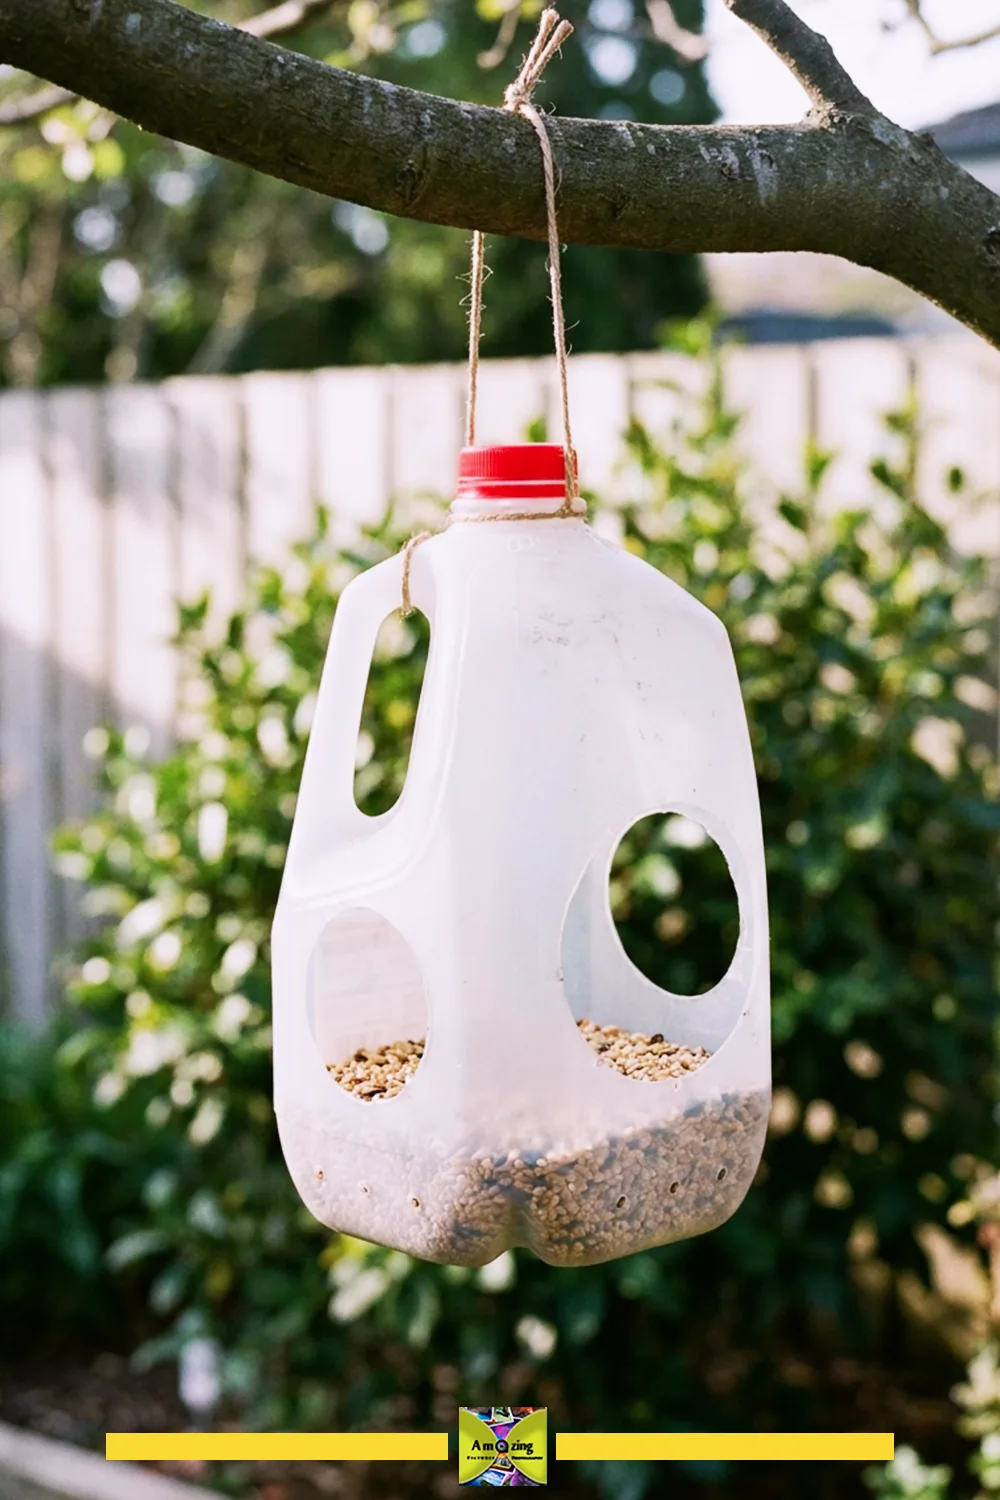
Include only where feeding is allowed and you can clean it regularly.
What it looks like: A jug with one or two smooth side openings, drainage holes in the base, and a cord through the handle for hanging.
Best use: Offering a small amount of suitable seed where you can reach the feeder to clean it.
Difficulty: Moderate.
Approximate time: 20 to 30 minutes (estimate).
Materials:
- One clean, dry milk jug with cap
- A short length of cord or wire for hanging
- Seed suited to your local birds
Tools:
- Marker
- Scissors or utility knife
- Awl or nail held in pliers
Steps:
- Cut one or two openings in the sides, large enough for the target birds to reach but not so large the seed pours out.
- Smooth every cut edge and pierce several drainage holes in the base so water cannot pool.
- Run the hanging cord through the handle so the feeder hangs level and open.
- Fill with a seed suited to the birds in your area and hang it where you can reach it for cleaning.
- Clean the feeder every two weeks, or more often in wet weather, and remove any seed that is wet or moldy. Follow the hygiene guidance in Penn State Extension’s feeder disease-prevention notes.
Customization: Add a small perch below each opening, or keep the openings small so birds take seed without perching inside.
Practical tip: Make every corner reachable with a sponge; a feeder you cannot clean will grow mold in the corners.
Common mistake: Skipping drainage, so seed at the base stays damp and spoils.
Safety note: Take the feeder down if you see sick birds, and check local advisories. Wear gloves when cleaning, and keep the cord short so it cannot loop a small animal or child.
10. Unlit Seasonal Ghost Figure
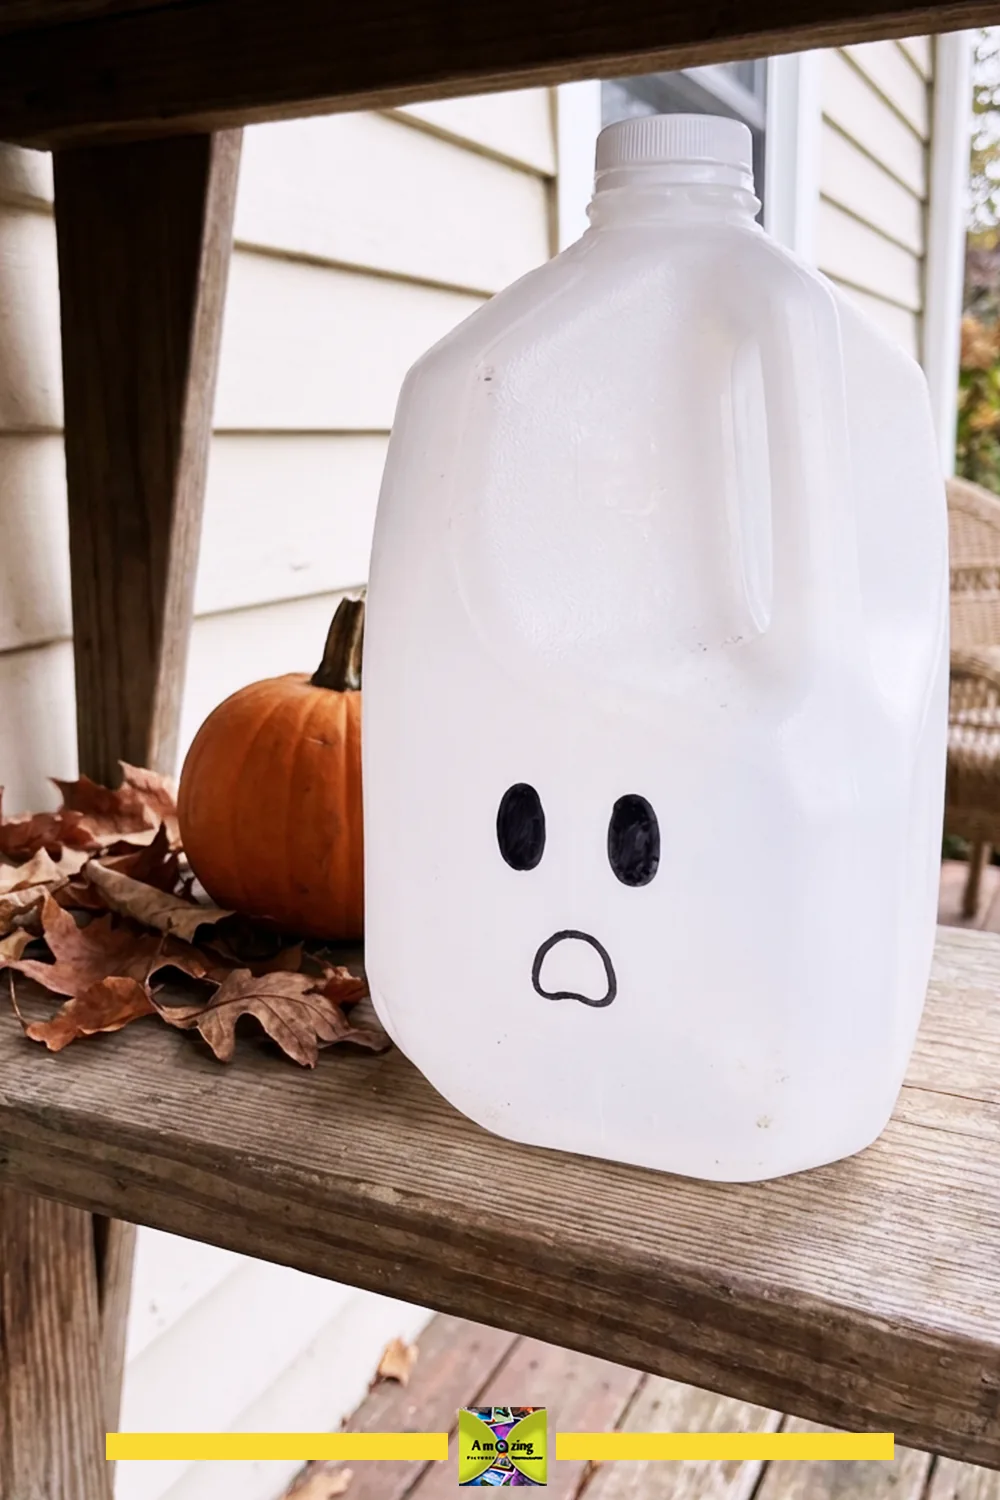
Daytime decoration only. No lights, candles, or electrical parts.
What it looks like: An intact white jug with a restrained face, standing as a small seasonal figure in daylight.
Best use: A simple indoor or sheltered-outdoor decoration away from walkways.
Difficulty: Easy.
Approximate time: 15 to 20 minutes, plus paint drying time (estimate).
Materials:
- One clean milk jug with its cap
- Fine-tip permanent markers or paint in black and one other color
Tools:
- None beyond the markers
Steps:
- Keep the jug whole and the cap on.
- Draw two eyes and a simple mouth on one face with the marker, keeping the features small and even.
- Let any paint dry fully before moving the jug.
- Stand the figure on a level surface where it cannot be knocked into a walkway.
- Bring it inside or store it dry after the season.
Customization: Leave the body plain so the white plastic is the main feature, or add a single band of color near the base.
Practical tip: Use a matte marker so the face reads clearly instead of catching glare.
Common mistake: Adding loose fabric or accessories that can blow away if the figure is placed outside.
Safety note: This is a daytime decoration with no internal lighting. Do not add candles, lights, or anything that could heat the plastic or become litter outdoors.
11. Scoop-and-Catch Game
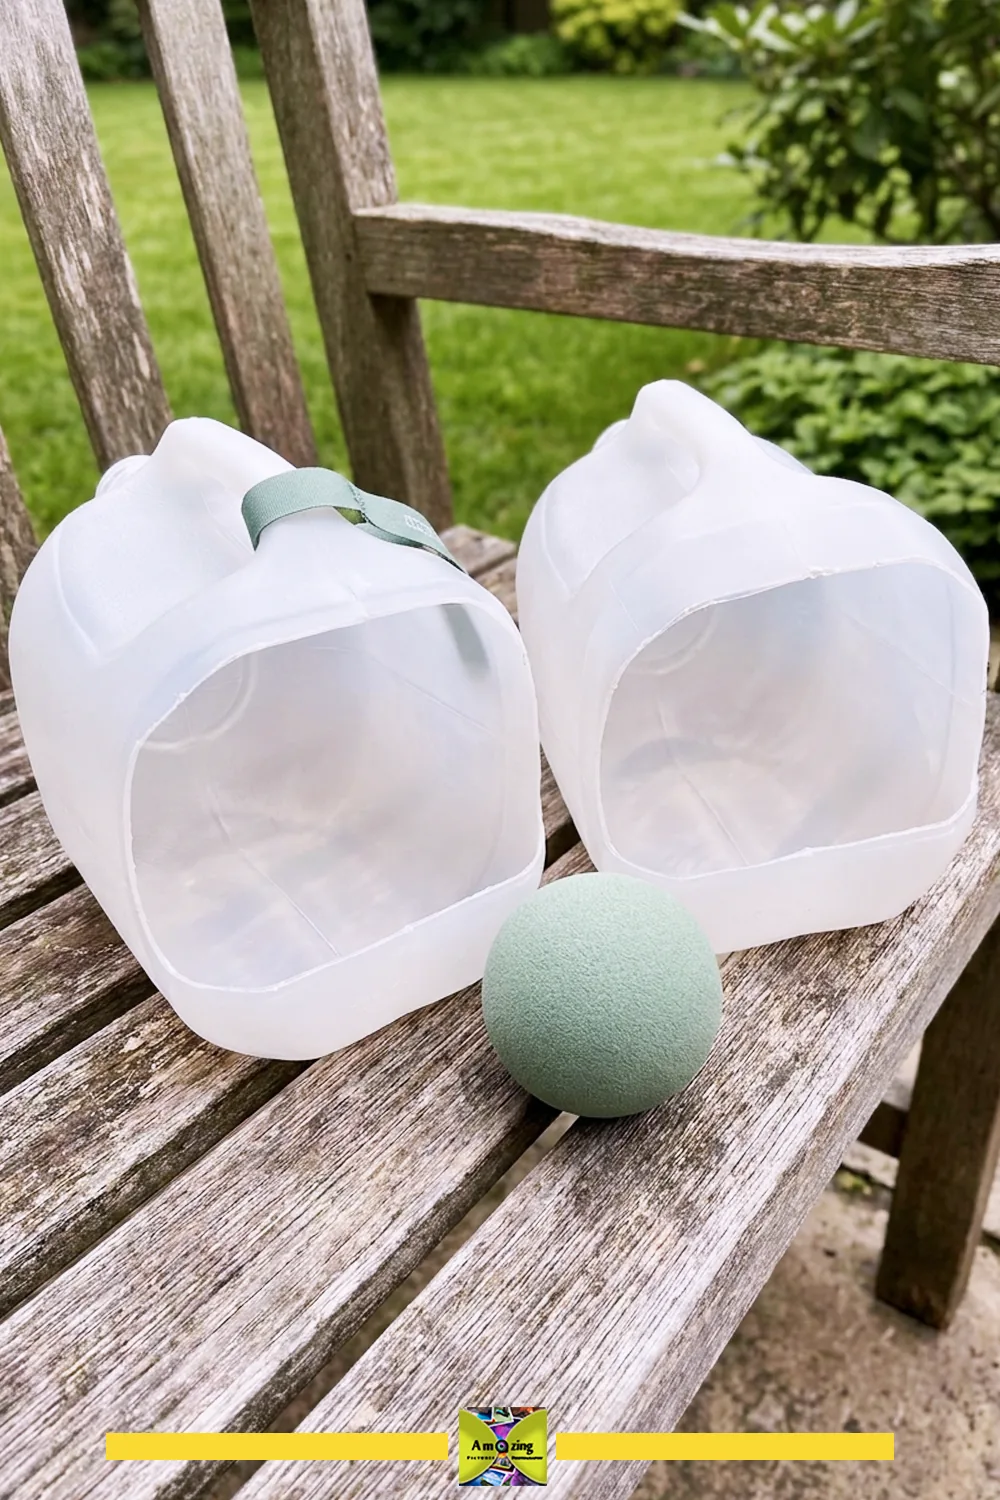
Adult-prepared casual game, not a certified toy.
What it looks like: A matched pair of smooth-edged catching scoops, each cut from a jug, used with a soft, lightweight ball.
Best use: A short-distance toss-and-catch game between two players.
Difficulty: Easy.
Approximate time: 15 to 20 minutes per scoop (estimate).
Materials:
- Two clean milk jugs of the same shape
- One soft, lightweight ball
Tools:
- Marker
- Scissors or utility knife
- Fine sandpaper or a nail file
Steps:
- Mark a scoop shape that keeps the neck and handle as the grip and leaves a wide open mouth, following the cut approach shown in the PBS Design Squad milk-jug scoop.
- Cut both scoops the same way and smooth every edge and corner until nothing is sharp.
- Check that each scoop is comfortable to hold and catches the ball without the rim digging in.
- Play at a short, modest distance and aim the toss toward the open scoop, never at a face.
- Inspect the rims before each use and set aside any scoop that cracks or develops a sharp edge.
Customization: Mark one scoop with a thin color band so the two are easy to tell apart.
Practical tip: Use a ball that is soft and light so a missed catch cannot hurt a player.
Common mistake: Leaving a raw cut rim, which can scrape a hand during a fast catch.
Safety note: An adult must do the cutting. Keep throw distances modest and never aim at faces. This is a casual game, not a certified toy, and it is not for young children.
12. Potting-Mix Scoop
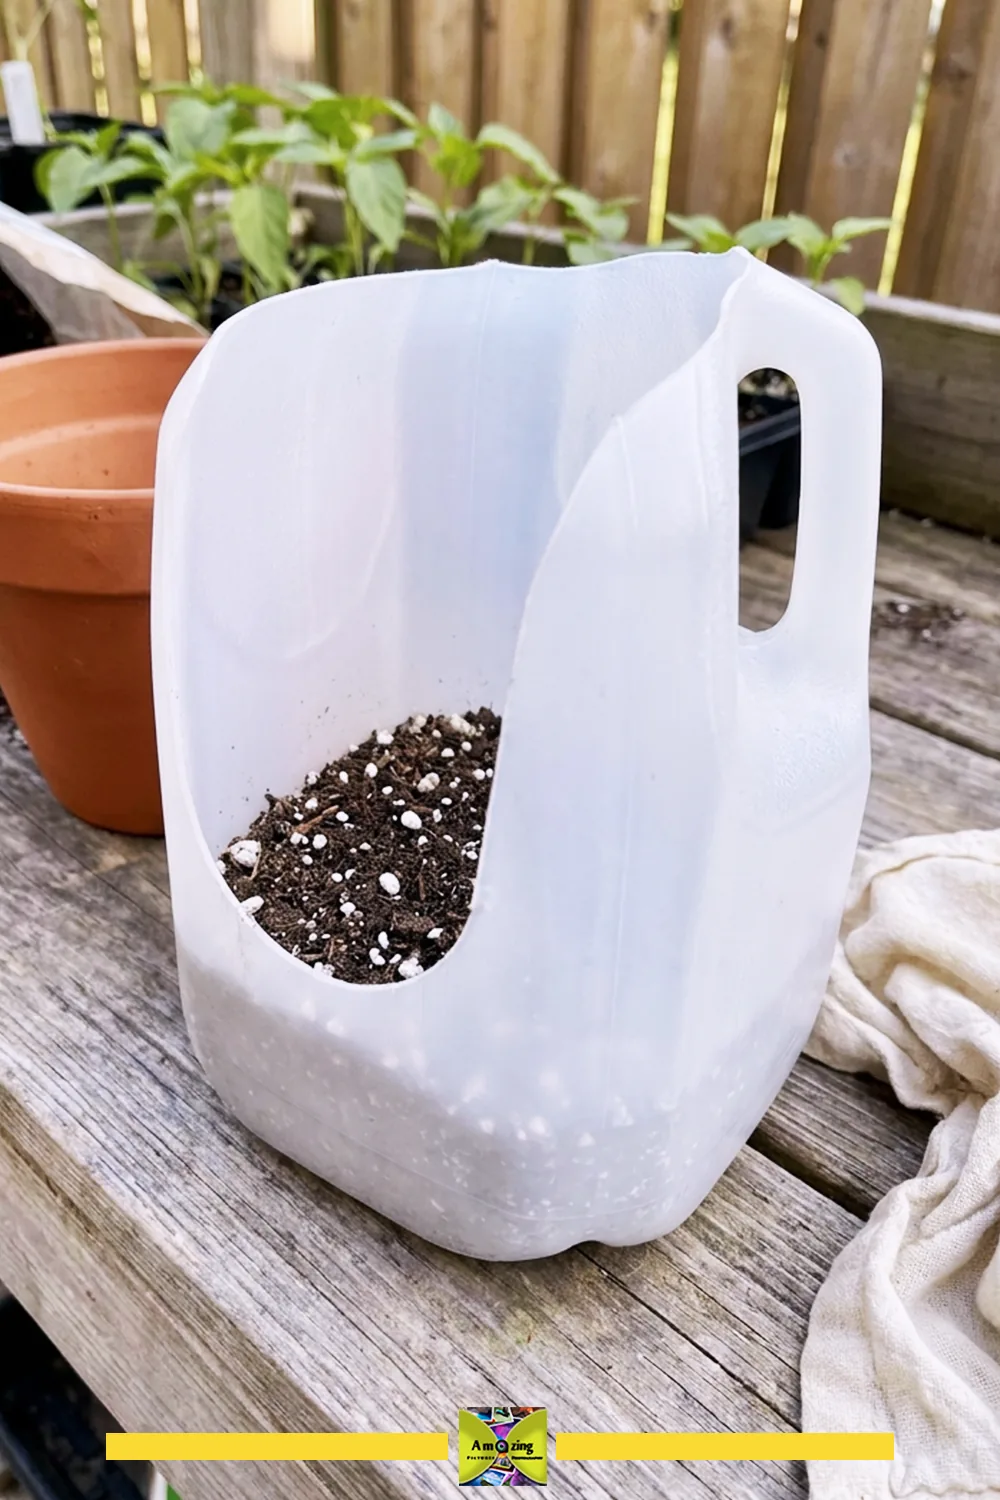
Tutorial-supported method. Keep a deep, curved bowl.
What it looks like: A deep curved scoop that keeps the handle as a grip for moving small amounts of dry potting mix.
Best use: Transferring dry potting mix from a bag to pots without a trowel.
Difficulty: Easy.
Approximate time: 10 to 15 minutes (estimate).
Materials:
- One clean milk jug with its handle
Tools:
- Marker
- Scissors or utility knife
- Fine sandpaper (optional)
Steps:
- Mark a deep U-shape that keeps the handle and a good section of the lower body as the bowl, distinct from the dustpan’s flat collecting edge.
- Cut along the line and smooth the rim.
- Check that the bowl holds a small scoopful of dry mix without it sliding out.
- Scoop mix from the bag and pour it into the pot.
- Rinse the scoop and let it dry if you switch between mixes.
Customization: Keep the pour lip slightly narrower than the bowl so the mix channels into a small pot.
Practical tip: Tap the handle side to release mix that sticks to the curved bowl.
Common mistake: Cutting a flat, shallow shape like the dustpan, which lets dry mix spill off the front.
Safety note: Follow the potting-mix manufacturer’s handling precautions, including any guidance about dust and washing hands after use.
13. Clothespin Dispenser
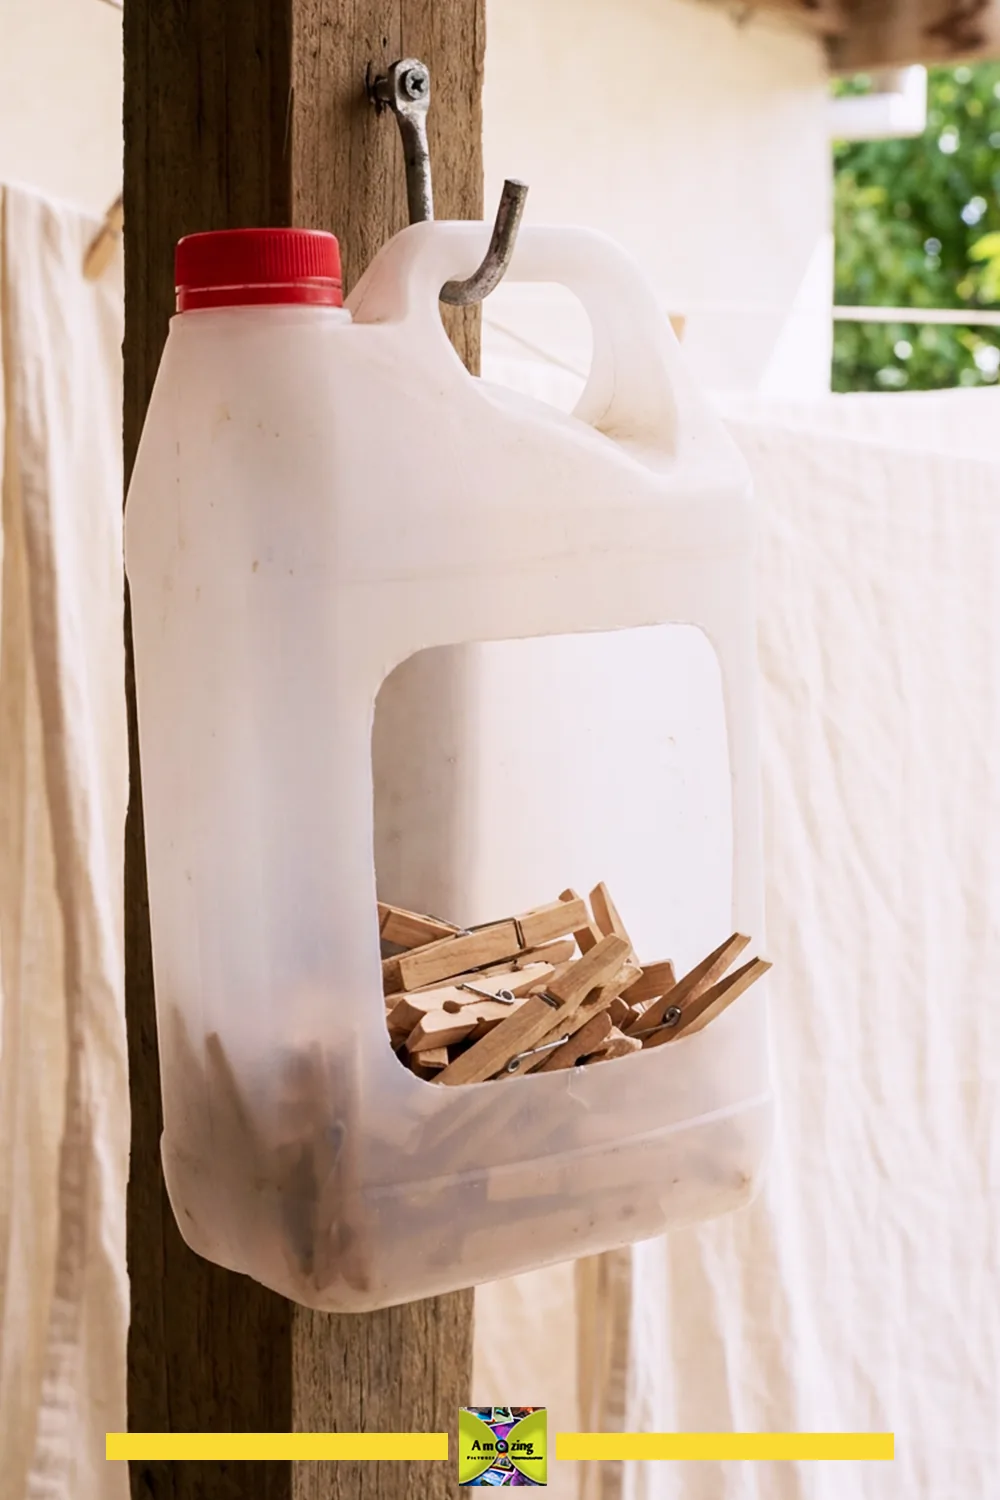
Editorial proposal. Test the wall attachment before loading it.
What it looks like: A jug with a wide retrieval opening cut in one side, hung by the handle so clothespins can be pulled out one at a time.
Best use: Keeping clothespins near the washing line where the dispenser can hang.
Difficulty: Easy.
Approximate time: 15 to 20 minutes (estimate).
Materials:
- One clean milk jug
- A hook or rod to hang it from
Tools:
- Marker
- Scissors or utility knife
- Fine sandpaper (optional)
Steps:
- Keep the handle intact and the cap on. Mark a wide opening in the upper front, leaving enough wall below it to hold the weight of the clothespins.
- Cut the opening and smooth the edges, rounding the corners so hands do not catch.
- Hang the jug by the handle on a hook or rod and check that it hangs level.
- Load clothespins through the opening and pull them out through the same opening.
- If the jug sags, reduce the load or choose a firmer jug rather than relying on a thin cut strip as a hook.
Customization: Cut the opening lower for a larger capacity, or add a second small opening for spare springs.
Practical tip: Keep the opening smaller than a full hand so clothespins come out one at a time instead of in a handful.
Common mistake: Cutting a narrow strip into a hook and expecting it to hold the loaded jug; a thin plastic hook will bend or tear.
Safety note: Keep the cut opening smooth, and hang the dispenser where children cannot reach and tip a loaded jug onto themselves.
14. Lightweight Luggage Identification Tag
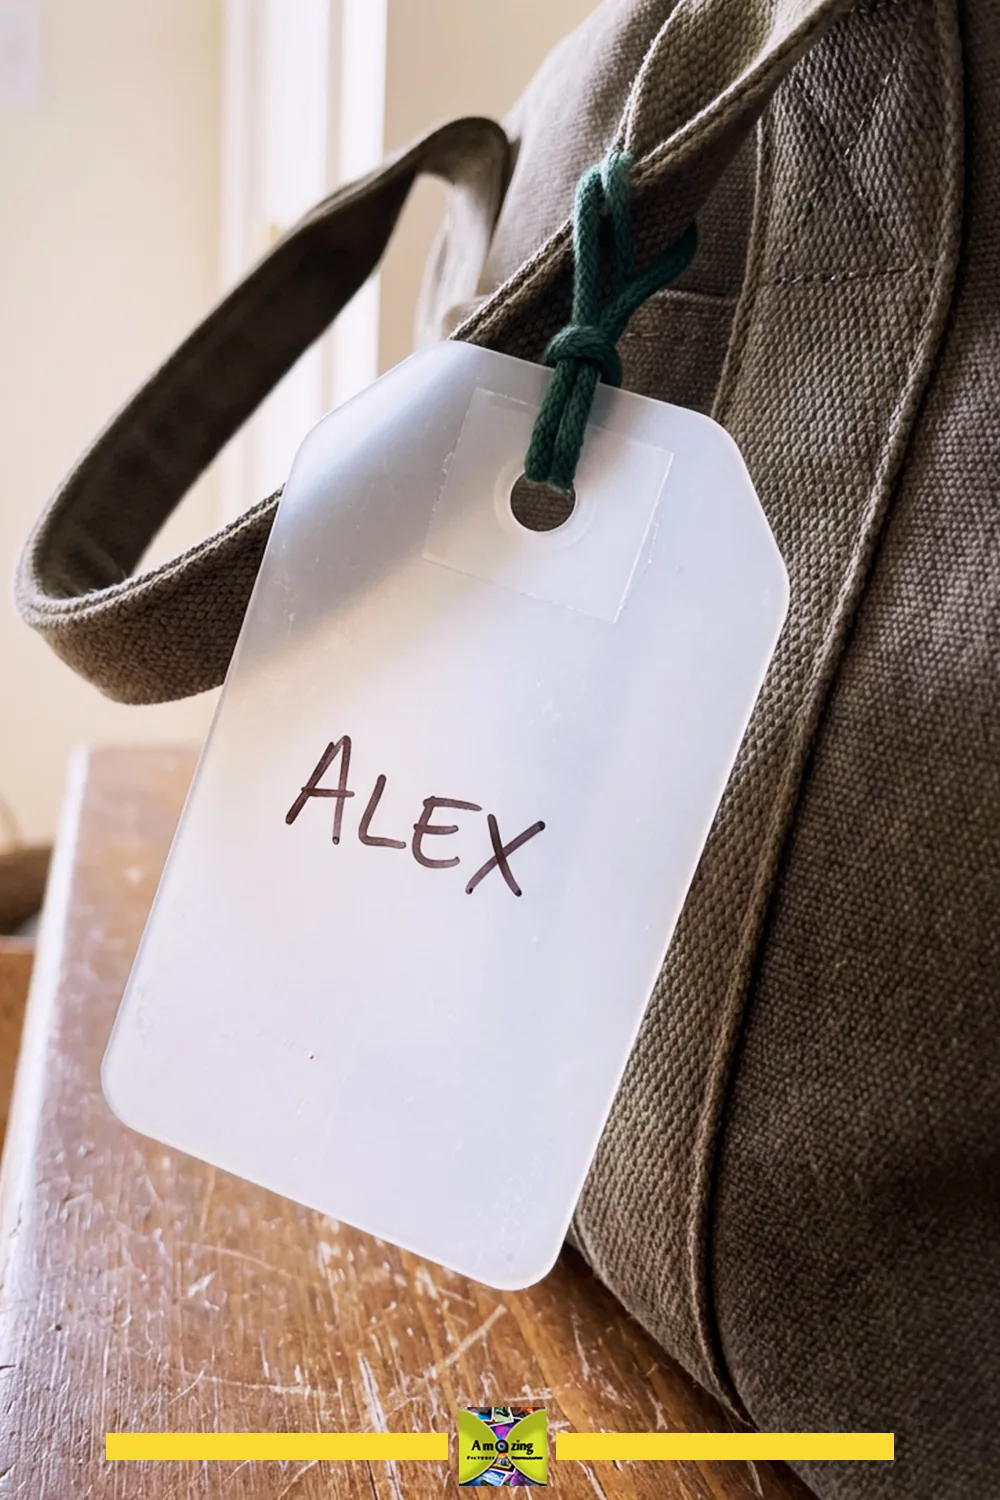
Editorial proposal. Test the hole and cord for tear and abrasion before publishing.
What it looks like: A smooth side-panel tag with a reinforced attachment hole and discreet contact details.
Best use: A lightweight tag to help identify a bag at a glance.
Difficulty: Easy.
Approximate time: 15 minutes (estimate).
Materials:
- One flat side panel from a clean milk jug
- A split ring or a short loop of cord
- Fine-tip permanent marker
Tools:
- Scissors
- Hole punch
- Fine sandpaper or a nail file
Steps:
- Cut a tag shape from the flat panel, about the size of a standard luggage tag.
- Round every corner and smooth the edges.
- Punch one hole, set back from the edge, and thread the split ring or cord through it.
- Write a first name, phone number, or email only. Do not write a full home address.
- Pull gently on the ring to confirm the hole does not tear, and replace the tag if the hole stretches.
Customization: Use a marker color that stands out against the white plastic, or write on a paper slip and slide it behind a clear second panel.
Practical tip: Test the marker on a scrap and rub it to confirm it will not smear after handling.
Common mistake: Punching the hole too close to the edge, so a pull tears through to the outside.
Safety note: This is an identification tag, not secure storage. It will not prevent theft or guarantee the tag stays on, so do not write a home address on it.
15. Reusable Bowling-Pin Set
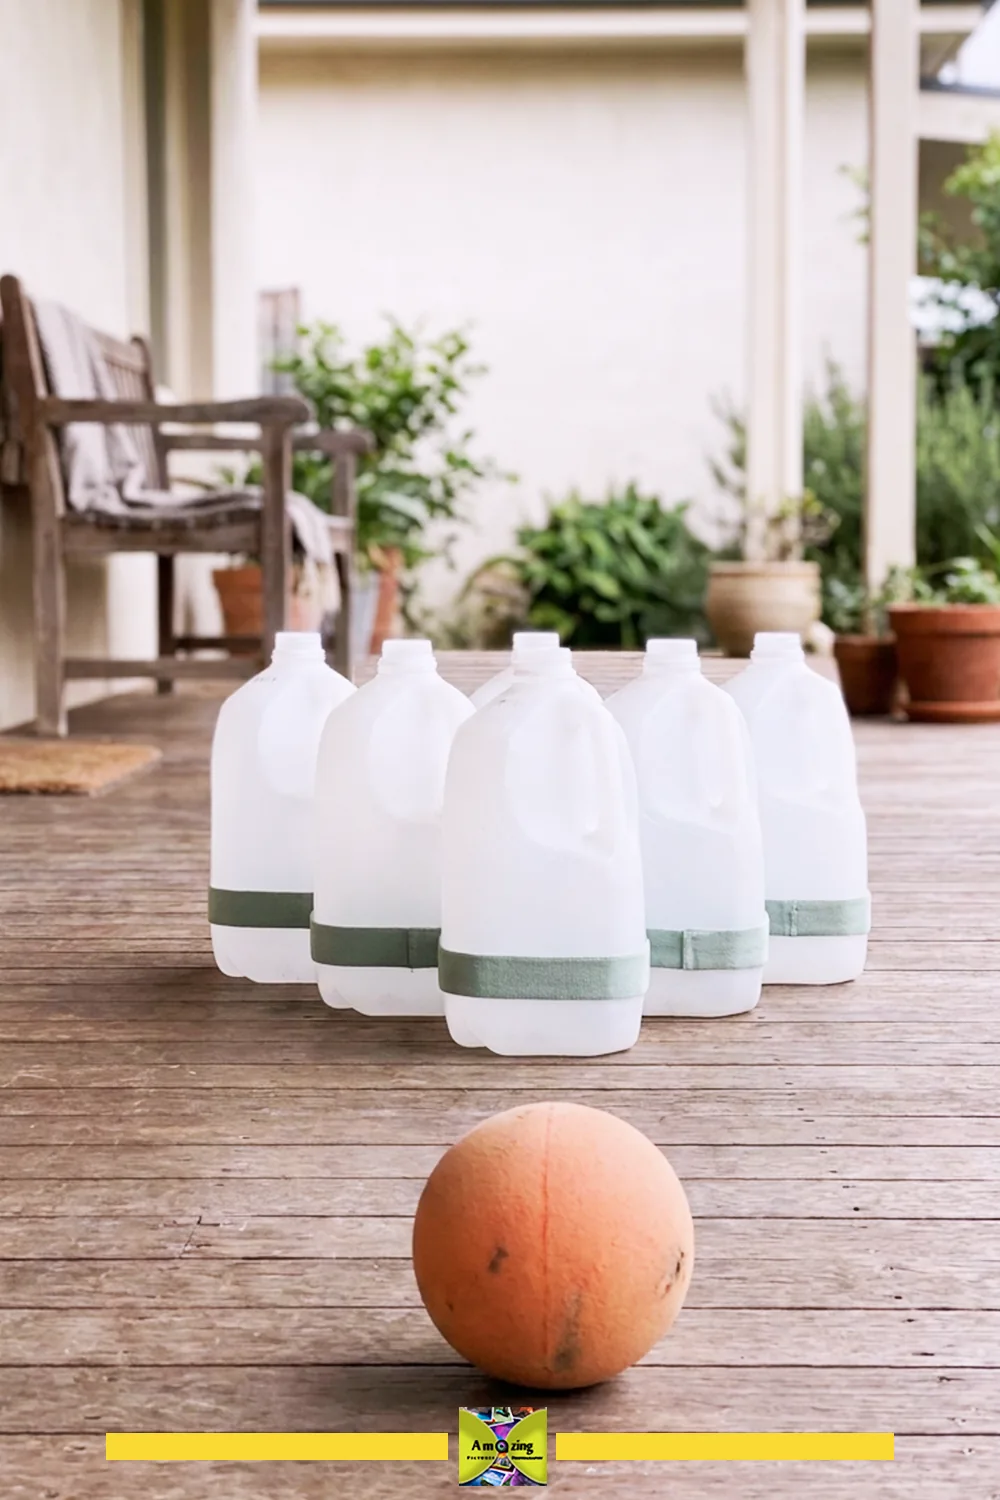
Casual adult-and-family game. Keep it a small part of the collection.
What it looks like: Several matching jugs stood as pins, knocked over with a soft ball on a clear, level surface.
Best use: A short indoor or sheltered-outdoor game on a flat floor or path.
Difficulty: Easy.
Approximate time: 10 minutes to set up (estimate).
Materials:
- Several clean milk jugs of the same brand and shape, with caps
- One soft ball
Tools:
- None
Steps:
- Clean and dry the jugs and screw the caps on.
- Set the jugs in a triangle on a clear, level surface.
- Add a little water or sand to each jug only if the pins tip over too easily; a small amount is enough, and the jugs should still be light to carry.
- Bowl the soft ball from a short distance and reset the pins by hand.
- Keep the playing area clear of obstacles and passersby.
Customization: Add a thin color band near the base of each pin, or leave them plain white.
Practical tip: Match the jugs before filling them; different shapes will not fall the same way.
Common mistake: Overfilling the jugs for ballast, which makes them heavy and unpleasant when one falls on a foot.
Safety note: Use a soft ball, and keep the pins light. This is a casual game, not a certified toy, and it is not for young children.
16. Non-Food Transfer Funnel
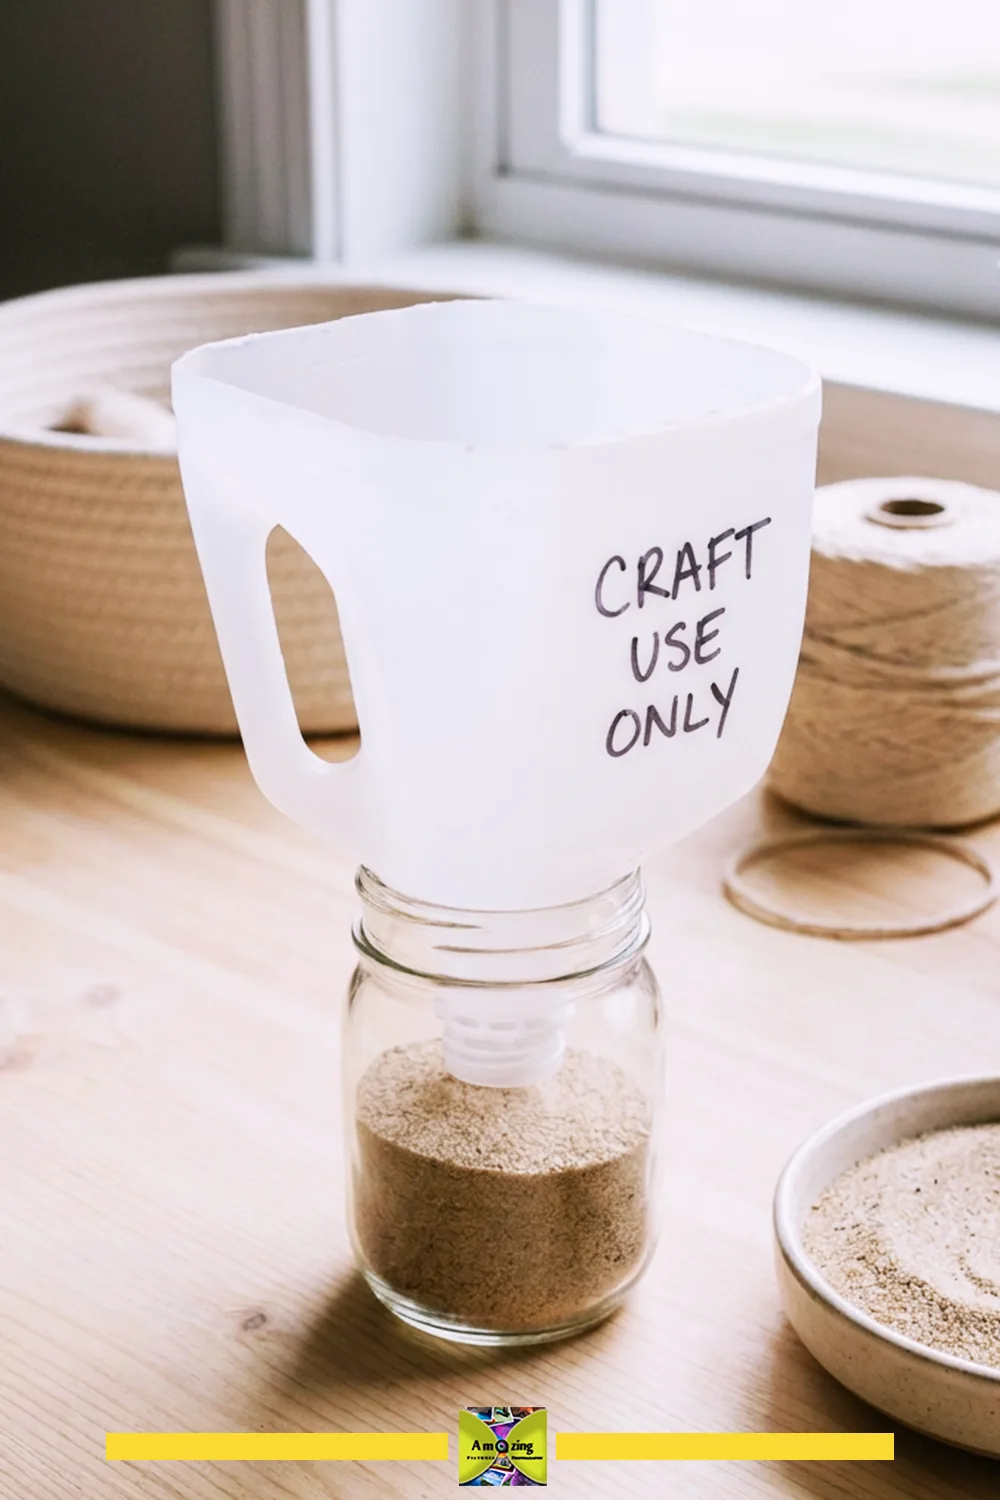
Tutorial-supported method. Keep it permanently out of food use.
What it looks like: The neck and shoulder of a jug, cut so the threaded opening pours a stream into a smaller container.
Best use: Filling a container with a dry craft material through a small opening.
Difficulty: Easy.
Approximate time: 5 to 10 minutes (estimate).
Materials:
- One clean milk jug with its neck and shoulder intact
Tools:
- Marker
- Scissors or utility knife
Steps:
- Mark a line around the jug below the shoulder, keeping the neck and a flared collar as the funnel.
- Cut along the line and smooth the wide rim.
- Set the receiving container on a level surface and hold the funnel over it.
- Pour a dry craft material, such as fine sand, rice, or small beads, through the funnel.
- Rinse and dry the funnel, and store it away from food, medicine, fuel, and household chemicals.
Customization: Keep the cap so you can stop the flow between pours, or cut the opening wider for a coarser material.
Practical tip: Match the neck opening to the receiving container; a neck that is too wide will spill around the target.
Common mistake: Repurposing the funnel for food after it has held craft material, which risks contamination.
Safety note: Mark the funnel clearly and keep it separate from food, medicine, fuel, and household chemicals.
17. Winter-Sowing Container
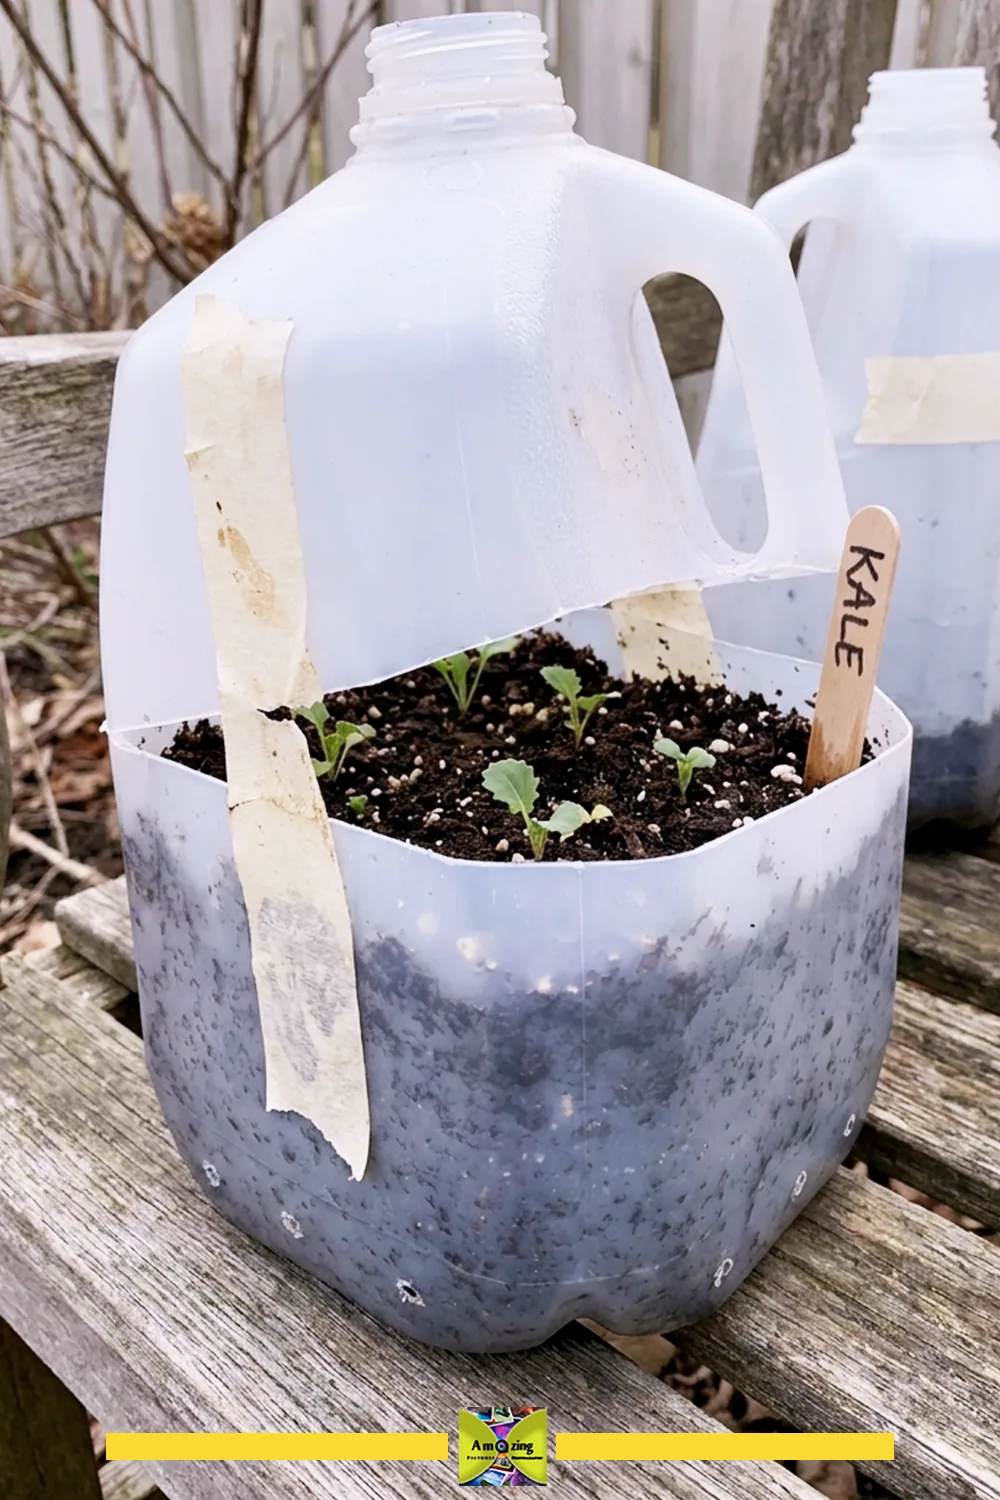
Extension-supported method. Timing depends on your local climate.
What it looks like: A jug cut nearly in two with a hinge left at the handle, filled with seed-starting mix and taped shut to act as a small outdoor greenhouse.
Best use: Starting cool-season seeds outdoors in late winter for transplanting in spring.
Difficulty: Moderate.
Approximate time: 20 to 30 minutes per jug, plus the season outdoors (estimate for setup).
Materials:
- One clean, dry milk jug
- Seed-starting mix or potting mix, not garden soil
- Seeds suited to winter sowing
- Clear or standard tape
- A label
Tools:
- Scissors or utility knife
- Awl or nail held in pliers
- Marker
Steps:
- Discard the cap. Cut around the middle of the jug, leaving a 1/2 to 1 1/2 inch section uncut near the handle as a hinge, as in the University of Missouri Extension milk-jug greenhouse method.
- Pierce several drainage holes in the bottom. Pierce or leave the cap opening for ventilation so air and moisture can move.
- Add about 3 to 4 inches of moistened seed-starting mix and let it drain.
- Sow seeds at the depth on the packet, close the top, and tape the seam shut, leaving the cap opening for ventilation.
- Set the jug outdoors in a sunny, wind-protected spot. Check moisture during dry spells and open the top on warm days to prevent overheating.
- When seedlings have true leaves, open the jug during the day to harden them off, then separate and transplant them.
Customization: Choose seeds that match your climate and the timing on the packet. Not every seed needs cold treatment, so read each packet rather than applying one calendar to all seeds.
Practical tip: Label the jug with the seed type and sowing date before it goes outside, where labels fade and get covered.
Common mistake: Forgetting ventilation, so the jug overheats on a warm day and damages the seedlings.
Safety note: Keep the jug where it will not be kicked or blown over, and follow the seed and mix labels for handling.
18. Minimalist Savings Bank
Tutorial-supported method. A savings container, not secure storage.
What it looks like: An intact jug with a finished coin slot and a removable base for retrieving the coins.
Best use: Collecting loose change at home.
Difficulty: Easy.
Approximate time: 15 to 20 minutes (estimate).
Materials:
- One clean milk jug with its cap
- Tape to hold the base
Tools:
- Marker
- Utility knife
- Scissors
Steps:
- Cut a coin slot in the upper front, wide enough for the largest coin you will save and no wider.
- Smooth the slot edges so coins drop through without snagging.
- Cut the base off cleanly around the bottom seam so it lifts off as a lid, and hold it in place with a strip of removable tape.
- Drop coins through the slot, and lift the base to empty the bank when it is full.
- Keep the decoration restrained, such as a single label or band, so the bank reads as intentional rather than busy.
Customization: Write a savings goal on one side with a marker, or leave the plastic plain.
Practical tip: Cut the slot just long enough for the largest coin so paper cannot be slipped out through it.
Common mistake: Cutting the slot too wide, so the bank is easy to fish coins back out of.
Safety note: This is a savings container, not secure storage. Keep it out of reach of young children, who could pull off the base and choke on small coins.
19. Replacement Shirt-Collar Stays
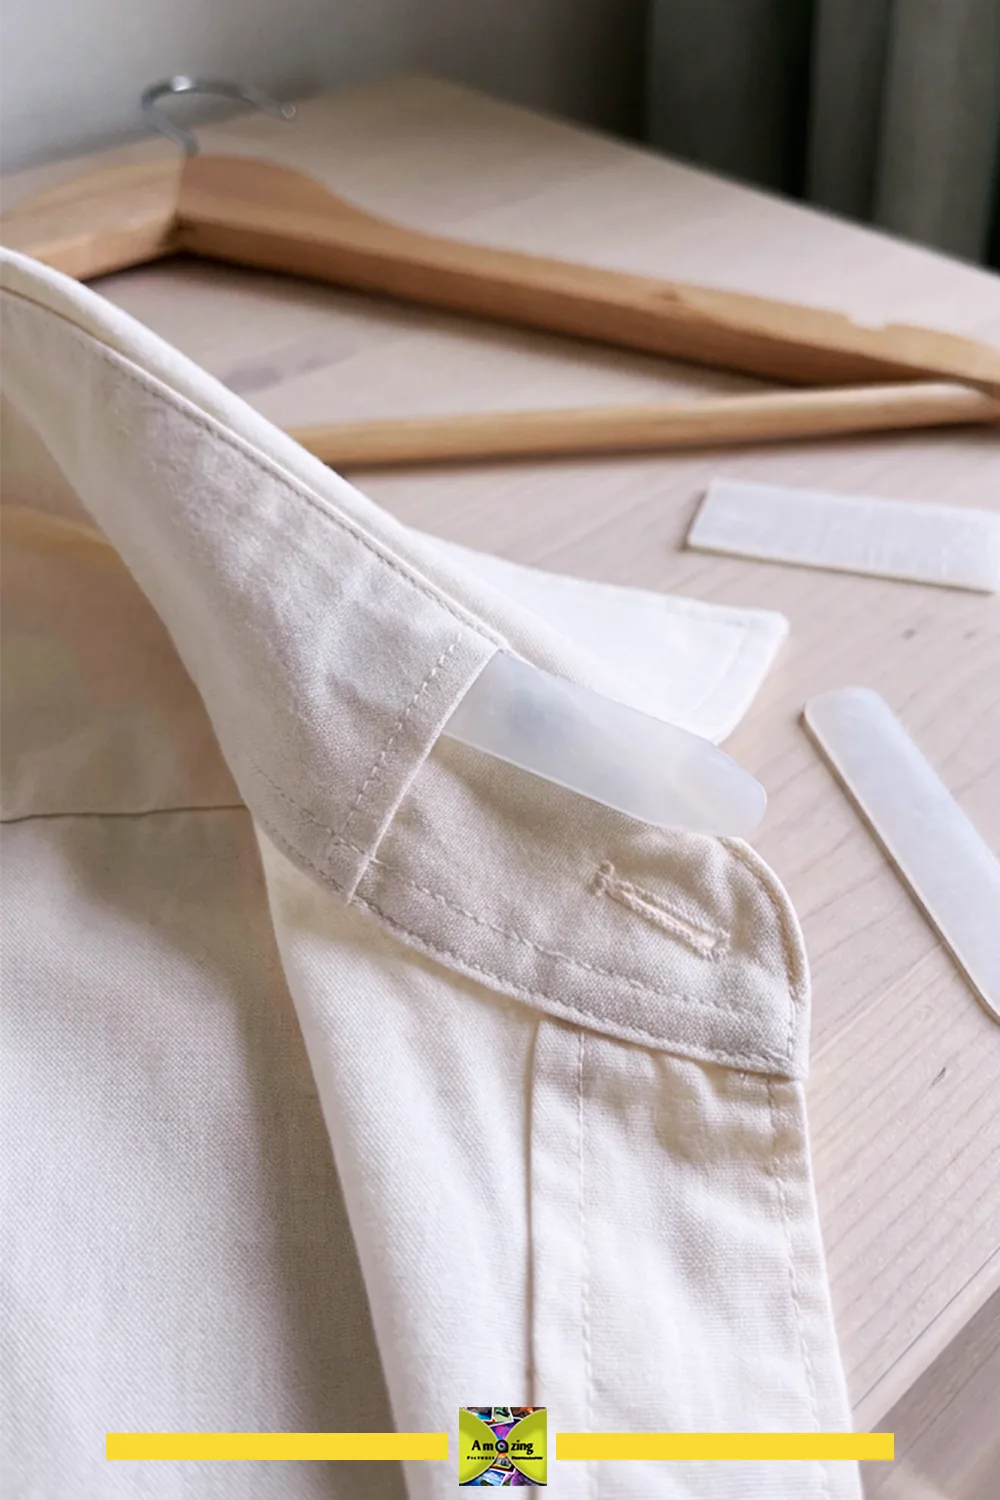
Reader-reported method. Confirm stiffness and pocket fit before describing it as a standard fix.
What it looks like: A thin, smooth stay cut from a flat panel to the size of an existing stay.
Best use: A spare stay for a casual shirt when the original is lost.
Difficulty: Easy.
Approximate time: 5 to 10 minutes per stay (estimate).
Materials:
- One flat side panel from a clean milk jug
- One existing collar stay to use as a size reference
Tools:
- Marker
- Scissors
- Fine sandpaper or a nail file
Steps:
- Trace the existing stay onto the flat panel.
- Cut the shape with scissors and round every corner with fine sandpaper.
- Slide the stay into the collar pocket and check that it fits without catching.
- Trim or sand until the stay slides in and out smoothly.
- Remove the stays before laundering or ironing, and replace any stay that bends or softens.
Customization: Cut several at once from the flat panel and store the spares together.
Practical tip: Match the thickness of the panel to the pocket; a panel that is too thick will push the collar out of shape.
Common mistake: Leaving a square, sharp corner that pokes the collar fabric or catches when removed.
Safety note: Round every edge fully. Milk-jug plastic is softer than a rigid commercial stay, so it is a spare, not a performance match.
20. Dry-Seed Distribution Shaker
Editorial proposal. Run a flow test over a tray before using it on a bed.
What it looks like: An intact jug with a perforated cap that shakes a dry seed evenly over a small area.
Best use: Scattering a suitable dry seed over a small prepared patch.
Difficulty: Easy.
Approximate time: 10 minutes (estimate).
Materials:
- One clean, dry milk jug with its cap
- A suitable dry seed
Tools:
- Awl or nail held in pliers
- A tray or sheet to catch the test flow
Steps:
- Pierce a few small holes in the cap with the awl or nail, keeping the holes small and even. Never make holes with heat.
- Add a small amount of dry seed and screw the cap on.
- Shake the jug over a tray and check that the seed falls in an even scatter without clumping.
- Enlarge or add holes in small steps if the seed will not pass through, and re-test after each change.
- Use the shaker only for plain dry seed. Do not use treated seed, fertilizer, or pesticides in it, and do not treat it as a precision rate.
Customization: Keep separate caps for fine and coarse seed, and mark each cap with its hole size.
Practical tip: Shake low over the ground so the seed does not drift, and test each new seed through the same cap.
Common mistake: Assuming one cap works for every seed; a fine seed will pour through holes meant for a coarse one.
Safety note: Wash hands after handling seed, and keep the shaker away from food and from young children, who could inhale or scatter the seed.
Troubleshooting Common Problems
Uneven cuts. Score a long line lightly first, then cut with the plastic supported. If a cut wanders, trim it back to a straight line rather than hiding the wobble under decoration.
Curling panels. A panel cut from a tight curve may curl. Choose a flatter part of the jug, or cut the panel so the curve works with the design instead of against it.
Poor dustpan contact. If the collecting edge does not sit flat, the jug’s base is too textured or curved. Pick a jug with a straight bottom edge, or trim the edge straighter.
Torn punched holes. A hole punched too close to the edge tears through. Move holes at least 1/4 inch back from any cut line, and press straight through rather than twisting.
Leaking or blocked watering holes. A blocked hole is usually clogged with debris; flush it with water. A leak at the rim means the cap is not seated, so check the cap rather than the holes.
Paint peeling. The surface was not cleaned, scuffed, and primed for plastic. Clean, scuff, and apply a plastic adhesion promoter or primer, then test on a scrap before repainting.
Adhesive release. Smooth polyethylene resists glue. Switch to a mechanical joint, or use a glue labeled for polyethylene and follow its cure time.
Unstable bases. A cut jug that rocks needs a flatter base or a little ballast. If trimming does not fix the wobble, discard the piece rather than propping it with a fragile support.
Inaccessible feeder corners. If you cannot reach a corner to clean it, reshape the opening or replace the feeder. A feeder you cannot clean will hold damp seed and mold.
Greenhouse overheating. Open the top on warm days or the seedlings will cook. A winter-sowing jug needs ventilation, not a tight seal.
Seed clumping. Damp seed clumps in a shaker. Dry the seed, use a dry jug, and shake over a tray to confirm an even flow before seeding a bed.
Outdoor brittleness. Sunlight and weather make milk-jug plastic brittle over time. Inspect outdoor pieces for cracks and replace them before they break. Do not assume paint or coating extends their life.
When a component is cracked, brittle, or has a torn attachment, discard it rather than covering the flaw with paint or fabric. A covered edge is still a failed edge.
Safety Notes for Cutting and Assembly
Cut cold. Do not modify plastic with open flame, a heated blade, or a burned hole. Melting plastic releases fumes and can burn skin, and heating an unknown material indoors is not safe.
Cut away from your body, with the plastic supported and your other hand outside the cutting path. An adult does the cutting. Keep caps, sharp offcuts, cords, and small attachments away from young children and pets, and treat small cut pieces as a choking hazard.
Use scissors, punches, and other cold-cutting tools for the basic projects. Do not add drilling or power tools just to make a simple project seem heavier.
Follow the exact label for any paint, primer, glue, or marker, including the compatible-substrate, ventilation, and curing instructions. Dry to the touch is not the same as fully cured.
These projects are not for food contact, and they do not include protective equipment, flotation devices, electrical work, or direct food-service uses. Do not use a jug for a load-bearing or support role it was not made for.
Outdoor pieces should be inspected regularly and removed when they crack or go brittle. UV light and weather age the plastic, and no coating makes a milk jug permanent.
Frequently Asked Questions
A milk jug becomes a watering can, dustpan, paint kettle, potting scoop, transfer funnel, winter-sowing container, bird feeder, savings bank, or a set of game pieces. The handle, neck, flat panel, and translucent wall each suit a different kind of project, so pick the feature your project needs.
Rinse with warm, soapy water, then rinse again with clean water. Dry the inside, the handle recesses, the cap, and the neck completely. Remove the label with warm water and soap, and confirm the jug only ever held milk, not chemicals.
Cut cold with sharp scissors or a utility knife on a supported surface, always away from your body and with your hands outside the cutting path. Score long lines lightly first. Do not heat or melt the plastic, and smooth any sharp edge before use.
Milk-jug plastic is low-surface-energy polyethylene, so most paints peel and most glues fail without preparation. Clean and scuff the surface, then use a plastic adhesion promoter or plastic primer made for polyethylene. Prefer mechanical joints over glue, and test any product on a scrap panel first.
A hole placed too close to a cut edge tears through, and a sharp corner concentrates stress. Keep holes at least 1/4 inch from any edge, round the corners, and press straight through rather than twisting.
Some can, for a time. Sunlight and weather make milk-jug plastic brittle, so inspect outdoor pieces regularly and replace them when they crack. Paint and coatings do not make the plastic weatherproof or permanent.
Cool-season vegetables, cold-hardy perennials, and native plants that need cold stratification are common choices. Not every seed needs cold treatment, and frost-sensitive plants are usually started later or indoors, so follow the timing on each seed packet and your local climate.
It depends on your local rules. Cut pieces, glued additions, coatings, and mixed materials may not belong in the same collection stream as an intact jug, and small offcuts are often excluded. Check your local recycling authority’s current guidance for what is accepted.
Materials I tested. On cleaned and scuffed HDPE, Rust-Oleum Specialty Plastic Primer under a standard acrylic topcoat gave the most reliable finish; after a full 48-hour cure it passed both a fingernail scratch and a tape-pull test, while an unprimed panel shed paint on the very first pull. Krylon Fusion All-in-One held nearly as well in a single step. For bonding, ordinary superglue and hot glue both peeled off the polyethylene intact, and only a two-part plastics-bonding adhesive used with its surface activator made a joint I could not pull apart by hand. A fine-tip permanent marker wrote cleanly and stayed put once it dried.
What this costs. In practice most of these projects cost nothing beyond a jug that was headed for the recycling bin, since the scissors, marker, tape, and cord were already in the drawer. The only real spend is on the builds that need a proper finish or bond: one can of plastic primer and a small tube of polyethylene adhesive, which together cost less than a single new dustpan and stretch across dozens of projects. Stick to the cut-and-use tools and skip the painted or glued builds, and the running cost is genuinely zero.
Posted by: Med Houssem · In: Gardening, Upcycling