Pallet boards are already the right shape for shelving — narrow, mostly uniform, and ready to be cut to length. That is why a simple wall shelf is one of the most practical projects you can start with when you have a reclaimed pallet and a few basic tools.
But pallet boards can become far more than one rustic ledge — we’ve even seen an ambitious pallet DIY project turned into a backyard pool.
A well-built pallet shelf can organize a cluttered kitchen, hold bathroom essentials where floor space doesn’t exist, display plants in a bright window, keep garage supplies accessible above a workbench, and bring warm reclaimed-wood character to rooms that would otherwise need store-bought shelving.
The challenge isn’t finding pallet shelf ideas. It’s figuring out which ones you can realistically build, which pallets are safe to bring indoors, and how to mount the finished shelf so it stays where you put it.
This guide covers 17 pallet shelf projects organized by room. Each one includes what the finished piece looks like, what it is best used for, the realistic difficulty level, approximate build time, materials, and enough construction detail that you understand how it goes together — not just what it looks like styled with candles and a succulent.
Before the projects, there are sections on pallet selection, wood preparation, and wall mounting that apply to every shelf in this article. Read those first if you have never worked with reclaimed pallet wood before.
Before You Build: How to Choose Pallets Safely
Not every pallet belongs in your living room.
The pallets you find behind a grocery store, stacked beside a construction dumpster, or offered free on a curb have traveled through supply chains that often involve chemicals, spills, pests, and rough handling. Some are safe for indoor furniture after cleaning. Others are not.
Understanding Pallet Markings
Pallets that cross international borders must comply with ISPM 15 (International Standards for Phytosanitary Measures No. 15), a global standard administered by the International Plant Protection Convention (IPPC). Treated pallets carry a stamp on the side of a stringer or block. You can read the full stamp specification in the IPPC’s ISPM 15 standard.
The stamp typically includes:
- The IPPC wheat-stalk logo
- A two-letter country code (such as US, CA, or MX)
- A facility identification number
- A treatment code
The treatment code is what tells you how the wood was treated:
HT (Heat Treated): The wood was heated to a core temperature of at least 56°C (133°F) for a minimum of 30 minutes. No chemicals are used. HT pallets are generally considered the safest choice for indoor DIY projects.
MB (Methyl Bromide): The pallet was fumigated with methyl bromide, a toxic pesticide that has been largely phased out under the Montreal Protocol because it depletes the ozone layer. The U.S. Environmental Protection Agency classifies it as a hazardous, ozone-depleting substance. Do not use MB-stamped pallets indoors. Avoid burning them. Handle with caution and dispose of them through appropriate waste channels.
DH (Dielectric Heating): An approved alternative that uses microwave or radio-frequency energy to heat the wood. No chemicals involved. Safe to use.
DB (Debarked): Indicates bark was removed. Often appears alongside HT. Safe.
KD (Kiln Dried): The wood was dried in a kiln to reduce moisture content. This is not a phytosanitary treatment on its own, but it uses heat and no chemicals. Safe.
What Markings Cannot Tell You
A heat-treatment stamp tells you how the pallet was treated at the point of manufacture. It does not tell you what was shipped on it afterward, what spilled on it during transport, or where it sat for six months in a warehouse.
Even an HT-stamped pallet should be rejected if it shows:
- Dark oil or chemical stains
- Strong odors (chemical, fuel, sour, or musty)
- Visible mold or fungal growth
- Soft, rotting wood that crumbles when pressed
- Signs of insect activity (sawdust piles, small holes, live bugs)
- Excessive cracking or structural weakness
- Unknown residue or caked-on material
Unmarked pallets — often called national pallets — have not been treated for international shipping. They may be perfectly safe if you can trace their history (for example, a pallet that held dry goods at a local business you know). Without that history, you cannot know what they were exposed to. Use your judgment, and when in doubt, pass.
Where to Find Usable Pallets
- Local hardware stores and lumber yards
- Garden centers and nurseries
- Small businesses that receive bulk shipments
- Craigslist and Facebook Marketplace (free listings)
- Neighborhood apps like Nextdoor
Always ask permission. Pallets stacked behind a business may be awaiting return to a supplier or reuse, not free for the taking.
My Advice, When choosing pallets for a project, I’d prioritize condition over appearance. A weathered board can be cleaned, sanded, and refinished, but I would skip any pallet with an unknown stain, strong odor, mold, soft wood, or signs of pests. If you can get pallets directly from a local business and ask what they were used to transport, even better — knowing their history makes it much easier to decide which boards are worth bringing into your workshop or home.
How to Prepare Pallet Wood for Indoor Shelves
Reclaimed pallet boards do not start out ready for your living-room wall. They arrive rough, dirty, full of nails, and often splintered. Preparing them properly is the difference between a shelf that looks intentional and one that looks like scrap wood screwed to a wall.
Dismantling the Pallet
Pulling a pallet apart without destroying the boards takes patience. Pallet nails are designed not to come out — they use ring-shank or spiral-shank fasteners that grip the wood aggressively.
Method 1: Pry bar and hammer (lowest cost)
Lay the pallet flat. Slide a flat pry bar between the deck board and the stringer. Work in short sections — lift a little, tap the board back down to loosen the nail, lift again. Avoid prying from one end only; that concentrates force at a single nail and splits the board. Once the board lifts free, remove or hammer through any remaining nails.
Method 2: Pallet buster (fastest manual option)
A pallet buster or deck wrecker is a specialized pry tool with two long tines that slide under the deck board and lift it evenly. The distributed force reduces splitting significantly. A common technique: insert the tines, apply smooth steady pressure, and let the tool’s leverage do the work. Jerking the handle increases the risk of splitting.
Method 3: Reciprocating saw with metal-cutting blade
Slide the blade between the deck board and stringer and cut through the nails at each contact point. This is the fastest method and preserves the most wood, but it leaves nail stubs embedded in the stringers and nail heads in the planks that you must still remove. Wear eye protection — cutoff nail fragments can fly.
Whichever method you use, expect to lose some boards. Pallet wood is typically lower-grade lumber, and even careful technique will break a few pieces. Collect more pallets than you think you need.
Removing Nails and Hidden Metal
Once boards are separated, go over every surface. Pallet boards often contain:
- Broken nail shafts below the surface
- Staples
- Small embedded metal fragments
- Nail heads flush with the wood
Use a nail puller, cat’s-paw, or locking pliers. A strong magnet passed over the board can reveal hidden metal. Do not skip this step — hitting a hidden nail with a saw blade or sander creates a safety hazard and damages your tools.
Cleaning the Wood
Start with a stiff dry brush to remove loose dirt, grit, and debris. For boards that need more cleaning, use warm water with a small amount of mild dish soap applied with a scrub brush. Work along the grain rather than across it.
Do not soak pallet boards or pressure-wash them with high force. Excess water raises the grain, swells the wood, and extends drying time significantly.
After washing, stack boards with spacers (thin strips of scrap wood) between each layer so air circulates. Let them dry completely — this can take several days depending on humidity and air movement. Wood that feels cool or damp to the touch is not ready for sanding or finishing.
A Note About Old Paint and Unknown Finishes
Some pallets or reclaimed boards may have old paint. If the pallet or the wood source predates 1978 — or if you simply cannot identify the coating — do not sand it aggressively.
According to the U.S. Environmental Protection Agency, lead-based paint was common in the U.S. before the residential ban in 1978. Sanding old painted surfaces without containment can release lead-contaminated dust into your home.
If you suspect lead paint, options include:
- Using an EPA-recognized lead test kit
- Setting that board aside and using a different one
- Consulting an EPA Lead-Safe Certified professional if you must work with the material
The safest approach with unknown painted pallet wood: leave it for outdoor projects only, or don’t use it at all.
Sanding Pallet Boards
Pallet wood needs more sanding than lumber from a home center. The boards usually start rougher, with splinters, raised grain, saw marks, dirt embedded in the surface, and sharp edges.
A reasonable progression:
- 80-grit: Remove splinters, surface grime, and the roughest texture. This step does the heavy work.
- 120-grit: Smooth the surface left by the 80-grit. Most of the fuzz and roughness should now be gone.
- 150 to 180-grit: Final pass for boards that will be used indoors where hands will touch the wood regularly.
For a more rustic shelf, you might stop at 120-grit — enough to eliminate splinters and sharp corners while leaving some texture and saw-mark character. For a kitchen shelf or a piece that will sit at eye level, go to 180-grit for a smoother surface.
Always sand along the grain. Sanding across the grain leaves scratches that become more visible after staining.
Round over sharp edges and corners by hand with sandpaper or a sanding block. A sharp 90-degree edge on a wall shelf at eye level is both unpleasant to touch and visually harsh.
Wear a dust mask or respirator (N95 minimum) while sanding. Wood dust is classified as a Group 1 carcinogen by the International Agency for Research on Cancer (IARC), and pallet wood may contain additional particulate from whatever the pallet carried. Eye protection is also essential — ANSI Z87.1-rated safety glasses or goggles.
Essential Tools and Hardware for DIY Pallet Shelves
You do not need a full woodworking shop to build any shelf in this article. A basic kit covers most projects. Build time and finish quality improve with additional tools, but the list below covers the realistic minimum.
Basic Toolkit
| Tool | Why You Need It |
|---|---|
| Tape measure (25 ft) | Measuring boards and wall placement |
| Pencil | Marking cut lines and drill points |
| Carpenter’s square | Ensuring cuts and assemblies are square |
| Level (24-inch minimum) | Installing shelves straight |
| Stud finder | Locating studs for mounting |
| Drill-driver (corded or cordless) | Drilling pilot holes and driving screws |
| Drill bit set | Pilot holes, countersinking |
| Screwdriver bit set | Phillips, square, and Torx bits |
| Hammer | Nail removal, light assembly |
| Flat pry bar | Dismantling pallets |
| Clamps (at least two) | Holding boards during assembly |
| Handsaw or circular saw | Cutting boards to length |
| Random orbital sander or sanding block | Surface preparation |
| Sandpaper assortment (80, 120, 150, 180 grit) | Progressive smoothing |
| Safety glasses (ANSI Z87.1) | Eye protection |
| Work gloves | Handling rough wood and nails |
| Dust mask or respirator (N95 minimum) | Protection from wood dust |
Useful Additions
- Jigsaw: For curved cuts or corner-shelf shaping
- Miter saw: Faster, cleaner crosscuts than a handsaw
- Pocket-hole jig: Hidden joinery for a cleaner look
- Countersink bit set: Recessing screw heads below the surface
- Pallet buster: Faster, cleaner disassembly with less board breakage
Common Hardware
| Hardware | Typical Use |
|---|---|
| 1¼-inch wood screws | Light assembly, attaching small cleats |
| 2-inch wood screws | General assembly of shelf components |
| 2½- to 3-inch construction screws | Mounting into wall studs |
| Wood glue (PVA, interior grade) | Strengthening joints |
| L-brackets (various sizes) | Supporting shelf weight, visible mounting |
| Floating-shelf brackets | Concealed mounting for a clean look |
| Toggle bolts or snap-toggle anchors | Drywall mounting between studs (light loads) |
| Masonry anchors (for concrete/brick) | Mounting on masonry walls |
| Cup hooks or coat hooks | Adding hanging storage to shelves |
In my Opinion, Match the hardware to the shelf’s actual job rather than buying one screw size for everything. For assembly, use screws long enough to bite securely into both pieces of wood without poking through the other side. For wall mounting, I prefer the most direct support possible — ideally fastening into studs with construction screws or using properly rated anchors when studs are not available. Brackets should suit both the shelf depth and the expected load. If you plan to paint or stain the shelf, finish the wood before final mounting so you can coat the edges and underside cleanly without working around the hardware.
Creative Pallet Shelf Ideas for Living Spaces
These shelves are designed to be seen — they sit in rooms where you spend time with company, watch TV, or relax. The emphasis is on balancing rustic character with a finish that looks deliberate.
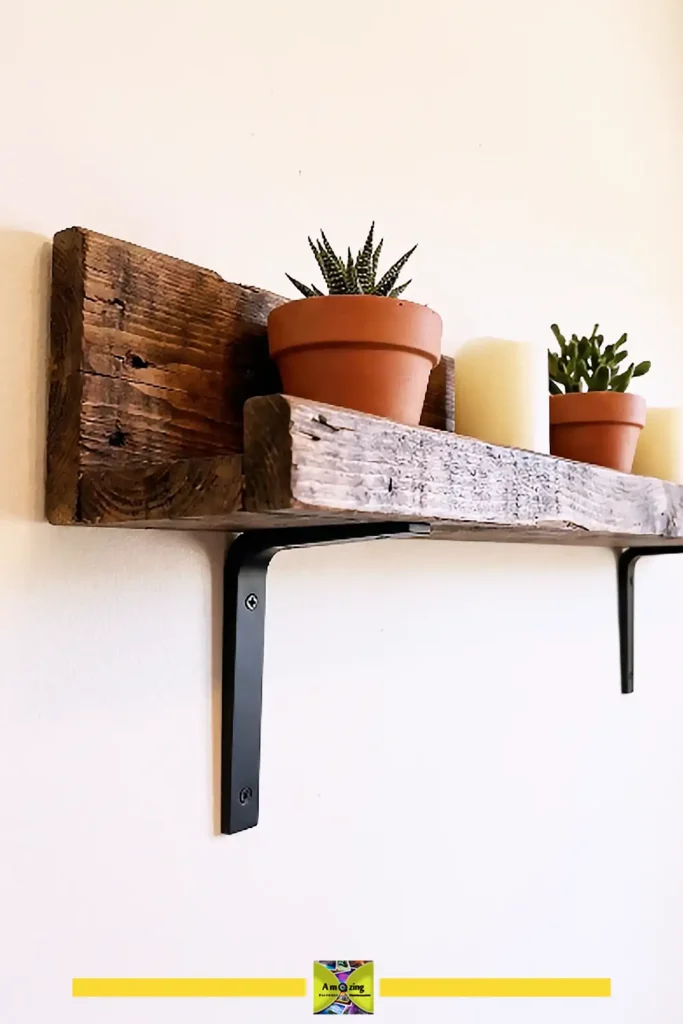
1. Rustic Pallet Wall Shelf With Front Lip
What it looks like: One or two pallet boards mounted horizontally with a narrow front strip running along the bottom edge, creating a shallow lip. The lip keeps small objects from sliding forward. Proportions are typically 36 to 48 inches wide and 5 to 7 inches deep.
Best use: Living room, hallway, or bedroom — displaying small plants, candles, framed photos, and decorative objects.
Best aesthetic: Rustic farmhouse, warm traditional, or cottage.
Difficulty: Beginner.
Approximate build time: 2 to 3 hours, not including wood prep and finish drying.
Materials: 1 pallet board for the shelf surface, 1 narrower strip (about 1 to 1½ inches wide) for the front lip, 2 small L-brackets, 1¼-inch wood screws, wood glue.
Tools: Tape measure, pencil, saw, drill, screwdriver, level, clamps, sandpaper.
How to build it:
- Select a pallet board without major warping. Cut it to your desired shelf length — 36 to 42 inches works for most walls.
- Cut a second narrow strip from another pallet board to the same length. This strip can be about 1 to 1½ inches wide.
- Sand both pieces through the full progression. Pay extra attention to the front edge of the shelf board — it is the most visible surface.
- Apply your chosen finish to all pieces and let them dry fully.
- Run a thin bead of wood glue along the bottom front edge of the main board. Clamp the front lip strip flush against it.
- After the glue sets, reinforce from underneath with 1¼-inch screws through the shelf board into the lip. Pre-drill to avoid splitting.
- Attach two L-brackets to the underside — one about 4 to 6 inches from each end. The vertical leg of each bracket will screw into the wall.
- Mount to wall studs using 2½-inch construction screws through the bracket holes.
Styling option: Dark walnut stain on the shelf with matte black brackets and neutral-toned decor.
Practical tip: Cut the shelf board slightly narrower than you think — a 5-inch depth holds most decorative objects nicely, keeps the shelf visually light, and reduces leverage on the mounting hardware.
Common mistake: Making the shelf too deep. A 10-inch pallet shelf with a 1-inch lip collects random objects instead of looking curated, and the extra depth increases the pull-out force on the upper bracket screws.
Mounting note: Always mount to studs when possible. With two brackets into studs, this shelf holds small decor safely. If studs do not align with your bracket spacing, mount a horizontal 1×3 cleat into the studs first, then attach brackets to the cleat.
2. Pallet Picture Ledge
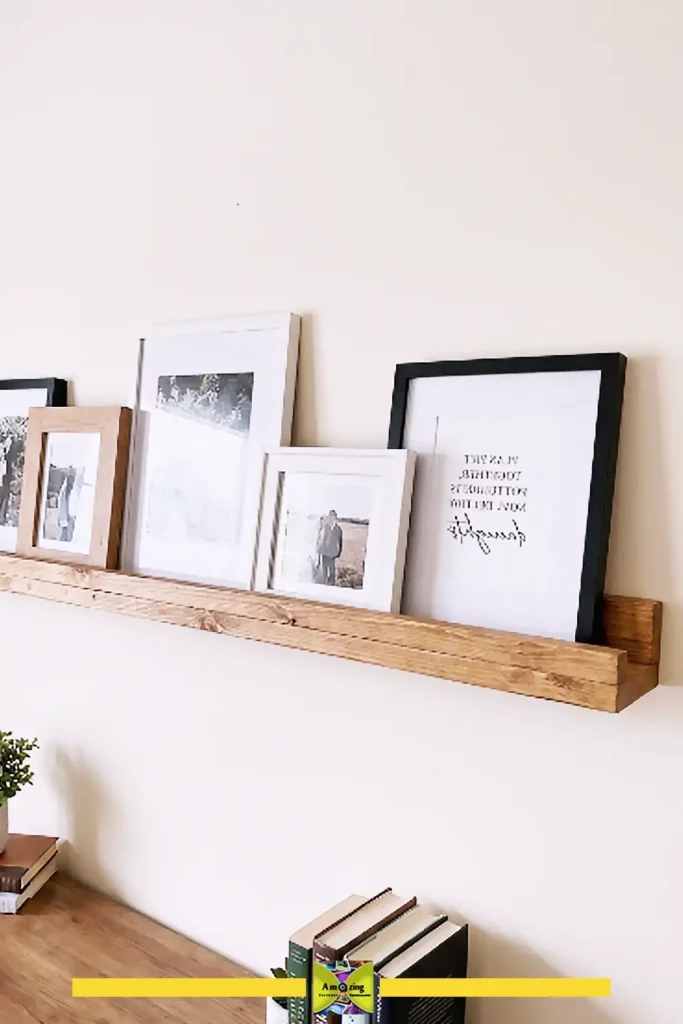
What it looks like: A narrow ledge, roughly 3 to 4 inches deep, with a short front retaining strip. Designed to hold framed photos, prints, small artwork, or postcards leaned against the wall rather than hung. The clean, shallow profile keeps attention on what is displayed.
Best use: Living room, hallway, stair landing, or bedroom — anywhere you rotate framed pieces or small artwork.
Best aesthetic: Minimal rustic, modern farmhouse, or gallery-wall alternative.
Difficulty: Beginner.
Approximate build time: 2 to 3 hours, plus finishing time.
Materials: 1 pallet board, 1 thin retaining strip (¾ × ¾ inch or similar), wood glue, 1¼-inch screws, floating-shelf bracket or L-bracket pair, wall fasteners.
Tools: Same as basic toolkit.
How to build it:
- Cut the shelf board to length — a 48-inch ledge works well for a small gallery arrangement.
- Rip the board to 3 or 4 inches wide if the pallet board is deeper.
- Sand to 180-grit for a refined look.
- Cut the retaining strip to match the shelf length. Sand it smooth and slightly round the top edge.
- Glue and screw the retaining strip along the front edge of the shelf from underneath.
- Finish with a clear satin polyurethane or a light stain. Avoid high-gloss on a picture ledge — it competes with the artwork.
- Mount to studs with brackets or use a concealed floating-shelf bracket for a cleaner look.
Styling option: Light whitewash finish with a satin clear coat. Layer three to five framed prints of varying sizes, some leaning directly on the shelf and others layered in front.
Practical tip: The front retaining strip only needs to be ½ to ¾ inch tall to stop frames from sliding. Anything taller visually competes with small artwork.
Common mistake: Mounting the ledge too high. A picture ledge should sit roughly 55 to 60 inches from the floor so artwork is at eye level — not near the ceiling.
Mounting note: Because picture ledges are shallow (low leverage) and hold lightweight objects, two brackets into studs or heavy-duty drywall anchors are usually sufficient. Use a level — a picture ledge that tilts forward will drop frames.
3. Pallet Floating-Style Shelf
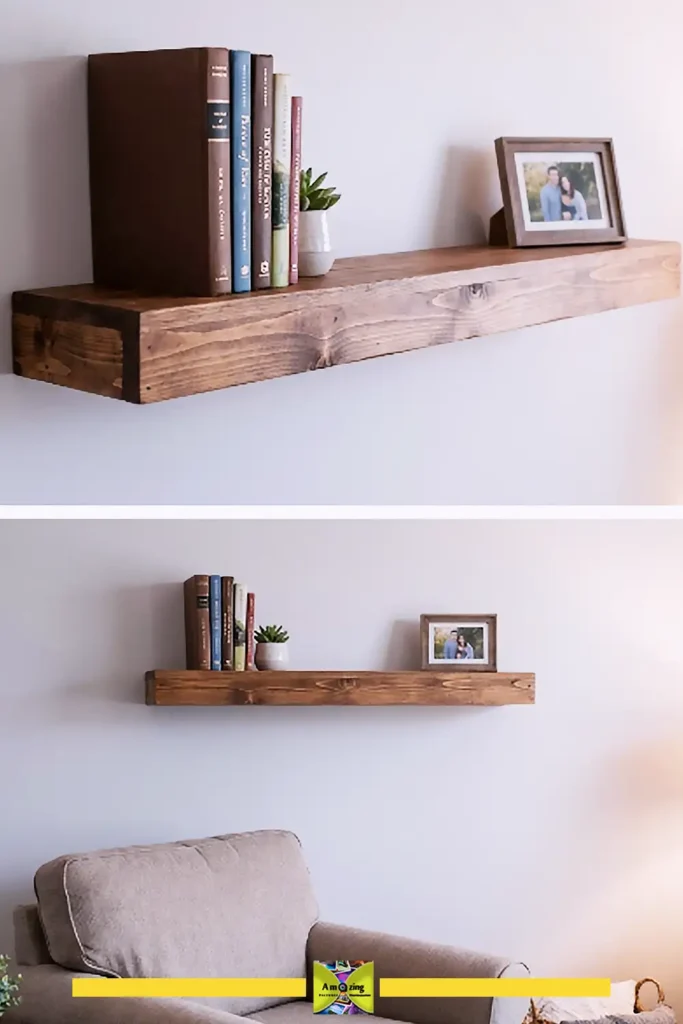
What it looks like: A thicker shelf (1½ to 2 inches) that appears to float off the wall with no visible brackets. The rustic pallet-wood top and edges provide warmth while the concealed mounting keeps the look clean and modern.
Best use: Living room, home office, or bedroom — displaying heavier decor, small stacks of books, or a few framed items.
Best aesthetic: Modern reclaimed wood, minimalist, or industrial-edge.
Difficulty: Intermediate.
Approximate build time: 3 to 5 hours, plus finishing.
Materials: 2 to 3 pallet boards for a laminated shelf body, heavy-duty floating-shelf bracket (rated for the expected load), wood glue, screws for lamination, wall fasteners.
Tools: Basic toolkit plus clamps for lamination.
How to build it:
- Cut pallet boards to the shelf length — typically 24 to 36 inches for a floating shelf.
- If using multiple boards to build thickness, arrange them so the best-looking faces become the top and front edges. Laminate the boards face-to-face using wood glue and clamps.
- Once the glue cures, sand the laminated blank thoroughly, paying attention to the visible front edge.
- The floating-shelf bracket must be mounted first — locate wall studs and install the bracket directly into at least two studs using the manufacturer’s hardware.
- The shelf body must have a cavity or slot to slide over the bracket rods. This can be created either by routing a recess into the back of a solid laminated shelf or by building the shelf as a hollow box with a solid front edge.
- Slide the shelf body onto the bracket, check for level, and secure it according to the bracket instructions.
Styling option: Walnut-toned stain with a matte clear coat. Pair with matte black or brushed steel bracket hardware.
Practical tip: The bracket determines everything. Choose a bracket rated well beyond the combined weight of the shelf itself and what you intend to place on it. A heavy pallet-wood shelf already loads the bracket before you add anything.
Common mistake: Underestimating the structural demands of a floating shelf. A pallet board simply screwed to a wall from the front is not a floating shelf — it will sag or pull out. The hidden bracket does the structural work; the wood provides the surface.
Mounting note: Floating-shelf brackets must be mounted to studs or a structural backing board spanning studs. Drywall anchors alone are not appropriate for a floating shelf of any significant weight. Follow the bracket manufacturer’s installation instructions.
Pallet Shelf Ideas for the Kitchen
Kitchen shelves need to be practical first — they hold things you reach for daily. They also face steam, occasional splashes, and food proximity, which means finish choice and wood preparation matter more here than in a dry living room.
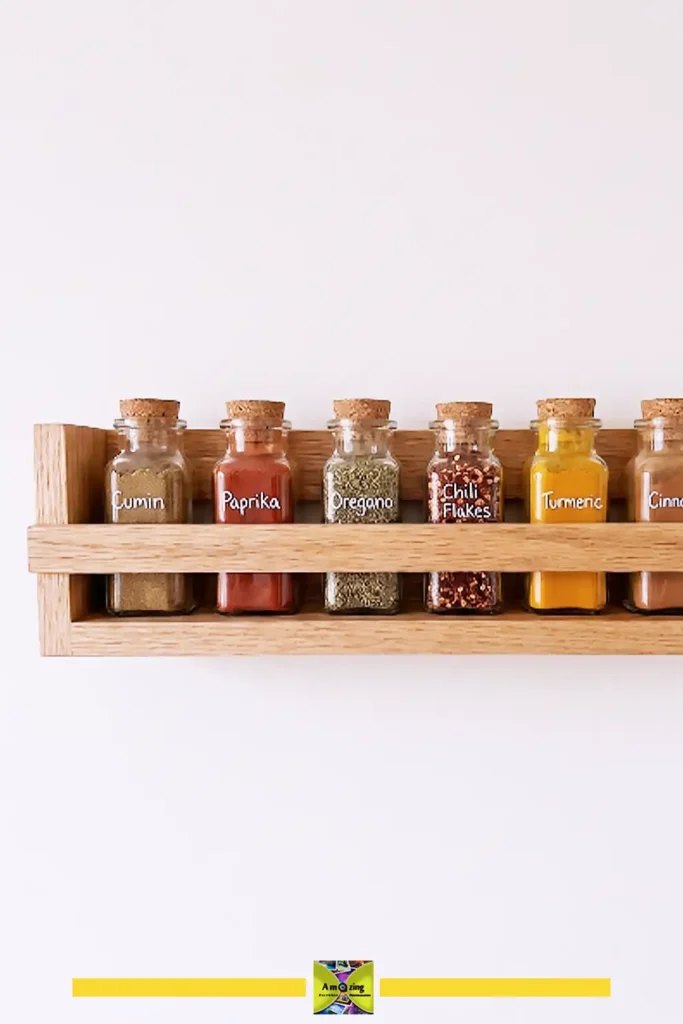
4. Pallet Spice Rack
What it looks like: A narrow, shallow shelf (3 to 4 inches deep) with a front retaining rail, sized to hold standard spice jars in one or two rows. Mounted on a kitchen wall near the cooking area but not directly above a heat source.
Best use: Kitchen — organizing spice jars where they are visible and reachable while cooking.
Best aesthetic: Warm rustic kitchen, farmhouse, or cottage kitchen.
Difficulty: Beginner to intermediate.
Approximate build time: 2 to 4 hours, plus finishing time.
Materials: 2 pallet boards (one for shelf, one for retaining rail), L-brackets, 1¼-inch screws, wood glue, food-area-appropriate finish.
Tools: Basic toolkit.
How to build it:
- Measure the spice jars you intend to store to determine shelf depth. Most standard jars need a shelf at least 3 inches deep. Add ½ inch for the rail and finger clearance.
- Cut the shelf board to length — 18 to 24 inches works for most kitchen wall spaces. Cut the retaining rail to the same length.
- Sand both pieces to 180-grit. A smoother surface is easier to wipe clean in a kitchen.
- Apply a clear finish rated for incidental food contact — several coats of a curing oil (such as tung oil) or a clear water-based polyurethane that has fully cured.
- Attach the retaining rail with glue and screws from underneath.
- Attach brackets to the underside and mount to studs.
Styling option: Light natural finish with uniform glass spice jars and clean printed labels.
Practical tip: Test-fit your tallest spice jar before finalizing the shelf position. Leave enough clearance above the shelf to grab jars easily — at least 2 inches more than the jar height.
Common mistake: Using untreated, roughly sanded wood directly beside food preparation surfaces. Kitchen shelves need a finish that can be wiped clean and will not absorb cooking oils or moisture.
Mounting note: Stud mounting is preferred. This shelf carries multiple small jars, each adding incremental weight. If a stud is not available in the right location, heavy-duty snap-toggle anchors may work for a lightly loaded spice shelf on drywall.
For a kitchen spice shelf, I’d choose a finish that fully seals the pallet wood and can handle regular wiping, splashes, and light cooking residue. A water-based polyurethane is a practical option when you want a clear, low-maintenance surface, while a properly cured tung-oil finish keeps more of the natural wood look. Whichever finish you choose, let it cure completely according to the manufacturer’s instructions before loading the shelf with spice jars. I’d also seal the underside and edges, not just the visible top surface, since kitchen moisture can reach those areas too.
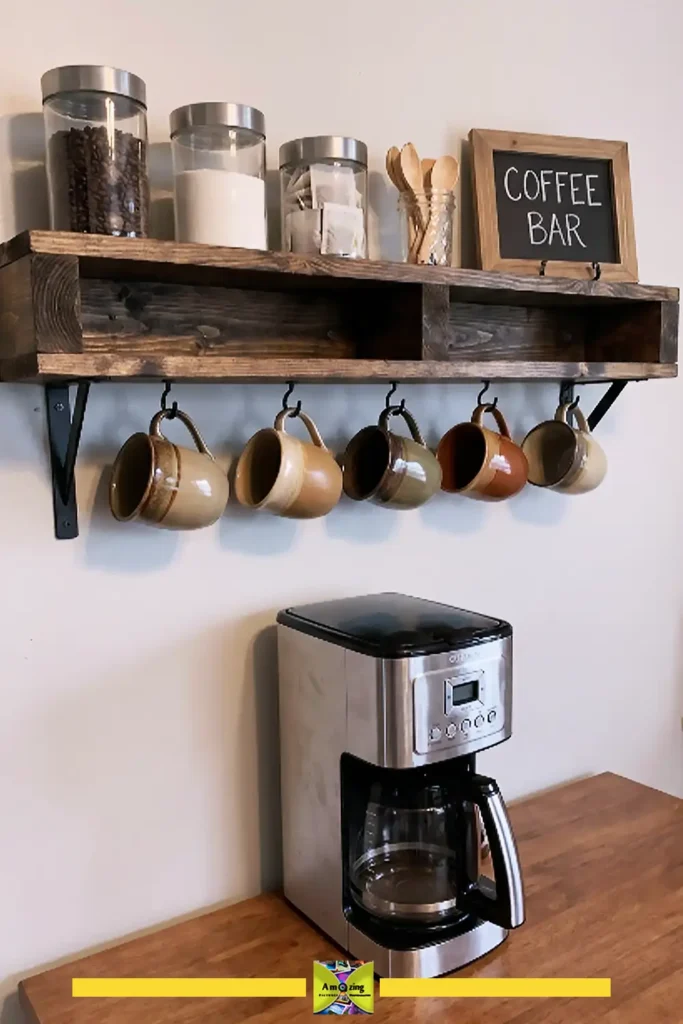
5. Pallet Coffee Station Shelf
What it looks like: A deeper shelf (6 to 8 inches) with a row of cup hooks mounted beneath. Holds mugs, coffee canisters, a small jar of spoons or sugar, and a decorative sign if desired. The shelf sits above a coffee maker or on an adjacent wall.
Best use: Kitchen — creating a dedicated coffee and tea zone without requiring counter space.
Best aesthetic: Rustic farmhouse, café-inspired, or industrial.
Difficulty: Beginner to intermediate.
Approximate build time: 3 to 5 hours, plus finishing.
Materials: 1 or 2 pallet boards (shelf surface), cup hooks (screw-in type with machine threads and nuts, not plain screw-in hooks), L-brackets, 1¼-inch and 2-inch screws, wood glue, clear finish.
Tools: Basic toolkit plus a drill bit sized for the hook threaded shaft.
How to build it:
- Cut the shelf board to length — 30 to 36 inches accommodates several mugs and supplies.
- If one pallet board is narrower than desired, join two boards edge-to-edge using glue and pocket screws or a cleat underneath.
- Sand to 180-grit. Apply a finish that handles occasional drips — a satin polyurethane works well.
- Mark hook positions on the underside, typically spaced every 4 to 5 inches. Drill through-holes sized for the hook machine threads.
- Insert hooks from above so the threaded shaft extends through the board. Secure each with a washer and nut underneath. The washer distributes the load across more wood surface.
- Mount the shelf to studs with brackets rated for the combined weight of the shelf, mugs, and supplies you plan to store.
Styling option: Dark stain with brass or black cup hooks. Arrange mugs by color or size for a clean café look.
Practical tip: Hanging ceramic mugs adds significant weight below the shelf. Each mug might weigh 12 to 16 ounces. Six mugs plus the shelf itself easily exceeds 10 pounds before you add coffee supplies. Mount accordingly.
Common mistake: Using plain screw-in hooks driven directly into the underside of the wood without a nut and washer. Under repeated loading (grabbing and replacing mugs), screw-in hooks can loosen and eventually pull out.
Mounting note: This shelf demands stud mounting. The combination of shelf weight, contents, and the downward pull of hanging mugs creates substantial load. Position the shelf so at least one bracket hits a stud; two is better.
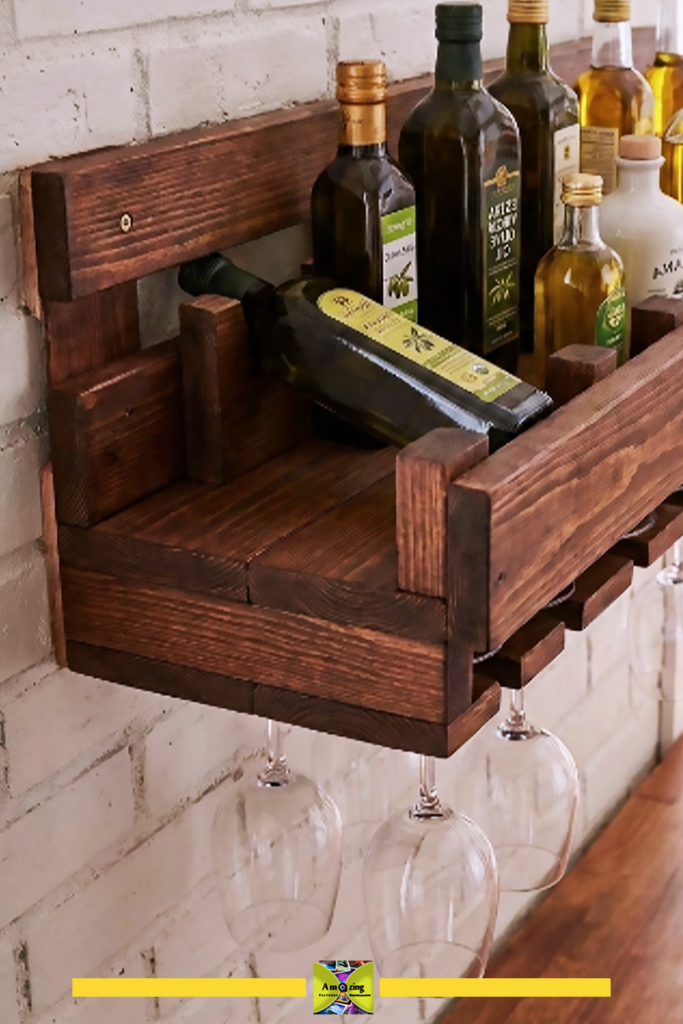
6. Pallet Bottle Shelf
What it looks like: A wall-mounted shelf with a horizontal surface that includes routed or built-up channels (or securely spaced rails) to hold bottles on their sides. The shelf can be a single row or stacked in two tiers.
Best use: Kitchen, dining room, or pantry — storing a small collection of bottles within reach but off the counter.
Best aesthetic: Rustic cellar, farmhouse dining, or industrial kitchen.
Difficulty: Intermediate.
Approximate build time: 4 to 6 hours, plus finishing.
Materials: Pallet boards (at least 2 for the body), wood for dividers or rails, 2-inch screws, wood glue, heavy-duty brackets or a French cleat system, appropriate wall fasteners.
Tools: Basic toolkit plus a jigsaw or router if cutting curved bottle recesses.
How to build it:
- Determine the shelf depth. A bottle is roughly 3 to 3½ inches in diameter. The shelf surface needs at least 8 inches of depth so the bottle rests fully on the shelf rather than balancing near the edge.
- Build the shelf surface from joined pallet boards. Add a front and back rail (1 to 1½ inches tall) so bottles cannot roll forward or backward off the shelf.
- For individual bottle positions, add small divider blocks spaced about 3½ inches apart along the inside of the front and back rails. Each bottle nestles between two dividers, held by the front and back rails.
- An alternative: using a hole saw or jigsaw, cut U-shaped recesses into the front rail so the bottle necks sit in the recesses. This requires more precise work but creates a cleaner look.
- Sand everything to 180-grit. Apply a finish appropriate for a dining area.
- Mount using a French cleat or heavy-duty brackets into studs.
Styling option: Rich dark stain with evenly spaced bottles, labels facing outward. Add a small rail underneath for hanging glasses by their bases.
Practical tip: A French cleat distributes weight across the entire length of the shelf and makes it easier to remove and rehang. For any shelf holding more than three or four bottles, a French cleat is worth the extra step.
Common mistake: Building a shelf that is too shallow or relying on glue alone to hold bottle supports. Bottles are heavy — six bottles at roughly 2.5 to 3 pounds each is 15 to 18 pounds. Every joint must be mechanically fastened.
Mounting note: A loaded shelf is heavy. Six bottles plus the shelf can exceed 25 pounds. Mount to studs only. A French cleat screwed into two studs provides solid support. Do not rely on drywall anchors alone for this project.
For a pallet bottle shelf, I’d build around the bottles you actually plan to store rather than relying on a standard dimension. Bottle diameters and shoulder shapes vary more than they look, so test-fit a few before fixing the dividers or recesses in place. I’d also leave a little extra clearance around each bottle so they slide in and out without scraping the wood. For a heavier setup, combining front and back retaining rails with individual dividers gives the bottles a more secure resting position than a flat shelf alone.
Pallet Bathroom Shelf Ideas
Bathroom shelves face humidity, occasional water contact, and tight wall spaces. Moisture-resistant finishing is not optional, and mounting must account for tile, drywall, or the combination of both.
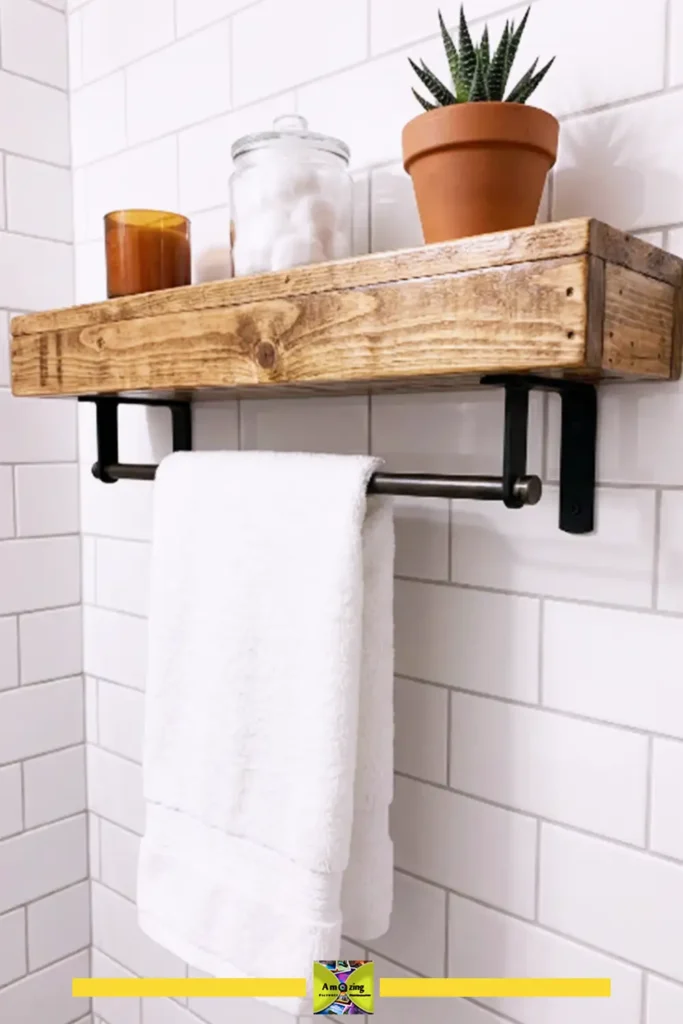
7. Pallet Bathroom Shelf With Towel Bar
What it looks like: A shallow shelf (4 to 5 inches deep) with a towel bar suspended beneath on brackets or a built-in rail. The shelf holds small jars, a candle, or a small plant, while the bar keeps a hand towel within reach.
Best use: Bathroom or powder room — combining a small display surface with practical towel storage.
Best aesthetic: Rustic bathroom, coastal, or farmhouse.
Difficulty: Beginner to intermediate.
Approximate build time: 3 to 4 hours, plus finishing and moisture-resistant coating cure time.
Materials: 1 pallet board for shelf, towel bar (a smooth dowel, metal bar, or thick pallet strip), 2 bar brackets, L-brackets, 2-inch screws, moisture-resistant finish.
Tools: Basic toolkit.
How to build it:
- Cut the shelf board to desired length — 18 to 24 inches for a typical bathroom wall.
- Sand to 180-grit.
- Apply a moisture-resistant finish. A marine-grade spar varnish or exterior-rated polyurethane provides better moisture protection than standard interior finishes. Apply multiple coats, including to the underside and all edges. Let cure fully.
- Mount the towel bar brackets to the underside of the shelf before hanging. Position them so the bar sits about 3 to 4 inches below the shelf surface — enough to hang and remove a folded towel.
- Attach L-brackets to the shelf underside and mount to studs.
Styling option: White-painted shelf with a natural wood towel bar and satin-nickel or black brackets. Coastal styling works well — light tones with a clear protective finish.
Practical tip: Do not assume standard interior polyurethane will hold up in a steamy bathroom. Look for products labeled for exterior or marine use, or specifically marketed for bathroom wood protection.
Common mistake: Treating pallet wood like it is naturally moisture-resistant because it is “rustic.” Reclaimed pallet wood is often more absorbent than kiln-dried store lumber and will swell, warp, or support mildew in a damp bathroom without proper sealing.
Mounting note: Bathroom walls may be tile over drywall, tile over cement board, or plain drywall. Drilling into tile requires a carbide-tipped masonry bit and care to avoid cracking. If the shelf will span across tile into drywall, plan your fastener locations before drilling.
8. Pallet Toilet Paper Storage Shelf
What it looks like: A compact shelf (roughly 14 to 18 inches wide, 5 to 6 inches deep) with a small rail or cubby underneath that stores two to four spare toilet paper rolls. Clean, functional, and compact.
Best use: Bathroom or powder room — keeps spare rolls accessible and off the floor.
Best aesthetic: Clean rustic, farmhouse bathroom, or minimalist.
Difficulty: Beginner.
Approximate build time: 2 to 3 hours, plus finishing.
Materials: 2 pallet boards (one for shelf top, one for the cubby front rail), 2 small side supports, L-brackets, 1¼-inch screws, wood glue, moisture-resistant finish.
Tools: Basic toolkit.
How to build it:
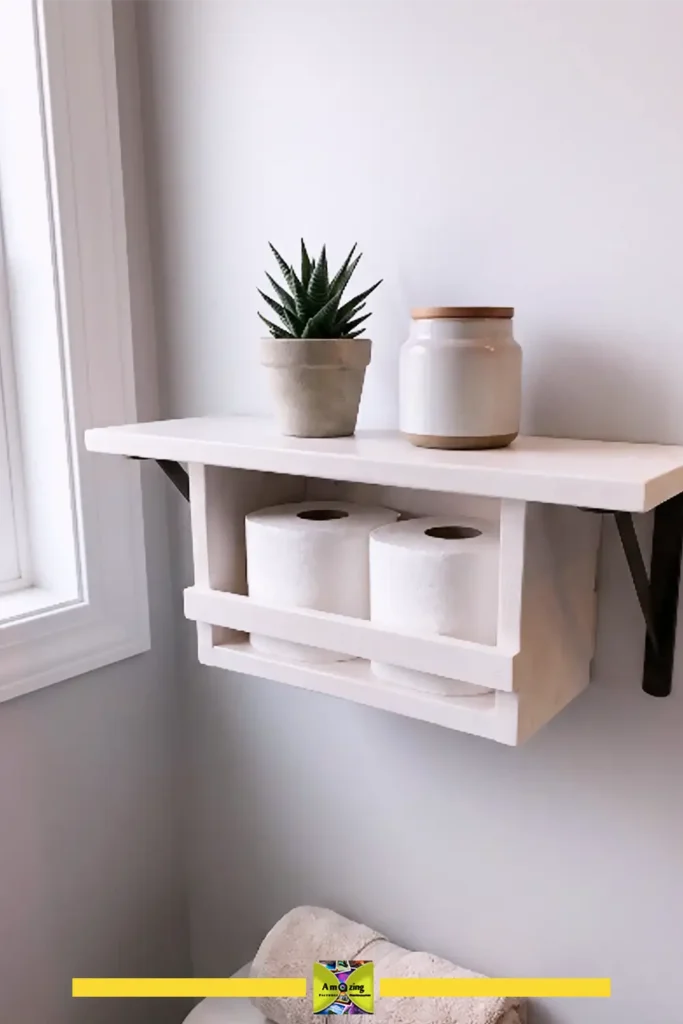
- Cut the shelf top to size. Cut two side supports (about 4 to 5 inches tall). Cut a front rail to match the shelf width.
- Sand all pieces to 180-grit.
- Assemble the cubby: attach the two side supports to the underside of the shelf top, then attach the front rail between them at the bottom. This creates an open-backed cubby roughly the size of two stacked toilet paper rolls.
- Apply a moisture-resistant finish to all surfaces.
- Mount to studs with L-brackets.
Styling option: Soft white paint with a satin clear topcoat. Rolled white toilet paper stored neatly in the cubby.
Practical tip: Build the cubby slightly wider than two rolls side by side. You want to be able to grab a roll without scraping your knuckles on the side supports.
Mounting note: This is a lightweight shelf. Two brackets into studs handle it easily. If stud alignment is difficult, a single bracket into a stud on one side and a heavy-duty drywall anchor on the other is reasonable for this load level.
Pallet Shelves for Bedrooms and Entryways
These spaces need shelves that fit into compact wall areas and serve specific daily functions — holding the items you reach for when leaving or the things you want beside the bed. For more on styling these compact spots, see our wall makeover ideas for small rooms.
9. Pallet Bedside Shelf
What it looks like: A compact wall-mounted shelf (about 14 to 16 inches wide, 6 to 8 inches deep) at bedside-table height, with an optional hook underneath. Replaces or supplements a traditional nightstand in small bedrooms.
Best use: Bedroom — holding a phone, a book, glasses, and a small lamp if the shelf is wide enough and properly mounted.
Best aesthetic: Warm rustic, modern reclaimed, or minimal.
Difficulty: Beginner.
Approximate build time: 2 to 3 hours, plus finishing.
Materials: 1 or 2 pallet boards, 2 heavy-duty L-brackets or a small wooden corbel, 2½-inch screws for stud mounting, 1¼-inch screws, optional coat hook.
Tools: Basic toolkit.
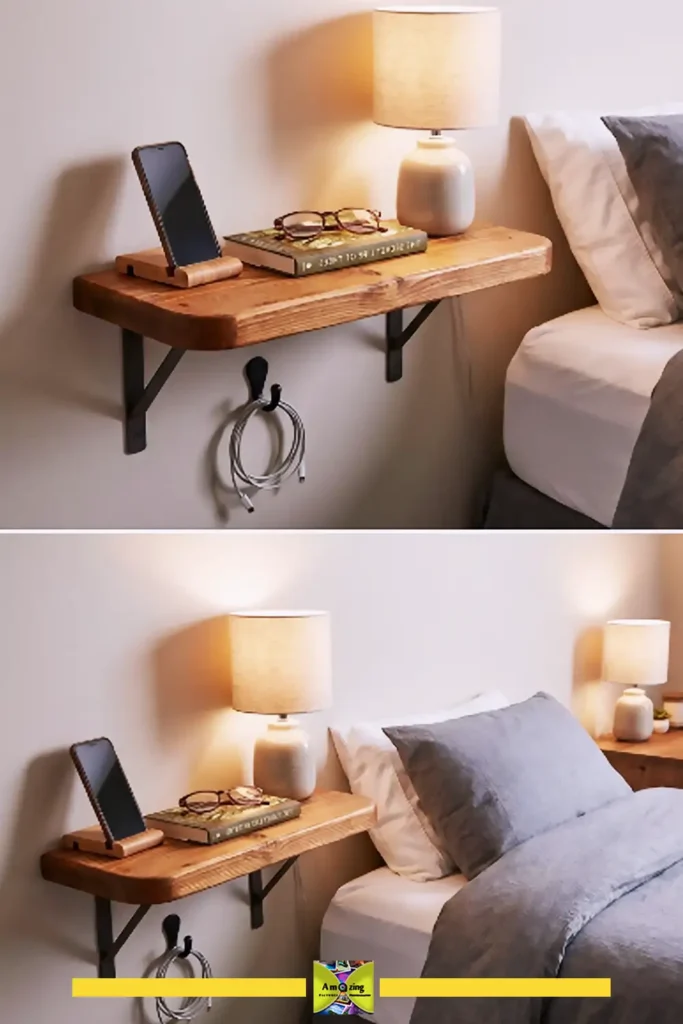
How to build it:
- Cut the shelf to size. Join two boards edge-to-edge if you want a deeper surface.
- Sand to 180-grit. Round the front corners — sharp corners at bedside height are easy to bump into.
- Apply a clear satin finish or light stain.
- Attach brackets to the underside with 1¼-inch screws.
- Mount the shelf at approximately 24 to 28 inches from the floor (standard bedside-table height).
- If adding a hook, screw it into the underside after the shelf is mounted.
Styling option: Light warm-toned stain with a single matte-black hook centered beneath.
Practical tip: If there is no outlet near the shelf for phone charging, position the shelf so a charging cable can reach from the nearest outlet without being stretched across a walkway.
Common mistake: Mounting too low or too high. Hold the shelf against the wall at different heights while sitting on the bed before committing to a position.
Mounting note: A bedside shelf holding a lamp, book, phone, and glasses needs solid mounting. Two brackets into studs is ideal. If a stud is only available at one bracket position, use a heavy-duty toggle anchor for the second, but keep the total load light.
10. Pallet Entryway Key Shelf
What it looks like: A narrow shelf (roughly 16 to 24 inches wide, 4 to 5 inches deep) with a row of hooks beneath for keys, a small top surface for mail or sunglasses, and an optional small mail slot. Compact enough for a small entryway or apartment wall.
Best use: Entryway, mudroom, or apartment hallway — catching keys, mail, and small daily-carry items.
Best aesthetic: Organized rustic, farmhouse entry, or modern functional.
Difficulty: Beginner to intermediate.
Approximate build time: 3 to 4 hours, plus finishing.
Materials: 1 pallet board for shelf surface, 3 to 5 coat or cup hooks (with machine threads and nuts), 2 L-brackets, 1¼-inch and 2½-inch screws, wall fasteners.
Tools: Basic toolkit plus drill bit sized to hook shanks.
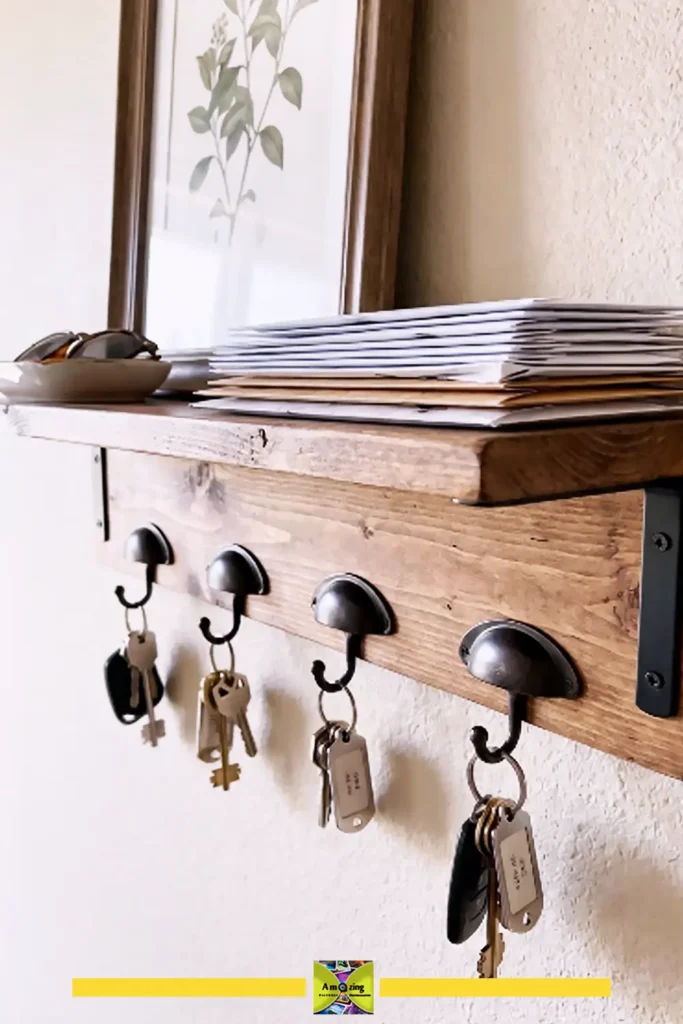
How to build it:
- Cut the shelf board to length. Sand to 180-grit.
- Mark and drill holes for hooks along the underside, spaced evenly. Avoid placing hooks so close to the ends that the wood might split.
- Secure each hook with a washer and nut from above. Countersink the nut slightly if you want a flush surface, or leave it on top and accept the visible hardware as part of the industrial look.
- Apply a durable clear finish — this shelf gets touched daily.
- Mount to studs. In an entryway, consider the height carefully. The shelf surface should be roughly 48 to 54 inches from the floor so you can see what is on it without bending.
Styling option: Medium brown stain with oil-rubbed bronze hooks. Add a small framed print or leaning mirror above.
Practical tip: Label the hooks if multiple people in the household will use them. A simple stamped-metal tag or small painted initial above each hook prevents the “whose keys are these?” problem.
Mounting note: Entryway shelves get pulled on — people grab keys, yank coats off nearby hooks, and bump them with bags. Mount to studs. Two brackets into wood studs with 2½-inch screws.
11. Pallet Corner Shelf
What it looks like: A triangular or L-shaped shelf that fits into a room corner. Two pallet boards joined at 90 degrees, supported by a small triangular cleat or bracket underneath each side. Visually lighter than a rectangular shelf because it tucks into unused corner space.
Best use: Bedroom corner, bathroom corner, entryway, or living room — holding a small plant, candle, or decorative object.
Best aesthetic: Space-saving rustic, boho, or cottage.
Difficulty: Beginner to intermediate.
Approximate build time: 3 to 4 hours, plus finishing.
Materials: 2 pallet boards for the shelf surfaces, 1 board for the corner cleat or small L-brackets, 1¼-inch screws, wood glue, wall fasteners.
Tools: Basic toolkit plus a square (essential for the 90-degree corner joint).
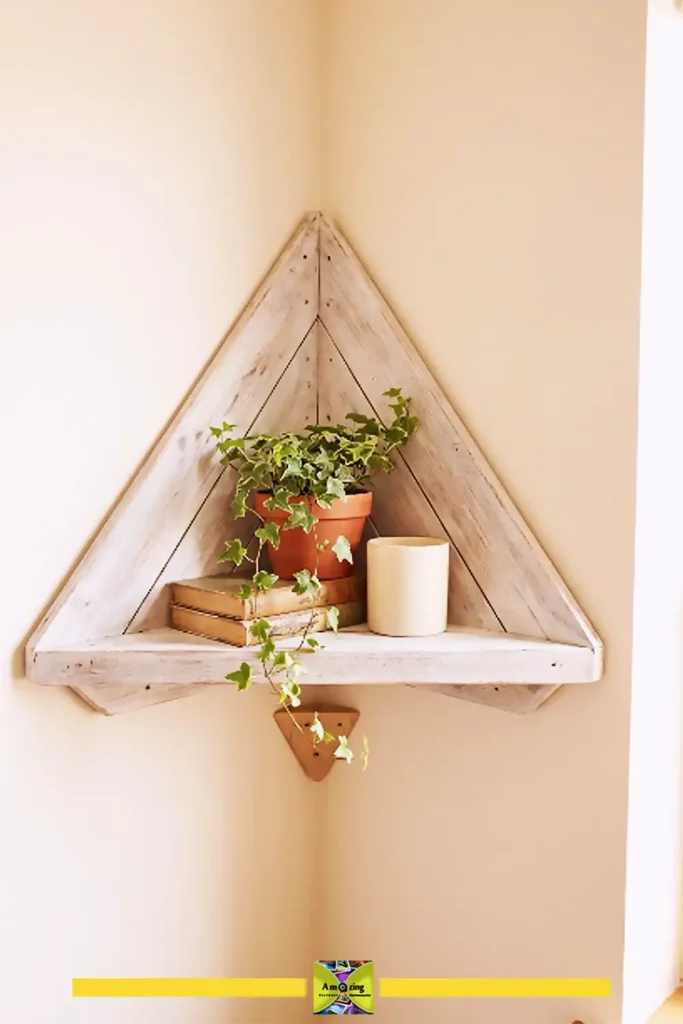
How to build it:
- Determine the size. Each side of the corner shelf can be 10 to 14 inches long from the corner outward.
- Cut both shelf boards to the same length. One board will butt against the face of the other at a 90-degree angle.
- Cut a triangular corner cleat from a scrap piece — roughly 4 to 5 inches along each wall side, with the hypotenuse cut at 45 degrees. Alternatively, use a small L-bracket under each board.
- Sand all pieces to 180-grit. Round the front corners.
- Assemble the two shelf boards: apply glue to the end grain of one board and butt it against the face of the second. Clamp and reinforce with screws from underneath.
- Attach the corner cleat or brackets to the underside.
- Dry-fit in the corner. Corners are rarely perfectly square. If the shelf does not sit flush, shim the gaps with small felt pads or thin wood wedges behind the mounting cleats.
- Mount each side to a stud if possible. Corner walls often have studs near the corner; a stud finder will confirm.
Styling option: Light whitewash with a trailing plant that softens the corner lines.
Practical tip: Dry-fit the shelf in the corner before finishing. If there is a visible gap between the shelf edge and the wall, you can scribe the board to match the wall profile, or accept a small gap as part of the rustic look. Painting the wall before mounting the shelf makes gaps less noticeable.
Mounting note: Corner shelves have limited mounting surface. A triangular cleat screwed into a stud on at least one wall side is ideal. Small L-brackets on both sides into drywall anchors can work for a lightweight decorative shelf.
Pallet Craft Room and Workshop Shelves
These shelves prioritize function — they need to hold supplies, stay organized, and survive daily use. Decorative finishes take a back seat to durability and accessibility. A shelf like this is the perfect home for your upcycled material projects and supplies for creative DIY projects.
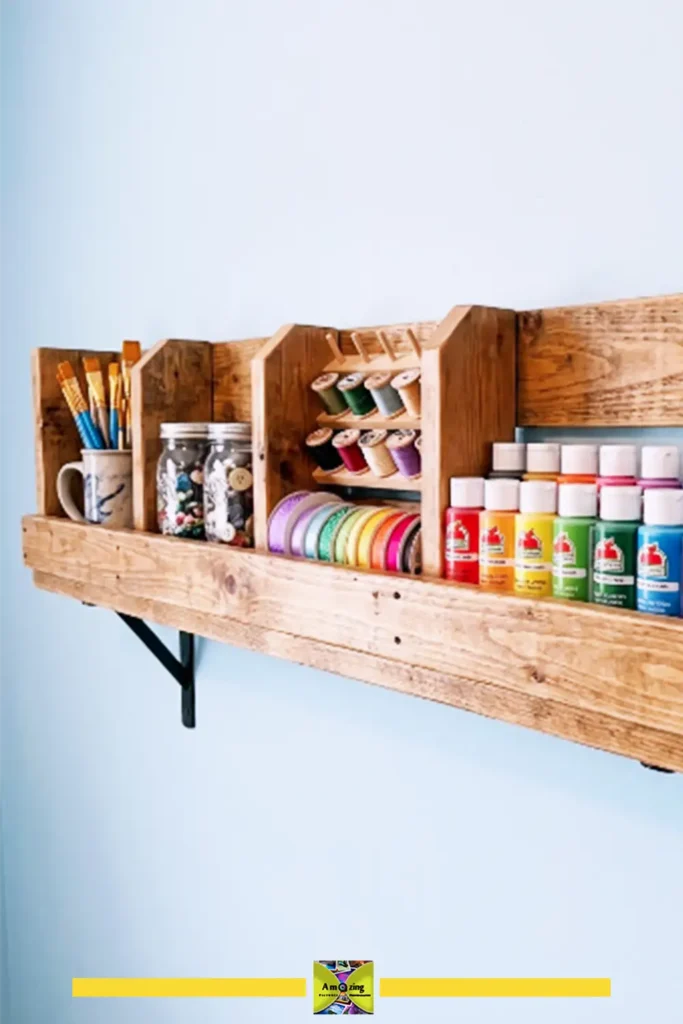
12. Pallet Craft Supply Shelf
What it looks like: A shallow shelf (5 to 6 inches deep) with a short front retaining rail and optional dividers or small compartments. Designed to hold paint bottles, thread spools, ribbon, brushes, and small craft jars without them rolling off the front or getting mixed together.
Best use: Craft room, sewing room, or hobby workspace — keeping small supplies visible and sorted.
Best aesthetic: Organized workshop, colorful craft space, or practical rustic.
Difficulty: Beginner to intermediate.
Approximate build time: 3 to 5 hours, plus finishing.
Materials: 2 pallet boards (shelf surface and front rail), optional thin divider strips, L-brackets, 1¼-inch screws, wood glue, durable clear finish.
Tools: Basic toolkit.
How to build it:
- Cut the shelf board to length based on available wall space — 24 to 36 inches is practical.
- Cut the front retaining rail to match. Keep it short — 1 to 1½ inches tall is enough to stop bottles and spools.
- If adding dividers, cut thin strips that slot between the shelf surface and front rail. Space them to fit specific supplies (paint bottles, thread spools, or small jars).
- Sand to 180-grit. Apply a clear finish that can handle occasional paint or glue drips being wiped off.
- Attach the front rail with glue and screws. If using dividers, place them between the shelf and rail before securing.
- Mount to studs with brackets.
Styling option: Painted in a color that contrasts with the supplies — white shelves make colorful craft materials pop; dark stain keeps the focus on the supplies.
Practical tip: Measure your tallest supply container before setting the space above the shelf. Leave clearance so you can lift items out without tipping them sideways.
Mounting note: Craft supplies add up in weight. A shelf loaded with paint bottles can easily exceed what drywall anchors alone should carry. Mount to studs.
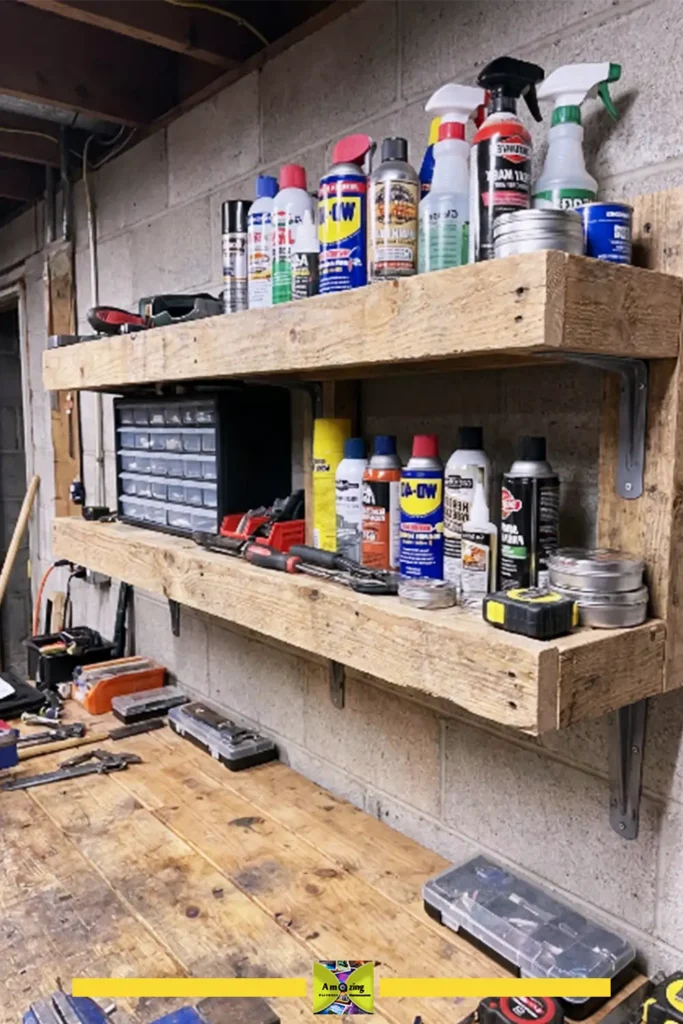
13. Pallet Garage Tool Shelf
What it looks like: A sturdy, utilitarian shelf (8 to 10 inches deep) built from the thicker pallet stringers or doubled-up deck boards. Deeper and stronger than indoor shelves, with a practical focus — no decorative rail, just a solid surface that holds spray bottles, small containers, hand tools, and workbench supplies.
Best use: Garage, workshop, or utility room — keeping frequently used supplies accessible above a workbench.
Best aesthetic: Workshop-functional, no-nonsense utility. Finish is secondary to strength.
Difficulty: Beginner to intermediate.
Approximate build time: 2 to 4 hours, plus finishing if desired.
Materials: Pallet stringers or thick deck boards for shelf surface, heavy-duty L-brackets or steel shelf brackets, 2½- to 3-inch construction screws, optional clear finish.
Tools: Basic toolkit plus a circular saw for thicker pallet lumber.
How to build it:
- Use the pallet’s stringers (the thick support beams) or double up two deck boards face-to-face with glue and screws for a stronger shelf surface.
- Cut to length — 36 to 48 inches works above a standard workbench.
- Sand only as much as needed to remove splinters and sharp edges. Garage shelves do not need a fine furniture finish.
- If finishing, apply a basic clear coat or paint — more for dust control than appearance. Unfinished rough wood in a garage collects dust that is hard to wipe off.
- Mount heavy-duty steel brackets to studs using 3-inch construction screws. This shelf must be mounted more securely than any indoor shelf in this article.
Styling option: This is the one shelf where function completely overrides form. Paint it a light color if the garage is dark — it makes finding small items easier.
Practical tip: Before mounting, measure the items you intend to store. Spray bottles, for example, are often 10 to 12 inches tall. Leave adequate vertical space above the shelf.
Common mistake: Treating a garage shelf like a decorative shelf. Heavier tools, metal containers, and solvent bottles add up quickly. Use thicker wood, bigger brackets, and longer screws than you think you need.
Mounting note: Garage walls may be exposed studs, drywall, or concrete block. For exposed studs, screw brackets directly into the framing. For concrete block, use appropriate masonry anchors. Do not mount a loaded tool shelf to drywall alone.
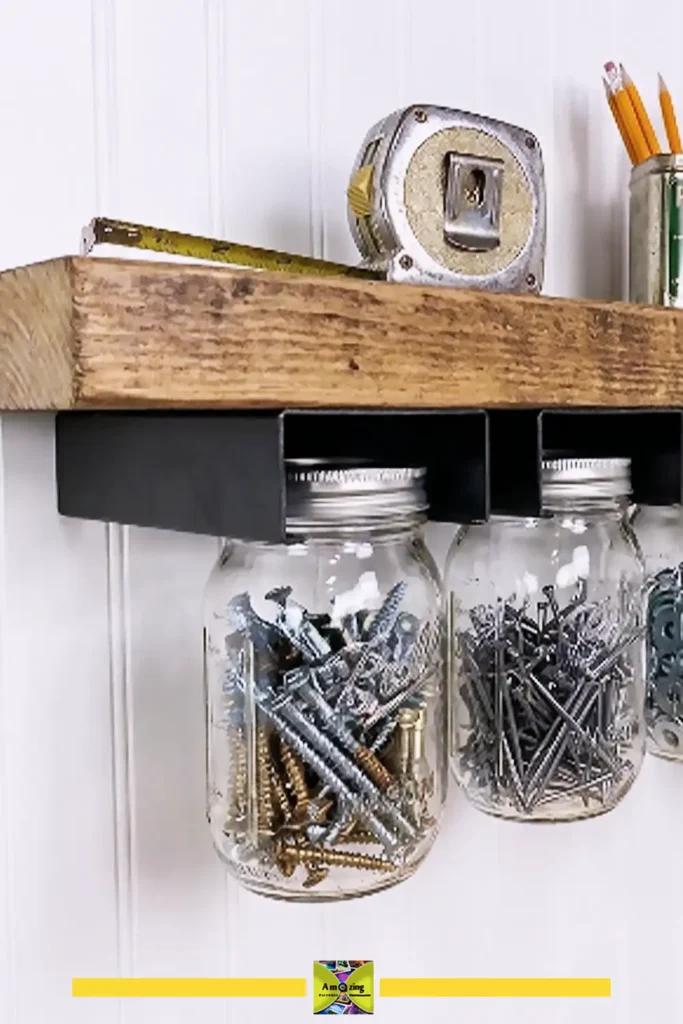
14. Pallet Shelf With Mason Jar Storage
What it looks like: A pallet shelf with glass mason jars mounted beneath on metal pipe clamps, hose clamps, or a wooden cradle system. The jars add sealed storage for small items — screws, buttons, craft supplies, bathroom cotton balls, or workshop hardware — while the shelf provides a surface above.
Best use: Craft room, workshop, bathroom, or laundry room — anywhere small items need visible, sealed storage.
Best aesthetic: Industrial-rustic, workshop-chic, or organized farmhouse.
Difficulty: Intermediate.
Approximate build time: 4 to 6 hours, plus finishing.
Materials: 1 pallet board for shelf, 3 to 5 mason jars with lids, metal pipe clamps sized to the jar diameter, small wood screws for clamp attachment, L-brackets, 2-inch screws.
Tools: Basic toolkit plus a screwdriver sized for the pipe-clamp screws.
How to build it:
- Cut the shelf board to length — 24 to 30 inches accommodates several jars.
- Sand to 180-grit. Apply a finish appropriate for the room (moisture-resistant for bathrooms, durable clear for workshops).
- Determine jar spacing. Hold each jar’s pipe clamp against the underside of the shelf, mark screw-hole positions, and pre-drill.
- Attach the pipe clamps to the shelf underside with short wood screws. Do not overtighten — you want the clamp band to open enough to slide the jar in.
- Fill jars with supplies, screw lids on, and slide each jar into its clamp. The lid rests against the clamp, holding the jar suspended.
- Mount the shelf to studs with brackets.
Styling option: Natural wood shelf with clear-finish jars and black pipe clamps. Alternating jar sizes (pint and half-pint) for visual variety while storing different item categories.
Practical tip: Do not glue jars to wood. The pipe-clamp method allows you to unscrew a jar, take it to your workspace, and return it to its holder. Test that each jar slides in and out smoothly before mounting the shelf.
Common mistake: Using clamps that are slightly too large, allowing jars to slip. The clamp should grip the jar firmly just below the lid. Bring a jar to the hardware store when buying clamps.
Mounting note: Mason jars filled with hardware, screws, or liquids become heavy. Six pint jars of screws can weigh 10 pounds or more. Mount to studs; the jar weight hangs below the shelf and increases the leverage on mounting hardware.
Pallet Plant and Outdoor Shelves
Outdoor pallet shelves face rain, sun, temperature swings, and the extra weight of potted plants and moist soil. Finishes, hardware, and wood selection all need to step up.
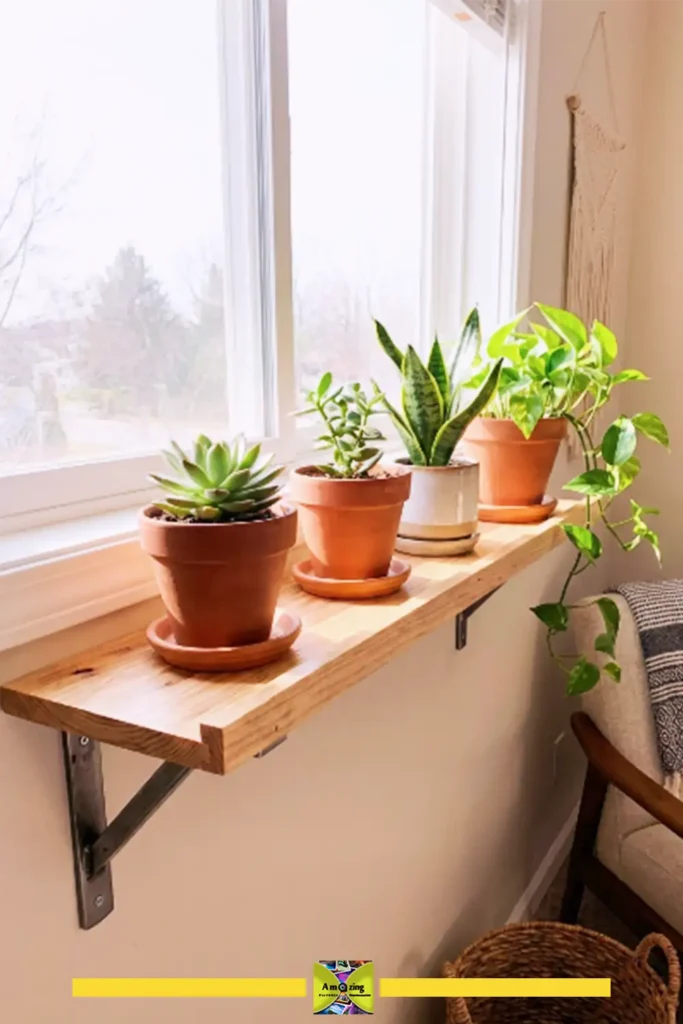
15. Pallet Plant Display Shelf
What it looks like: A wall-mounted shelf (6 to 7 inches deep) sized for small to medium plant pots, with a subtle front lip and a moisture-resistant finish. Mounted near a bright window indoors or on a covered patio wall outdoors.
Best use: Living room near windows, sunroom, covered patio, or balcony — displaying lightweight potted plants.
Best aesthetic: Indoor jungle, boho, or garden-room.
Difficulty: Beginner to intermediate.
Approximate build time: 3 to 4 hours, plus finish curing.
Materials: 1 pallet board, front lip strip, heavy-duty brackets, 2-inch screws, exterior-rated finish (for outdoor use) or moisture-resistant interior finish.
Tools: Basic toolkit.
How to build it:
- Cut the shelf board to length — 24 to 36 inches.
- Cut a low front lip (¾ to 1 inch tall). Sand all pieces to 180-grit.
- Apply finish: for indoor use near windows, a satin polyurethane works. For outdoor use, apply at least two to three coats of exterior spar varnish or marine-grade finish. Coat all six surfaces of every board.
- Attach the front lip with glue and screws.
- Mount to studs. A plant shelf should include a slight lip because pots can be top-heavy and are easily bumped.
Styling option: White-painted shelf makes green foliage pop. Natural wood stain complements terracotta pots.
Practical tip: Always use plant saucers under pots, even on a sealed shelf. Trapped moisture between a pot and the wood surface will eventually damage any finish. Lift pots rather than sliding them.
Common mistake: Loading a standard pallet shelf with large ceramic planters full of wet soil. A 10-inch ceramic pot with moist soil can weigh 15 to 20 pounds. Limit this shelf design to small and medium pots — roughly 4 to 6 inches in diameter — unless you build with thicker wood and heavier brackets.
Mounting note: Stud mounting is necessary. The shelf must handle the weight of pots plus soil plus water. Two brackets into studs with construction screws.
16. Pallet Garden Shelf
What it looks like: A small outdoor shelf (6 to 8 inches deep) built from the thickest pallet boards available, mounted on a fence, shed wall, or exterior house wall. Holds lightweight gardening supplies, small pots, or outdoor decor.
Best use: Garden area, patio, balcony, or beside an outdoor potting bench.
Best aesthetic: Rustic garden, cottage garden, or functional outdoor.
Difficulty: Intermediate.
Approximate build time: 3 to 5 hours, plus outdoor finish cure time.
Materials: Pallet stringers or thick deck boards, heavy-duty galvanized or stainless steel brackets, corrosion-resistant exterior screws, exterior-rated wood finish (spar varnish or exterior penetrating oil).
Tools: Basic toolkit.
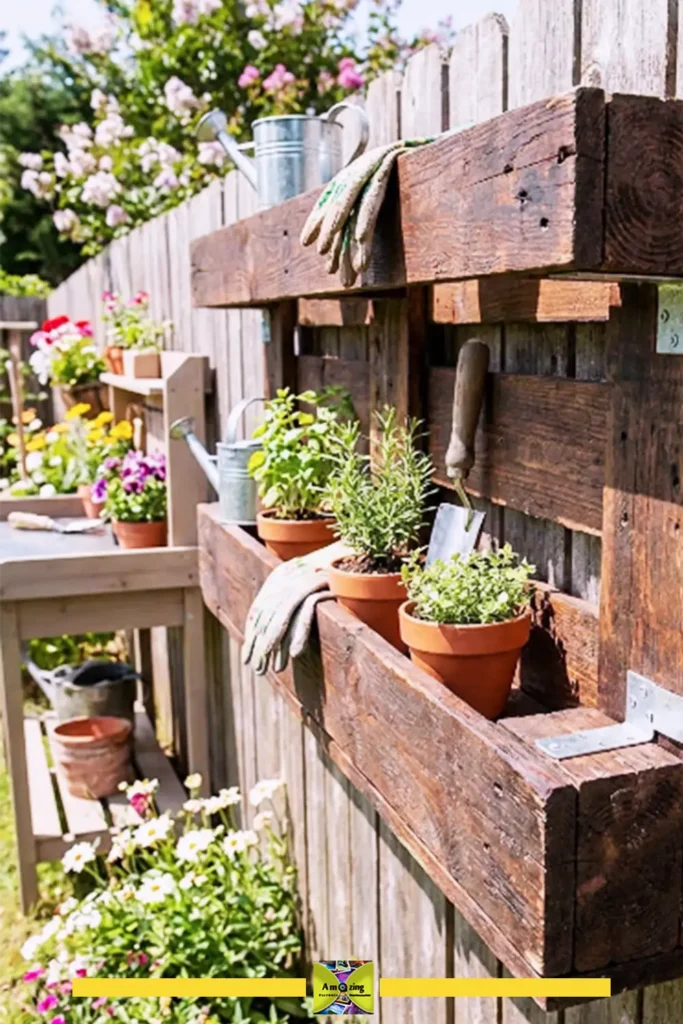
How to build it:
- Use the best boards from your pallet — thicker, fewer knots, no cracks. Cut to length.
- Sand to 120-grit. Outdoor shelves do not need a furniture-grade finish but must be splinter-free.
- Apply exterior finish. Spar varnish contains UV inhibitors that slow sun damage. Penetrating oil finishes are easier to maintain (reapply annually) but offer less UV protection. Apply to all surfaces including end grain.
- Use corrosion-resistant hardware — galvanized or stainless steel brackets and exterior-grade screws. Standard interior screws will rust within a season outdoors.
- Mount to a solid structure. For a fence, attach directly to fence rails or posts. For masonry or stucco, use appropriate masonry anchors.
Practical tip: Drill a couple of small drainage holes near the back of the shelf if it will be fully exposed to rain. Water pooling on a flat shelf shortens its life significantly.
Common mistake: Assuming reclaimed pallet wood is naturally weather-resistant because it looks rough. Untreated pallet wood left outdoors will gray, crack, warp, and eventually rot — often within one to two seasons. An exterior finish is not optional.
Mounting note: Outdoor mounting surfaces vary. For a wood fence, screw into rails or posts (not just fence boards). For stucco or masonry, use sleeve anchors or epoxy-set anchors. For siding, you must hit the sheathing or studs behind it.
17. Pallet Rope Hanging Shelf
What it looks like: One or two pallet boards suspended from above by sturdy rope, creating a floating shelf that hangs rather than being wall-mounted. The rope passes through drilled holes at each corner and is secured with knots beneath. Visually light and suitable for bohemian, coastal, or casual room styles.
Best use: Living room, bedroom, bathroom, or covered patio — displaying lightweight decor, small plants, or towels.
Best aesthetic: Boho, coastal, cottagecore, or casual eclectic.
Difficulty: Beginner to intermediate.
Approximate build time: 2 to 3 hours, plus finishing.
Materials: 1 or 2 pallet boards, ½-inch or thicker natural rope (sisal, cotton, or synthetic — polyester holds up better in humid areas), 4 screw eyes or eye bolts for the ceiling or wall bracket, appropriate ceiling/wall anchors.
Tools: Basic toolkit plus a drill bit sized for the rope diameter.
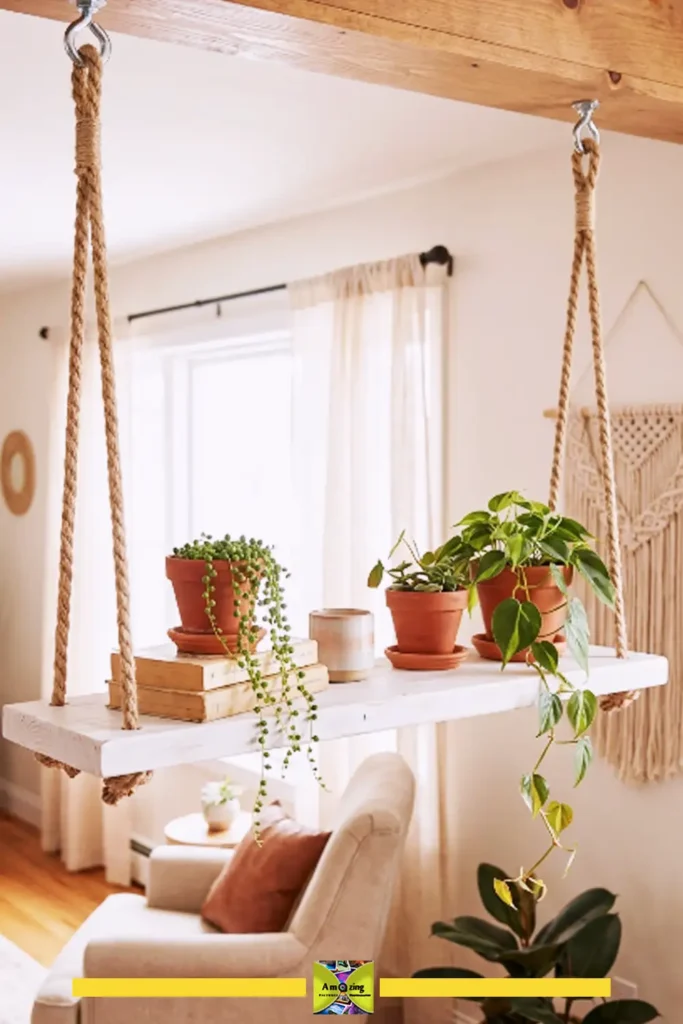
How to build it:
- Cut the shelf board to desired length — 24 to 30 inches keeps the proportions balanced.
- Drill four holes through the board, one at each corner, roughly 1½ to 2 inches in from both edges. The hole diameter must be slightly larger than the rope — snug but not tight.
- Sand thoroughly to 180-grit. The rope will rub against the hole edges, so smooth them well.
- Apply finish. Let cure completely before adding rope.
- Cut two equal rope lengths. Each rope passes down through a front hole and back up through the corresponding back hole. The knots underneath support the board.
- Thread the ropes through the holes. Tie a secure double- or triple-overhand knot under each hole. Position the shelf at the desired height and adjust knots until the shelf hangs level.
- Mount the screw eyes or eye bolts into a ceiling joist or wall bracket above. Tie the rope ends securely to the eye hardware.
Styling option: Natural sisal rope with a whitewashed shelf and trailing plants. For a two-tier version, add a second shelf lower down on the same ropes.
Practical tip: Hang the shelf, load it with the items you intend to display, and check level again. Rope stretches slightly under load, especially natural fiber. Adjust knots after a day or two of settling.
Common mistake: Threading rope through holes that grip too tightly. The rope needs slight clearance to slide during adjustment. If the hole is too tight, the rope frays; if too loose, the shelf tips.
Mounting note: This shelf hangs from above, so the anchor point must support the full shelf weight plus contents. For a ceiling installation, you must anchor into a ceiling joist — not just drywall. For a wall-mounted bracket (a projecting arm), the bracket must be securely mounted to studs. Keep loads light — small plants, lightweight decor, or folded towels — especially in the single-board version.
How to Finish Pallet Shelves
The right finish protects the wood, makes it easier to clean, and determines whether the shelf reads as farmhouse-rustic, modern-industrial, or coastal-casual.
Clear Natural Finish
Use when you want to keep the reclaimed-wood color as-is.
- Water-based polyurethane: Dries clear, low odor, minimal yellowing over time. Good for interior shelves. Available in satin, semi-gloss, and gloss.
- Oil-based polyurethane: Adds a warm amber tone. More durable than water-based for high-use surfaces. Longer cure time.
- Tung oil or Danish oil: Penetrates the wood rather than sitting on top. Produces a natural, low-sheen look. Requires periodic reapplication.
- Wax finish: Soft, natural feel. Least protective. Best for decorative shelves that see little handling.
Wood Stain
Changes the wood color while letting the grain show through. Apply stain first, then a clear topcoat.
- Dark walnut: Classic rustic-farmhouse look. Hides some imperfections.
- Weathered gray: Driftwood or coastal effect. Works well over wood with visible grain texture.
- Warm oak or honey: Keeps the wood light and natural-looking.
- Ebony or espresso: Dramatic contrast, especially with white walls.
Always test stain on a scrap piece of the same pallet wood first. Reclaimed boards absorb stain differently than new lumber, and the color can surprise you.
Paint
Covers the grain completely and creates a clean, uniform surface.
- White or off-white: Farmhouse, cottage, coastal.
- Black or charcoal: Industrial, modern.
- Sage green, navy, or terracotta: Color-pop options that still feel grounded.
- Chalk paint: Matte, velvety finish. Requires a wax or clear topcoat for durability.
Painted pallet shelves need the same sanding preparation as stained ones — sanding smooth before painting prevents the rough texture from telegraphing through the paint.
Whitewash
A thinned paint technique (typically one part white paint or white stain to one or two parts water) that lightens the wood while keeping the grain visible. Different from opaque paint because the wood character remains the focus. Whitewash works well for cottage, coastal, and shabby-chic shelves.
Apply with a brush or rag, wipe back excess before it dries, and build up in thin layers rather than one heavy coat. Seal with a clear topcoat afterward.
Outdoor Finish
Exterior projects need finishes formulated for weather exposure:
- Spar varnish: Contains UV inhibitors and remains slightly flexible as wood expands and contracts.
- Exterior penetrating oil: Soaks into the wood. Easier to maintain (reapply annually) but offers less film protection.
- Exterior paint with primer: Full coverage with UV and moisture protection. Use exterior-grade products only — interior paint outdoors fails quickly.
No finish provides unlimited weather resistance. Outdoor pallet shelves require periodic inspection and refinishing.
For notes Pallet boards can take finish very differently from one piece to the next, especially when the wood has weathered unevenly. I’d always test the stain, paint, or clear coat on an offcut first and let it dry fully before committing to the whole shelf. For a more consistent result, sand each visible board to a similar smoothness and apply thin coats rather than trying to correct uneven color with one heavy coat. If you want to preserve the reclaimed character, leave some knots, nail marks, and grain variation visible instead of trying to make every board look like new lumber.
How to Mount Pallet Shelves Safely
Mounting is the step most DIY articles gloss over, and it is the step where pallet shelves most often fail. A well-built shelf that pulls out of the wall is worse than useless — it damages the wall, breaks whatever was sitting on it, and could injure someone.
Locating Wall Studs
Use a stud finder. Standard U.S. framing places studs 16 inches on center, though 24-inch spacing also exists. Confirm by measuring from a corner — studs should be at consistent intervals.
When the stud finder gives inconsistent readings, use the knock method (tap the wall and listen for a solid sound vs. a hollow one) or drive a small finish nail where you expect a stud to confirm.
Fastener Selection by Wall Type
Wood studs with drywall: 2½- to 3-inch construction screws or lag bolts driven into the center of the stud. Pre-drill to prevent splitting the stud. Two screws per bracket into a stud is more secure than one.
Drywall only (no accessible studs): This is the weakest mounting scenario and should be used only for lightweight decorative shelves. Heavy-duty snap-toggle or toggle bolts are the strongest drywall-only option. Standard plastic expansion anchors are not appropriate for any shelf that holds more than a few ounces.
Masonry or concrete: Use sleeve anchors, wedge anchors, or epoxy-set threaded rod. Drill with a hammer drill and carbide-tipped masonry bit. Follow the anchor manufacturer’s spacing and depth specifications.
Tile over backer board: Drilling into tile requires a carbide-tipped bit, steady pressure, and patience. Drilling into the grout line is easier but less strong. Ideally, locate and mount into studs behind the tile if possible.
Bracket Selection
- L-brackets: Visible but simple. Choose a size appropriate to the shelf depth — the horizontal leg should extend at least two-thirds of the shelf depth.
- Floating-shelf brackets: Concealed heavy-duty steel brackets. Must be mounted to studs. The bracket, not the wood, carries the weight.
- French cleat: A two-part interlocking cleat system. One half mounts to the wall (into studs); the other attaches to the back of the shelf. Strong, stable, and removable.
- Wood corbels: Decorative brackets that add visual weight. Choose corbels that are solid wood and properly anchored.
Load Considerations
The weight a shelf can carry depends on:
- Wall material and fastener type
- Number of fasteners in studs
- Bracket design and material
- Shelf depth (deeper shelves create more leverage)
- Shelf construction
There is no universal weight rating for a pallet shelf. A shelf mounted to two studs with heavy-duty brackets will carry far more than the same shelf mounted to drywall with anchors. When in doubt, mount to studs and keep the load lighter than you think necessary.
For any shelf that will hold significant weight or be mounted in an uncertain wall condition, consult the hardware manufacturer’s instructions or a qualified professional.
How to Make Pallet Shelves Look More Professional
Rustic does not have to mean unfinished. These small moves separate a shelf that looks built from one that looks thrown together. Once it’s up, it pairs nicely with other recycled-material wall decor on the same wall:
Select boards of similar thickness. Pallet boards from the same pallet usually match, but mixing boards from different pallets can create awkward steps at joints. Sort by thickness before you start.
Align visible edges. Where two boards meet at a corner or along a front face, take the time to make the joint clean. A 1/16-inch misalignment catches the eye from across the room.
Fill unnecessary nail holes if desired. Some people leave nail holes for character; others fill them. If filling, use a wood filler that accepts stain similarly to the surrounding wood. Test on a scrap first.
Leave selected marks for character. Not every dent or nail hole needs to disappear. The key is intentionality — keep the marks that add warmth and fill or sand away the ones that look like damage.
Countersink screws. A screw head sitting proud of the surface looks unfinished. Drill a countersink recess, drive the screw flush or slightly below, and fill the recess if desired.
Coordinate hardware across projects. If your picture ledge uses matte black brackets and your coffee shelf uses brushed nickel, the inconsistency reads as haphazard. Pick one metal finish and stick with it.
Limit the finish palette across a room. A room with three different pallet shelves in three different finishes looks disconnected. Choose warmth (browns, ambers, warm whites) or coolness (grays, whitewashes, clear coats) and stay consistent.
Clean excess glue before it dries. Wet glue wipes off with a damp cloth. Dried glue shows as a shiny patch that repels stain and finish. Check every joint after clamping.
Keep shelf proportions balanced. A 48-inch shelf that is only 3 inches deep looks spindly. A 12-inch shelf on a 20-inch wall section feels heavy and awkward. Hold the boards against the wall before cutting and live with the proportions for a few minutes.
Hide rough cuts where possible. A crosscut from a handsaw can be cleaned up with sanding. But if the cut edge will be highly visible (like the front edge of a floating shelf), consider using a miter saw for a cleaner line or covering the edge with a thin face strip.
Common Pallet Shelf Mistakes to Avoid
- Using pallets you cannot identify. If a pallet has no markings, visible contamination, or an unknown history, it is not worth the risk for indoor use.
- Failing to check for hidden nails and metal before cutting or sanding. A hidden nail can destroy a saw blade, damage a sander, or become a projectile.
- Skipping sanding or stopping too early. Splinters on a shelf that holds towels, clothes, or anything you touch regularly are not “rustic charm.”
- Building every shelf with warped boards. A slightly bowed pallet board can be used for short projects. A severely twisted board cannot be straightened with screws — set it aside.
- Making shelves too deep. Deep shelves collect clutter, look heavy, and increase the load on mounting hardware. Most wall-mounted pallet shelves do not need to exceed 7 or 8 inches.
- Using insufficient mounting hardware. Screwing brackets into drywall without anchors or using screws too short to reach the stud is the most common — and most avoidable — shelf failure.
- Ignoring total shelf weight. Pallet wood is denser than it looks, especially hardwood pallets. Weigh your shelf before mounting so you know what the hardware is supporting before anything is placed on it.
- Overloading shelves. A shelf that holds a few small plants looks great. The same shelf loaded with heavy books and a large vase may fail. Match what you place on the shelf to how it was built and mounted.
- Using untreated wood in bathrooms or outdoors without proper sealing. Moisture and raw pallet wood do not mix. The wood will warp, discolor, or support mold. Seal appropriately for the environment.
- Applying finish before the wood is fully dry. After cleaning, pallet wood can hold moisture for days. Trapping that moisture under paint or polyurethane causes peeling, bubbling, and eventually rot.
- Mounting without checking level — twice. Check level when you mark the bracket positions, check again when you hang the shelf, and check one more time after loading. A shelf that is even slightly out of level draws the eye.
Frequently Asked Questions
How do you make a shelf from a pallet?
Start by selecting a clean, heat-treated (HT) pallet. Dismantle it carefully to recover usable boards. Remove all nails and hidden metal. Clean the boards, let them dry completely, then sand through progressive grits from 80 to at least 150. Cut the boards to your shelf dimensions, apply a finish appropriate for the room, and assemble using screws and wood glue. Mount to wall studs with brackets or a French cleat system. The key is spending time on preparation — sanding and finishing determine whether the result looks like furniture or reclaimed scrap.
What pallet wood is safe to use indoors?
Pallets stamped HT (heat treated), DH (dielectric heating), or KD (kiln dried) are generally considered the safest choices for indoor use because they were treated without chemicals. Avoid MB (methyl bromide) pallets entirely. However, even HT-stamped pallets may have been exposed to spills, chemicals, or contaminants during their service life. Inspect every pallet for stains, odors, mold, and residue before deciding to bring it indoors.
Do you need to sand pallet wood before using it?
Yes. Pallet wood is typically rougher than store-bought lumber, with splinters, raised grain, saw marks, and embedded grit. At minimum, sand with 80-grit to remove splinters and the worst roughness, then progress to 120-grit for a surface that is safe to touch. For shelves at eye level or in kitchens and bathrooms, continue to 150 or 180-grit. The only exception is an outdoor workshop shelf where splinters are acceptable and a coarse sanding is enough.
How do you hang a pallet shelf?
Locate wall studs using a stud finder. Mark bracket positions so at least one — ideally two — align with studs. Pre-drill bracket holes into the studs and drive 2½- to 3-inch construction screws. Use a level to confirm the shelf is straight before fully tightening. For drywall-only mounting (light shelves only), use heavy-duty snap-toggle or toggle bolts. Never hang a pallet shelf with standard plastic drywall anchors. For masonry walls, use appropriate sleeve or wedge anchors.
Can pallet shelves hold books?
Yes, but with important caveats. A shallow book ledge (4 to 5 inches deep) with a front retaining rail can display a small collection of books facing outward. For a deeper shelf holding rows of books spine-out, the weight adds up quickly — a shelf of standard hardcover books can exceed 30 pounds per linear foot. This requires stud mounting, heavy-duty brackets or a French cleat, and thicker pallet wood (stringers rather than thin deck boards). Do not build a deep, heavily loaded bookshelf from thin pallet deck boards mounted to drywall anchors.
Should you stain or paint pallet shelves?
Both work. Stain lets the wood grain and character show, which suits rustic, farmhouse, and industrial styles. Paint creates a uniform, clean surface and works better for modern or colorful rooms. The choice depends more on the room style and the condition of your pallet wood — heavily marked boards with patchy color often look better painted, while boards with attractive grain and consistent color benefit from stain.
How do you make pallet wood look better without losing the rustic character?
Sand enough to remove splinters and sharp edges but stop before the surface feels like new furniture — 150-grit is a good stopping point for visible texture. Apply a clear satin finish rather than gloss, which can look plastic-like on reclaimed wood. Fill large, distracting nail holes but leave smaller marks. Choose hardware (brackets, hooks) with an intentional finish — matte black, oil-rubbed bronze, or brushed steel. Mount the shelf level, style it simply, and keep the finish palette limited. The goal is rustic that reads as designed, not scrap wood that was screwed up without thought.
Final DIY Inspiration
The best pallet shelf project is the one that fits your wall space, matches your skill level, and serves a real purpose in your home.
If you are new to working with reclaimed wood, start with the rustic wall shelf or the picture ledge. Both use just one or two boards, need minimal joinery, and let you practice pallet preparation and finishing without committing to a complex build.
If you have a specific storage problem — a cluttered kitchen counter, a bathroom without shelves, a garage workbench buried in supplies — choose the project that solves it. A pallet shelf that earns its wall space by doing real work will look better than a purely decorative shelf that collects dust.
Take your time on preparation. Most of what makes a pallet shelf look good happens before assembly: choosing the right boards, removing nails carefully, sanding thoroughly, and applying finish in thin even coats. Rushing through prep to get to the building step shows in the result.
And before you mount anything, check that the hardware you chose can support what you plan to put on the shelf. A shelf that stays on the wall for years is a success. One that pulls out in six months is a lesson.
Posted by: Med Houssem · In: Decoration, DIY, Upcycling