Achieving a super clean engine bay, so clean you could eat off it, is possible! This guide provides a detailed walkthrough of how to clean your car engine using readily available and inexpensive products. This method is applicable to various vehicles with different types of engine grime, from grease and oil to mud and rust. Learn how to transform your dirty engine bay into one that looks brand new.
The Engine Bay Super Clean Process
The Engine Bay Super Clean process is straightforward, breaking down into the following steps:
- Preparing the engine for cleaning.
- Performing a dry clean.
- Performing a wet clean.
- Drying the engine.
- Detailing the engine bay.
Each step is explained in detail to address any potential questions.
Step 1: Preparation
Preparation is key. Begin by laying out all cleaning supplies next to the engine. This will make the cleaning process quicker and more enjoyable. It’s advisable to wear gloves to protect hands from chemicals and oils, and safety glasses to guard against splashes.
Next, isolate the power source by disconnecting the battery. If the battery is easily accessible in the engine bay, removing it will provide easier access for cleaning. Regardless, disconnect both the positive and negative leads to completely isolate the battery.
The purpose of disconnecting the battery is to eliminate the risk of short circuits from water exposure. With the battery disconnected, there’s no electricity running through the system, minimizing the risk of damage. After cleaning and detailing, ensure everything is dry before reconnecting the battery.
Finally, even with the battery disconnected, protect sensitive components from excessive moisture. Components like the alternator and distributor should not be soaked. For vehicles with plastic engine covers, ensure water doesn’t get trapped underneath. While everything under the hood is designed to withstand some moisture, avoid using a pressure washer. Pressurized water can damage connections, leading to corrosion and future issues.
Be careful to prevent water from entering the engine oil dipstick, brake fluid reservoir, power steering reservoir, and automatic transmission dipstick. Ensure these are tightly sealed.
Step 2: Dry Cleaning the Engine
Before introducing water, perform a dry clean to remove loose dirt and debris. A lot of the dirt and debris that gets on the engine is just dust and road grind that settles on the top of everything. This prevents dirt from being pushed into hard-to-reach places during the wet cleaning stage.
Use brushes to agitate surface dust. The type of brush isn’t critical, but long-handled brushes are useful for reaching difficult areas. Options include toothbrushes, painter’s brushes, and metal wire brushes. It is important to wear a dust mask during this process.
Remove the agitated dust using a vacuum, leaf blower, or air compressor attachment. Using a vacuum and a brush together works well.
For metal intakes, a metal wire brush can remove discoloration, stains, pitting, and corrosion. Rotary tools with metal wire attachments can expedite this process. Be cautious around plastic discs, sensors, or rubber hoses.
This step involves using brushes, dusting the engine, and vacuuming to prepare for the wet clean.
Step 3: Wet Cleaning the Engine
The wet cleaning step involves using a hose to wet down the engine bay. It is not as daunting as it seems. The engine can be cleaned when warm or cold. If cleaning a warm engine, ensure it’s not too hot to comfortably touch. Avoid using cold water on a hot engine to prevent warping or cracking. A warm engine makes it easier to remove dirt, grime, and grease, like washing dishes with warm water.
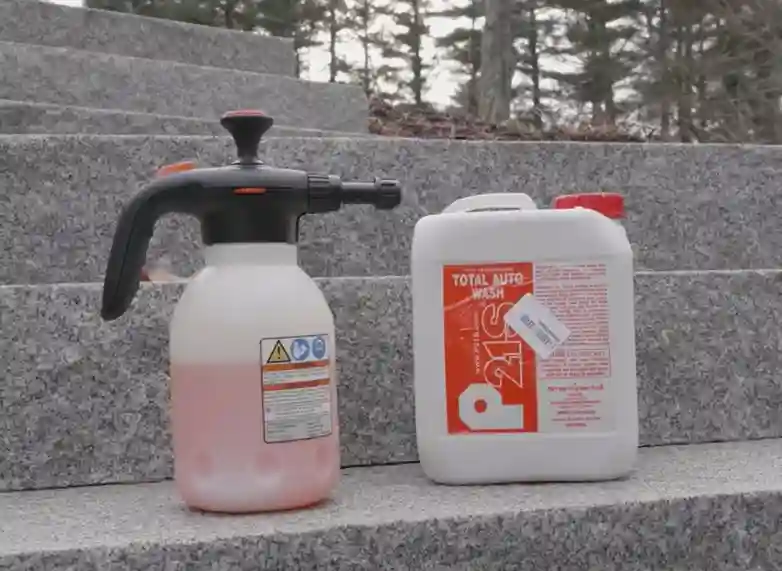
To begin, you’ll need a hose, cleaning wipes, soapy water, a garbage bag, microfiber towels, an assortment of brushes, and pipe cleaners. Cover the top of the engine with a garbage bag to minimize water exposure to the top of the engine. Although it is okay to get water off to the sides. Whether the engine is in a truck, has a plastic cover, or is covered by the wiper shroud, this step should always be followed to play it safe. The wet cleaning process involves cleaning the hood, the outside of the engine bay, and then the actual engine itself.
First, hose down the painted surfaces on the hood. Rinse off any dirt on the hood liner, unless it’s sagging or delicate. Apply a degreaser, such as soapy water, to the hood liner and painted surfaces. Wipe down the surfaces with a microfiber towel. Rinse everything with water.
Next, clean the outside of the engine bay by working around the perimeter. Rinse down each section to remove surface dirt. Use cleaning wipes to wipe down easily accessible surfaces to remove oil and grease. Rinse away the loosened dirt. Then, apply a degreaser, such as soapy water, and agitate with a brush. Use pipe cleaners for tight spots. Finally, rinse everything away with the hose. Repeat this process for the entire engine bay.
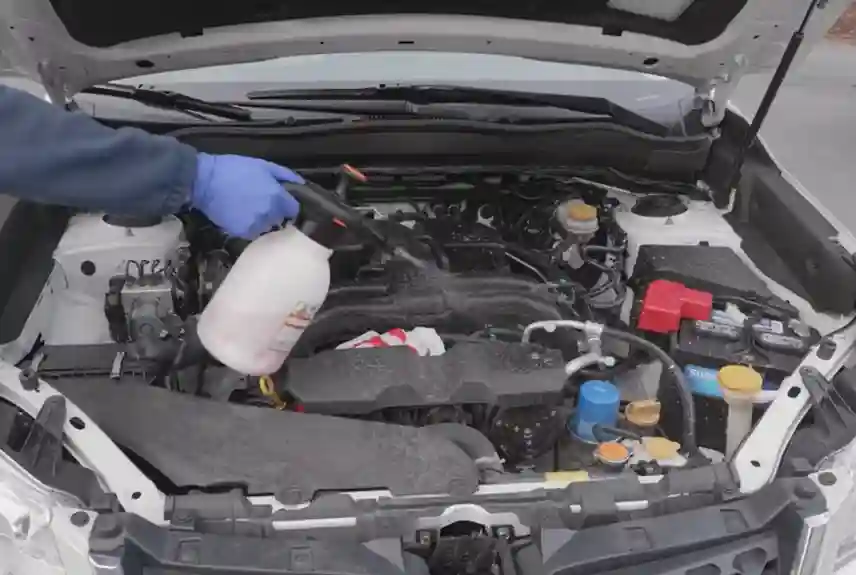
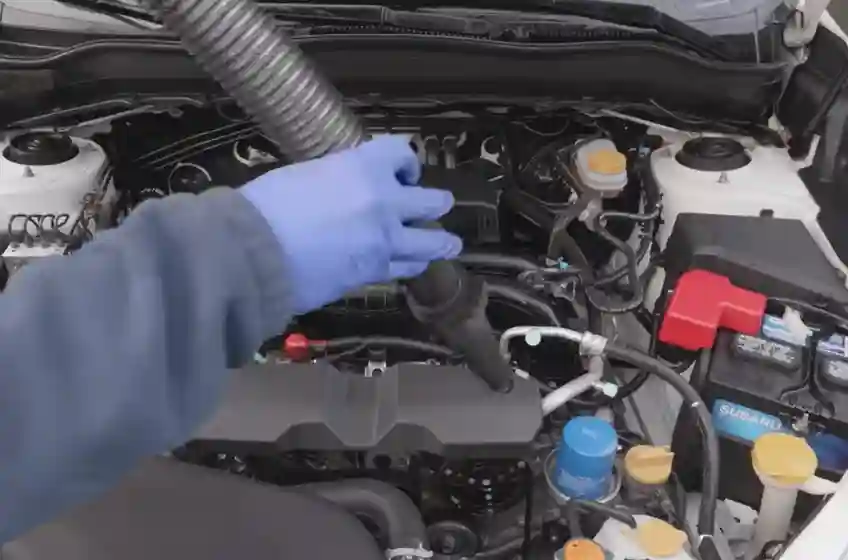
Carefully remove the garbage bag from the engine. Now, focus on cleaning the engine itself. For larger engines, split the engine down the middle and work on one side at a time. Removing components, like the intake, can provide better access. Start by cleaning off any grease and oil with cleaning wipes.
Spray down the area with soapy water and agitate with a brush and pipe cleaners. Alternatively, use a toothbrush for hard-to-reach areas. Wipe everything down with a microfiber towel to absorb the soapy water, dirt, and grease. Wrap a pipe cleaner in a microfiber towel for even harder-to-reach spaces.
Step 4: Drying the Engine
After cleaning, use a clean microfiber towel to dry the engine bay thoroughly. This step removes any missed dirt and standing water. Use a vacuum to suck up puddled water. The engine needs to be completely dry before moving on to detailing.
Step 5: Detailing the Engine Bay
The final step is detailing, which includes detailing the hood. The goal is to protect and enhance the appearance of the engine bay.
If the hood liner is stained, consider using a black, non-flammable fabric dye to restore it. Apply spray wax to all painted surfaces. Buff the wax into the paint with a microfiber towel. The spray wax not only makes the paint look better but protects it.
Detail all rubber and plastic surfaces with a water-based trim restorer. Avoid using oily or greasy products like WD-40 or motor oil, as these can attract dust and damage the materials. Apply the trim restorer with a brush, ensuring thorough coverage. Let it soak for about 10 minutes, then buff off the excess with a microfiber towel. This soaks into the pores of the plastic and rubber and allows removal of the top layer, so it doesn’t collect dust.
For a final touch, use paint markers to touch up rusted bolts or faded lettering. Clean off any rust with a metal wire brush, then cover it with black paint. Coloring faded lettering can also improve the appearance.
With all components reinstalled, including the cleaned intake and battery, the engine bay will look brand new.
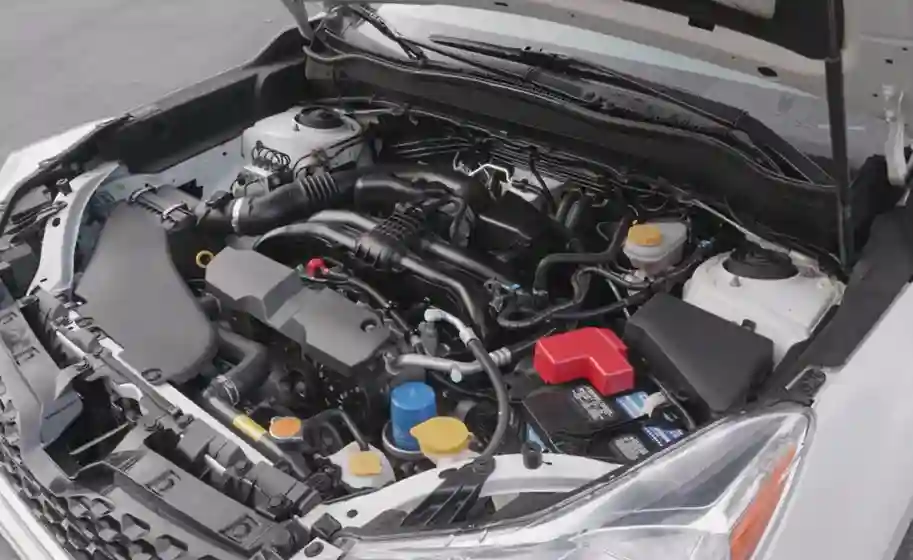
This process takes about two hours, but it’s simple and rewarding. Not only will the engine bay look good, but the rubber and plastic components will be protected.
Be sure to take before and after pictures to show off the cleaned engine!
Maybe 2 hours is a long time for many of us, so for a fast and effective method, the video below comes with a winning process that takes approximately five minutes.