A broken umbrella is not one material. It is a thin coated canopy wrapped around a metal and plastic mechanism, and those two halves need different decisions. The canopy can become a genuinely useful sewing project. The frame, with its springs, ribs, and pinch points, needs to be treated carefully and often disposed of separately.
This guide walks through that whole path: deciding whether the umbrella should be repaired instead, inspecting and cleaning the fabric, removing the canopy safely, and then sewing 14 projects that keep the recovered fabric as a real structural or visual part of the finished piece. No token panel glued onto something made mostly from new material.
Every measurement, time, and material choice below is a starting point, not a promise. Your umbrella’s canopy wedges, coating, and condition will set the real numbers, so test on an offcut before you cut into the good fabric.
Before You Cut: Repair, Donate, or Dismantle?
The first job is to stop and ask whether this umbrella still has life in it. Many people dismantle an umbrella that only needs a minor repair, and that is a worse outcome than reusing the fabric.
What Counts as a Repairable Fault
A loose canopy thread, a detached tie, or a missing tip is often a small fix. Check the manufacturer’s site for repair guidance, spare parts, warranty, or a take-back program first. Some makers service their frames for a small fee or under a limited guarantee. Check the provider’s current terms and eligibility before arranging a repair or return.
When the Frame or Mechanism Is the Danger
A bent rib, broken stretcher, cracked runner, damaged shaft, failed spring, or a jammed automatic mechanism is different. Those parts can create sharp edges or stored spring energy. Keep an automatic umbrella closed and restrained if its mechanism behaves unpredictably. Do not force it open, force it closed, straighten it, or try to release it by hand.
For a valuable, traditional, antique, complex, or sentimental umbrella, leave it to a repair specialist. And confirm ownership before you alter a borrowed, shared, workplace, hotel, school, costume, or family umbrella.
A Simple Decision Framework
- Continue using it after a verified minor repair.
- Obtain manufacturer parts or professional repair.
- Preserve it intact for historic, artistic, or sentimental value.
- Donate it only if it is fully serviceable and the receiving organization accepts it.
- Recover suitable canopy fabric from a genuinely unrepairable umbrella.
- Offer safe, separated parts through an authorized reuse channel.
- Check local scrap-metal, rigid-plastic, textile, and mixed-waste rules for the remainder.
- Dispose of contaminated, spring-loaded, or inseparable remains according to local guidance.
Photograph and document the intact umbrella before you dismantle it. A visibly damaged umbrella should not be donated as functional equipment without full disclosure and the receiving organization’s approval.
Know Your Umbrella: Types, Mechanisms, and Canopy Fabrics
Not every umbrella is the same object, and the differences change what you can safely do with it.
Compact, Stick, Golf, Automatic, Children’s, Clear-Dome, and Specialty Umbrellas
Compact folding, stick, golf, automatic-open, automatic-close, children’s, clear-dome, beach, patio, paper, and traditional handcrafted umbrellas all differ in frame design, spring energy, and canopy attachment. This article focuses on ordinary personal umbrellas whose canopy you can assess and remove safely. Patio, beach, antique, traditional paper, and specialty umbrellas need separate guidance and are often better left to a professional.
An automatic-opening or automatic-closing mechanism may contain stored spring energy. Treat any umbrella that opens or closes on its own as a spring-loaded object until you know otherwise.
Polyester, Nylon, Pongee, Vinyl, Clear Film, and Unknown Coated Fabric
Canopy fabric is not one material. Polyester is common, durable, and cheap. Pongee is a denser, smoother weave, often polyester-based, with a soft feel and good water runoff. Nylon is light and strong but can shrink with humidity. Some canopies are vinyl, clear plastic film, cotton, blended textile, or laminated sheet, and many have an unknown coating.
Appearance, sound, feel, and water beading cannot reliably tell you the fiber, the coating, or how the fabric will handle heat, cleaning, or sewing. A water-repellent finish, a laminated layer, a seam coating, dye, print ink, and years of sun all change what the fabric can do.
Why Canopy Fabric Comes in Radial Wedges
An umbrella canopy is usually built from wedge-shaped panels that meet at a center opening and end in a perimeter hem. Panel seams, the center opening, the hem, tip pockets, tie straps, vent layers, and attachment loops all affect how much usable fabric you have. Repeated folding weakens the same creases over time, and ultraviolet light can embrittle fibers and fade prints. A coating can peel, turn sticky, transfer, or lose performance with age.
How to Inspect and Clean Recovered Canopy Fabric
Record, Inspect, and Reject Unsafe Material
Record the brand, model, dimensions, mechanism, known age, use history, care label, and canopy information before you touch anything. Work with an umbrella from a known household source when you can, and inspect the canopy open only when you can control the mechanism safely. Use a large, clear area away from children, pets, breakable objects, and bystanders, and wear eye and hand protection when you inspect damaged metal.
Look for broken ribs, exposed wire, loose end caps, splintered shafts, cracked handles, damaged springs, corrosion, and sharp fragments. Then check both canopy faces, the panel seams, center opening, hem, vent layers, tips, and folds for mold, mildew, insects, droppings, bodily-fluid contamination, chemical residue, oils, fuel, smoke, sticky coating, persistent odor, flaking layers, unstable dye, holes, thinning, tears, abrasions, and brittle folds.
Reject contaminated or badly degraded material instead of hiding the problem inside a project. Laundering does not automatically make an exposed canopy safe to sew. Map the sound panels and the no-use zones before you remove anything.
Cleaning and Drying Without Damaging the Coating
There is no one washing recipe. Follow the manufacturer’s care label when one exists. Polyester, nylon, coated woven fabric, clear film, vinyl, laminated material, cotton, and unknown canopies need different care, and mold, chemicals, fuel, oil, sewage, floodwater, sticky degradation, or strong unknown odors can be grounds to reject the fabric outright.
Remove dry surface debris gently so you do not abrade the coating. Test moisture, cleaning product, agitation, dye stability, coating, and seam behavior on an expendable corner first. Machine washing can damage coatings, crease films, distort panels, or transfer hardware residue, and warm or hot water can affect coatings, adhesives, dyes, and synthetic fiber. Avoid bleach, strong solvents, disinfectants, fabric softener, abrasive brushes, twisting, and wringing.
Support wet fabric instead of hanging it from a weakened point, and dry it completely on both sides and through the folded seams, away from direct heat and strong sun. After drying, inspect again for odor, shrinkage, delamination, tackiness, dye transfer, stiffness, and coating loss. Reject fabric that still seems questionable.
How to Remove Fabric From an Umbrella Frame Safely
The exact method depends on the umbrella’s design and mechanism. Read any manufacturer documentation first, and confirm the umbrella is stable enough to position without sudden movement. Restrain an automatic or unpredictable mechanism without placing your hands in the opening path, and never point the umbrella toward your face or another person.
Release Attachments, Don’t Cut a Tensioned Frame
Identify the center cap, tip pockets, sewn ties, clips, ferrules, retaining thread, vent layer, and perimeter attachments. Release the accessible textile attachments one at a time instead of cutting ribs or forcing tips through the fabric. Use a seam ripper only where the stitch is visible and your supporting hand is outside its path. Use pliers only for a verified removable fitting, never to force a spring-loaded part.
Avoid bolt cutters, grinders, rotary cutting tools, torches, heat, and uncontrolled metal cutting. Stop if the mechanism shifts, a spring is exposed, the shaft is pressurized, a sharp fracture is hidden, or the design does not make sense. Seek repair or waste-handling guidance when safe separation is not practical.
Control the Small Parts and Isolate the Frame
Lay the released canopy flat without stretching the center opening, then inspect again for small metal or plastic parts. Keep removed caps, thread, fasteners, and fragments in a closed container, and label all recovered fabric by source umbrella. Cover and isolate the remaining frame while you check local disposal guidance.
Panel Planning and Cutting Coated Fabric
Measure Wedges and Make Full-Size Paper Patterns
Count the canopy wedges and measure each one at several points. Record the original seam allowances, center opening, perimeter hem, vent construction, and damaged sections. Decide whether to keep the radial canopy shape or separate individual wedges, and make full-size paper patterns before you unpick any panel seam. Arrange all major pattern pieces before cutting small parts, and match wedges that share compatible stretch, coating, weight, and wear.
Keep original fold lines away from handles, zipper ends, pocket corners, casings, and other high-stress areas. Center printed motifs, keep directional prints upright, and mirror wedge placement on paired bags or covers. Use deliberate color blocking where the original radial sequence cannot be kept, and test marking tools on the less visible side.
Cut Safely and Save Offcuts for Testing
Use pattern weights or clips when permanent pinholes are undesirable, and sharp fabric shears for controlled cuts. Use a rotary cutter only on a suitable mat with stable hand placement, and always cut away from your body, keeping the supporting hand outside every blade path. Cut one manageable layer at a time, save broad sound offcuts for seam and coating tests, and store or discard damaged blades safely.
Sewing Coated Umbrella Fabric: Needles, Stitches, and Seams
Thin coated canopy fabric is not sweater knit, and it is not quilting cotton. If you have sewn with knits before, reusing old sweater knits follows different rules for stretch, pressing, needles, and seams than the smooth, non-stretching, coated surface you are holding now.
Needle, Thread, Stitch, and Presser-Foot Choices
Do not prescribe one needle for every canopy. Check that your machine can handle the full fabric, lining, stabilizer, binding, and reinforcement stack, then choose the needle type and size for the documented material and layer count. Replace bent, blunt, burred, or damaged needles, and pick thread for the fiber, seam function, abrasion, moisture exposure, and intended care. A good-quality polyester thread is a common starting point for outdoor-facing synthetics.
Test every complete layered seam on a matching offcut. Very short stitches can create a perforated tear line in thin synthetic fabric, and very long stitches may fail to control a loaded seam. Adjust stitch length, tension, and presser-foot pressure only through your machine manual and sample results. A nonstick foot, walking foot, or tissue under the fabric can help a coated layer stop sticking to the foot. Keep clips clear of the needle, start away from bulky radial seam intersections, never pull fabric from behind the presser foot, never force a stalled machine, and switch the machine off before changing a needle, foot, bobbin, or setup.
Seams, Linings, Reinforcement, and Closures
No single construction is best. Compare these options against your material and project before you commit:
| Option | Best for | Coating and moisture | Key limitation |
|---|---|---|---|
| Existing canopy seams retained intact | clean, sound panels | keeps the original seam | hidden wear can still fail or leak |
| Plain seams with controlled allowances | simple bags and linings | a new seam can leak | narrow allowances pull apart |
| Narrow zigzag or overcast edges | finishing raw edges | controls fray, not a seal | not a waterproofing method |
| Bound seams | exposed edges needing a clean finish | encloses the raw edge | adds bulk on stiff coating |
| French seams | light, uncoated layers | encloses the raw edge inside | too bulky on coated fabric |
| Flat-felled seams | high-wear, load-bearing seams | durable and flat | stiff with thick coatings |
| Turned-and-topstitched construction | self-finished edges | hides the raw edge | needs extra seam allowance |
| Fully lined construction | anything touching contents or skin | hides coating and raw edges | doubles cutting and bulk |
| Fabric bindings | edges, casings, handles | clean enclosed edge | long loops are a hazard |
| Sew-in interfacing | stabilizing openings | no heat risk | an extra layer to test |
| Lightweight woven backing | reinforcing thin canopy | spreads the load | changes drape and stiffness |
| Fusible interfacing | reinforcement where heat is safe | can wrinkle or delaminate a coating | heat and adhesive test first |
| Removable rigid inserts | bins and organizers | smooth, enclosed edges | remove before cleaning |
| Zippers | pouches and closures | zipper tape can leak | wavy zip on thin fabric |
| Drawcord channels | shoe bags and wraps | channel can twist | no long accessible loops |
| Buttons with reinforced loops | decorative closures | no hardware stress | loop must reach sound fabric |
| Snaps through reinforced areas | quick closures | flat finish | tears without backing |
| Hook-and-loop closures | easy open and close | grabs lint and coating | can pull at the coating |
| Lightweight webbing handles | bags that carry weight | strong and low-stretch | must extend into the body |
| Fabric handles reinforced into the body | soft matching handles | coordinated look | tears if stitched to one layer |
| Adhesive, low-stress positioning only | temporary placement | can soften or stain coating | fails on stressed or washed seams |
A coating can make layers slide, drag, stick, or feed unevenly. Pins and needles leave permanent holes, and new seams may leak even when the original canopy shed water. An unsupported single layer can stretch or tear around handles and closures, so reinforcement must extend into sound fabric. Heavy hardware can tear thin canopy fabric, drawcord channels need finished ends with no long accessible loops, and adhesive alone is unsuitable for stressed, folded, washable, or frequently handled seams unless the exact system is verified.
Water Resistance vs. Waterproof: What Recovered Canopy Can and Cannot Do
Separate the words. Water beading is a drop sitting on the surface. Water repellency is a treated surface that makes water bead and roll off. Water resistance slows penetration under pressure. Waterproof material and waterproof seams resist water at a specified pressure, and leakproof construction means the whole finished object holds water out. Vapor transmission and drying behavior are different questions again.
Original umbrella performance does not transfer to a newly sewn object. Age, abrasion, ultraviolet exposure, washing, coatings, punctures, new seams, zipper tape, closures, and edge finishes all change how water behaves. A home spray test cannot establish standardized waterproof performance, and a project may slow a small splash yet still leak through seams or closures. Keep damp contents unsealed after a short time, dry wet projects completely before storage, and never promise protection for electronics, documents, medication, cameras, or emergency supplies. Water beading on an offcut does not establish that the finished project will resist leaks through its seams and closures.
Adhesives, Paint, and Surface Treatments
This is a thin coated fabric, not a rigid plastic that glues well. If you have worked with rigid plastic bottle cap crafts, that material bonds in a way canopy fabric does not. Here, sewing is the primary join, and adhesives and paints are optional extras that need testing.
- No adhesive: the default. Sew the seams and skip chemistry you cannot verify.
- Fabric adhesive: only one intended for the verified fiber and coating, on low-stress areas.
- Seam-sealing products: only for compatible documented materials, and sealing does not make a project waterproof by itself.
- Double-sided textile tape: for temporary positioning before sewing.
- Repair tape: only one intended for a verified canopy material.
- Textile paint, fabric markers, and screen or block printing: can stiffen thin fabric and crack at folds, so test first.
- Spray coatings: only when rated for the exact material and use, with label-compliant ventilation and overspray control.
- No additional surface treatment: often the safest and most honest choice.
Unknown coatings may reject adhesive or paint, and solvents may soften, stain, or delaminate a canopy. Dry-to-touch does not mean ready for folding, sewing, washing, or furniture contact, and no treatment restores the umbrella’s original protective performance without verified testing.
Portable Bags
The three bags below keep contents light, dry, and non-fragile. For all of them, use full-size patterns based on your actual contents and usable wedges, line any area where abrasion or coating transfer is possible, reinforce openings, handles, zipper ends, and corners, finish cord ends with no long loops, and test loads gradually. Keep out food, medicine, loose blades, leaking toiletries, electronics, documents, and breakables, and retire the bag if handles stretch, seams open, coatings transfer, zippers fail, or fabric tears around needle holes.
1. Fold-Flat Lightweight Tote
What it looks like: a slim tote that folds flat and keeps the canopy’s radial color pattern across the front.
Best use: light shopping, a library bag, or a spare carry tote.
Difficulty: beginner.
Approximate time: 2–3 hours.
Materials: two large canopy panels for the body, two reinforced fabric handle strips, matching polyester thread, and an optional smooth lining.
Tools: paper pattern, fabric shears, clips, tape measure, iron-free marking tool, and a sewing machine.
- Measure the usable wedges and cut a full-size paper pattern for the front, back, and handles.
- Cut the body panels so the radial seams sit symmetrically and motifs stay upright.
- Reinforce the handle attachment points by folding a second layer into sound fabric.
- Sew the handles into the top edge before closing the side seams.
- Join the side and bottom seams with a finish tested on an offcut.
- Turn right side out, press with no direct heat on the coating, and check the corners.
- Load it gradually with light, dry items and inspect the seams.
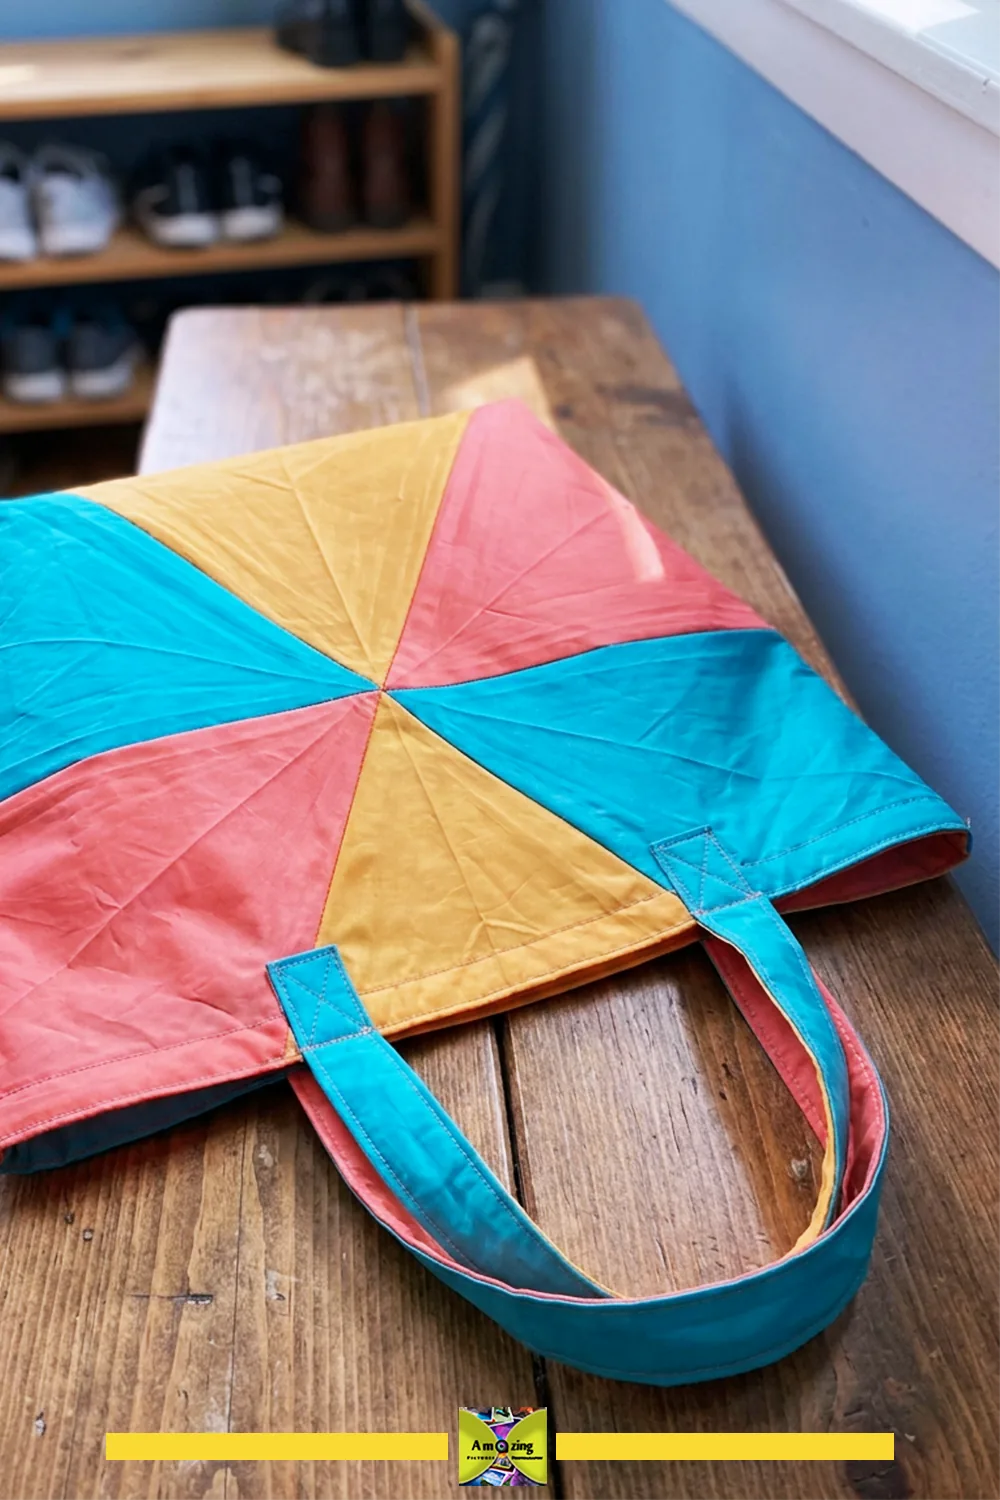
Customization: keep the full radial sequence, or reorder wedges into a deliberate light-to-dark or alternating layout; add one quiet solid panel; match the handles to a neutral lining.
Practical tip: run a second topstitching line over the handle ends so the load spreads past the first stitch row.
Common mistake: putting a handle seam through an old fold line, which tears first under load.
Safety note: keep contents light and dry; this is not a heavy grocery bag.
Before closing the sides, fold the tote into the size you want to carry and check where the handle ends land. Stagger bulky joins so they do not stack into one stiff lump. A bag that folds neatly is much easier to keep by the door or tuck into another bag.
2. Lined Zippered Project Pouch
What it looks like: a small boxy pouch with a smooth lining and a zipper set between reinforced ends.
Best use: sewing notions, cables, or small tools that stay dry.
Difficulty: beginner to intermediate.
Approximate time: 2–3 hours.
Materials: canopy panels sized to the pouch, a smooth lining, a zipper, and polyester thread.
Tools: pattern, shears, clips, zipper foot, and a sewing machine.
- Cut the outer, lining, and seam allowance to match the zipper length plus the desired depth.
- Reinforce the zipper ends with a small fabric tab so the teeth do not chew the canopy.
- Stitch the zipper between the outer and lining with the zipper foot, keeping clips clear of the needle.
- Sew the side and bottom seams, then finish or bind the raw edges as tested.
- Turn through the opening, settle the corners, and topstitch the zipper seam flat.
- Zip it several times and check the ends for strain.
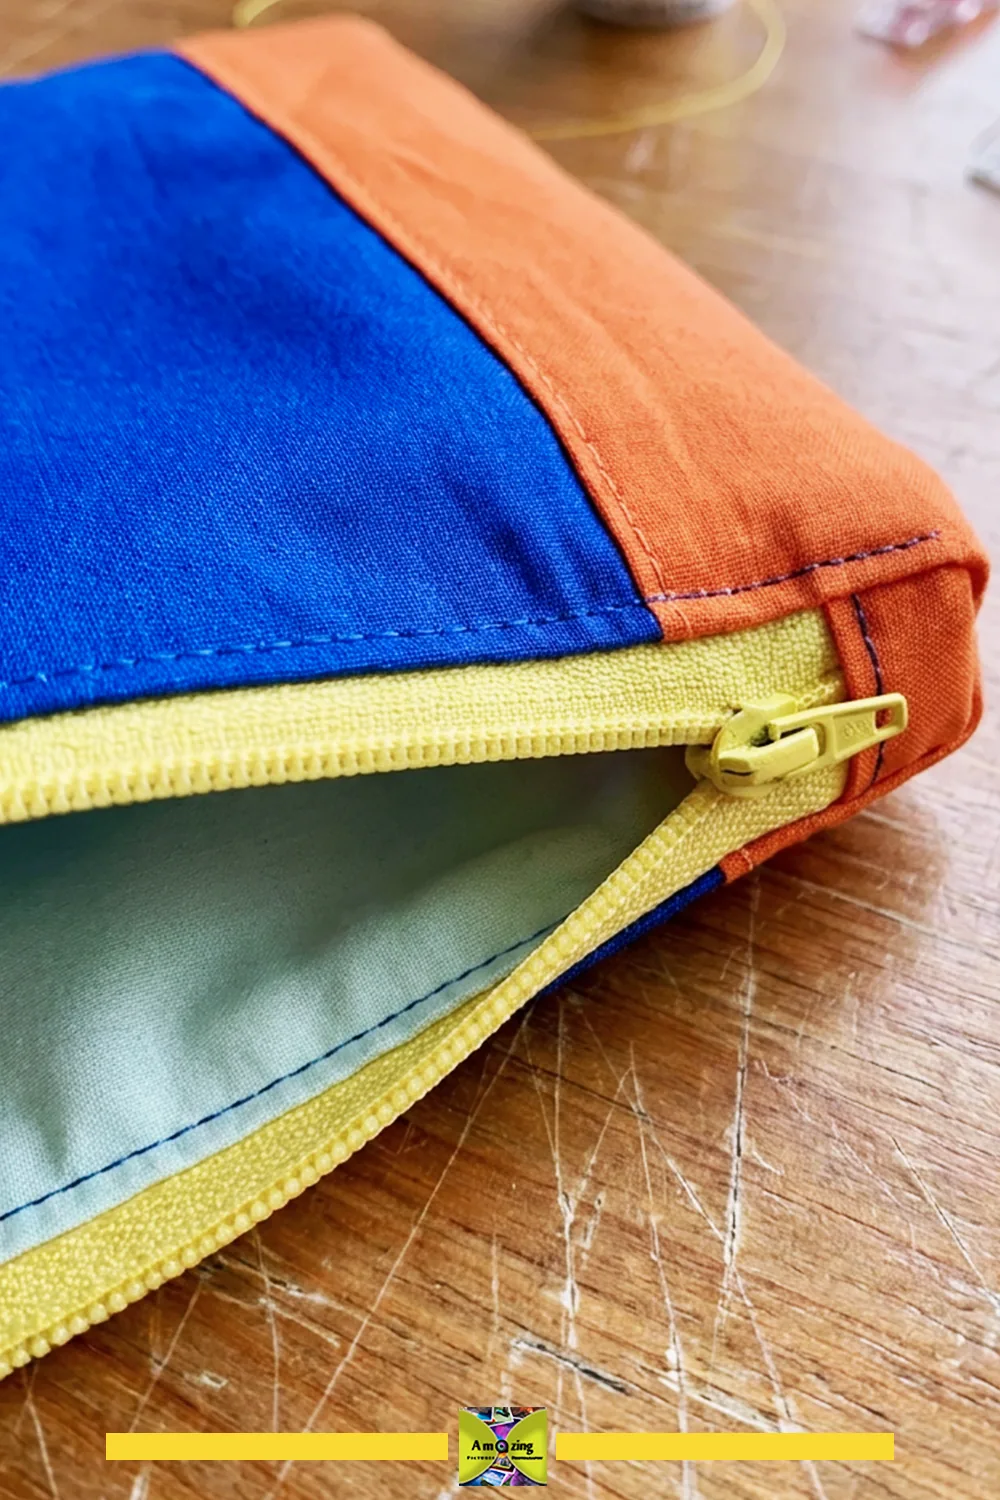
Customization: color-block two wedges, add a small pull tab, or use a contrasting lining so the inside reads clearly.
Practical tip: sew the zipper to the lining first, then to the outer, so the outer coating never sits directly against the zipper teeth.
Common mistake: cutting the outer without seam allowance for the zipper depth, leaving the pouch too small for its contents.
Safety note: keep blades, leaky toiletries, and anything that could puncture the coating out of this pouch.
Choose a lightweight coil zipper with sound tape and a smooth-running slider, then pair it with polyester sewing thread suitable for your machine and fabric layers. Make a small sample using the canopy, lining, and zipper tape together. Check both sides for puckering, skipped stitches, or widening needle holes before committing to the pouch; the best stitch setting depends on that exact combination.
3. Secondary Damp-Item Pouch
What it looks like: a simple pouch with a separate washable lining and an easy closure, for damp items only.
Best use: a gym or travel pouch for a damp washcloth, not for leak containment.
Difficulty: beginner.
Approximate time: 1–2 hours.
Materials: canopy outer, a separate tested washable lining, a closure, and polyester thread.
Tools: pattern, shears, clips, and a sewing machine.
- Cut the outer and lining to the same finished size, plus seam allowance.
- Sew the lining as a self-contained pouch and test that it washes and dries on its own.
- Attach the closure to the outer so it opens fully for air-drying.
- Join the outer and lining with finished top edges.
- Use it upright, empty it promptly, and dry both layers completely before storage.
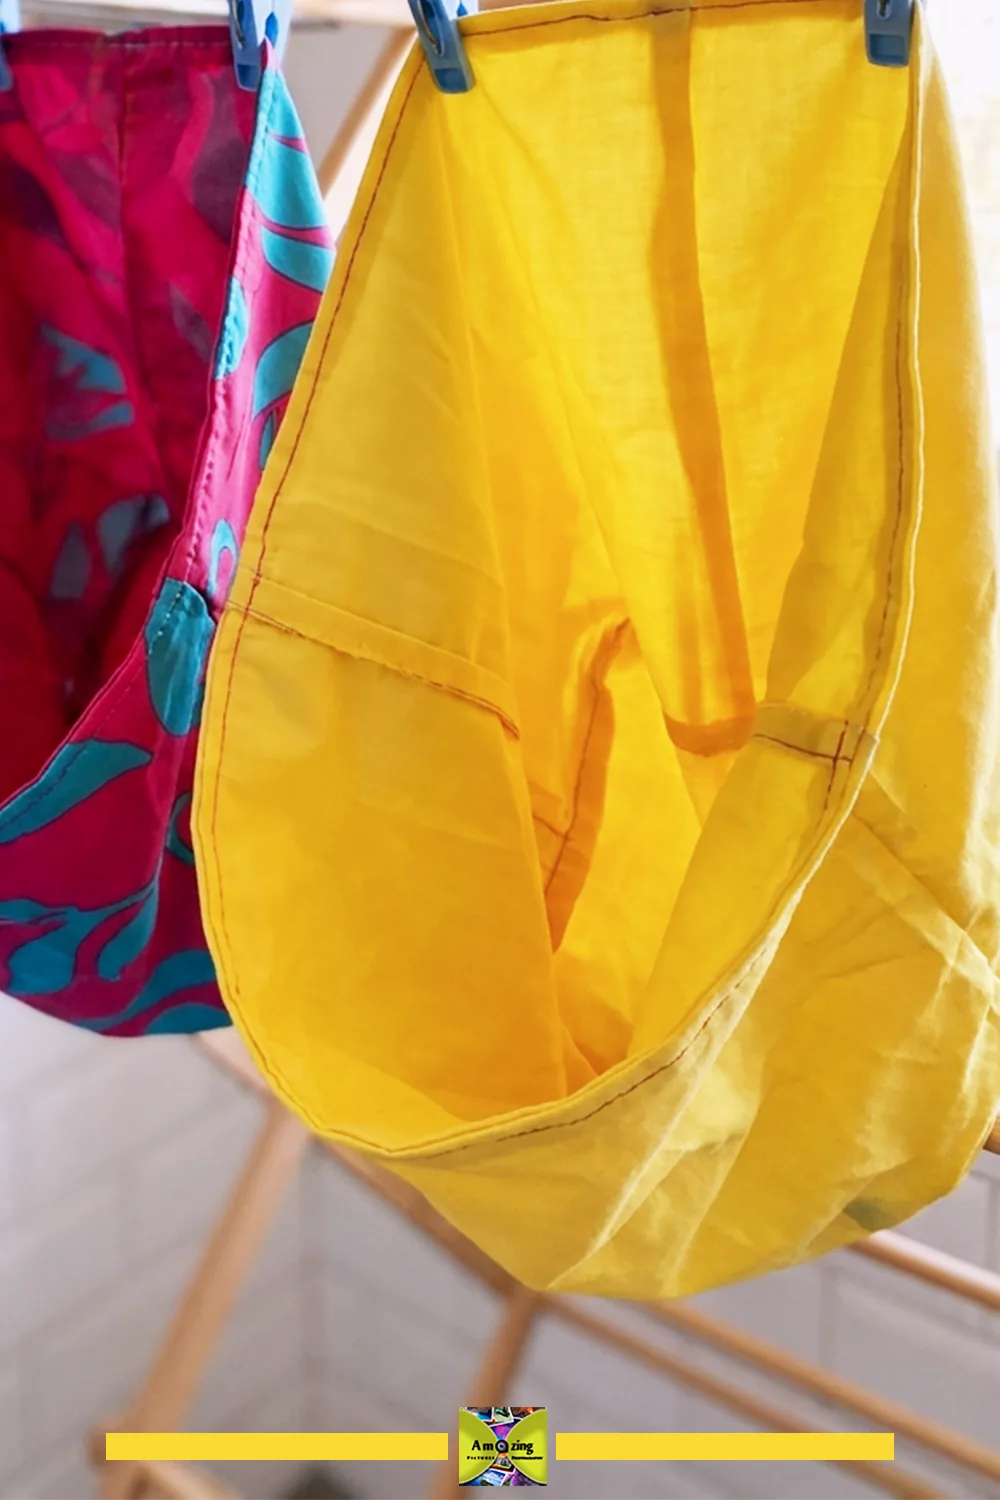
Customization: a drawcord closure, a reinforced loop for hanging to dry, or a light color-blocked outer.
Practical tip: make the lining slightly smaller than the outer so it never bunches against the closure.
Common mistake: trusting the canopy outer to hold liquid. It is a secondary pouch, not a leakproof bag.
Safety note: test for leakage before use, keep it upright, and do not seal wet contents for long.
Travel and Closet Organization
These four organizers hold dry, lightweight textiles and gifts. Keep out food, liquids, sharp objects, hot items, medicine, and valuable breakables, and reinforce any handle independently of the decorative surface.
4. Drawstring Shoe-Storage Bag
What it looks like: a roomy drawstring bag with a smooth lining and an enclosed cord channel.
Best use: storing a dry pair of shoes in a suitcase or closet.
Difficulty: beginner.
Approximate time: 1.5–2.5 hours.
Materials: canopy outer, smooth lining, drawcord, and polyester thread.
Tools: pattern, shears, clips, safety pin or cord threader, and a sewing machine.
- Cut the outer and lining to fit the shoe length plus ease.
- Sew a folded casing near the top, leaving clean finished openings at both ends.
- Thread the cord through the casing and finish the cord ends so they do not fray or form long loops.
- Join the side and bottom seams, then line the inside smoothly.
- Insert only dry shoes and test the drawstring several times.
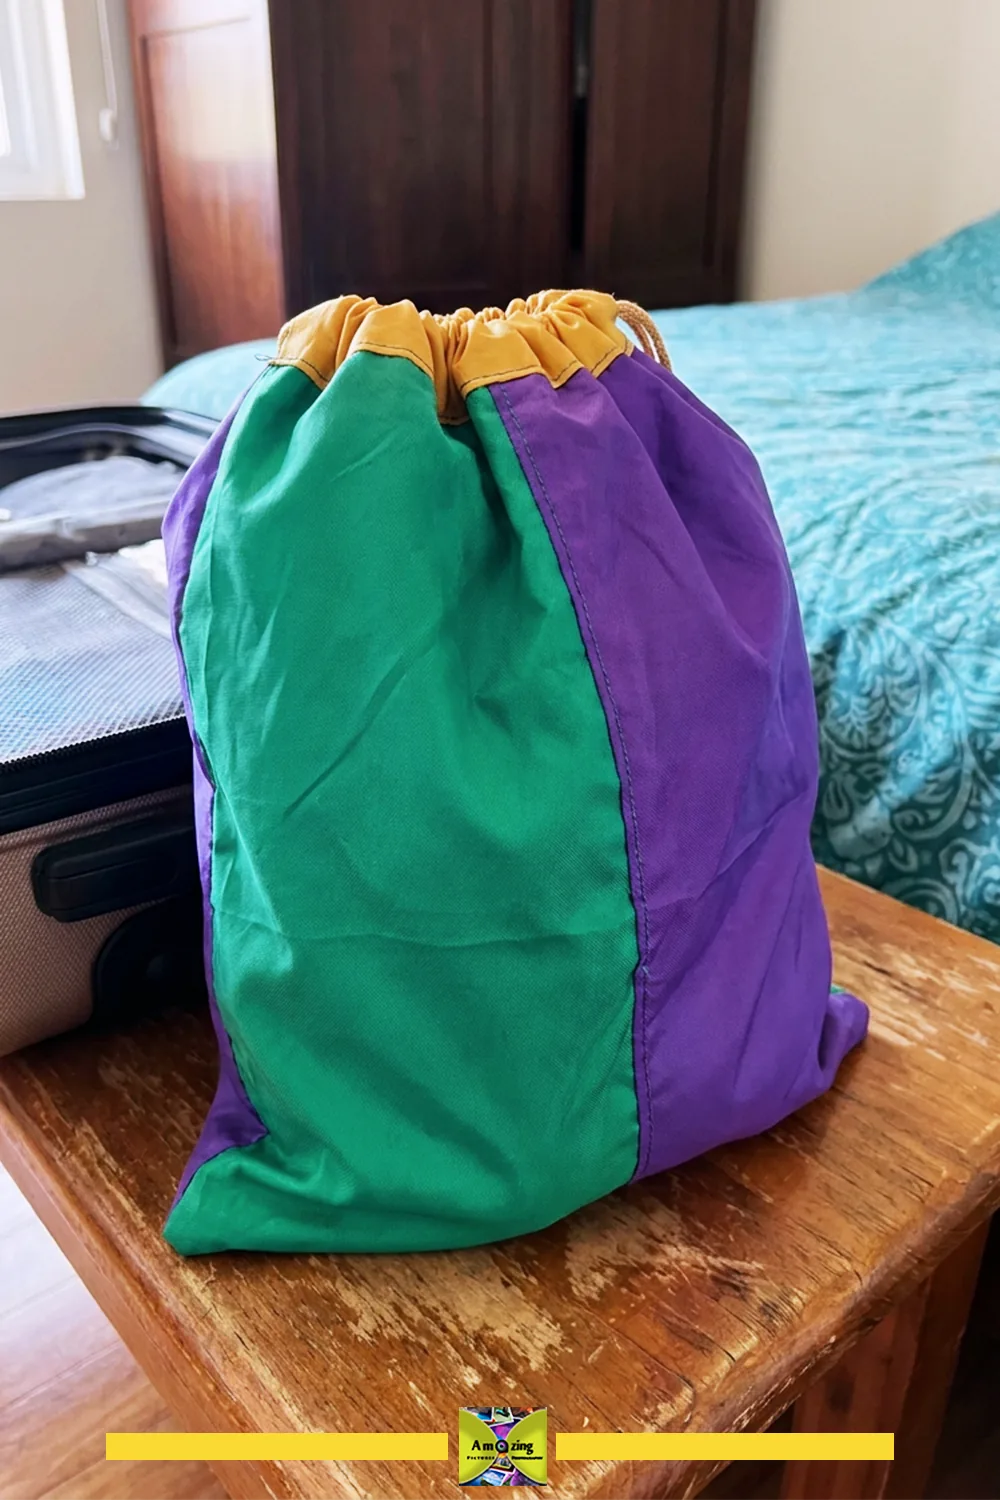
Customization: a second cord for a double-pull closure, a name tag, or a contrasting casing fold.
Practical tip: cut the casing on the bias-free straight grain so the channel does not twist when the cord pulls through.
Common mistake: leaving a long single cord loop that can catch on a door handle or around a child or pet.
Safety note: dry shoes only, and no long accessible cord loops.
5. Travel Laundry-Separator Bag
What it looks like: a breathable or ventilated bag that keeps dry garments separate from clean clothes.
Best use: holding dry worn clothes on a trip, with no odor or moisture-containment claim.
Difficulty: beginner.
Approximate time: 2–3 hours.
Materials: canopy outer, a breathable or ventilated lining, a drawcord or zipper, and polyester thread.
Tools: pattern, shears, clips, and a sewing machine.
- Cut the outer and a breathable lining to the same finished size.
- Add a ventilation panel or leave the closure loose so air can move.
- Reinforce the closure ends and the top edge.
- Join the layers, finish the seams, and test the closure.
- Pack only dry garments and empty it after each trip.
Customization: a mesh window, a hanging loop, or two compartments for light and dark garments.
Practical tip: make the lining removable if the canopy and the lining need different cleaning.
Common mistake: marketing it as an odor-proof or moisture-proof bag, which it is not.
Safety note: dry garments only, and no claim of containing odor or liquid.
6. Lightweight Packing Pouch Set
What it looks like: a set of enclosed pouches with color-coded panels for sorting.
Best use: organizing chargers, socks, or small items inside a bag.
Difficulty: beginner.
Approximate time: 1–2 hours per set.
Materials: assorted canopy wedges, light lining, a closure per pouch, and polyester thread.
Tools: pattern, shears, clips, and a sewing machine.
- Cut matching fronts and backs from wedges that share a color or print direction.
- Line each pouch and enclose the seams.
- Add a simple closure to each and color-code the panels by use.
- Finish the edges and turn each pouch right side out.
- Label or group them so contents stay obvious at a glance.
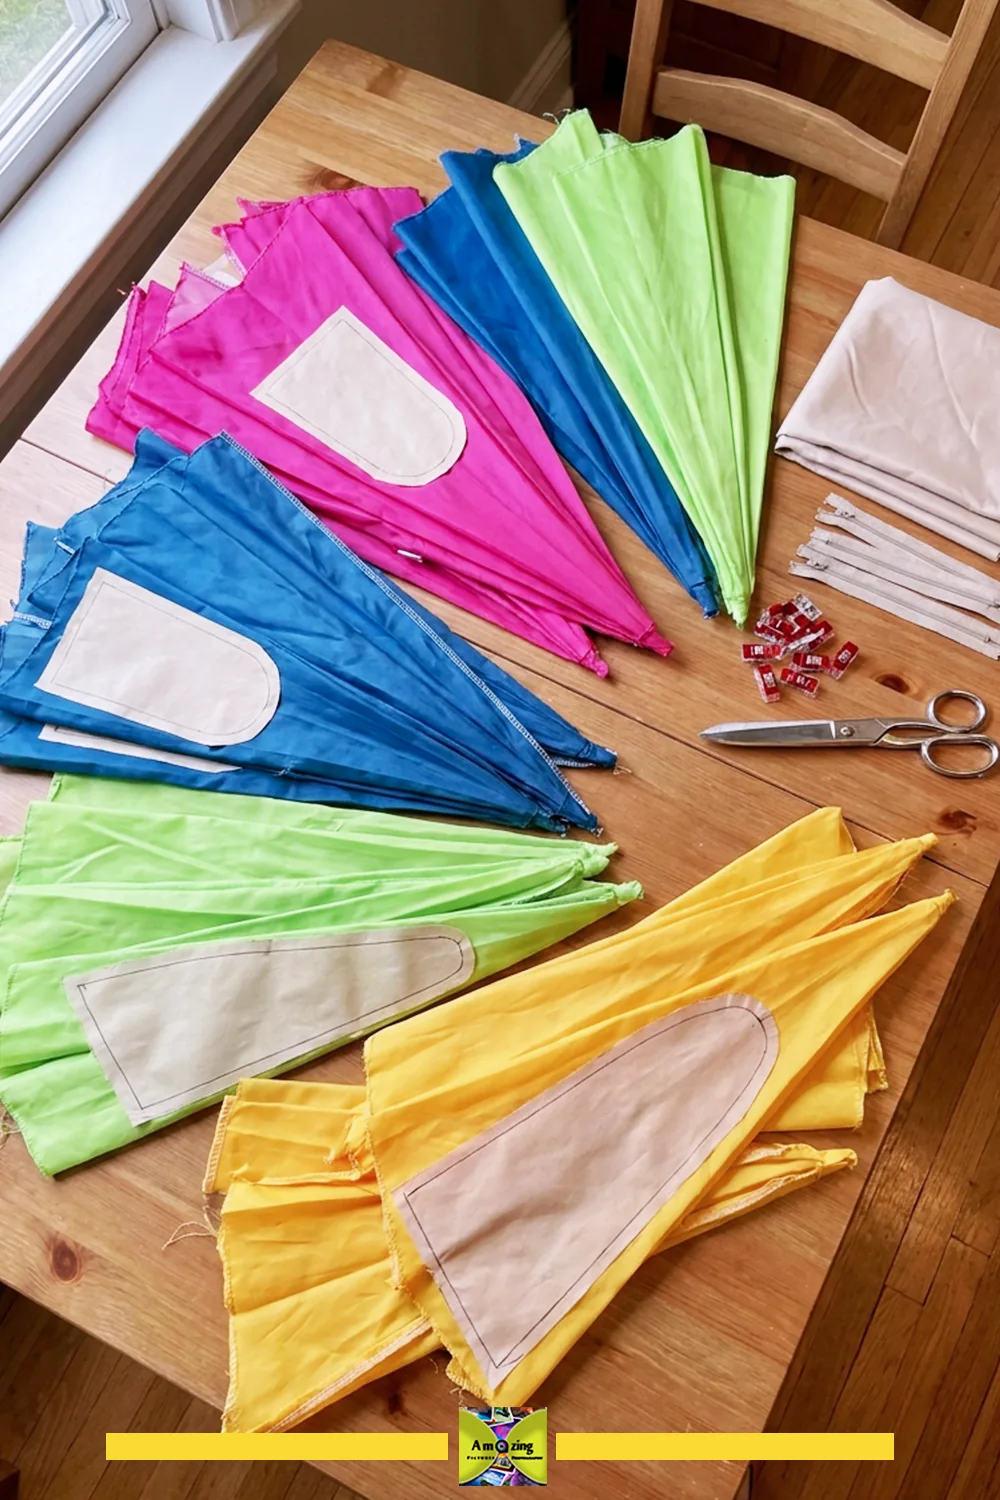
Customization: one neutral lining across the whole set, or a matching pull on every closure.
Practical tip: cut all six pouches from one layout so the color-coding reads as one set, not random scraps.
Common mistake: calling them compression or security pouches. They organize, nothing more.
Safety note: no compression, security, or checked-luggage protection claim.
7. Fold-Flat Closet Storage Bin
What it looks like: a rectangular bin with a smooth lining and removable rigid inserts that folds flat when empty.
Best use: storing light, dry textiles on a shelf.
Difficulty: intermediate.
Approximate time: 3–4 hours.
Materials: canopy outer, smooth lining, removable smooth-edged rigid inserts, and polyester thread.
Tools: pattern, shears, clips, tape measure, and a sewing machine.
- Cut the outer, lining, and insert sleeves to the shelf dimensions plus seam allowance.
- Sew the insert sleeves so the rigid pieces slide in and out and every edge is enclosed and smooth.
- Reinforce the base corners and any carry handle independently of the decorative panels.
- Join the outer and lining with finished top edges.
- Insert the rigid pieces, fill with light dry textiles, and check the base does not sag.
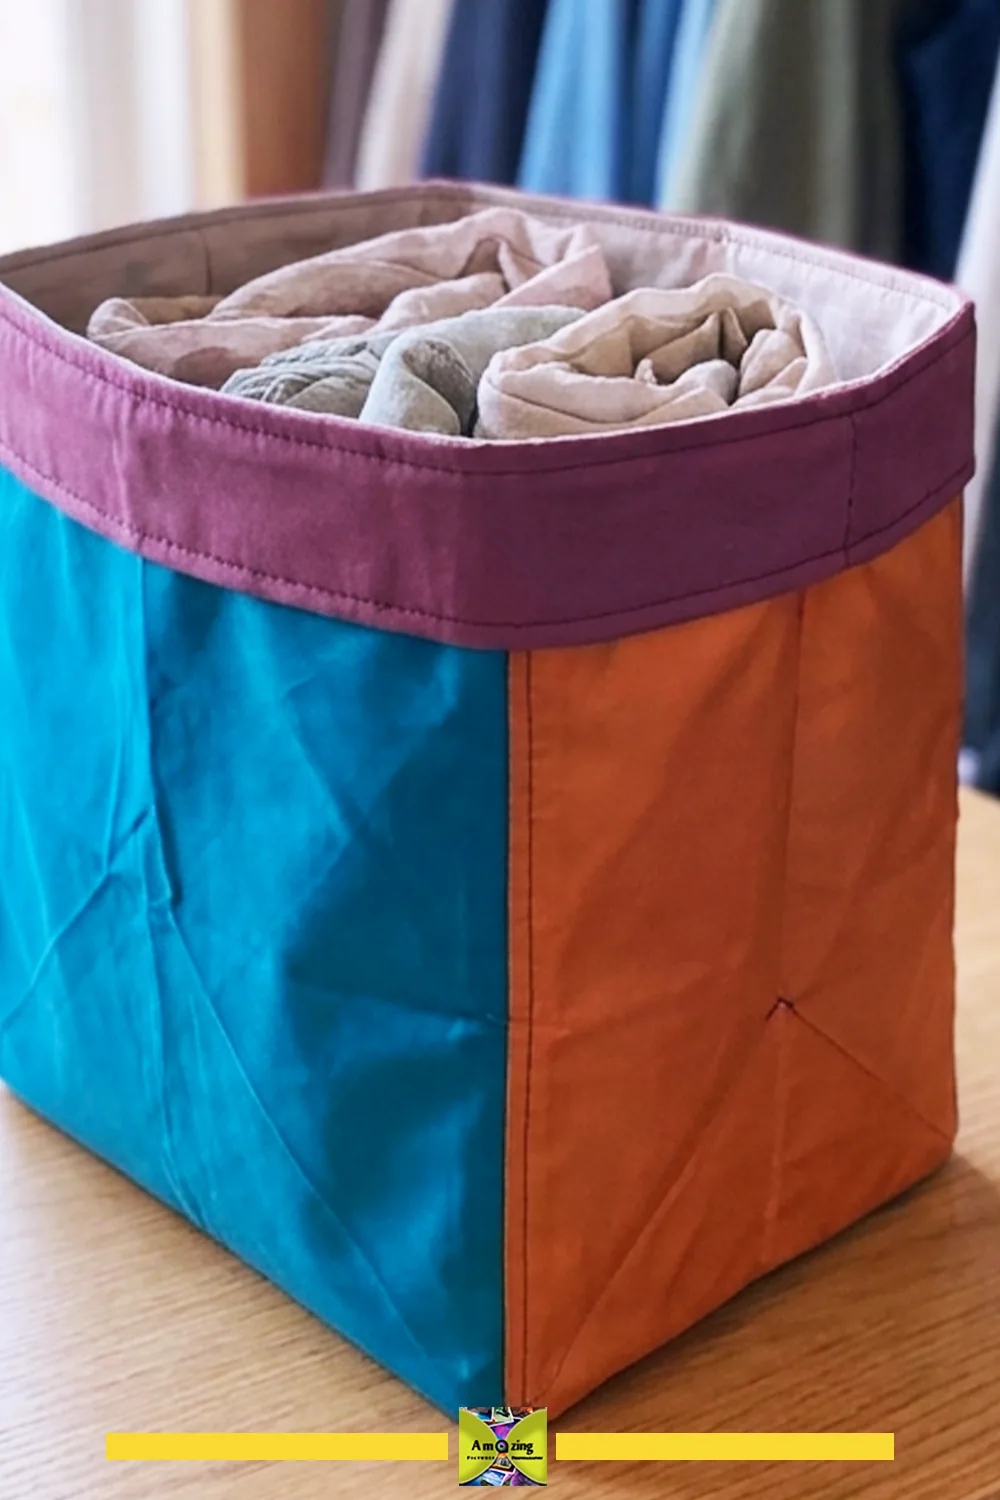
Customization: a fabric label on the front, or one color per shelf for a coordinated set.
Practical tip: make the rigid inserts removable so the fabric and the insert can be cleaned or replaced on different schedules.
Common mistake: carrying the bin by its decorative ties or closures, which then tear out.
Safety note: light dry textiles only, and retire it if an insert emerges or the folds crack.
Removable Household Covers
These four covers are removable, fitted to the real object, and never meant to touch power, blades, heat, or a running appliance.
8. Replacement Sleeve for a Working Umbrella
What it looks like: a fitted sleeve sized to a folded canopy and handle, with enough ease to slide on and off without force.
Best use: replacing a lost or torn sleeve on a compatible, fully working umbrella.
Difficulty: beginner to intermediate.
Approximate time: 1.5–2.5 hours.
Materials: one sound canopy wedge or panel, a light lining if needed, and polyester thread.
Tools: the working umbrella, tape measure, shears, clips, and a sewing machine.
- Measure the folded canopy, strap, handle, and tip of the working umbrella.
- Cut the sleeve with enough ease that it slides on and off without catching.
- Leave a drainage and drying path so the sleeve cannot trap moisture against the canopy.
- Keep any strap or closure clear of the opening mechanism.
- Slide it on and confirm the umbrella still opens and closes safely.
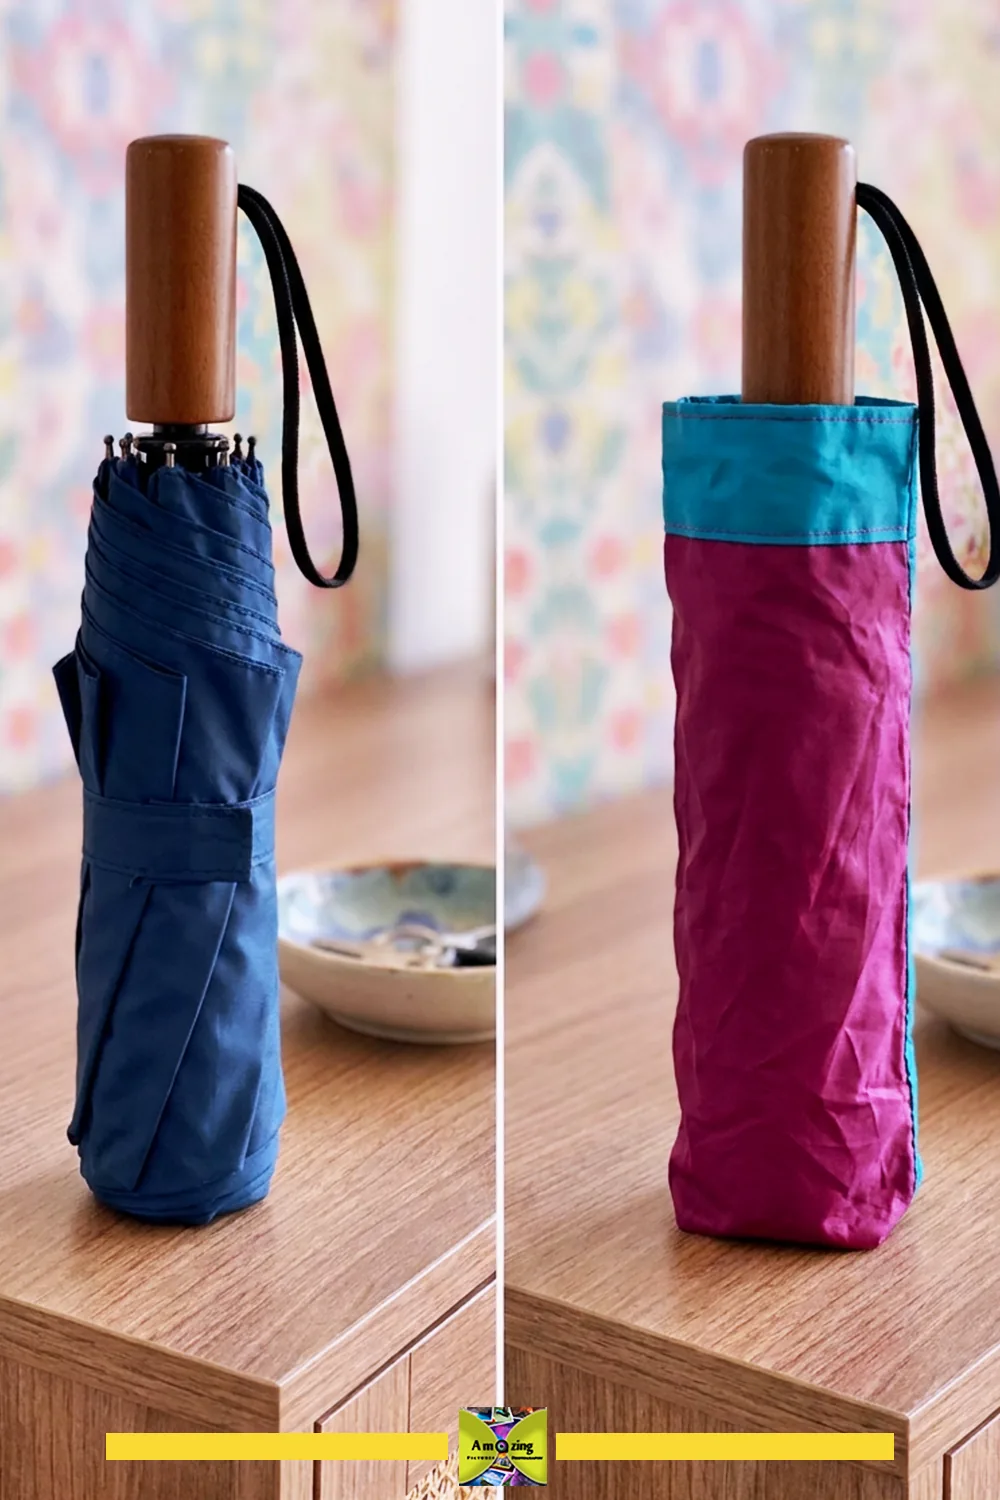
Customization: a contrasting top band, or a small loop that stays clear of the runner.
Practical tip: fit the sleeve to the folded, closed umbrella only, then test the open and close cycle before finishing the seams.
Common mistake: adding a strap or snug fit that catches the ribs or restricts safe opening.
Safety note: use only with a compatible, fully functional umbrella, and retire the sleeve if it snags, stains, or restricts handling.
9. Removable Lining for a Rigid Storage Basket
What it looks like: a fitted lining with smooth corners that drops into an existing rigid basket.
Best use: protecting the basket interior while the basket carries the load.
Difficulty: intermediate.
Approximate time: 2–3 hours.
Materials: canopy panels, a smooth lining, and polyester thread.
Tools: the actual basket, paper pattern, shears, clips, and a sewing machine.
- Measure the basket interior and make a full-size paper pattern for the base and sides.
- Cut the outer and lining with the corners fitted, not baggy.
- Sew the corners as fitted darts or box corners, and enclose the seams.
- Fold the top edge over the basket rim or add a simple tie that stays inside.
- Load the basket and confirm the basket, not the fabric, carries the weight.
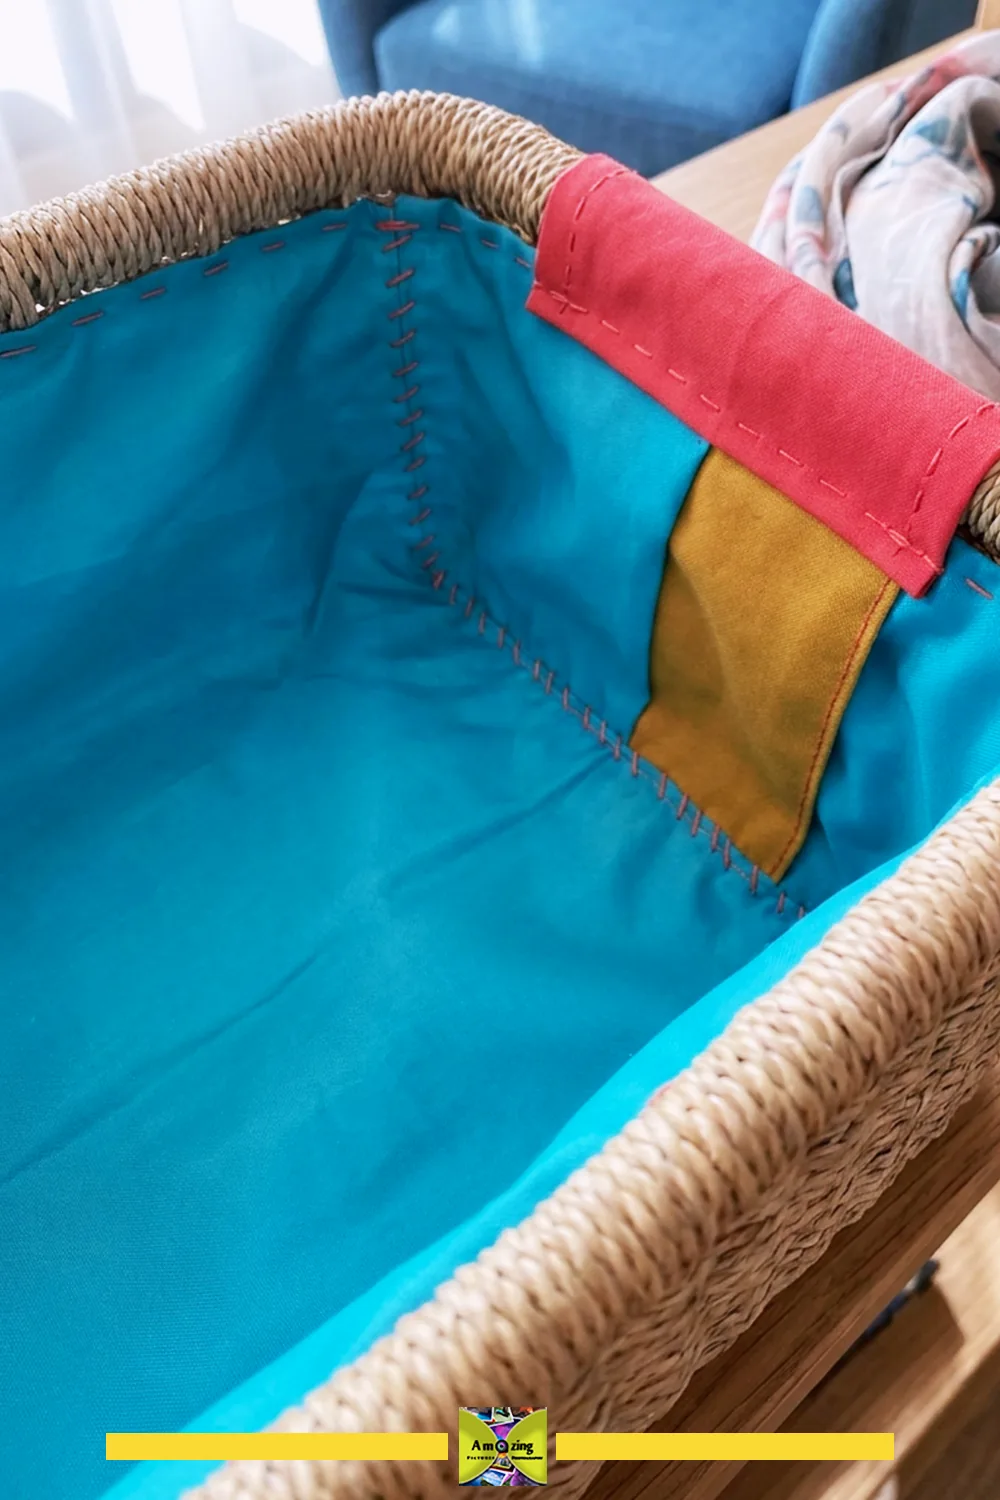
Customization: a fold-over cuff in a contrasting panel, or a label that faces outward.
Practical tip: cut the lining slightly smaller than the outer so it never bunches at the corners.
Common mistake: letting the lining take the load, so the corners or ties tear.
Safety note: loads are supported by the basket, not the lining, and the lining holds no blades, chemicals, or hot tools.
10. Fitted Sewing-Machine Dust Cover
What it looks like: a fitted cover with a non-shedding lining and clearance around every control and vent.
Best use: keeping dust off a sewing machine that is switched off, unplugged, and cool.
Difficulty: intermediate.
Approximate time: 2–3 hours.
Materials: canopy outer, a smooth non-shedding lining, and polyester thread.
Tools: the exact machine, tape measure, paper pattern, shears, clips, and a sewing machine.
- Measure the machine, including handles, spool pins, controls, vents, cords, and any attached accessories.
- Cut the outer and lining with clearance so nothing is caught or covered during setup.
- Sew the side panels and lower edges fully enclosed.
- Fit it over the machine and confirm every control and vent stays clear.
- Remove the cover completely before plugging in or operating the machine.
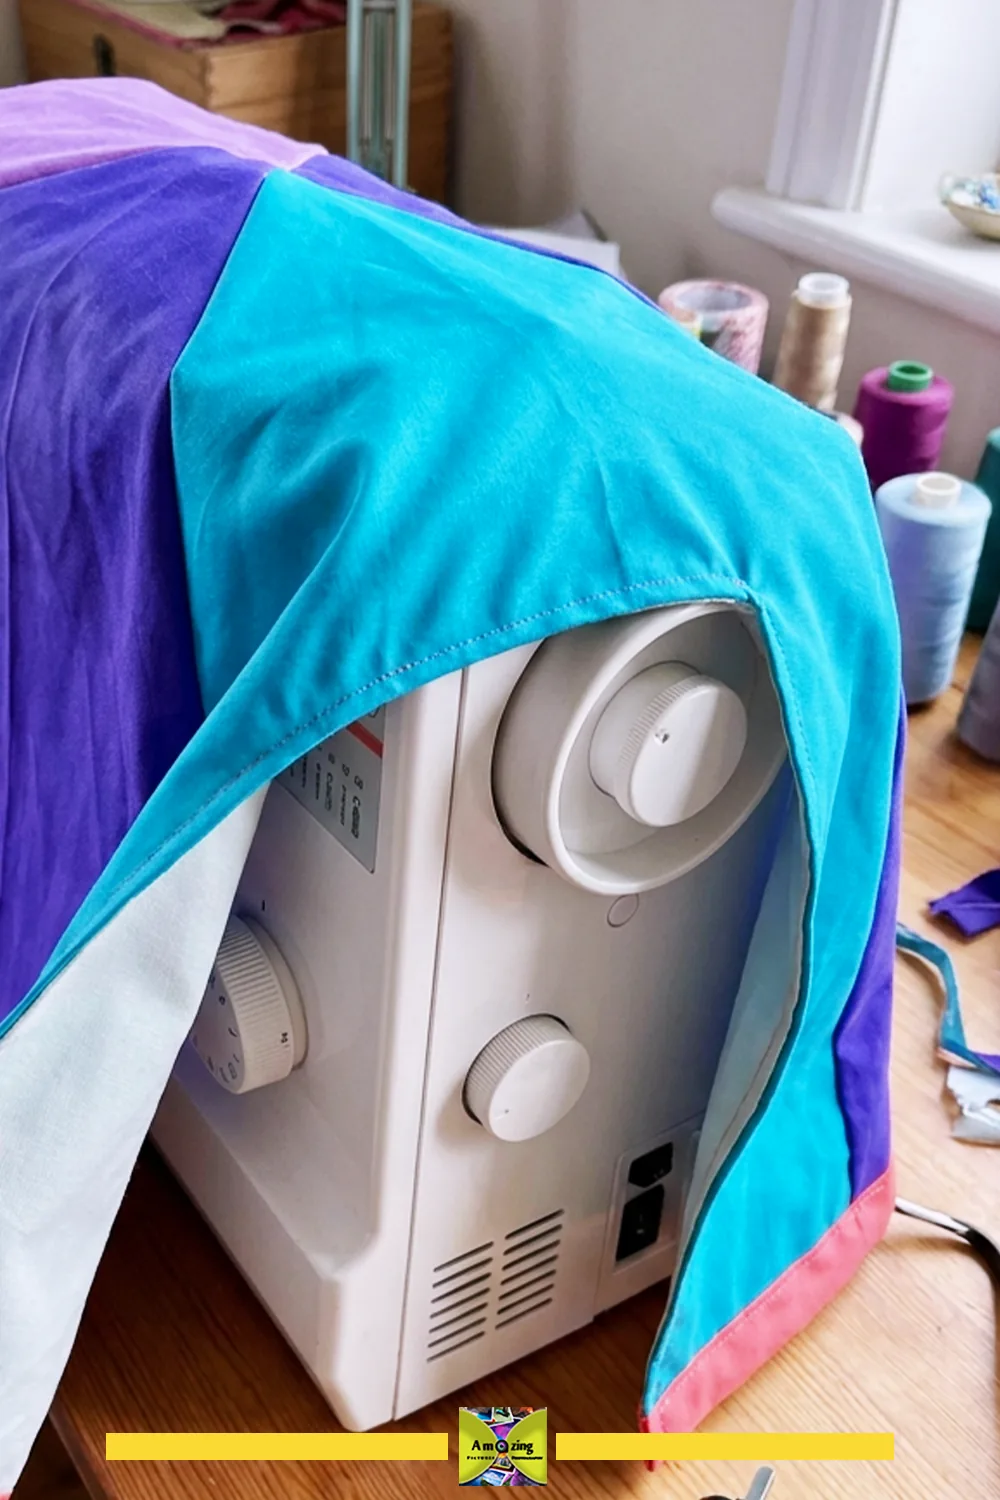
Customization: a clear viewing strip, a pocket for the foot control, or a matching label.
Practical tip: fit the cover with the machine off and unplugged, then set it aside before you ever power the machine on.
Common mistake: leaving the cover on or near the machine while it runs, or implying it blocks dust inside the machine.
Safety note: use only when the machine is off, unplugged, stationary, and cool, and make no moisture, impact, fire, or internal-dust claim.
11. Removable Craft-Table Splash Layer
What it looks like: a fitted layer with a nonabrasive backing and secured edges over a worktable.
Best use: catching small dry splashes and protecting a table surface during light craft.
Difficulty: beginner.
Approximate time: 1.5–2 hours.
Materials: canopy top, a nonabrasive backing tested against the furniture finish, and polyester thread.
Tools: the actual table, tape measure, shears, clips, and a sewing machine.
- Measure the table and cut the top and backing with a small overhang that does not hang into walkways.
- Test the backing against the furniture finish before you sew it on.
- Sew the edges so they lie flat and there are no loose cords or ties.
- Lay it over the table and check it does not slide.
- Clean it immediately according to the spilled product and the furniture maker’s guidance.
Customization: a printed motif centered on the workspace, or a smooth trim around the edge.
Practical tip: use a separate rated mat for blades, heat, solvents, heavy paint, resin, drilling, or puncturing, and keep this layer for light dry work only.
Common mistake: treating it as a waterproof or cut-resistant work surface, which it is not.
Safety note: no waterproof, chemical-containment, cut-resistance, or full furniture-protection claim, and remove it if it turns slippery, saturated, contaminated, torn, or tacky.
Light-Duty Home Accessories
The last three projects are indoor, dry, and decorative in a useful way.
12. Roll-Up Dry-Art-Tool Organizer
What it looks like: a roll-up organizer with a protective flap and reinforced pockets for dry art tools.
Best use: holding dry pencils, brushes, and small tools in one place.
Difficulty: intermediate.
Approximate time: 2–3 hours.
Materials: canopy outer, a smooth pocket lining, a protective flap, a tie, and polyester thread.
Tools: the actual tools it will hold, pattern, shears, clips, and a sewing machine.
- Measure the tools and cut pocket widths to fit each one.
- Sew the pockets with enclosed seams and reinforcement at every pocket opening.
- Add a flap that folds over the tool tips and a tie that closes without a long loop.
- Roll it up and check nothing falls out when it turns.
- Store only dry tools and retire it if a pocket tears or the coating transfers.
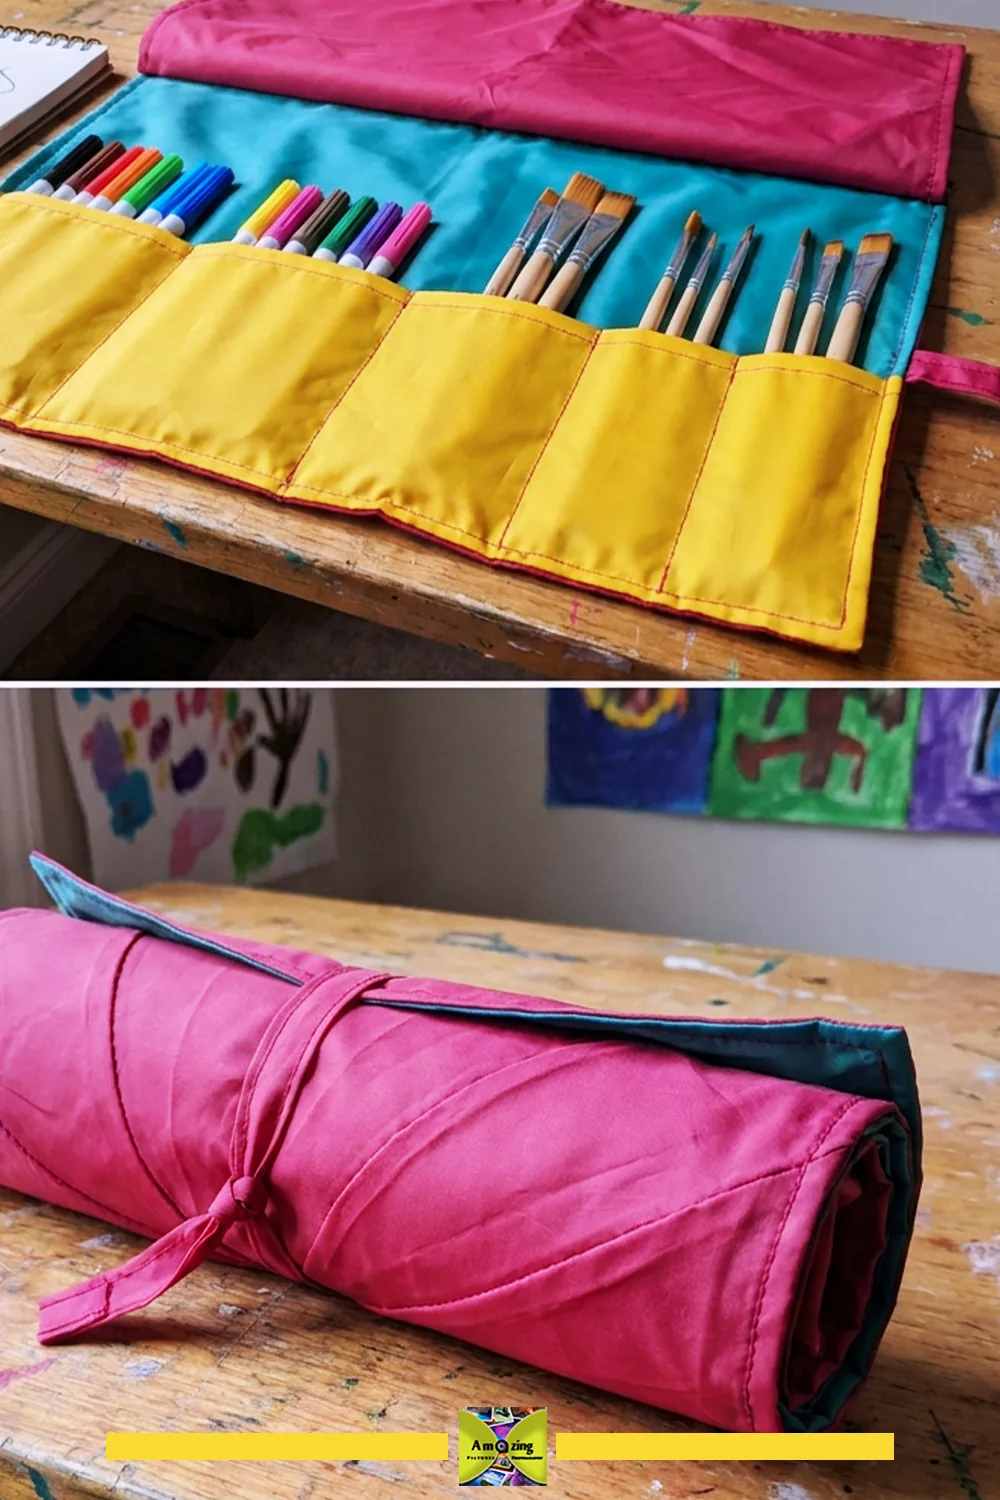
Customization: one pocket per color family, or a label stitched to each pocket.
Practical tip: cut the flap wide enough to cover the tool tips completely so nothing pokes the coating when it rolls.
Common mistake: storing wet brushes, blades, solvents, or hot tools, which damage the fabric and each other.
Safety note: dry tools only, and no blades, solvents, or hot tools inside.
13. Reusable Fabric Gift Wrap and Flat Gift Bag
What it looks like: a reusable wrap or flat bag using intact printed wedges with fully finished edges.
Best use: wrapping a light, dry gift without single-use paper.
Difficulty: beginner.
Approximate time: 1–1.5 hours.
Materials: one or two clean printed wedges, and polyester thread or a simple finished tie.
Tools: shears, clips, tape measure, and a sewing machine or hand needle.
- Choose a clean, intact printed wedge with a centered motif.
- Finish every raw edge with a narrow hem or binding.
- For a flat bag, cut two matching panels and sew three sides, leaving a clean top edge.
- Add a short tie or closure that carries nothing and forms no long loop.
- Wrap only light, dry gifts and store the wrap flat when not in use.
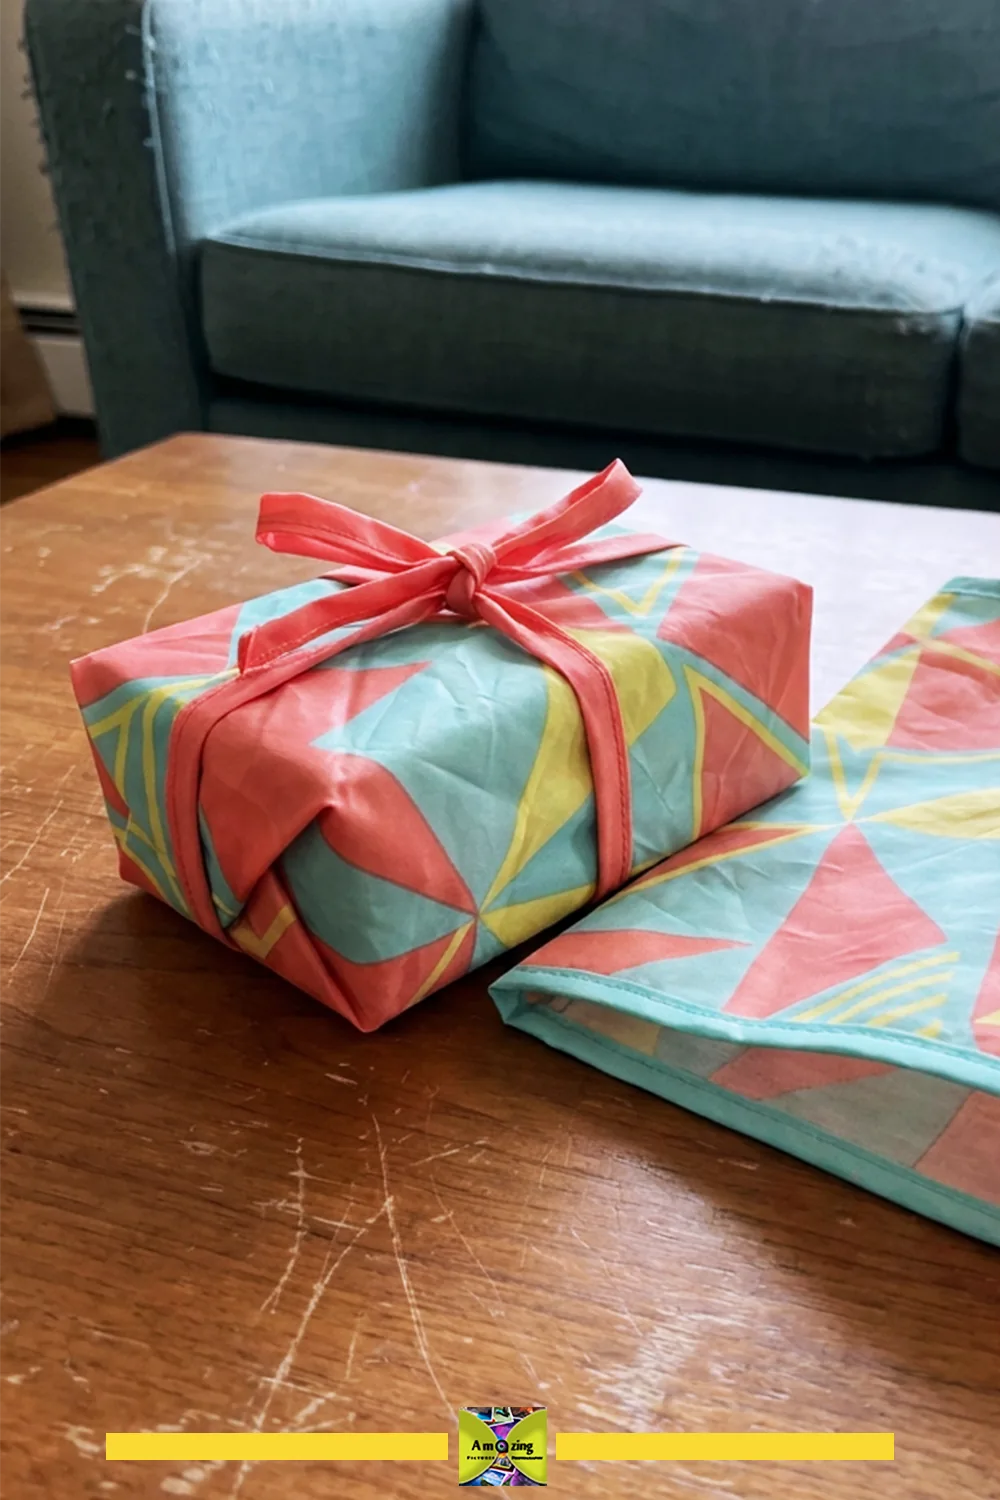
Customization: a contrasting binding, a small fabric tag, or a matched set of wraps in one palette.
Practical tip: reuse the original perimeter hem only when it is clean, sound, and suited to the wrap, otherwise bind the edges fresh.
Common mistake: carrying a heavier gift by the decorative tie, which then tears the fabric.
Safety note: light, dry gifts only, no unpackaged food, liquids, sharp objects, hot items, medicine, or breakables, and no carrying by the decorative tie.
14. Indoor Decorative Cushion Cover
What it looks like: a cushion cover with a separate smooth lining, an enclosed zipper, and a centered radial motif.
Best use: a dry, indoor decorative cover over a pillow insert.
Difficulty: intermediate.
Approximate time: 2–3 hours.
Materials: canopy panels, a smooth full lining, an enclosed zipper, and polyester thread.
Tools: the actual insert, full-size pattern, shears, clips, zipper foot, and a sewing machine.
- Measure the insert and make a full-size pattern for the front and back.
- Reinforce the radial seam intersections and the center opening before assembly.
- Sew the smooth lining as its own inner cover so the coating never sits against the insert.
- Set an enclosed zipper along one side.
- Center the radial motif, then test for coating and dye transfer before regular use.
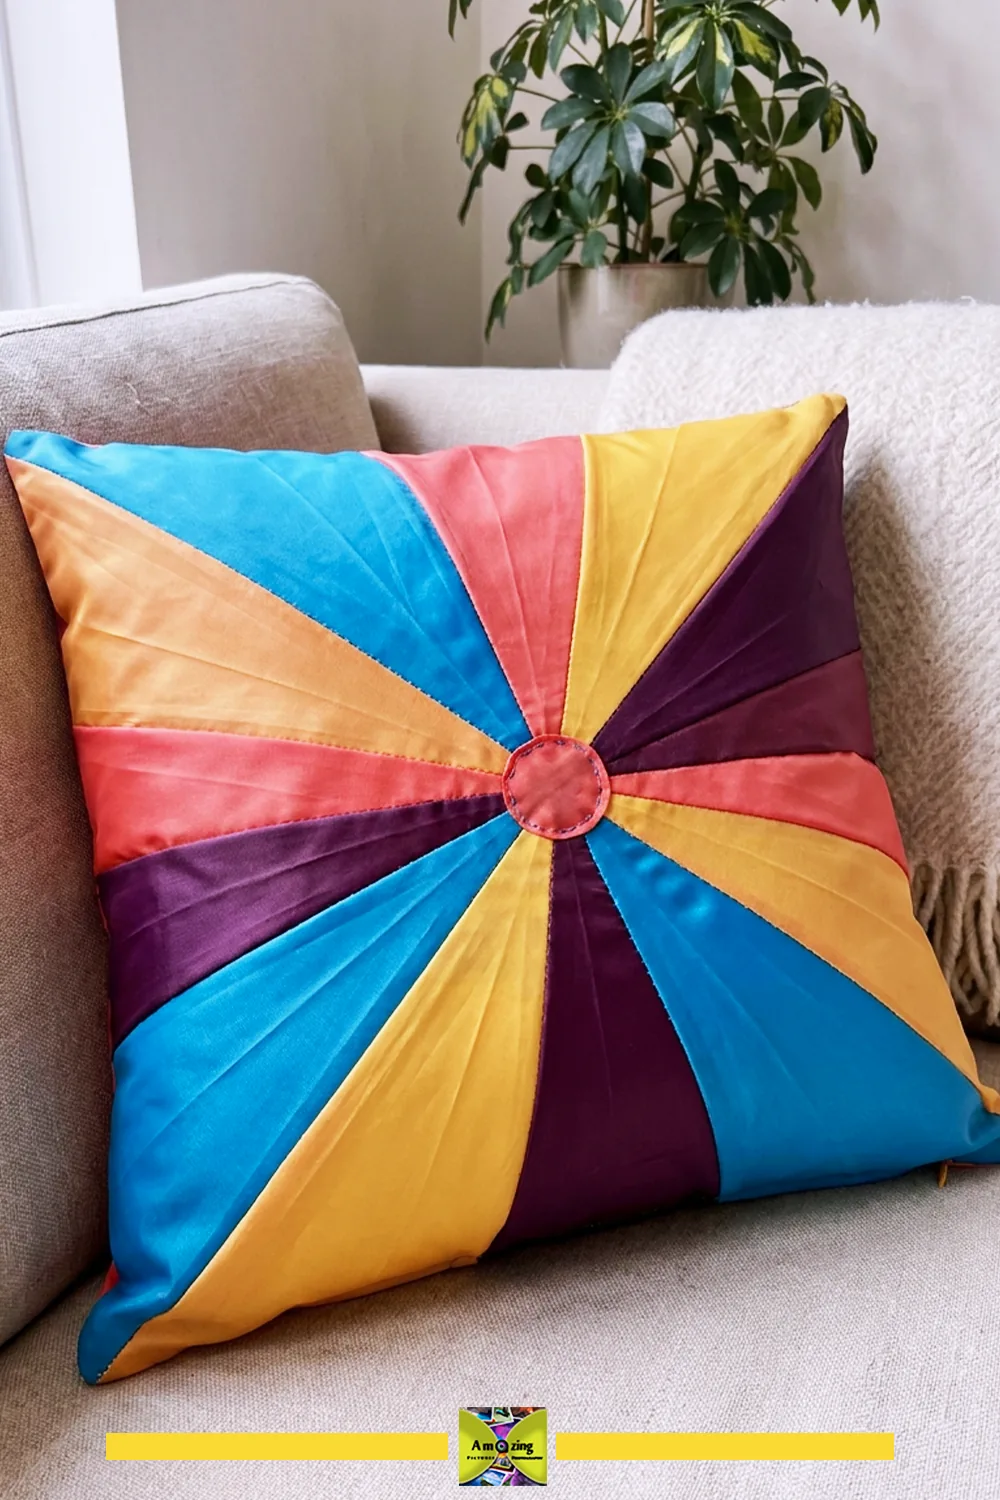
Customization: a light-to-dark radial arrangement, or a single patterned front with a quiet solid back.
Practical tip: cut the lining first and use it to confirm the fit before you cut the canopy outer.
Common mistake: skipping the lining, so the coating shows through or transfers onto the insert.
Safety note: dry indoor decorative use only, with no skin-sensitivity, floor-cushion, outdoor, washable, or moisture-resistant claim, and retire it if the coating transfers, the fabric turns brittle, a seam opens, or the lining shifts.
Let the canopy pattern do the decorating. Lay the front panel over the filled lining and check the motif from across the room before trimming it to size. A design that looks centered on a flat cutting mat can shift visually once the cushion rounds out, especially where several wedges meet.
How to Make Umbrella-Fabric Projects Look Intentional
The difference between a rescued fabric project and a pile of scraps is restraint. Limit each project or set to about two to five colors, and keep a complete radial color sequence where it improves the design. Separate wedges and reorder them only through a measured layout, pair one patterned wedge with quieter solid panels, and align original radial seams symmetrically. Center motifs, keep directional prints upright, and mirror panel placement on paired pouches or bags.
Repeat pocket, binding, handle, and topstitch dimensions, and use one neutral lining across a coordinated set. Match zippers, webbing, cord, thread, labels, and visible hardware. Conceal stabilizers, raw seams, old attachment points, and rigid-insert edges. Use original perimeter hems only when they are clean, sound, and suited to the design, and skip the bows, beads, glitter, lettering, and unrelated trim. Photograph reflective or coated fabric in broad, diffused light, and show the radial seams, coating condition, needle holes, bindings, linings, and reinforcement in close-up.
Care and Maintenance
Follow the most restrictive requirement among the canopy, lining, thread, stabilizer, adhesive, coating, zipper, cord, handles, hardware, and rigid insert, and avoid one universal washing, drying, ironing, steaming, bleaching, or solvent recipe. Remove rigid inserts and detachable hardware before cleaning, and empty every organizer and bag before moving or cleaning it.
Test dye, coating, adhesive, and surface transfer before contact with pale fabric, paper, shelves, or furniture. Dry every safely cleaned project completely before closing, folding, filling, stacking, or storing, and store projects loosely folded or flat in a dry, ventilated spot away from sunlight, heat, chemicals, children, and pets. Check seams, handles, pocket openings, zippers, channels, folds, linings, coatings, and inserts regularly, and repair early fraying before it grows. Retire a project that develops mold, persistent odor, tackiness, coating transfer, severe fading, brittle fabric, enlarged needle holes, open seams, failed handles, exposed inserts, or broken closures. Base cleaning frequency on use and the materials’ care instructions, and inspect the project before each use rather than assuming a fixed service life.
Troubleshooting Common Problems
- The umbrella proves repairable after you start: stop and finish the repair path before taking fabric.
- An automatic mechanism moves unexpectedly: keep it closed and restrained, hands out of the opening path, and set it down.
- A runner stays jammed or a broken rib or spring becomes exposed: stop, isolate the frame, and treat it as sharp or spring-loaded waste.
- A tip cap will not release or hidden wire appears: do not force it; cut around it only if you can see the stitch, or stop.
- The fabric is unknown, moldy, smelly, or sticky: reject it rather than hide the problem.
- A coating flakes or transfers, or dye moves in a moisture test: set that panel aside or reject it.
- Panels will not lie flat, or wedges differ in usable size: press gently with no direct heat and re-measure each wedge before cutting.
- Pins leave permanent holes or a marking tool will not disappear: switch to clips and test markers on the hidden side.
- Fabric gets pulled into the needle plate or layers shift under the pattern: start on a scrap, use a straight-stitch plate or tissue, and keep a stable hand.
- The machine skips stitches or thread nests underneath: re-thread, change the needle, and test on a matching offcut.
- Seams pucker or thin fabric tears along short stitches: lengthen the stitch and check tension on a sample.
- Coated fabric drags under the foot: try a nonstick or walking foot, or tissue over the seam.
- Fusible or adhesive products wrinkle, melt, stay tacky, or delaminate: stop using heat on unknown coatings and test on an offcut.
- New seams leak in a controlled test: reseal or redesign rather than claiming waterproof.
- A tote or bin sags, a sleeve fits too tight, or a machine cover catches: re-measure the real object and add ease or reinforcement.
- Finished projects look random: return to a two-to-five-color limit and a measured layout.
Safety When Repurposing Broken Umbrellas
Assess repair before you dismantle, and follow the manufacturer’s instructions or a specialist for complex or automatic mechanisms. Stored spring energy, sudden opening, pinch points, sharp ribs, broken stretchers, exposed wire, ferrules, and loose tips are all real hazards, so wear eye protection and suitable work gloves for frame inspection and canopy removal, and keep the opening path directed away from your face and bystanders. Never let a child dismantle a damaged umbrella, and never cut or force a tensioned frame.
Reject moldy, flooded, chemically contaminated, smoke-damaged, sticky, brittle, or unidentified material. Work on a stable cutting mat in a well-lit area, use seam rippers, scissors, rotary cutters, craft knives, needles, pins, and awls carefully, cut away from your body, and keep your hands outside every blade and puncture path. Store and dispose of blades, pins, broken needles, metal fragments, and small fittings safely, keep synthetic fabric, lint, adhesives, paints, and solvents away from heat, sparks, and flame, and follow exact label ventilation for adhesives, paints, sprays, cleaners, and coatings.
Do not force stitching through dense seams or coatings, and do not use open-flame testing, burning, heated cutting, direct ironing, or uncontrolled steaming. Keep cords, caps, fittings, needles, pins, fragments, and offcuts away from children and pets, and make no direct food-contact or unsupported waterproof, medical, protective, child-safe, pet-safe, weather-safety, structural, or load-bearing claim. Retire a project when the fabric, seams, handles, closures, coatings, or inserts begin to fail.
Frequently Asked Questions
The clean canopy fabric makes light-duty bags, zippered pouches, shoe bags, laundry separators, packing pouches, storage bins, a replacement umbrella sleeve, a basket lining, a sewing-machine dust cover, a craft-table layer, an art-tool roll, gift wrap, and a decorative cushion cover. The damaged frame is a separate hazard and is usually disposed of, not crafted with.
Yes. Check the manufacturer’s repair guidance, warranty, or spare parts first. A loose thread, detached tie, or missing tip is often a small fix, while a bent rib, failed spring, or jammed automatic mechanism is a sharp or spring-loaded hazard to handle carefully or leave to a specialist.
Keep the mechanism restrained and the opening path away from your face. Release the sewn ties, tip pockets, clips, ferrules, and center cap one at a time instead of cutting ribs or forcing tips through the fabric. Use a seam ripper only where the stitch is visible, stop if a spring is exposed, and keep small parts in a closed container.
Only after you check the care label and test a small area. Coated polyester, nylon, clear film, vinyl, and laminated fabric need different care, and machine washing or heat can damage a coating. Reject moldy, sticky, or contaminated fabric instead of trying to wash the problem away.
There is no single answer. Use a sharp, fresh needle sized to the layer count, a good polyester thread, and a stitch length long enough not to perforate a tear line and short enough to hold the seam. A nonstick or walking foot and tissue under the seam can help coated fabric stop sticking, but test every layered seam on an offcut first.
Not automatically. The original canopy was water-repellent or water-resistant through a coating that age, sun, abrasion, and washing weaken, and new needle holes and seams can leak even when the original surface beaded water. Treat a finished project as splash-resistant at most and test it before trusting it.
Lengthen the stitch slightly, reduce upper tension, use a fresh needle, and support the seam with tissue or a nonstick foot. Start away from bulky radial seam intersections, never pull the fabric from behind the presser foot, and test on a matching offcut before sewing the good panels.
It depends on your local program. An umbrella mixes metal, plastic, textile, springs, and coatings, so it does not belong in ordinary single-stream recycling as a whole. Some areas accept a clean, separated metal frame as scrap metal while the rest goes to trash, so check with your local government, waste service, or a scrap-metal facility before making any claim.
Start With One Project
Do not try to process a whole closet of broken umbrellas at once. Choose one umbrella, decide whether it should be repaired instead, and if it cannot, recover one clean canopy and make a single fold-flat tote. That first build teaches you how your specific fabric cuts, feeds, and sews, and it tells you which projects are worth your time.
Recover only material that suits a planned project, and do not keep dangerous frames or unidentified fragments. Safe repair and continued use may be worth more than any craft, and a clean canopy turned into a bag you actually use is a better outcome than a pile of half-finished scraps.
Check your sewing supplies before buying anything for these projects. A clean recovered canopy may cost nothing, but lining, zippers, binding, thread, and reinforcement still count toward the budget. Price only the supplies you need to buy, and distinguish the full package price from the amount used in one project. Start with a small pouch or gift wrap if the larger bag would require buying most of its components.