Old sweater crafts turn garments you no longer wear into something you’ll use every day — a cozy pillow cover, a lined tote, a pair of felted mittens, a storage basket that stands on its own. The catch is that a sweater is not a piece of quilting cotton. It stretches, unravels, curls, felts, and pills, and two sweaters labeled “wool” can behave completely differently once you put scissors to them.
That’s why this guide starts with assessment instead of instructions. Before you cut, you’ll learn how to read the labels, identify the fiber, check for damage, and decide whether the garment should be repaired, donated, or repurposed. Then you’ll find 15 projects with enough detail to recreate each one, plus the techniques that make the difference between “obviously a recycled sweater” and “something that looks deliberately made.”
Not every knit behaves the same, and no single method works for every sweater. Where a technique depends on your specific garment, machine, or measurements, this article says so — and marks exactly where your own test results belong.
Before You Cut: How to Assess an Old Sweater
Repair, donate, or repurpose?
The first decision isn’t “what should I make” — it’s “should I cut this at all.” A sweater that is merely out of fashion, slightly pilled, or a bit tight is often more useful as a garment than as raw material. If it’s still clean and wearable, consider mending it, passing it along, reselling it, or donating it to an organization that accepts clothing. A wearable garment is usually worth more to someone as clothing than as a craft supply. This same assess-and-prep-first habit applies to any reclaimed material u2014 see how it plays out in another material-specific reuse collection.
Cut for crafting when the sweater has a problem that makes it unwearable as-is: a shrunken or felted body, a stain that won’t come out, a hole that can’t be neatly mended, or a damaged section surrounded by plenty of good fabric. If the garment is contaminated — mold, mildew, chemicals, pests, or bodily fluids — handle it separately rather than bringing it into your sewing room. Local textile-collection and recycling options vary, so check what your area accepts before assuming a dirty sweater can simply go in a donation bin. Fabric isn’t the only household item worth rescuing this way u2014 here’s how another old household fabric becomes a garden piece.
Read the fiber-content and care labels
The label on the inside seam tells you most of what you need. Look for the fiber-content line (for example, “80% wool, 20% nylon”) and the care instructions. Under U.S. law, wool and other fiber content must be identified by generic name and percentage, and the care label must state how to wash or dry-clean the garment (see the FTC’s clothing and textiles labeling guidance). Both labels are your starting point for every technique that follows.
A label is a strong clue, not a guarantee. Two sweaters can both read “wool” and still craft differently depending on knit tension, ply, and whether the wool is superwash-treated. Always test on a hidden offcut before you commit to washing, cutting, pressing, or gluing the whole garment.
Wash and dry before you craft
Clean fabric behaves predictably. Dirt, oils, and residue make stitches slip, adhesives fail, and felting unpredictable. Wash and dry each garment according to its own care label before cutting. A sweater that has been in storage or came secondhand should be washed or dry-cleaned even if it looks clean. Washing also removes the oils that attract clothes moths.
For the wash itself, follow the label — hand-wash or machine-wash at the stated temperature, and dry flat or tumble only as directed. The goal is a clean, stable starting point, not a felting experiment. Save any deliberate felting for a separate, controlled step you’ll read about below.
Inspect for damage, pests, and contamination
Spread the sweater flat in bright light and look it over. Check for:
- Moth or beetle damage — irregular holes, thinned or “grazed” patches, gritty frass (droppings), silken webbing, or shed casings, especially under the collar and cuffs. Adult moths don’t eat fabric; their larvae do, and they target animal fibers like wool and cashmere.
- Mildew or mold — discolored spots, a musty odor, or a fuzzy, three-dimensional surface growth. Mildew thrives when stored textiles sit in humidity.
- Stains, odors, and residue — oil, food, perfume, or smoke that may not wash out and could transfer to your project.
- Weak spots — thinned elbows, stretched sections, broken seams, or areas that have already begun to pull apart.
Reject any garment that is severely degraded, heavily contaminated, or so damaged that you’d be cutting around more fabric than you’d use. If you find live pests, clean and treat the garment (wash, dry-clean, or freeze it) before it joins your stash. Consumer Reports explains how to identify and eliminate clothes moths.
Measure the usable fabric before choosing a project
A sweater looks big on a hanger and small on a cutting mat. Before you pick a project, lay the sweater flat and measure the body panels, sleeves, cuffs, and hems you can actually use. A fitted adult sweater often yields far less flat fabric than you expect once you subtract the seams, the collar, and any damaged area. Choose the project to fit the fabric you have — not the other way around.
Sort and plan placement around cables, ribs, holes, and stains
Group your sweaters by fiber, thickness, stretch, knit structure, color, texture, and condition. Then, for each project, make a paper pattern and move it over the fabric before you cut. Place pieces to:
- center or repeat a cable, rib, stripe, or motif,
- work around holes, stains, and stretched sections,
- run the stretch direction the way the finished item will be pulled,
- keep cuffs, hems, collars, pockets, and button plackets intact when they can save you finishing work.
Photograph the original garment and mark damaged areas with pins or chalk before you cut. That reference photo will help you match motifs and remember what you planned.
Test a cut and stabilize raw edges
Cut a small, hidden, or damaged area first — a seam allowance or a leftover cuff — to see how that specific knit behaves. Some knits run instantly; others are stable. Once you know, stabilize every edge you cut by stay-stitching, zigzagging, or overcasting before the fabric has a chance to ladder. Preserve finished edges (cuffs, hems, ribbing) wherever they’ll do the finishing work for you.
Save the useful offcuts, not the clutter
Keep offcuts only if they’re realistically usable — a stack of felted squares for patches, long strips for a wreath, or cuffs for cuffs. Store cleaned sweaters and scraps in a dry, breathable container away from moisture and pests, and let go of the tiny or dirty scraps that will only accumulate.
Fiber Basics: Wool, Blends, Cotton, and Synthetics
How fibers behave differently when washed, pressed, and stitched
Fiber type changes every step of the process. Animal fibers (wool, cashmere, alpaca, mohair) are warm, absorbent, and shaped by heat, moisture, and agitation — which is why they felt and shrink. Plant fibers like cotton are absorbent and heat-tolerant but less elastic; a cotton sweater will drape and may stretch without the springy recovery of wool. Synthetics (acrylic, polyester, nylon) resist felting and mildew but can be slippery, prone to pilling, and sensitive to high heat from an iron, which can melt or glaze the fibers.
A blend inherits traits from each component. An 80/20 wool-nylon sweater will still felt, just differently than 100% wool. When in doubt, cut a swatch and test how it responds to washing, pressing, stitching, and (if you plan to felt) agitation before you build anything from it.
Felting — which sweaters felt, and which never will
Felting is the controlled shrinking and matting of animal-fiber knits into a dense, non-fraying fabric. It only works on untreated animal fiber — wool, alpaca, mohair, and similar. Two facts save a lot of frustration:
- Superwash wool will not felt. It is treated specifically to resist shrinking and felting, so a “superwash” or machine-washable wool sweater is the wrong candidate.
- Blends felt unpredictably. A high-percentage wool blend may felt; a low one may not, and the synthetic component can pucker or resist the matting.
The common method is to wash the garment in warm or hot water (around 40°C / 104°F) on a regular cycle — not a wool/delicate cycle, which is designed to prevent felting — with agitation, adding a towel or old jeans to increase friction. Results depend on your machine, water temperature, spin speed, and the sweater’s knit tension, and the process is permanent. Felting shrinks knits more in one direction than the other, so always test a swatch first and stop when the fabric reaches the density you want. Skip felting entirely for cotton, acrylic, polyester, or any synthetic-heavy knit. DROPS Design’s felting guide covers the method in detail.
Needles, threads, and stitches for knit fabric
Cut knit fabric needs the right needle or the machine will skip stitches and punch runs. A ballpoint (jersey) needle has a slightly rounded tip that slides between the knit loops instead of piercing them — right for stable knits like cotton sweaters and stable wool. A stretch needle adds a design that helps highly elastic or ribbed knits feed without skipped stitches; if a ballpoint needle keeps skipping on a stretchy rib, switching to a stretch needle is often the fix. Choose the size to match the fabric weight — roughly 70/10 for fine knits up to 90/14 for bulky ones.
Pair the needle with a polyester or polyester-wrapped thread, which has a little give, and test the stitch on an offcut before the real seam. A narrow zigzag or a stretch stitch tolerates the fabric’s movement better than a straight stitch, which can pop when the knit is pulled. Adjust stitch length, thread tension, and presser-foot pressure on a scrap until the seam lies flat without stretching the fabric. Check your sewing machine manual for the exact settings your model recommends.
Stabilizing, finishing, and reinforcing cut edges
A cut knit edge is the main place projects go wrong. Stabilize it in one of several ways:
- Stay-stitch a line just inside the seam line before handling the piece much.
- Zigzag or overcast the raw edge to stop it laddering.
- Serge the edge if you have an overlocker.
- Bind or line the edge with a woven tape or a lining fabric when the edge will take real wear.
Support bulky seams by grading or trimming seam allowances, and avoid dragging or stretching the fabric while measuring, cutting, pinning, and sewing. At stress points — tote handles, cushion openings, basket bases, zipper ends — reinforce with an extra line of stitching, a bar tack, or a woven interfacing so the knit doesn’t carry the load alone.
Sewing vs. No-Sew: Choosing the Right Construction
Sewing is the stronger choice for knit fabric, and the honest answer is that stitching beats glue almost everywhere that matters. A machine-sewn seam holds far more tension than even a strong fabric glue, stays flexible as the knit stretches, and survives repeated washing. Most fabric glues dry stiff, which means they crack and peel the first time a stretchy knit flexes — and even “washable” fabric glues lose meaningful strength after repeated laundering.
Reserve no-sew methods for decorative or lightly used projects where the piece won’t be stretched, loaded, flexed, or washed — a wreath wrapped around a foam form, a cachepot sleeve that sits still, a trim applied to a finished item. If the piece will be pulled, filled, carried, or laundered, sew it. If you do use fabric adhesive, read the label to confirm it’s compatible with your fiber, apply it in a thin even layer, and test it on an offcut first. Never rely on glue for a load-bearing seam.
Cozy Home Projects
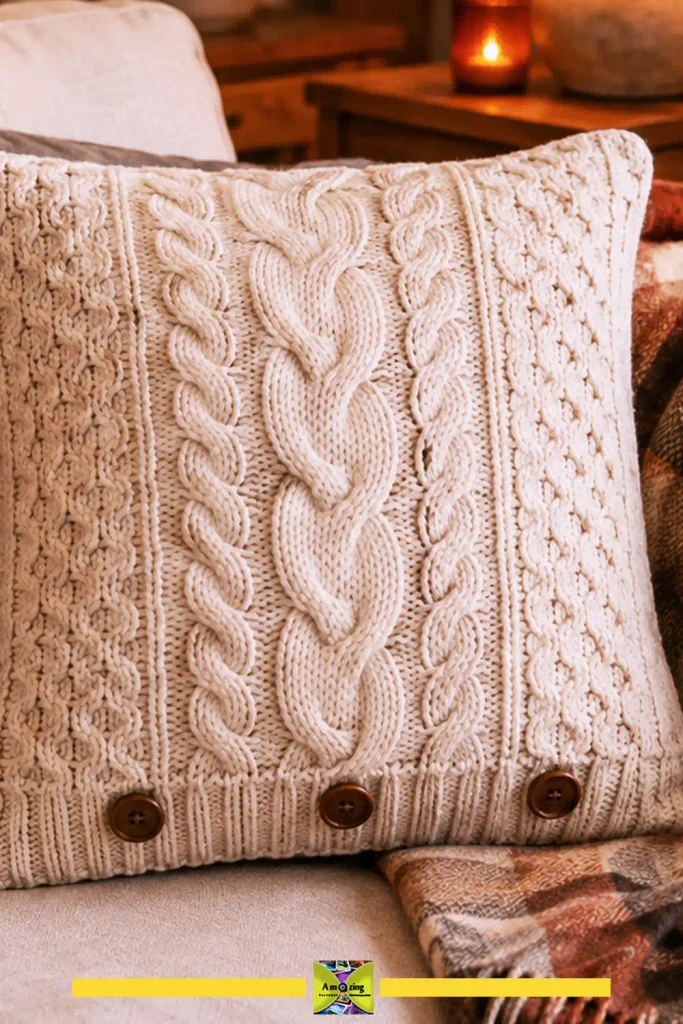
Cable-Knit Removable Pillow Cover
What it looks like: A plush envelope-back pillow cover that shows off a thick cable or textured knit, with a hidden overlap opening so it slips off for washing.
Best use: A sofa or bed accent that updates seasonal décor without sewing a new pillow each time.
Difficulty: Beginner to intermediate.
Approximate time: 1–2 hours.
Materials:
- One cable- or texture-knit sweater front panel large enough to cover your pillow form plus seam allowance
- A soft backing fabric (cotton or fleece) for the back
- Matching thread
- A pillow insert
Tools:
- Measuring tape or ruler
- Paper for a pattern
- Fabric scissors or rotary cutter and mat
- Pins or clips
- Sewing machine with a ballpoint needle
- Iron
Steps:
- Measure the pillow insert. Cut one front panel from the sweater body, adding a 1.5 cm (5/8 in) seam allowance on all sides. Place the cable or texture where it will center on the finished cover.
- Cut two back panels from the backing fabric, each the width of the front and slightly more than half its height, so they overlap at the center.
- Stabilize the raw edges of the knit panel with a zigzag or overcast stitch before sewing.
- Hem the center edge of each back panel.
- Lay the front panel right side up, place the two back panels right side down on top with their hemmed edges overlapping, and pin all around.
- Sew the perimeter with a narrow zigzag or stretch stitch, then trim and finish the seam allowance.
- Turn right side out, press gently, and insert the pillow form.
Customization:
- Use the cuff or ribbed hem as a decorative band across the front
- Pair a bold cable knit with a quiet solid back
- Add a visible button closure instead of the envelope overlap
Practical tip: Cut the knit front with the stretch running side to side so the cover hugs the pillow without sagging.
Common mistake: Skipping the edge stabilization — a cable knit can ladder quickly once cut, and the seam may pull open.
Safety note: Keep pins and loose threads away from children and pets while assembling.
For this kind of cover… I’d choose a sweater with a dense! stable knit rather than a very loose or open cable pattern… because it behaves better once cut and sewn! Match the front panel to the pillow form before trimming so the main cable lands in the center instead of drifting toward one side… After sewing! wash the finished cover using the gentlest method appropriate for the sweater fiber and check the fit again once it is completely dry… If the cover feels slightly loose, a fuller pillow insert can help, but if the knit has stretched noticeably, reduce the next pattern by a small amount rather than relying on the seam alone to tighten it.
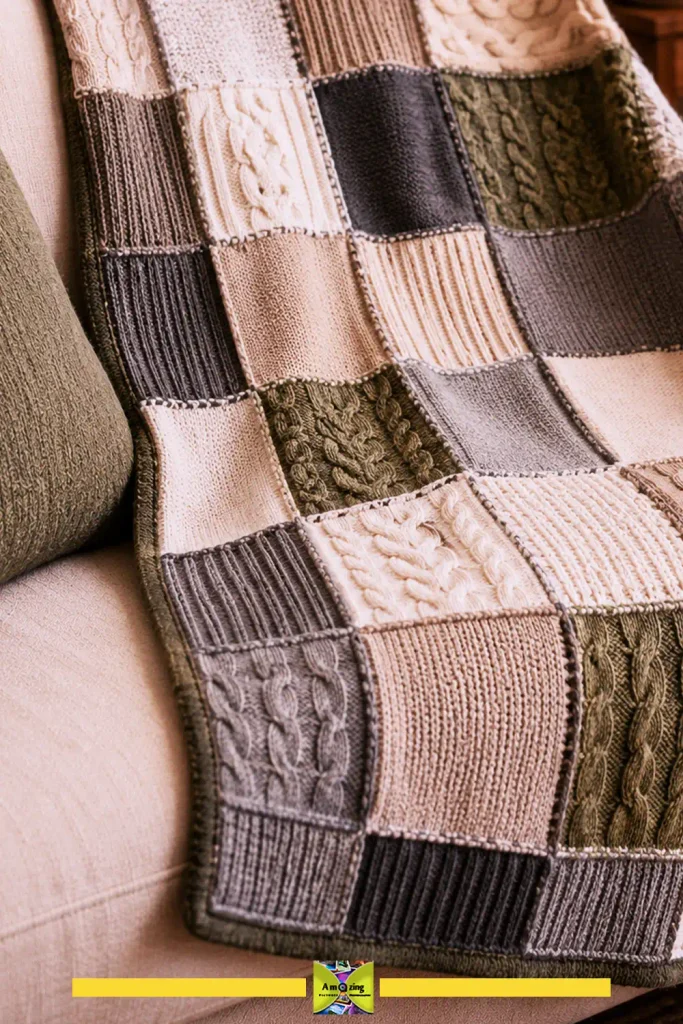
Patchwork Sweater Lap Throw
What it looks like: A small throw assembled from coordinated squares or rectangles, with the different knit textures arranged in a deliberate grid or gradient.
Best use: A cozy lap blanket for a chair or sofa; a way to use the body panels of several sweaters at once.
Difficulty: Intermediate.
Approximate time: 3–5 hours.
Allow roughly 3–5 hours for a small lap throw… depending on the number of sweater panels! how much edge stabilization each knit needs and whether the backing is added in the same session…. Cutting and arranging the squares often takes longer than expected because the different textures need to be balanced before sewing. I’d record the active cutting, assembly, and finishing time separately from washing or drying time on the first completed throw, then replace this estimate with the actual build time from your tested size.
Materials:
- Several sweaters in a coordinated palette and similar weight
- A backing fabric (fleece or cotton flannel)
- Matching thread
Tools:
- Cardboard or paper template for squares/rectangles
- Rotary cutter and mat
- Ruler
- Pins or clips
- Sewing machine with a ballpoint needle
- Iron
Steps:
- Cut a square or rectangle template (for example, 25 cm / 10 in) from cardboard. Cut one square from each sweater, staying within flat body panels.
- Stabilize the edges of every knit square with zigzag or overcast stitching so they don’t stretch or ladder.
- Lay out the squares on a flat surface and rearrange until the colors and textures look intentional. Photograph the layout before sewing.
- Sew squares into rows with a narrow zigzag, pressing seams to one side, then sew the rows together.
- Trim the assembled top square, then lay it on the backing fabric right sides together.
- Sew around three sides, turn right side out, then fold in and stitch the opening closed. Topstitch a border if desired.
Customization:
- Arrange squares in a tonal gradient from light to dark
- Repeat one rib or stripe in every other square
- Mix a single bold patterned knit with solids
Practical tip: Keep all sweaters close in thickness so the finished throw lies flat and feeds evenly through the machine.
Common mistake: Mixing weights too aggressively — a bulky cable square next to a fine jersey square will pucker and won’t lie flat.
For a lap throw like this… I’d decide on the finished dimensions first! then work backward to the number of sweater squares needed… A throw made from 25 cm / 10 in squares builds up quickly! so even a handful of sweaters can provide enough usable fabric if the body panels are large. I’d keep the knits within a similar weight range and test-sew two squares before cutting the entire batch… After the first wash, check whether any seams ripple or stretch more than the others… if they do, stabilize those knit types more firmly in future builds or reduce how much they are mixed with lighter fabrics.
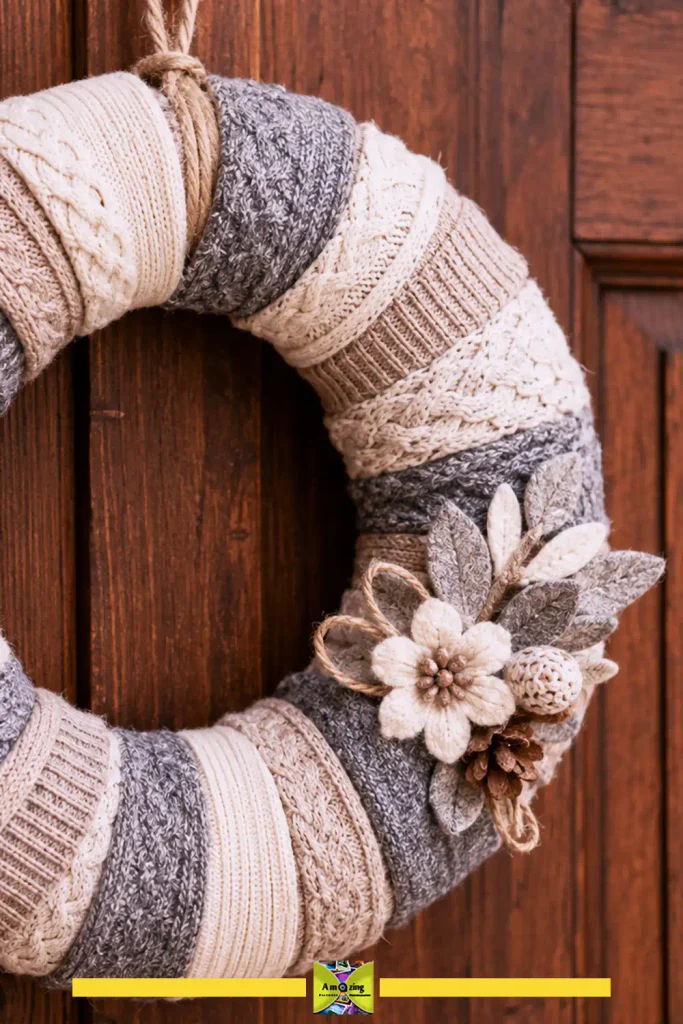
Sweater-Strip Winter Wreath
What it looks like: A foam or wire wreath form wrapped in overlapping strips of sweater knit, with the textures and colors alternating for a soft, textured ring.
Best use: A no-sew seasonal door or wall accent that uses long scrap strips.
Difficulty: Beginner.
Approximate time: 45–90 minutes.
Materials:
- A wreath form (foam or wire)
- Several sweater scraps cut into long strips
- Optional twine or ribbon for hanging
Tools:
- Scissors
- Straight pins or hot glue (only if the form won’t be washed or heated)
- A tape measure
Steps:
- Cut sweater scraps into strips roughly 5–8 cm (2–3 in) wide and long enough to wrap the form once with a little overlap.
- Anchor the first strip at the back of the form with a pin or a dab of glue, then wrap it around, slightly overlapping each pass.
- Continue with additional strips, tucking the ends to the back and pinning or gluing them in place.
- Alternate colors and textures as you work, keeping the tension even.
- Finish with a loop of twine or ribbon at the top for hanging.
Customization:
- Use a single tonal palette for a restrained look, or alternate cream, oatmeal, and gray for a soft winter ring
- Add a few felted wool shapes as a focal point
Practical tip: Pull each strip just snug enough to stay put — stretching it too tight makes the wreath look lumpy and warps the form.
Common mistake: Overloading the ring with too many competing textures and colors so it reads as busy rather than soft.
Safety note: Keep the wreath away from open flames and active heat sources; knit is combustible.
For a medium wreath form… I’d cut more sweater strips than I think! I’ll need before starting so I can keep the wrapping rhythm consistent without stopping midway… The total number depends on the form diameter, strip width, and how much each layer overlaps… but a fuller wrap will use noticeably more fabric than a loose one… Before fixing anything permanently! wrap two or three strips around the form and check the spacing from the front… If the knit starts bunching or the form shows through, adjust the overlap rather than pulling the fabric tighter. Once the first wreath is finished! Record the form size and total strip count so the next one is much easier to plan. If you like the wreath, you’ll find more coordinated recycled-material décor in our larger round-up.
Filled Door Draft Blocker
What it looks like: A long fabric tube filled with a heavy, non-allergenic filling, sized to sit against the bottom of a door, with a washable outer cover.
Best use: Blocking cold drafts under an interior door; a practical use for long, straight sweater body panels.
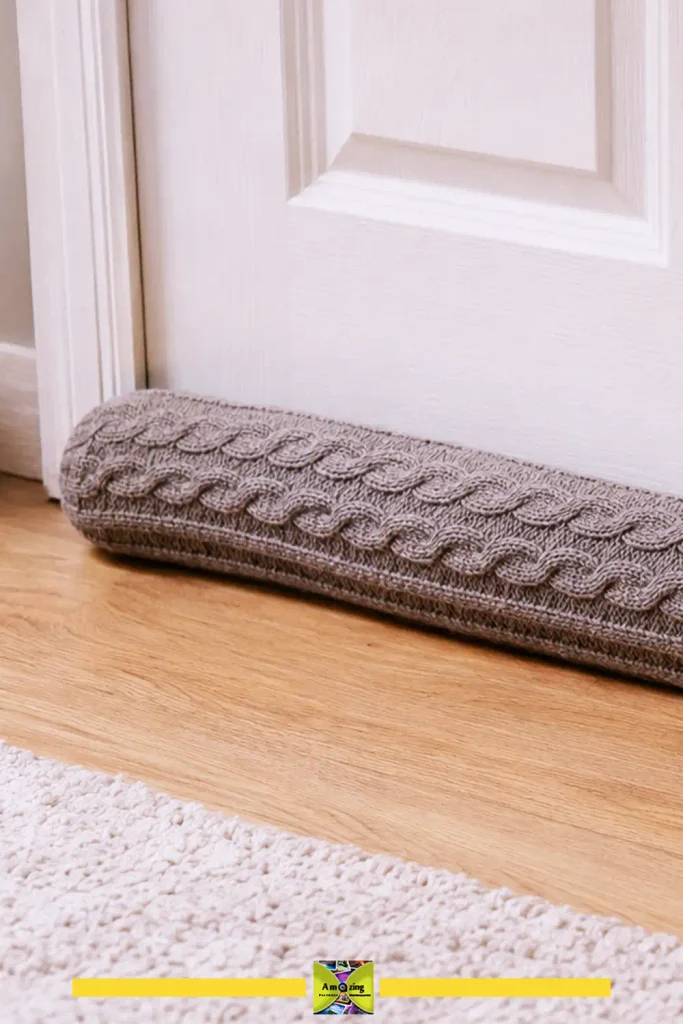
Difficulty: Beginner to intermediate.
Approximate time: 1–2 hours.
Materials:
- A long straight panel of sweater knit (or a sewn tube of panels) for the outer cover
- A sturdy inner sleeve fabric
- Filling such as dried rice, lentils, or buckwheat hulls
- Matching thread
Tools:
- Ruler
- Scissors
- Pins or clips
- Sewing machine with a ballpoint needle
- A funnel for filling
Steps:
- Measure the width of the door and add a little length so the blocker overlaps both sides.
- Cut the sweater panel to that length plus seam allowance, and a width that wraps into a tube.
- Sew an inner sleeve from the sturdy fabric, leaving one end open; fill it loosely with the filling and stitch the end closed. Filling should be firm enough to block drafts but soft enough to sit flush.
- Sew the sweater outer cover into a tube, right sides together, leaving one end open for turning.
- Turn the outer cover right side out, insert the filled inner sleeve, and close the open end with a hand or machine stitch.
- Confirm the finished blocker lies flat against the floor and the door.
Customization:
- Make the outer cover removable with a simple closure so it can be washed
- Use a cable-knit panel for a decorative look
- Add a loop handle to hang it when not in use
Practical tip: Leave the filling a little loose and test the fit under the door before closing the final seam — overfilling makes it roll instead of sit flush.
Common mistake: A knit cover with a too-thin inner sleeve can let fine filling leak, and the blocker sags or bulges unevenly.
Safety note: Keep small loose filling away from children and pets, and avoid using food grains if pests or moisture are a concern in your home.
For a draft blocker… I’d choose the filling based on how much weight you actually need and how easy it will be to maintain! Rice or lentils give good weight! but they are more vulnerable to moisture and pests… while buckwheat hulls are lighter and shift more easily inside the sleeve. Whatever you use! test the filled inner tube against the door before closing it permanently. If it rolls away from the gap, remove some filling; if it collapses and leaves spaces, add a little more. For the outer sweater cover, a removable design is worth the extra effort because it can be washed separately without disturbing the filling. After the first wash, check whether the knit has stretched or shrunk and adjust the next cover pattern if needed.
Useful Storage and Gifts
Reinforced Soft-Storage Basket
What it looks like: A structured fabric basket with a stable lining and a stiffened base, soft enough to look cozy but firm enough to stand on its own and hold folded linens or toys.
Best use: Open storage on a shelf or in a closet that needs to keep its shape — an under-covered alternative to floppy knit bins.
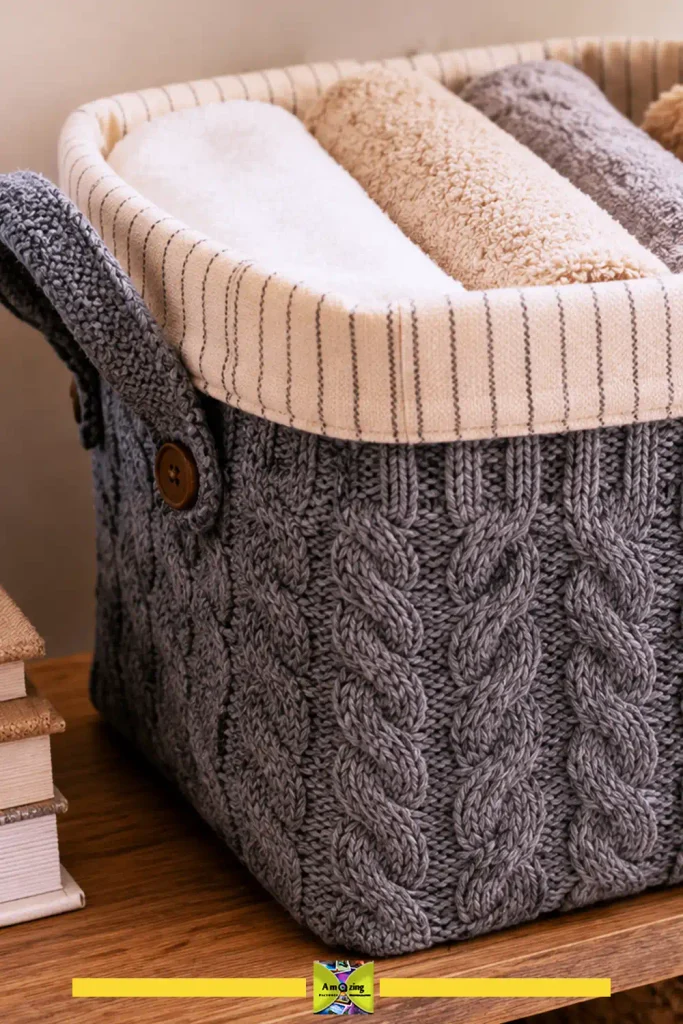
Difficulty: Intermediate.
Approximate time: 2–3 hours.
Materials:
- A thick or felted sweater for the outer shell
- A stable lining fabric (canvas or cotton duck)
- Stiff interfacing or a rigid base insert (cardboard covered in fabric, or plastic canvas)
- Matching thread
Tools:
- Ruler
- Scissors
- Pins or clips
- Sewing machine with a ballpoint needle
- Iron
Steps:
- Decide the finished basket dimensions (height, width, depth) and cut the outer shell from the felted sweater, adding seam allowance. Felt the wool first if you want a denser, non-fraying shell.
- Cut the lining and interfacing to match.
- Fuse or baste the interfacing to the wrong side of the outer shell so the knit can’t stretch out of shape.
- Sew the outer shell into a box shape, then the lining into the same box shape, leaving an opening in the lining for turning.
- Insert a rigid base piece between the outer shell and lining to keep the bottom flat.
- Drop the lining into the shell, stitch the top edges together, and turn through the lining opening; close it.
- Press the top edge and confirm the basket stands square and holds its shape when filled.
Customization:
- Use a contrasting lining that folds over the top edge for a visible trim
- Add two small handles
- Make a set in graduated sizes for a shelf
Practical tip: The base insert is what separates a “real” basket from a saggy bag — don’t skip it, and cover it in fabric so it looks finished.
Common mistake: Relying on the knit alone for structure. Without interfacing and a rigid base, the basket collapses as soon as it’s filled.
For a soft-storage basket… I’d test the structure with the kind of load you actually plan to store before deciding the build is finished! A fabric-covered plastic canvas or thin rigid board insert usually keeps the base flatter than interfacing alone… especially under folded towels, toys, or craft supplies… If the sides begin bowing outward! add firmer interfacing or a second stabilizing layer rather than relying on the sweater knit to recover its shape. I’d also remove the rigid base before washing whenever possible, then check the basket again after drying to see whether the outer knit stretched, shrank, or twisted around the lining.
Sweater-Sleeve Gift Bag with Reusable Closure
What it looks like: A small drawstring or folded-top bag made from a sweater sleeve, with the finished cuff becoming the top opening and a ribbon or cord for closure.
Best use: Reusable wrapping for a bottle, candle, book, or small gift; a fast project from a single sleeve.
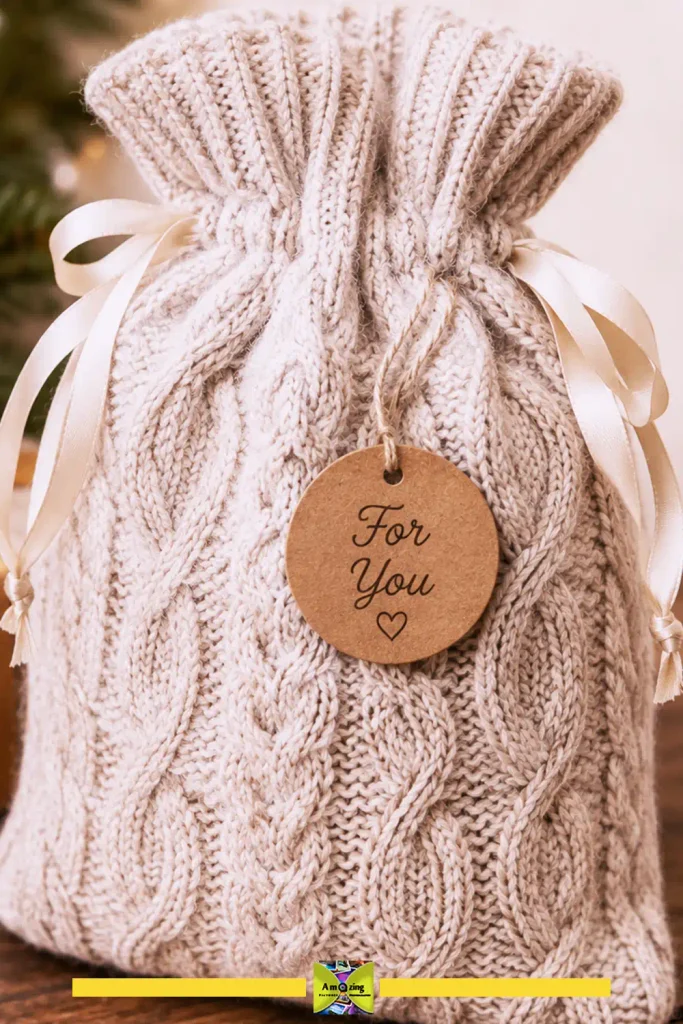
Difficulty: Beginner.
Approximate time: 20–40 minutes.
Materials:
- One sweater sleeve
- A length of ribbon, cord, or twine
- Matching thread
Tools:
- Scissors
- Pins or clips
- Sewing machine with a ballpoint needle (or hand needle)
- A safety pin for threading the cord
Steps:
- Cut the sleeve to the length you need, keeping the finished cuff as the top edge.
- Turn the sleeve inside out and stitch the cut bottom edge closed with a straight or zigzag stitch, then turn it right side out.
- For a drawstring, fold the top edge (or the cuff) down to form a narrow channel and stitch it, leaving a gap; thread the cord through with a safety pin.
- For a folded-over flap, skip the channel and simply tie a ribbon around the folded top after filling.
- Add a small tag or label for a finished look.
Customization:
- Box the bottom corners for a flat base that stands
- Leave the cuff raw for a cozy gathered top
- Pair a patterned sleeve with a solid ribbon
Practical tip: Sew the bottom seam twice or use a small zigzag — a gift bag that splits open defeats the purpose.
Common mistake: Cutting the sleeve too short and ending up with a bag that won’t close around the gift.
For a sleeve gift bag… I’d test the bag with the actual gift before deciding on the closure! A drawstring works well for lighter items because it keeps the top neat and reusable… while a folded cuff with ribbon is usually better for bulkier gifts that need more opening space! If the bag will carry something heavier such as a bottle or thick book… reinforce the bottom seam with a second row of stitching and check the knit for stretching before wrapping it… Sleeves with a dense ribbed cuff tend to hold their shape better than very loose knits, especially after repeated use.
Removable Cachepot Sleeve
What it looks like: A snug knit sleeve that slips over a plain indoor plant pot, hiding the plastic nursery pot without touching soil or water.
Best use: A quick, removable way to dress up a dry indoor plant pot — an under-covered no-sew or lightly sewn project.
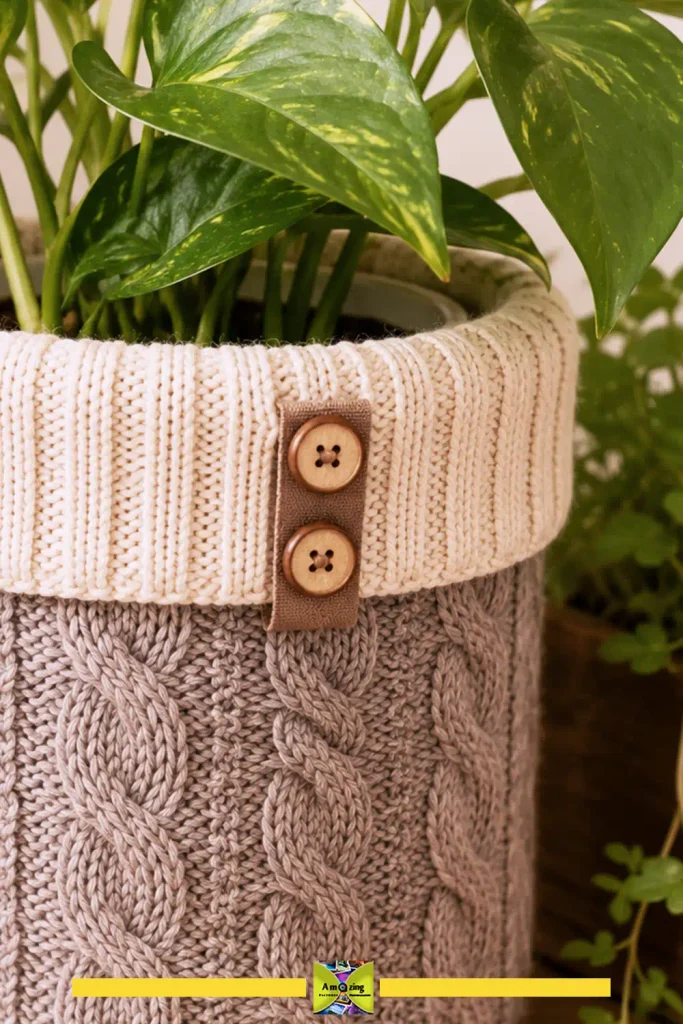
Difficulty: Beginner.
Approximate time: 15–30 minutes.
Materials:
- A sweater sleeve or body panel
- Optional trim or buttons
Tools:
- Scissors
- Measuring tape
- Pins
- Fabric glue or a hand needle and thread (for a seamed version)
Steps:
- Measure the height and circumference of the cachepot you want to cover.
- Cut a sleeve or panel slightly taller than the pot so the top can fold over the rim.
- Wrap it around the pot and mark where it overlaps.
- For a no-sew version, apply fabric adhesive to the overlap, wrap snugly, and let it dry flat away from heat. For a sewn version, stitch a seam up the back.
- Fold the top edge over the rim and adjust so the sleeve sits straight. The cover should be easy to remove for watering and cleaning.
Customization:
- Fold a contrasting cuff over the rim
- Add buttons or a small tag
- Use a ribbed cuff at the top for a tidy edge
Practical tip: Keep the cover removable and dry — a knit sleeve in constant contact with a wet pot will absorb moisture and can mildew.
Common mistake: Cutting the sleeve too snug so it stretches and bulges, or too loose so it slips down the pot.
Safety note: This covers a dry, decorative cachepot only. Do not place knit fabric over heat sources, and keep it away from standing water and drainage.
For a removable cachepot sleeve… I’d test the fit with the plant in place and again after watering… because nursery pots can become heavier and slightly shift inside the decorative pot! Leave just enough ease that the sleeve slides off without stretching the knit… especially around a wider rim! I’d also remove the cover every time I water, wipe the outside of the pot and saucer completely dry, then replace the sleeve only after there is no moisture left. As the plant grows, check occasionally that the pot has not been upsized or changed shape enough to put the knit under constant tension; if it has, remake the sleeve a little larger rather than forcing the original one to fit.
Lined Tote Bag
What it looks like: A soft-sided tote with a reinforced top edge and sturdy handles, lined so the knit doesn’t stretch or snag on the contents.
Best use: A market or everyday carry bag that uses the body of a large sweater and holds up to real use.
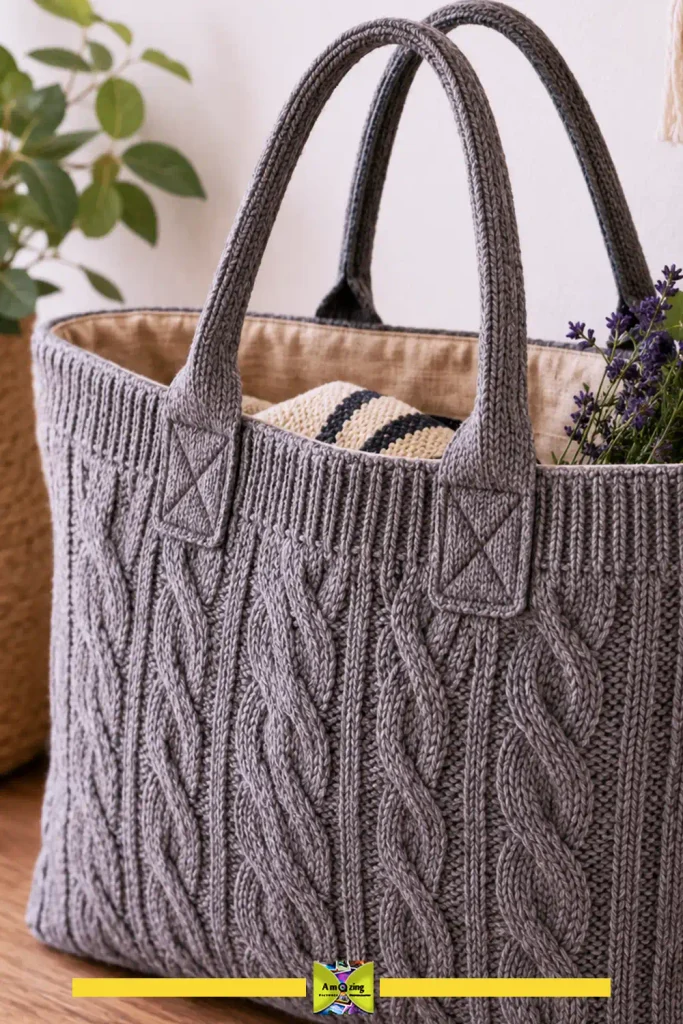
Difficulty: Intermediate.
Approximate time: 2–3 hours.
Materials:
- A thick or felted sweater panel for the outer
- A lining fabric (canvas or cotton)
- Interfacing for the top edge and handle attachment points
- Matching thread
Tools:
- Ruler
- Scissors
- Pins or clips
- Sewing machine with a ballpoint needle
- Iron
Steps:
- Cut the outer bag body from the sweater — two panels (or one folded) plus seam allowance — and identical pieces from the lining and interfacing.
- Fuse or baste interfacing to the wrong side of the outer panels to stop the knit from stretching.
- Sew the outer panels into a bag, then the lining into a bag, leaving a turning gap in the lining.
- Make the handles: cut two strips of knit, reinforce them with interfacing or a woven tape, fold and stitch into firm straps.
- Position the handles on the outer bag, folding under the raw ends, and stitch them in place with a reinforced box or bar tack at each attachment.
- Drop the lining into the outer bag, stitch around the top edge, and turn through the lining gap; close it.
- Topstitch the top edge to keep it crisp, and reinforce each handle attachment with an extra pass.
Customization:
- Use the sweater’s ribbed hem as the bag’s top band
- Add an interior pocket
- Choose a bold patterned knit for the outer and a solid lining
Practical tip: Reinforce the handle attachment points — the knit alone will stretch and tear under a full load.
Common mistake: Skipping the interfacing, which lets the bag sag and the handles pull out of the knit.
The handles are the first place I’d watch once this tote starts carrying real weight. Pack the finished bag gradually… a folded sweater, a couple of books, then a few heavier everyday items… and check the stitching after each test! If the handle area begins to stretch or wrinkle… the problem is usually not the seam itself but the lack of support behind it. A small square of extra interfacing or woven tape hidden inside the lining can spread the pull over a wider area and make the bag feel much sturdier. Check the side seams too! if they stay flat and the top edge holds its shape after several loaded carries, the construction is doing its job.
Padded Zippered Pouch
What it looks like: A small padded pouch with a zipper closure, sized for non-fragile accessories or a device stored while disconnected from power.
Best use: Protecting small items in a bag — a device sleeve, a pencil case, or a travel pouch for chargers and cables.
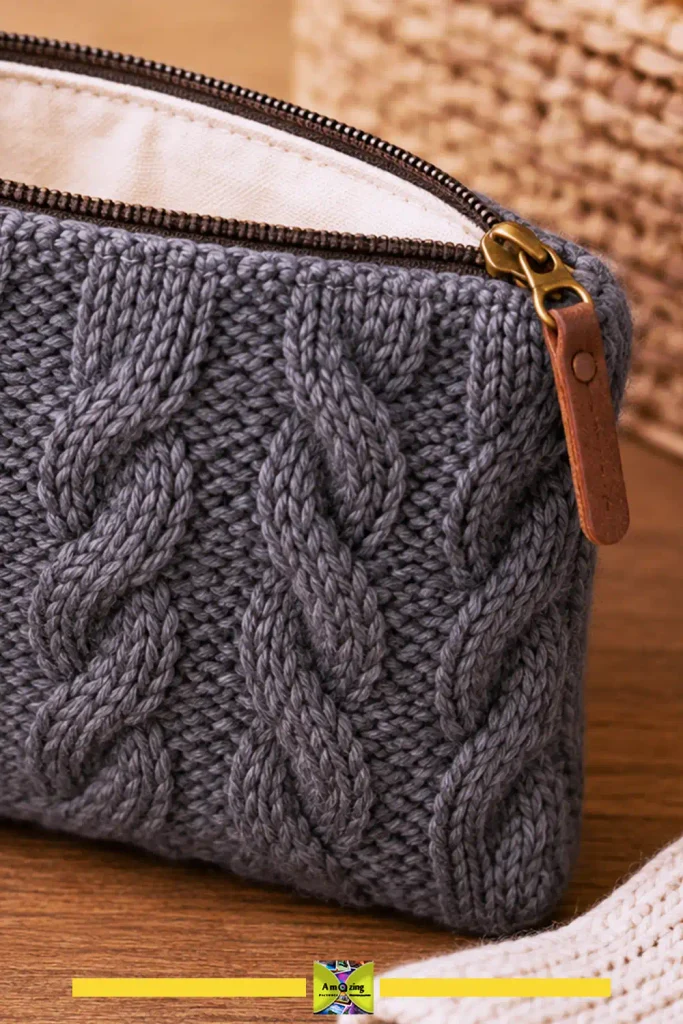
Difficulty: Intermediate to advanced.
Approximate time: 1.5–3 hours.
Materials:
- A sweater panel for the outer
- A lining fabric
- A layer of padding (cotton batting or felted wool)
- A zipper the right length
- Matching thread
Tools:
- Ruler
- Scissors
- Pins or clips
- Sewing machine with a zipper foot and ballpoint needle
- Iron
Steps:
- Decide the pouch dimensions and cut the outer, lining, and padding layers to match, adding seam allowance.
- Layer the padding between the outer and lining, and baste them together.
- With the zipper foot, sew the zipper to the top edges of the layered front and back panels, right sides together, so the zipper teeth face inward.
- Open the zipper partway, then sew the three remaining sides of the pouch with the layers right sides together.
- Trim and finish the seam allowance, turn right side out through the open zipper, and press the seams.
- Check the zipper runs smoothly and the corners are square.
Customization:
- Add a wrist strap
- Box the bottom corners for a flat base
- Use a contrasting zipper as a deliberate color accent
Practical tip: Open the zipper before sewing the final side — a closed zipper traps the bag inside out and you’ll have to unpick it.
Common mistake: Stretching the knit as you insert the zipper, which makes the top edge wavy and the zipper catch.
Safety note: Store electronic devices disconnected from power; a knit pouch is a soft cover, not protection against drops or heat.
A pouch like this is worth testing with the exact item you plan to carry! Because a “close enough” fit can make the zipper work harder than it should! Slip the device, cables, or stationery inside and check whether the top edge bows or the zipper teeth are being pulled sideways… If they are! give the next version a little more ease instead of adding thicker padding! After a few days of use… inspect the zipper ends and the knit beside the zipper tape… those are the spots most likely to show early strain. If they stay flat and the slider still moves freely, the sizing and stabilization are probably right.
Wearable Accessories
Felted-Wool Mittens
What it looks like: Warm mittens drafted from the maker’s own hand outline, cut from felted wool so the edges don’t fray and the fabric blocks wind.
Best use: Cold-weather mittens sized to fit, using felted wool from an untreated wool sweater.
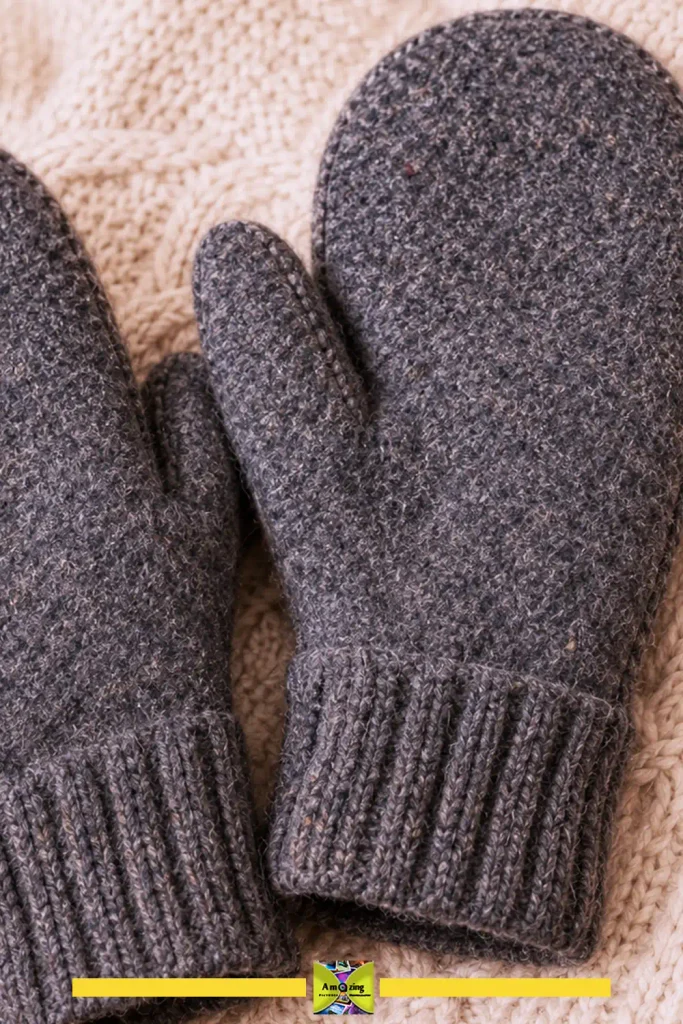
Difficulty: Intermediate to advanced.
Approximate time: 2–4 hours including felting.
Materials:
- An untreated wool sweater, felted first
- Matching thread
- Optional lining fleece for extra warmth
Tools:
- Paper and pencil for the pattern
- Ruler
- Scissors
- Pins or clips
- Sewing machine with a ballpoint needle
- Hand needle
Steps:
- Felt the wool sweater first (see the felting section) so the fabric is dense and non-fraying.
- Trace one hand on paper with the fingers relaxed and slightly spread, then add roughly 1.5 cm (5/8 in) of seam allowance all around for the mitten body and a little extra at the cuff.
- Cut two mirrored mitten pieces per hand from the felted wool, placing the cuff (or a ribbed hem) at the wrist for a finished edge.
- Pin the pieces right sides together and sew around the mitten with a straight or narrow zigzag stitch, leaving the wrist open.
- Clip the curve between the thumb and fingers, turn right side out, and test the fit while you can still adjust.
- If the thumb feels tight or limits movement, enlarge the pattern at the thumb gusset and recut — fit is worth a test pair.
- Optionally line with fleece, and reinforce the thumb seam.
Customization:
- Use the sweater’s ribbing for the cuff
- Add a contrasting thumb
- Line with fleece for extra warmth
Practical tip: Make a quick test mitten from a scrap first — hand outlines vary, and a thumb that’s too tight is the most common fit failure.
Common mistake: Cutting without enough ease around the thumb, so the finished mitten binds and limits movement.
Safety note: Handmade mittens are warmth, not protection — do not treat them as heat-resistant or protective against impact.
Don’t trust the paper pattern until you’ve moved your hand inside a test mitten. A pair can look roomy on the table and still pinch badly where the thumb joins the palm. Measure around the widest part of your hand, note the finished felt thickness, and give the thumb more breathing room than the fingers. After sewing the test piece, wear it for a few minutes and make a fist, grip a mug, and flex your thumb. Any pulling at the thumb seam means the pattern needs more ease before you cut into the best part of the sweater.
Ribbed Ear-Warmer Headband
What it looks like: A stretchy headband made from the ribbed cuff or hem of a sweater, wide enough to cover the ears, with a finished edge all the way around.
Best use: A quick cold-weather accessory that keeps ears warm without a full hat.
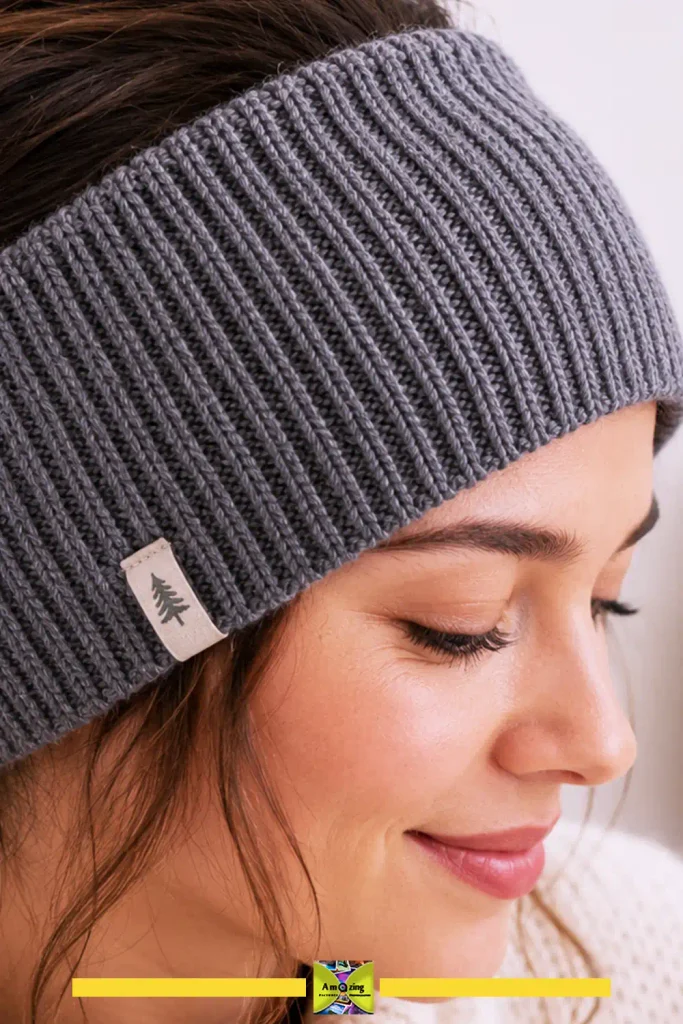
Difficulty: Beginner.
Approximate time: 20–40 minutes.
Materials:
- The ribbed cuff or hem of a stretchy sweater, or a body panel cut to width
- Matching thread
Tools:
- Scissors
- Measuring tape
- Pins or clips
- Sewing machine with a ballpoint needle or a hand needle
Steps:
- Measure around the head where the headband will sit, and subtract a little for stretch so it grips without squeezing.
- Cut the ribbed cuff or hem to that length, keeping the finished edge.
- If using a cuff, it may already be a tube — flatten it and adjust the width. If using a panel, fold it into a band and stitch the long edges.
- Join the short ends right sides together with a zigzag or stretch stitch to form a loop.
- Turn right side out and test the fit; adjust the seam if it’s too loose or too tight.
Customization:
- Twist the band once before joining for a crossover style
- Use a two-tone cuff
- Add a small woven label at the seam
Practical tip: The ribbing does the work — cut with the ribs running around the head so the band stretches comfortably.
Common mistake: Cutting the band to the exact head measurement with no negative ease, so it slides off as soon as you move.
Ribbing can be deceptive… it looks like it has plenty of stretch until the band is actually worn for a while. I’d measure the head where the band will sit, then make the first version only slightly shorter rather than aggressively reducing the length. Try it on for ten or fifteen minutes, not just a quick mirror check. If it leaves pressure marks or starts creeping upward, adjust the seam before calling the fit finished. Once you find the right amount of negative ease for that particular sweater knit, write it down; different ribbing can behave very differently even when the measurements look identical.
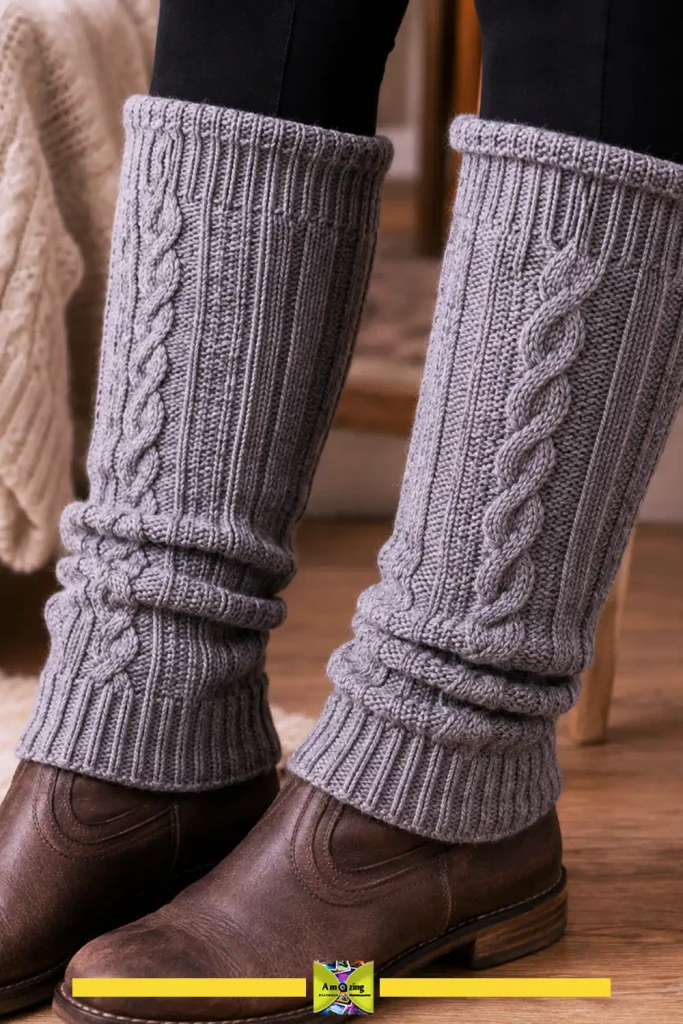
Sweater-Sleeve Leg Warmers
What it looks like: Two warm tubes worn over the lower legs, cut from sweater sleeves with a finished upper edge that stays up.
Best use: Extra warmth for layering under or over boots and leggings, or around the house on cold days.
Difficulty: Beginner.
Approximate time: 30–60 minutes.
Materials:
- Two sweater sleeves of similar length
- Optional elastic or a drawcord for the top
- Matching thread
Tools:
- Scissors
- Measuring tape
- Pins or clips
- Sewing machine with a ballpoint needle
Steps:
- Measure from ankle to just below the knee, plus a little length for the fold.
- Cut both sleeves to that length, keeping the finished cuff as the lower or upper edge.
- If the cut end will be at the top, finish it by folding it under and stitching, or add a narrow elastic channel to keep it up.
- If the sleeves are too wide, take in the seam slightly for a closer fit.
- Hem any raw edges and check both warmers are the same length.
Customization:
- Keep the cuff at the ankle for a snug lower edge
- Add a drawcord at the top
- Use two coordinating colors
Practical tip: Finish the top edge so it holds — an unfinished raw edge will roll and slip down your leg.
Common mistake: Cutting the warmers to different lengths or leaving the top edge raw so it curls and won’t stay up.
Sleeve shape matters more here than the sweater size on the label. A slightly tapered sleeve usually makes a better leg warmer because it follows the calf instead of hanging like a straight tube. Before sewing the top edge, pull both sleeves on over the leggings or boots you plan to wear and walk around for a few minutes. If they start sliding, add a narrow elastic channel or take in the seam a little rather than making the whole warmer tighter. Once the fit feels right… match the second sleeve to the first instead of measuring each one independently… that helps the finished pair sit at the same height.
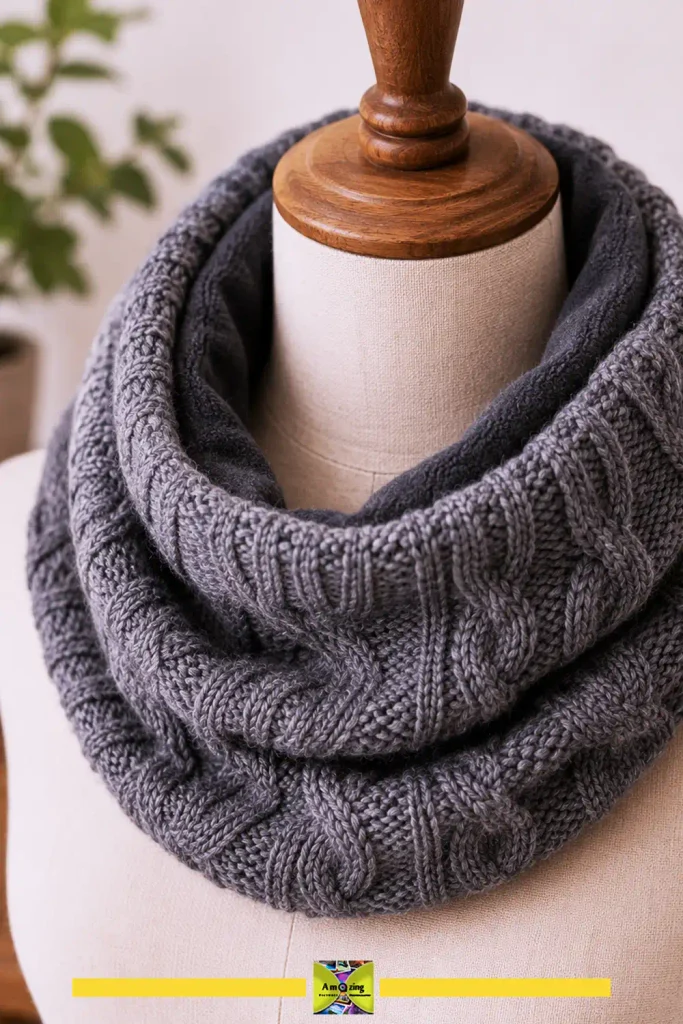
Soft Cowl Scarf
What it looks like: A soft, seamless loop worn around the neck, made by joining the ends of a sweater body or sleeve, with an optional lining for a clean finish.
Best use: A cozy neck warmer that needs no wrapping or tying; a fast project from a single panel.
Difficulty: Beginner.
Approximate time: 30–60 minutes.
Materials:
- A soft sweater panel or sleeve long enough to loop the neck
- Matching thread
- Optional lining fleece
Tools:
- Scissors
- Pins or clips
- Sewing machine with a ballpoint needle
Steps:
- Cut a rectangle from the sweater body or a wide sleeve — roughly 60 cm (24 in) long by 25–30 cm (10–12 in) wide, adjusted to your neck and desired drape.
- Fold the rectangle in half lengthwise, right sides together, and stitch the long edge into a tube.
- Bring the two short ends together, right sides together, and stitch them into a loop, leaving a small opening for turning.
- Turn right side out through the opening and stitch it closed.
- For a lined version, repeat with fleece and slip it inside before closing.
Customization:
- Use a turtleneck collar as the finished outer edge
- Add a lining for a clean interior
- Join two coordinating panels for a two-tone loop
Practical tip: Use a wide, soft panel and keep the seam on the inside — the cowl should drape, not stand stiff.
Common mistake: Making the loop too short and tight, so it pulls at the neck instead of draping.
The easiest way to judge a cowl is to wear it before you finish the final opening. Pin or baste the loop together, slip it over your head, and check whether it sits comfortably without pulling at the neck or collapsing too flat. If the fabric is very stretchy, shorten the loop a little; if the knit is dense or lined with fleece, give it more room so it can drape naturally. I’d also keep the joining seam at the back or low on one side, where it is less noticeable and less likely to rub. After a few wears! check whether the loop has stretched longer than expected… soft knits can relax with use, especially when the cowl is stored hanging.
Practical Projects from Smaller Scraps
Washable Pet-Bed Cover
What it looks like: A removable cover for a pet bed, sewn from a thick or felted sweater, with reinforced seams and a removable insert so the whole thing can be washed.
Best use: A durable, washable bed cover for a dog or cat, sized to an existing bed or a simple stuffed insert.
Difficulty: Intermediate.
Approximate time: 1.5–3 hours.
Materials:
- A thick or felted sweater panel (or several sewn together)
- A sturdy zipper or strong closure
- Matching thread
- A bed insert or stuffing
Tools:
- Ruler
- Scissors
- Pins or clips
- Sewing machine with a ballpoint needle
Steps:
- Measure the pet bed or decide the finished size, then cut the top and bottom panels from the sweater, adding seam allowance.
- Stabilize and reinforce the seams, especially the corners, with an extra line of stitching.
- Sew the panels together with the zipper or closure along one edge so the cover can be removed for washing.
- Turn right side out and insert the bed or stuffing.
- Check for loose threads, exposed fasteners, or gaps a pet could chew or pull.
Customization:
- Use a felted wool top for durability and a fleece bottom for grip
- Make the cover reversible
- Add a simple snap or zipper closure
Practical tip: Reinforce the corners and the closure — those are the first places a pet’s weight and claws will work the seams loose.
Common mistake: Leaving raw edges or loose threads inside the cover, which a pet can chew and swallow.
Safety note: Test the finished cover for loose threads, exposed fasteners, removable stuffing, and chewing hazards before giving it to a pet, and retire it when seams open or fibers shed heavily.
A pet-bed cover gets a much tougher workout than a decorative cushion… so the real test is what happens after repeated use and washing. Pay particular attention to the zipper ends, corners, and any seam where the animal regularly steps or curls up. If the knit begins stretching around those areas, reinforce them from the inside with a small patch of sturdy woven fabric before the damage spreads. It’s also worth washing the finished cover once before regular use… that first cycle will quickly reveal whether the sweater fabric shrinks, sheds, twists, or changes fit around the insert…
Felted Chair-Leg Floor Protectors
What it looks like: Small felted-wool pads fitted over the feet of chair legs to reduce scuffing and noise on hard floors.
Best use: A low-cost, slip-on alternative to plastic floor protectors for chairs used on hard floors — an under-covered scrap project.
Difficulty: Beginner.
Approximate time: 20–40 minutes.
Materials:
- Felted wool scraps (thick enough to cushion)
- Matching thread
- Optional a thin non-slip backing
Tools:
- Scissors
- Measuring tape
- A hand needle and thread
- A chair to measure
Steps:
- Felt the wool scraps first so the fabric is dense and won’t fray (see the felting section).
- Measure the chair-leg foot — its diameter and a little height up the leg.
- Cut a circle for the bottom and a band for the sides, adding a small overlap for the seam.
- Stitch the band into a ring, then stitch the circle to the bottom to form a cap.
- Fit the cap over the leg and adjust so it grips without slipping off.
Customization:
- Cut pads in a single neutral color for an invisible finish, or in a deliberate accent color
- Add a thin non-slip backing if the felt slides
Practical tip: Felt thick and fit snug — thin or loose pads wear through quickly and slide off as the chair is dragged.
Common mistake: Expecting the felt to do what a rubber pad does. Felt cushions and muffles sound, but it can slide on very smooth floors and will wear through over time.
Safety note: A felt pad is not a permanent structural fix for an unstable chair — replace worn pads and address any loose or damaged leg separately.
How to Make Mismatched Sweaters Look Intentional
The difference between “recycled” and “deliberate” is usually restraint. A few habits make a set of unrelated sweaters read as a collection. The same aesthetic-first approach carries across seasons, as in these everyday upcycled materials projects:
- Limit the palette to two to five coordinated colors. A handful of related tones (cream, oatmeal, gray, and one accent) looks curated; six unrelated colors looks random.
- Repeat one cable, rib, stripe, or texture. Repeating a single knit motif across pieces ties them together even when the colors differ.
- Pair one bold patterned knit with quieter solids. Let a Fair Isle or argyle be the focal point and surround it with plain knits.
- Align motifs before cutting. Match stripes and cables at the seam so they flow instead of ending abruptly.
- Use symmetry — or a deliberate asymmetry. A centered arrangement looks intentional; a slightly off-center placement reads as a mistake.
- Coordinate buttons, zippers, linings, handles, and labels. Matching hardware and trims unify the whole set.
- Combine similar fabric weights. A bulky cable next to fine jersey puckers; keeping weights close makes seams lie flat.
- Conceal or decoratively finish raw seams. A clean finish — bound, lined, or topstitched — is what separates polished from improvised.
- Use a tonal gradient for patchwork. Arranging squares light-to-dark is a simple, reliable way to make patchwork look planned.
- Edit the embellishment. Let the knit texture carry the design; add buttons or trim only where they earn their place.
Troubleshooting Common Old Sweater Craft Problems
- Knit unraveling after cutting — stabilize the edge (stay-stitch, zigzag, overcast, or serge) as soon as it’s cut, before handling it much.
- Edges curling or stretching — counteract curl with a stay-stitch line, binding, or a lining, and handle the piece without dragging.
- Fabric pulled into the machine — use a ballpoint or stretch needle, lighten presser-foot pressure, and start the seam with a scrap strip under the edge so the feed dogs catch.
- Skipped stitches, thread breakage, wavy seams — change the needle first, then test stitch length and tension on an offcut; switch to a narrow zigzag or stretch stitch.
- Bulky intersections that won’t feed evenly — trim or grade the seam allowance and hand-crank over the thickest spot if needed.
- Panels shrinking at different rates — wash and felt all pieces for a project together, or pre-treat them identically.
- Adhesive soaking through or leaving stiff patches — apply glue in a thin even layer, test on an offcut, and avoid adhesives on anything that will be stretched or washed.
- Pillow covers sagging or twisting — cut the knit with the stretch running the correct direction and add a less-stretchy backing.
- Tote handles stretching — reinforce handle attachment points with interfacing or woven tape and a box stitch.
- Storage baskets collapsing — add interfacing and a rigid, covered base insert.
- Mittens too tight or limiting the thumb — add ease at the thumb gusset and make a test mitten first.
- Draft blockers leaking filling — use a sturdy, tightly woven inner sleeve and don’t overfill.
- Pet-bed seams opening — reinforce corners and the closure, and check for loose threads before each use.
- Chair-leg protectors slipping or wearing through — felt thick, fit snug, and replace pads once they thin.
- Projects looking uneven or improvised — limit the palette, repeat one texture, align motifs, and finish raw edges cleanly.
Safety When Repurposing Sweaters
- Use scissors, rotary cutters, craft knives, pins, and needles with care — cut away from your body, keep fingers clear of the blade path, and store sharp tools closed when not in use.
- Keep fingers clear of the needle, the presser foot, and all moving machine parts; switch off and unplug the machine when threading, changing the needle, or clearing a jam.
- Follow the instructions for your sewing machine, iron, and any appliance, and only use heat settings the manufacturer supports.
- Avoid deliberate high-heat treatment when the fiber content is unknown — an unknown synthetic can melt, glaze, or scorch.
- Prevent burns during pressing, steaming, washing, or controlled felting; let hot fabric and appliances cool before handling.
- Ventilate the workspace when using adhesives, paints, or spray products, and follow the product’s ventilation and safety guidance.
- Keep pins, buttons, zippers, loose fibers, small decorations, and removable pieces away from young children and pets, which can choke on or ingest them.
- Avoid loose loops, long cords, weak handles, and detachable decorations where they could snag, trip, or strangle.
- Do not claim that a handmade accessory provides protective, orthopedic, medical, or impact-resistant performance — these items are warmth and decoration, not safety equipment.
- Keep fabric projects away from open flames, heaters, hot appliances, active bulbs, and energized equipment.
- Test pet projects for loose threads, exposed fasteners, removable stuffing, and chewing hazards before use.
- Discontinue use when seams open, fibers shed heavily, the project stretches out of shape, or attachments become loose.
Frequently asked questions
The most useful old sweater crafts are items you’ll actually use: pillow covers, lap throws, lined totes, gift bags, storage baskets, cowls, mittens, headbands, leg warmers, pet-bed covers, draft blockers, and wreaths. Start by sorting the sweater by fiber and condition, then match the project to the fabric you actually have.
Stabilize the cut edge immediately — stay-stitch, zigzag, overcast, or serge it before handling the piece much. Test a hidden or damaged area first to see whether that specific knit runs, and preserve finished edges like cuffs and hems wherever you can.
Only untreated animal-fiber knits felt — wool, alpaca, mohair, and similar. Superwash wool is treated specifically not to felt, and cotton, acrylic, and polyester won’t felt at all. Blends felt unpredictably, so test a swatch first.
Yes. Wash and dry each garment according to its care label before cutting, so dirt, oils, and residue don’t make stitches slip, adhesives fail, or felting unpredictable. A secondhand sweater should be washed or dry-cleaned even if it looks clean.
It depends on the project and the fiber. Sewn, fully finished items from washable fibers can often be machine-washed on a gentle cycle, but felted wool, glued seams, and loosely stabilized edges may not survive repeated washing. Test on an offcut and follow the original care label.
A ballpoint (jersey) needle works for stable knits, and a stretch needle helps with highly elastic or ribbed knits. Use a polyester thread and a narrow zigzag or stretch stitch rather than a straight stitch, then test the settings on an offcut.
Some decorative or lightly used projects can — a wreath, a cachepot sleeve, or a trim. But for anything that will be stretched, filled, carried, or washed, sewing is the stronger, more durable choice. Fabric glue dries stiff and loses strength with washing, so don’t rely on it for load-bearing seams.
Keep only realistically usable scraps — felted squares for patches, long strips for a wreath, cuffs for cuffs. Store them dry and pest-free, and recycle or discard the tiny, dirty, or unusable bits rather than accumulating textile waste.
Start With One Sweater
Old sweater crafts reward a small start. Pick one sweater you’re ready to let go of, read its label, wash it, and choose a single beginner project — a gift bag, a headband, or a cachepot sleeve. Test your cut and your stitch on a scrap, and only move to the mittens or the structured basket once you’ve seen how that particular knit behaves. One good project will teach you more about the material than any list of 15, and it’ll keep the rest of your sweater stash out of the “someday” pile.