Old CD crafts take a material most of us have stopped using and turn it into something we’ll actually keep — a wall panel that catches the light, a desk clock that costs almost nothing, a jewelry display that tidies a cluttered dresser. The appeal is the iridescent surface: it shifts color as it moves, which is exactly why it looks either striking or chaotic depending on how you use it.
That’s why this guide starts before the project list. You’ll learn how to decide whether a disc should be sold, donated, or archived; how to review recordable media for personal data; how to tell pressed, recordable, and rewritable discs apart; and how to clean, sort, and test the material safely. Then you’ll find 15 projects with enough detail to recreate each one — plus the techniques that separate a polished, intentional piece from shiny scraps glued to a board.
Not every disc behaves the same way, and no single attachment method is best for every job. Where a technique depends on your specific discs, tools, or measurements, this article says so and marks exactly where your own test results belong.
If sorting and testing a reclaimed material before you build appeals to you, another small-discarded-item collection on this site applies the same assess-first approach to plastic bottle caps.
What Can You Make From Old CDs and DVDs?
Here is a quick orientation. This article covers fifteen projects organized into five groups:
- Wall Décor Projects — a framed geometric panel, a mosaic picture-frame surround, and layered botanical artwork
- Tabletop Projects — a minimalist desk clock, a cold-drink coaster set, and a decorative trinket-tray insert
- Organization and Display — a tiered bracelet and earring display, a jewel-case seed-packet organizer, and a hinged mini shadow box
- Gifts and Personal Projects — a refillable notebook cover, a reusable gift-box medallion, and a jewel-case photo-frame gallery
- Light, Green Décor, and Creative Use — a suspended mobile, an iridescent cachepot sleeve, and a photography backdrop

Plus a full preparation and data-privacy guide, a material-basics section, an attachment comparison table, aesthetic guidance, troubleshooting, a safety section, and a disposal guide.
Feel free to jump to the group that interests you most. Every project includes a materials list, a tools list, numbered instructions, customization ideas, a practical tip, a likely mistake, and a photo opportunity.
Before You Craft: Privacy, Sorting, and Safe Preparation
Donate, sell, or archive before you alter
The first question isn’t “what should I make” — it’s “should I alter this disc at all.” A commercial music CD, a playable game, or a movie you still enjoy is often worth more intact than as raw material. If a disc still plays, consider keeping it, selling it, passing it along, or donating it to a library, thrift store, or charity that accepts it. Check what a given organization currently accepts rather than assuming.
Alter a disc when it has a problem that makes it unusable as-is: deep scratches that cause skipping, a duplicated or obsolete disc, a failed burn, or a title nobody wants. And before anything else, check whether it holds personal data — that decision overrides the whole project.
Review discs for private data first
This step matters most for recordable and rewritable discs you made yourself — burned music, backups, photo archives, tax files, business documents. A commercial pressed disc rarely holds your personal data, but a CD-R or DVD-R very well might.
Visible scratches do not prove a disc is unreadable. The reflective layer can still carry recoverable data even when the top is scuffed. Repainting, scratching, or decorating a disc is not secure destruction, and this article makes no claim that it is. If a disc contains sensitive files, research an appropriate destruction method through an authoritative information-security source before deciding whether it is safe to repurpose. If secure destruction makes the disc unusable for crafting, privacy wins — set it aside and handle it correctly.
NIST SP 800-88, the U.S. media-sanitization standard, treats optical media as requiring physical destruction — typically crosscut shredding, pulverization, grinding, or incineration — when the data is sensitive. See the sources section.
Pressed vs recordable vs rewritable discs
Discs fall into three broad families, and the difference affects privacy and handling:
- Pressed discs (commercial audio CDs, movie DVDs, game discs): data is physically stamped into a polycarbonate layer, covered with a thin reflective metal layer (often aluminum), a protective lacquer, and a printed label. They are read-only and rarely hold personal data.
- Recordable discs (CD-R, DVD-R, DVD+R): a polycarbonate base carries a spiral groove, an organic dye recording layer, and a reflective metal layer. A laser darkens the dye to store data. These are the discs most likely to hold personal files.
- Rewritable discs (CD-RW, DVD-RW, DVD+RW): instead of dye, they use a phase-change metal alloy that a laser toggles between two states. They can be erased and rewritten.
A visual inspection cannot always identify the exact type or coating, and different brands, ages, and labels vary. Treat any disc you can’t identify as potentially fragile and test before committing.
Inspect discs for damage and contamination
Hold each disc in bright light and check both sides for:
- Cracks and deep chips, especially radiating from the center hole or outer edge. These are weak points that will break further.
- Delamination or flaking — a coating peeling away from the plastic, a sign the layers are already separating.
- Warping — a disc that no longer sits flat.
- Residue — adhesive, stickers, food, or unknown substances.
- Deep scratches on the underside that break through the plastic.
- Contamination — mildew, chemicals, or an odor you can’t identify.
Mark anything questionable so you can set it aside.
Reject discs that aren’t worth using
Set a disc aside — or dispose of it correctly — if it is cracked, deeply chipped, delaminating, flaking, badly warped, or contaminated. A disc that sheds fragments as you handle it is a hazard, not a material. A disc you can’t identify and that may hold data should be handled through the data-review step above, not treated as scrap.
Inspect and sort jewel cases
Jewel cases and DVD cases deserve the same scrutiny:
- Reject cases with sharp fractures, severely brittle panels, broken hinges, missing tabs, or loose fragments. A case that snaps and sheds sharp plastic isn’t worth saving.
- Remove paper inserts and labels when appropriate — they’re paper and can often be recycled separately, and they’re useful as templates or labels in some projects.
- Separate the tray, the front and back panels, the hub, and any hardware into their own piles. Many cases are polystyrene, which behaves differently from the polycarbonate of the discs.
Clean discs and cases without damaging them
Work from a clean, dry cloth and non-abrasive methods:
- Discs: wipe gently from the center straight out to the edge with a soft, lint-free cloth, lightly dampened with water. If a disc is dirty, a drop of mild dish soap in warm water and a gentle rinse work, followed by thorough drying. Avoid scrubbing in circles across the data surface and avoid harsh solvents — some cleaners can cloud or damage the coating.
- Cases: wipe with a damp cloth and mild soap, then dry. Paper inserts can be pulled out and set aside dry.
- Never soak discs or cases, and don’t use unverified cleaners. The goal is to remove dust and oils so paint and adhesive can grip.
Dry everything completely
Trapped moisture under paint, adhesive, or a label is a common cause of peeling and clouding. After cleaning, air-dry every disc and case at room temperature, away from direct heat and sunlight. Confirm everything is dry before painting, gluing, or assembling.
Sort by size, color, reflectivity, and condition
Once clean, sort your stash so you can pull what you need:
- Diameter and thickness — CDs and DVDs are usually 12 cm (about 4.7 in) across; mini discs and some specialty discs are smaller. Match size and thickness within any project that needs an even surface.
- Surface color and printed design — the silver data side, the printed label side, and any decorative artwork all read differently once assembled.
- Reflectivity and transparency — some discs are more mirrored, some more tinted.
- Condition — separate intact discs from sacrificial test discs and from anything that should be discarded.
Make a cutting and layout plan
Before you alter anything, decide the palette, the backing material, the spacing, and where the reflections will point in the finished display location. A few intact discs, deliberately spaced on a matte backing, usually look better than a crowded field of mismatched pieces. Write the plan down or sketch it so you aren’t improvising mid-project.
Test on a sacrificial disc
Every claim in this article — a drill bit, a cutting method, a paint, a primer, an adhesive, a finish — should be tested on one damaged or unwanted disc first. A method that works on one disc can crack, delaminate, fog, or fail on another. This single habit prevents most of the failures in the troubleshooting section.
Worth a try: Keep a simple test card beside each spare disc: note its label, the surface you worked on, the product or tool used, and any cracking, clouding, or lifting. Change one variable at a time so you can tell which part of the process needs adjusting.
Store prepared pieces safely
Keep prepared pieces in a rigid, labeled container that cannot spill sharp fragments. Store uncut discs upright or flat where they won’t warp, crack, or become mixed in with discs you still want to play.
Material Basics: How Optical Discs and Cases Behave
Layered construction of pressed, recordable, and rewritable discs
All optical discs are layered, which is why they never behave like a single solid piece of plastic. A pressed disc is polycarbonate stamped with pits, then a reflective metal layer, a protective lacquer, and a printed label. A recordable disc swaps the stamped pits for an organic dye layer over a grooved polycarbonate base. A rewritable disc uses a phase-change metal alloy in place of the dye. Each layer expands, flexes, and bonds differently — which is why cutting or drilling can separate them.
Why coatings, dyes, and adhesives react differently
The reflective layer, the label, and the recording layer are not the same material as the polycarbonate base. When you cut, drill, paint, or glue a disc, you’re working across those layers. A solvent or adhesive that is fine on polycarbonate can lift a label or attack a dye layer. A cut edge exposes every layer at once, which is where flaking and delamination start. This is why a visual inspection can’t promise how any given disc will behave.
Why you can’t always tell a disc by looking
The label tells you the format (CD-R, DVD-RW, and so on), but not the exact dye, alloy, or coating a specific manufacturer used. Two discs that look identical can cut or paint differently. That’s the argument for testing on a sacrificial disc and for favoring intact-disc designs where the layers stay sealed inside.
Intact-disc designs vs cut mosaics
An intact disc keeps its layers enclosed and its edges factory-smooth. It’s safer to handle, needs no edge finishing, and is more durable. A cut mosaic exposes sharp, layered edges that must be enclosed, backed, or sealed — and it keeps shedding small fragments if it isn’t. The default should be: use an intact disc whenever it suits the design, and cut only when the project genuinely needs it.
Drilling discs safely
Drilling is the most common modification these discs need, and the most common place to crack them. Never hold a disc in your hand while drilling it — it can spin, shatter, or grab the bit. Use these steps:
- Wear suitable eye protection and work on a stable surface.
- Support the disc fully on a flat backing board or scrap wood, and clamp it or hold it firmly by the outer edge, well away from the hole.
- Mark the hole location away from cracks, existing damage, and the edge.
- Use a small, sharp bit (a brad-point or high-speed-steel bit) at low speed with gentle pressure. Start with a small pilot hole and enlarge it if needed.
- Let the bit cool, and stop if the disc begins to melt, chatter, or crack.
Keep drilled holes away from cracks and unsupported edges, and test bit type, speed, backing, and placement on a sacrificial disc first. Drilling optical discs is genuinely hazardous — a disc that slips can spin loose — so treat this step with care. See the SANS source in the sources section.
Cutting discs — and when to skip it
Cutting polycarbonate can cause splintering, sharp edges, flaking layers, or sudden breakage. The safest editorial recommendation is often to avoid cutting and choose an intact-disc alternative. When a project does require cut pieces, work with proper eye protection, a stable backing, and tools you have genuinely tested — and expect to enclose or seal every cut edge. Do not boil, heat, or soften discs to cut them; heating unknown coatings can release fumes and won’t make the result safe. Capture, contain, and dispose of chips and fragments promptly.
Painting, priming, and finishing
Acrylic paint and paint markers work on discs, but the slick surface needs preparation. Clean the disc, lightly scuff the surface you’ll paint with fine sandpaper, and apply a primer (gesso or a plastic-specific primer) if you want an opaque, durable finish. Build up thin coats rather than one thick one, and seal with a clear acrylic finish if the piece will be handled. Test your exact paint, primer, and finish on a sacrificial disc, and note that paint and adhesive can lift the reflective layer if applied too aggressively or if the coating is already weak.
Choosing adhesives for smooth plastic and cases
Polycarbonate and hard plastic cases are smooth and low-porosity, so adhesive choice matters. A solvent-based craft adhesive rated for plastics (such as E6000, which the manufacturer lists for polycarbonate) or a two-part epoxy generally bonds well after the surface is clean and lightly scuffed. Hot-melt glue is not universally suitable — it can soften under heat and form bulky joints — and cyanoacrylate (super glue) can fog clear plastic, bond skin rapidly, and create brittle joints. For any load-bearing or suspended piece, mechanical attachment is safer than adhesive alone.
Choosing the Right Attachment
There is no single best attachment for CD crafts. The right choice depends on the materials, whether the piece is decorative or load-bearing, whether it must be removable, and the surface you’re mounting to. The table below compares the main options.
Attachment methods compared
| Method | Suitable surfaces | Best uses | Required preparation | Curing/setting needs | Reversible? | Likely limitations | Safety considerations | Testing requirements |
|---|---|---|---|---|---|---|---|---|
| Solvent craft adhesive (e.g., E6000) | Polycarbonate, hard plastic cases, wood, cork, felt, fabric | Non-stressed decorative bonds; disc-to-backing; felt or cork bases | Clean, dry, lightly scuffed surfaces | 24–72 hours for full strength (follow the label) | No | Softens under high heat; may lift weak labels or coatings | Ventilate; avoid skin and eye contact | Cure a sample and try to peel it |
| Two-part epoxy | Disc to wood, metal, hard plastic | Stronger bonds; jewelry-display joints; hardware | Clean and scuff both surfaces; mix correctly | Several hours to full cure (follow the label) | No | Hard, brittle joints; messy if over-applied | Ventilate; avoid skin contact | Pull-test one cured joint |
| Double-sided mounting tape (heavy-duty) | Disc to frame, wall, or smooth backing | Lightweight, removable wall and frame mounting | Clean, dry, flat surfaces | Immediate grab; full bond after pressing | Semi (may leave residue) | Fails on rough, dusty, or heavy loads | Keep out of reach of children | Check after 24 hours and after a week |
| Mechanical fasteners (screws, bolts, washers) | Disc to wood, board, or frame | Wall panels, clocks, jewelry displays, hanging pieces | Pre-drill holes; use washers to spread load | None (mechanical) | Yes | Screw heads can scratch; holes can crack if too near edges | Drill with eye protection; support the disc | Tighten and test the load |
| Stitched fabric pockets | Fabric to disc or disc insert | Notebook covers, fabric-backed displays | Mark and pre-punch stitch holes | None | Yes (unstitch) | Only as strong as the fabric and stitching | Keep needles clear of fingers | Tug the stitched pocket |
| Enclosed frames / shadow boxes | Any disc or mosaic inside a frame | Mosaic frames, shadow boxes, wall panels | Frame sized to hold the piece with a backing | None beyond assembly | Yes (open the frame) | Adds size and weight; needs hanging hardware | Handle glass carefully | Check the frame closes and hangs level |
| Channel-mounted / clip construction | Disc edges into a grooved rail or clip | Desk displays, cachepot sleeves, modular pieces | Rail or clip sized to disc thickness | None | Yes | Disc can slide out if the channel is loose | Mind sharp clip edges | Fit and wiggle-test the disc |
Adhesive vs mechanical vs enclosed attachment
A joint that only holds its own weight — a flat accent glued to a board — can use a well-tested adhesive. A joint that will be pulled, hung, or leaned on — a clock, a mobile, a jewelry display — should use a mechanical fastener, an enclosed frame, or a stitched pocket. The dividing question is simple: if this connection fails, does something fall, break, or injure someone? If yes, don’t rely on adhesive alone.
Why adhesive alone fails on suspended projects
Adhesive has no mechanical grip, and a hanging or suspended piece flexes and loads the joint constantly. On a slick disc surface, adhesive can creep, peel, or shear — especially if the disc flexes or the room warms. For anything that hangs, use a drilled hole with a mechanical fastener, a stitched pocket, or an enclosed frame, and test it over a protected surface before display.
Protecting surfaces from discs and hardware
Disc edges and metal hardware can scratch walls, desks, furniture, and jewelry. Use washers, felt pads, cork, or a backing layer between any metal or hard edge and the surface it touches. On a wall panel or clock, the fastener that faces the wall or table is the one that will do the scratching — cushion it.
Wall Décor Projects
Project 1 — Framed Intact-Disc Geometric Wall Panel
What it looks like: A shallow frame holding several intact discs arranged in a measured grid, arc, or radiating pattern, with the reflective surfaces catching light against a matte backing. No cutting required.
Best use: Statement wall art for a hallway, living room, or home office that shows off the discs’ iridescence without the hazard of cut edges.

Difficulty: Beginner.
Approximate time: 1.5–3 hours.
Materials:
- Several intact discs in a limited palette
- A shadow-box frame or rigid board with a raised edge
- A matte backing (painted board, black or white foam board, or fabric-covered board)
- Strong adhesive or small mechanical fasteners
- Felt or cork pads for any rear-facing edges
Tools:
- Ruler
- Pencil
- Low-tack tape
- Adhesive applicator or drill with a small bit (if fastening)
- Screwdriver
- Level
Steps:
- Choose a palette of two to five disc finishes and a simple pattern — parallel rows, a radiating arc, or a symmetric grid — before you place anything.
- Prepare the backing: paint or cover it in a matte color so the discs read clearly against it.
- Dry-lay the discs on the backing and adjust spacing until the composition looks deliberate. Photograph the layout for reference.
- Attach each disc. For a lightweight panel, a strong adhesive rated for the materials is acceptable; for a heavier panel, use a drilled hole and a mechanical fastener with a washer so the disc can’t fall.
- Let any adhesive cure fully, fit the panel into the frame, and check the front.
- Mount with hardware rated for the finished weight, into a stud or suitable anchor, and level it.
Customization:
- Use all-silver discs on black for a monochrome look
- Alternate the silver data side with the printed label side for contrast
- Run a single tonal gradient left to right
- Leave generous negative space between discs
Practical tip: The matte backing is what makes the reflections look intentional — a shiny disc against a glossy background just turns into glare. Keep the backing flat and neutral.
Common mistake: Crowding the discs so the panel reads as a clutter of mirrors rather than a composition. Space them and limit the palette.
Worth a try: Measure the usable space inside the frame before choosing your disc count. Arrange paper circles the same size as your discs, check the margins, then transfer the center positions to the backing. Keep any fixing heads low enough to clear the glazing.
If you enjoy this kind of display, recycled-material wall decor projects gather more ideas in the same spirit.
Project 2 — Iridescent Mosaic Picture-Frame Surround
What it looks like: A plain picture frame covered in carefully cut disc pieces, grouted or edge-sealed so no sharp edge is exposed, giving a jewel-like iridescent border.
Best use: Framing a favorite photo or print as a gift or a decorative accent.

Difficulty: Intermediate (involves cutting and edge enclosure).
Approximate time: 2–4 hours, plus grout or sealant cure. Treat this as a hands-on planning estimate for a small frame. Cutting, sorting, and arranging the pieces may take longer on a first attempt; add the adhesive’s full cure time and the grout or sealant waiting times stated on their labels.
Materials:
- A plain picture frame (wood or rigid board)
- Unwanted discs prepared for cutting
- A grout or a clear epoxy/decoupage sealant to enclose edges
- Strong adhesive
- Painter’s tape to mask the frame opening
Tools:
- Safety glasses
- Cutting mat
- A tested cutting method (see the material-basics section) or pre-cut pieces
- Adhesive applicator
- Grout spreader or brush
- Lint-free cloth
Steps:
- Mask the frame’s inner opening and the glass so adhesive and grout stay off the photo area.
- Cut discs into pieces using a method you’ve tested on a sacrificial disc, and sort the pieces by size. Wear eye protection and collect fragments promptly.
- Dry-lay the pieces around the frame and adjust until the arrangement looks intentional.
- Adhere each piece, working from the inner edge outward, leaving narrow, even gaps if you plan to grout.
- Once the adhesive has set, apply grout to fill the gaps and wipe the surface clean — or brush a clear sealant over the pieces if you prefer a smooth, non-grouted finish. The goal is that every cut edge is enclosed or sealed so nothing sharp remains exposed.
- Let it cure fully, remove the masking, and check that no edge catches on a cloth run across the frame.
Customization:
- A silver-and-white palette for a clean look
- Rainbow pieces arranged as a gradient
- Dark grout for a stained-glass effect
- Seal with glossy epoxy for a smooth finish
Practical tip: Cut fewer, larger pieces and leave even gaps — dozens of tiny shards are harder to enclose and more likely to leave a sharp corner.
Common mistake: Sealing only the front and leaving sharp edges exposed on the inner and outer rims, where hands will touch them. Enclose every edge, not just the visible face.
Safety note: This project involves cutting, which produces sharp fragments. Wear eye protection, work on a stable surface, collect chips promptly, and keep the work area clear of children and pets.
Material check: Make a small sample using the same disc type, frame backing, adhesive, and finish planned for the project. Reject pieces that crack or shed their reflective layer during preparation. Follow each product’s compatibility and cure instructions, then inspect the sample for lifting, clouding, and exposed corners. A thin clear coating is not enough if a sharp edge still projects above it; change the layout or enclosure before decorating the full frame.
Project 3 — Layered Botanical Wall Artwork
What it looks like: Intact discs or safely prepared disc sections layered with painted or cut-paper botanical silhouettes (leaves, stems, blooms) on a rigid backing, so the iridescent surface shows through as a glowing background.
Best use: A softer, organic wall piece that balances the discs’ hard geometry with natural shapes.

Difficulty: Beginner to intermediate.
Approximate time: 2–3 hours. The range is a hands-on estimate for a small composition. Detailed silhouette cutting adds time; allow separate drying time for the painted backing and full curing time for the adhesive before hanging.
Materials:
- Several intact discs
- A rigid backing board
- Matte paint for the background
- Botanical silhouettes cut from paper, cardstock, or vinyl
- Adhesive
- Optional a shadow-box frame to enclose the layers
Tools:
- Scissors or craft knife
- Cutting mat
- Paintbrush
- Adhesive applicator
- Pencil for layout
Steps:
- Paint the backing a matte, natural tone and let it dry.
- Lay out the discs as glowing “windows,” then arrange botanical shapes over and around them so the reflection shows through the negative space.
- Adhere the discs to the backing first, then layer the botanical shapes on top, keeping some of the disc surface visible.
- If any disc edge will be exposed and sharp, enclose it with the frame or seal it — or choose intact discs so no edge is cut at all.
- Let the adhesive cure, then hang with hardware rated for the finished weight.
Customization:
- Use dried-pressed or painted leaves
- A single large botanical silhouette over a cluster of discs
- Matte charcoal backing with silver discs
- An enclosed frame for a gallery look
Practical tip: Leave more of the disc visible than you first think — the reflection is the point, and covering it up with paper defeats the effect.
Common mistake: Gluing delicate paper shapes directly over the reflective surface without a sealed edge, so they curl or peel over time.
Worth a try: Cut a sample leaf from cardstock and position it across a disc before making the full set. If it bridges a raised edge, support that section at the same height; pressing a flat silhouette over an uneven stack can leave a visible kink.
Tabletop Projects
Project 4 — Minimalist Desk Clock
What it looks like: A single intact disc used as the clock face, with a small battery-operated clock mechanism through the center hole and the hands reading against the reflective or painted surface.
Best use: A clean desk or shelf clock that repurposes one disc — a fast, genuinely useful project.

Difficulty: Beginner.
Approximate time: 20–40 minutes. This is an assembly estimate for a plain disc and a compatible clock kit. Add any paint or ink drying time, allow extra time if making a stand, and check that the hands move freely before placing the clock on display.
Materials:
- One intact disc with a standard center hole
- A battery-operated clock mechanism with hands that fit through the hole
- A battery
- Optional paint or markers to add numerals
- Optional felt pads for the back
Tools:
- Small screwdriver (if the mechanism requires assembly)
- Ruler and pencil if adding numerals
- Paint or markers
Steps:
- Choose a disc whose label or reflective side you want as the face, and decide whether to add numerals or leave it minimal.
- If adding numerals, mark their positions lightly and apply them in a clean, readable style; let paint or ink dry completely.
- Insert the clock mechanism shaft through the center hole from the back, following the mechanism’s instructions, and attach the hands so they sit just clear of the disc face.
- Insert the battery and set the time.
- Confirm the hands rotate freely without rubbing the disc, and add felt pads to the back so the mechanism doesn’t scratch the surface it sits on.
Customization:
- Paint the face matte black and add white dots for a modern look
- Keep the silver side bare and add small metallic numerals
- Use a printed label side as a graphic face
- Add a simple stand or easel so it sits upright
Practical tip: Fit the hands so there’s a small gap above the disc face — clock hands that rub the surface will bind or scratch it.
Common mistake: Using a mechanism whose shaft is too short for the disc plus any added thickness, so the hands can’t seat properly.
Safety note: The mechanism is battery-operated and low-voltage, but keep the small hands, hardware, and battery away from young children.
Worth a try: Measure the full face assembly, including any backing and washers, and compare it with the mechanism maker’s supported dial thickness. Check the retaining washer covers the disc’s center opening and leave access to the battery when choosing a stand.
Project 5 — Cold-Drink Coaster Set
What it looks like: A set of coasters with moisture-resistant decorative faces and non-slip cork or felt backs, sized for cold drinks. Not for hot cookware and not for direct food contact.
Best use: Protecting a table from condensation while adding a little iridescent color to a coffee table or desk.

Difficulty: Beginner.
Approximate time: 1–2 hours for a set of four. Use this as a hands-on estimate for four simple coasters, excluding drying and curing. Complete and test a sample after the products’ full cure times before decorating the rest of the set.
Materials:
- One intact disc per coaster (or a covered disc)
- Cork or felt sheet for the backs
- A clear sealant rated for the finish
- Strong adhesive
Tools:
- Scissors or craft knife
- Adhesive applicator
- Ruler
- A cutting mat
Steps:
- Decide whether to use the disc’s own surface or cover it. If covering, apply your decorative face (paper, fabric, or paint) and seal it with a clear finish rated for moisture.
- Cut a cork or felt circle the same size as the disc and glue it to the underside. This keeps the coaster from sliding and protects the table.
- Let the adhesive and any sealant cure fully, following the label.
- Test one coaster with a cold glass and check that condensation doesn’t reach the table and the coaster doesn’t slide.
- Make the set and label the stack clearly: cold drinks only, not food, not hot cookware.
Customization:
- Cover the discs with coordinating paper or fabric
- Paint a simple geometric design
- Leave the iridescent side bare and seal it
- Color-code each coaster for different drinks
Practical tip: The cork or felt back does the real work — it prevents sliding and protects the table — so make it slightly larger than the disc and center it well.
Common mistake: Treating the coasters as heat-proof or food-safe. Condensation from a cold drink is fine; a hot pan or a slice of food is not.
Safety note: These are for cold drinks only. Do not place hot cookware on them, and do not use them for direct food contact.
Material check: Check that the finish manufacturer permits occasional water exposure after full curing and that the product suits your decorative surface. Finish one complete sample, including the center opening and backing, before making the set. Place it on a washable, water-resistant surface with a cold glass and inspect for clouding, tackiness, peeling, or moisture underneath. Repeat after it dries; if moisture reaches the underside, revise the construction before using it on furniture.
Project 6 — Decorative Trinket-Tray Insert
What it looks like: A shallow tray lined with enclosed mosaic pieces, creating an iridescent base for keys, jewelry, or small objects — a separate rigid tray, not intended for food.
Best use: A catch-all for a dresser, entryway, or desk that adds color without food-contact claims.

Difficulty: Intermediate (involves cutting and enclosure).
Approximate time: 1.5–3 hours, plus sealant cure. This is a hands-on estimate for a small tray with a simple layout. Allow extra time for sorting pieces and enclosing edges, plus the adhesive and finishing products’ specified cure times before adding belongings.
Materials:
- A shallow tray or a rigid board with a raised rim
- Unwanted discs prepared for cutting
- Strong adhesive
- A grout or clear epoxy sealant to enclose edges
- Felt pads for the base
Tools:
- Safety glasses
- Cutting mat
- Tested cutting method or pre-cut pieces
- Adhesive applicator
- Grout spreader or brush
- Lint-free cloth
Steps:
- Cut discs into pieces using a method you’ve tested on a sacrificial disc, wearing eye protection and collecting fragments.
- Dry-lay the pieces inside the tray and adjust the pattern.
- Adhere the pieces, then fill gaps with grout or seal the surface so every cut edge is enclosed.
- Let it cure fully, then run a cloth over the surface to confirm no edge catches.
- Add felt pads to the base and label the tray clearly: decorative catch-all, not for food.
Customization:
- A silver-and-white mosaic on a dark tray
- A tonal gradient across the tray floor
- Larger pieces with generous grout lines
- A single intact disc inlaid in the center
Practical tip: A tray with a raised rim does half the enclosure work for you — the rim hides the outer edges, so you only need to seal the top surface.
Common mistake: Treating the finished tray as food-safe or leaving a rough edge along the rim where fingers will brush against it.
Safety note: Cut pieces are sharp until enclosed. Seal every edge and keep the work area clear of children and pets while cutting.
Material check: Check compatibility with both the disc surface and the tray material before choosing the adhesive and finish. Make a small sample of the complete layer sequence, allowing the waiting and cure times each label specifies. Inspect for loose pieces, bubbles, tacky patches, and exposed edges, especially where the mosaic meets the rim. Use a folded cloth to check for snags rather than bare fingertips. Keep jewelry off the insert until the finish is fully cured and the surface is smooth.
Organization and Display
Project 7 — Tiered Bracelet and Earring Display
What it looks like: Two or three intact discs mounted on a stable central rod at increasing heights, with drilled holes around the edges to hold earrings, and the flat disc surfaces holding stacked bracelets — a rigid, weighted base keeps it from tipping.
Best use: Tidying jewelry on a dresser while showing it off — an under-covered, genuinely useful project.

Difficulty: Intermediate (requires drilling and a stable base).
Approximate time: 1.5–2.5 hours. Treat the range as a hands-on assembly estimate with the base and hardware ready. Base construction, drilling practice, and adjustments may take longer; leave time for a careful stability check before use.
Materials:
- Two or three intact discs
- A rigid weighted base (a wood round, a heavy ceramic plate, or a sealed board)
- A central rod or threaded post with nuts and spacers
- Drilled-hole rings for earrings
- Felt pads for the base
Tools:
- Drill with a small bit
- Safety glasses
- Backing board
- Wrench or screwdriver
- Ruler
Steps:
- Mark evenly spaced earring holes around the outer edge of the upper disc or discs — away from cracks and the edge, and sized for your earring hooks.
- Drill the holes with the disc supported on a backing board, using eye protection and low speed. Smooth any burrs.
- Assemble the tier: mount the base disc to the weighted base, add a central rod, then stack the additional discs at increasing heights using spacers so there’s room for bracelets on each level.
- Tighten the assembly until stable, then add felt pads to the underside of the base.
- Test stability — load it with the jewelry you’ll actually store, and confirm it doesn’t tip under uneven weight.
Customization:
- Paint the discs matte black and let the metal jewelry pop
- Keep the iridescent sides up
- Use a brass or brushed-nickel rod
- Vary disc sizes so the tiers read as a deliberate stack
Practical tip: The weighted base does the structural work — the discs only display. Make the base wider and heavier than the loaded jewelry, or the whole thing tips.
Common mistake: Drilling earring holes too close to the edge so they tear through, or skipping the stability test so the display tips under a heavy bracelet stack.
Safety note: The drilled holes must be burr-free so they don’t scratch jewelry or skin. Keep the small rod, nuts, and earring findings away from young children and pets.
Worth a try: Lay your longest pair of earrings beside the planned tier spacing before cutting the rod. Leave room below the hooks and space for your fingers above each tier. Check the assembled stand with jewelry concentrated on one side as well as evenly distributed.
Project 8 — Jewel-Case Seed-Packet and Pattern Organizer
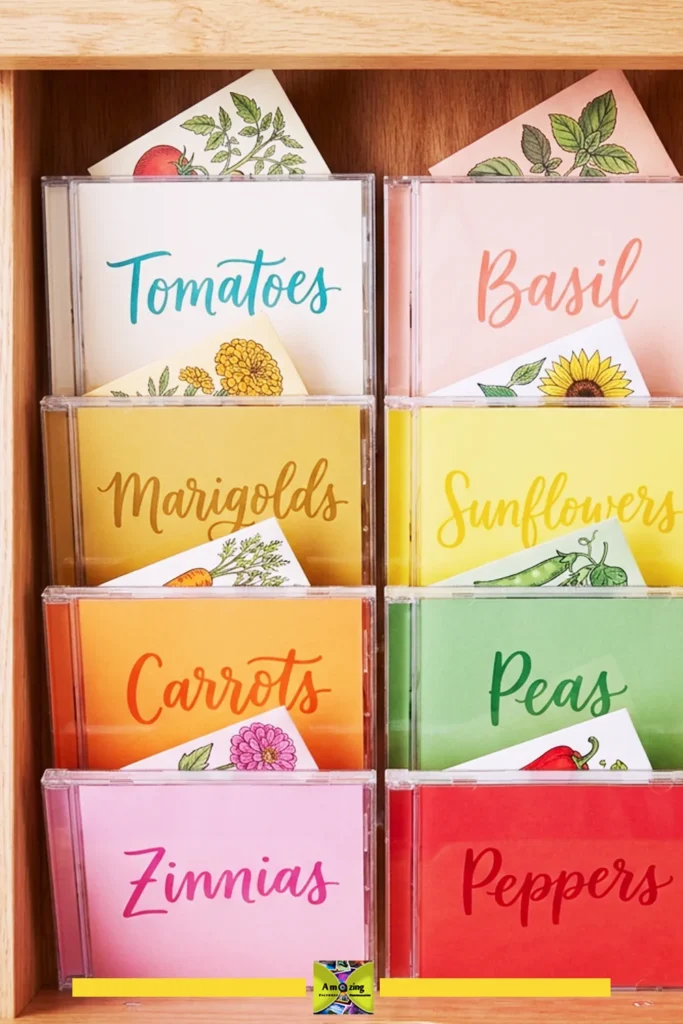
What it looks like: Clear or frosted jewel cases standing upright as visible, labeled dividers that hold seed packets, craft patterns, swatches, or small flat supplies — an under-covered organizing system.
Best use: Taming a seed drawer, craft stash, or paper-pattern pile with category cards you can read at a glance.
Difficulty: Beginner.
Approximate time: 30–60 minutes for a set. The estimate assumes a small batch of clean, dry cases and simple handwritten labels. Cleaning, drying, printing category cards, and sorting a large stash add separate time.
Materials:
- Clean, sound jewel cases (reject sharp or broken ones)
- Cardstock for category cards
- Adhesive labels or a fine marker
- Optional small washi-tape or paint for a color code
Tools:
- Scissors
- Ruler
- Marker or printer
Steps:
- Inspect each case and reject any with sharp fractures or broken hinges.
- Remove and recycle the paper inserts, and clean and dry the case.
- Make a category card for each case — write the category name large enough to read on a shelf, and add a color swatch or icon if it helps.
- Slide the card into the front of the case so it reads through the clear panel.
- Fill each case with its category — seed packets, pattern sheets, or swatches — and stand the cases upright in a drawer, box, or shelf. Keep a case’s contents light enough that it doesn’t tip forward.
Customization:
- Color-code the cases by category
- Group them in a shallow drawer
- Use the cases to separate fabric swatches or paint chips
- Label the spine for easy scanning
Practical tip: The card inside the clear front does the labeling work — print it large and keep the contents from bulging so the case stays flat and readable.
Common mistake: Overloading a case so it bows or the hinge stresses, or keeping a cracked case that later snaps and sheds sharp plastic.
Worth a try: Use one case as a fit template before cutting all your labels. Keep seed packets in their original envelopes so sowing details stay with them, and label the spines as well as the fronts. A snug desktop box keeps the row together when you pull a case out.
Project 9 — Hinged Jewel-Case Mini Shadow Box
What it looks like: A clean jewel case repurposed as a small shadow box, with the front panel framing a lightweight keepsake — a ticket, a pressed flower, a photo, or a tiny memento — mounted on the case’s interior.
Best use: A coordinated set of small, giftable display frames for lightweight keepsakes. Sharp or broken cases are rejected.

Difficulty: Beginner.
Approximate time: 20–40 minutes per box. This is a hands-on estimate for a clean case and a ready-to-mount, flat keepsake. Drying flowers or preparing fabric backing adds time; follow any adhesive waiting instructions before closing the case.
Materials:
- One sound, clean jewel case per box (reject sharp, cracked, or brittle ones)
- A lightweight keepsake
- Cardstock or fabric for the backing
- Adhesive or double-sided tape
- Optional a small label
Tools:
- Scissors
- Ruler
- Adhesive applicator
Steps:
- Inspect the case and reject any with sharp fractures, broken hinges, or brittle panels.
- Remove the tray and paper inserts, then clean and dry the case.
- Cut a cardstock or fabric backing to fit the case interior and attach the keepsake to it — a photo, ticket, pressed flower, or small flat memento.
- Place the mounted backing inside the case and close it, checking that the hinge still works and the keepsake sits flat without pressing against the front panel.
- Stand the finished box upright or prop it open, and make a coordinated set if desired.
Customization:
- Use fabric-covered backing for a soft finish
- Arrange a set of three in matching colors
- Add a small handwritten label
- Prop the case open on a small easel
Practical tip: Keep the keepsake lightweight and flat — a jewel case hinge is thin, and a heavy object will stress it and eventually crack the plastic.
Common mistake: Using a case with a hairline hinge crack that isn’t visible until it’s loaded, then snapping when the case is opened.
Worth a try: Make the backing as a removable insert and try closing the case before attaching the keepsake. Keep fabric folds, tape, and decorations clear of the hinge and closing tabs. Use a copy of a treasured photo or ticket if adhesive will touch it.
Gifts and Personal Projects
Project 10 — Refillable Notebook Cover
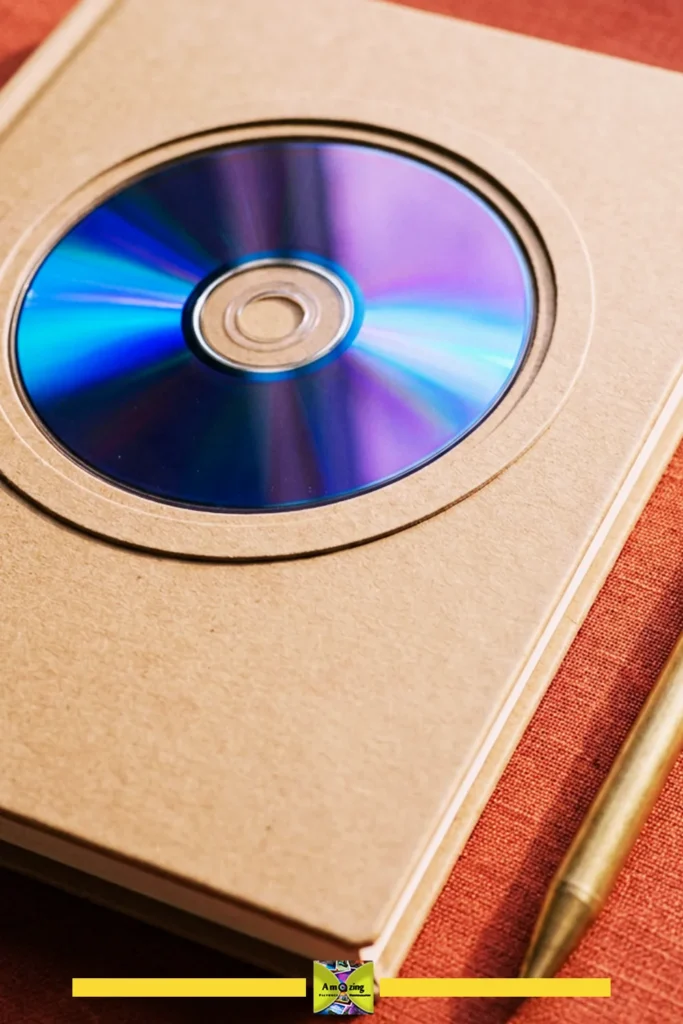
What it looks like: A plain notebook or sketchbook cover decorated with flat disc accents whose edges are fully enclosed or recessed, so nothing catches on hands or bags.
Best use: A personalized, giftable notebook that repurposes a disc without the sharp-edge problem.
Difficulty: Beginner to intermediate.
Approximate time: 45–90 minutes. The range estimates hands-on work for a simple pocket on a ready-made rigid cover. A stitched pocket or recessed board design may take longer; add full adhesive cure time before handling or packing the notebook.
Materials:
- A plain notebook or sketchbook with a rigid cover
- One or more intact discs
- A backing material (paper, fabric, or a thin cover board) to enclose the disc edges
- Strong adhesive
- Optional a clear sealant
Tools:
- Scissors or craft knife
- Cutting mat
- Adhesive applicator
- Ruler
Steps:
- Choose an intact disc — its factory edges are already smooth, which is the whole point.
- Create a recessed or framed pocket on the cover: either glue a backing layer over the disc so its edges are covered, or set the disc into a cutout so its edge sits flush with the cover surface.
- Adhere the disc into the pocket, keeping every edge enclosed or recessed so nothing catches.
- Let the adhesive cure, then run your hand and a cloth over the cover to confirm no edge snags.
- Optionally seal the surrounding surface so the cover wears evenly.
Customization:
- Set the disc into a fabric cover with a stitched pocket
- Recess it into a cardboard cover
- Use two discs as a spine-and-front accent
- Cover the label side and leave the reflective side facing out
Practical tip: Recess or enclose the entire disc edge — a disc glued flat on top of a notebook cover is the version that snags on everything.
Common mistake: Leaving the disc proud of the cover surface so its edge catches on hands, pockets, and bags.
Worth a try: Build a paper mock-up of the disc pocket and open the notebook fully before gluing. Keep the pocket clear of the spine and any refill fittings, and allow enough cover margin to enclose the entire disc edge. Check the finished pocket with a cloth for snags.
Project 11 — Reusable Gift-Box Medallion
What it looks like: A covered or painted intact disc used as a decorative medallion or topper on a gift box, replacing a bow with something the recipient can reuse.
Best use: A reusable, personal alternative to ribbon for a wrapped gift.

Difficulty: Beginner.
Approximate time: 15–30 minutes per medallion. This is a hands-on estimate for a simple topper with a prepared design. Painting, layered decoration, and adhesive curing add waiting time before the medallion can be tied onto the gift.
Materials:
- One intact disc per medallion
- Decorative paper, fabric, or paint to cover the label side
- Strong adhesive or a loop for hanging
- A ribbon or twine to hold it on the box
Tools:
- Scissors
- Adhesive applicator
- Paint or markers (optional)
Steps:
- Decide which side faces out. Cover or paint the label side if you don’t want the printed artwork to show, and leave the reflective side if you do.
- Attach any covering and let it cure. Add a small loop or a ribbon if the medallion will hang or double as an ornament.
- Wrap the gift, then sit the medallion on top and tie it in place with ribbon or twine so it stays put without being glued to the box.
- Check that the medallion can be lifted off cleanly and reused.
Customization:
- Cover the disc with a map, sheet music, or patterned paper
- Paint it in the recipient’s colors
- Add a small initial
- Thread it with twine for a rustic look
Practical tip: Tie the medallion on rather than gluing it to the box — it stays reusable, and the recipient can lift it off without tearing the paper.
Common mistake: Gluing the medallion directly to the gift wrap, which turns a reusable topper into a one-time sticker.
Worth a try: Keep the disc’s center hole open when applying the covering. Thread a separate ribbon loop through it and secure that loop beneath the ribbon wrapped around the box. This gives you a central attachment point while letting the recipient untie the topper.
Project 12 — Jewel-Case Photo-Frame Gallery
What it looks like: Several small jewel cases standing upright or wall-mounted as a coordinated grid of tiny photo frames, each showing one photo through its clear front panel.
Best use: A coordinated desktop gallery or a small wall display of favorite photos, made from cases you’d otherwise discard.

Difficulty: Beginner.
Approximate time: 30–60 minutes for a set. Use this as a hands-on estimate for a small set of clean cases with photos already printed. Add cleaning and drying, photo editing or printing, and any wall-mounting product’s required waiting period.
Materials:
- Clean, sound jewel cases (reject sharp or broken ones)
- Printed photos cut to the case size
- Cardstock or mat for the backing
- Adhesive or double-sided tape
- Optional wall-mounting putty or tape
Tools:
- Scissors
- Ruler
- Adhesive applicator
Steps:
- Inspect and clean each case, rejecting any with sharp fractures or broken hinges.
- Remove the paper inserts and cut each photo to the case’s interior size, with a small mat if you want a border.
- Slide or adhere the photo into the case so it reads through the clear front, backing it with cardstock so it sits flat.
- Stand the cases upright on a shelf, or mount a coordinated grid on the wall with removable adhesive or tape rated for the combined weight.
- Check that each photo sits straight and the hinge isn’t stressed.
Customization:
- Match all photos in a single orientation
- Use the cases as mini frames for postcards or pressed flowers
- Arrange a 3×3 grid on the wall
- Paint the case edges a single color
Practical tip: Cut the backing slightly oversized so the photo stays pressed flat against the front panel — a loose photo slides and looks crooked.
Common mistake: Mounting the cases to the wall with adhesive that isn’t rated for the weight, so they fall.
Worth a try: Lay out paper templates on the wall before mounting the cases, and keep every hinge facing the same direction. Check the mounting product’s instructions for both the case plastic and your wall finish, including its load limit and waiting period. Choose a shelf display if either surface is unsuitable.
Light, Green Décor, and Creative Use
Project 13 — Suspended Indoor Light-Catching Mobile
What it looks like: Several intact discs suspended at varied heights from a ring or rod, catching and reflecting light as they turn. Made from intact discs, so there are no cut edges.
Best use: An indoor light-catcher near a window, hallway, or reading nook.
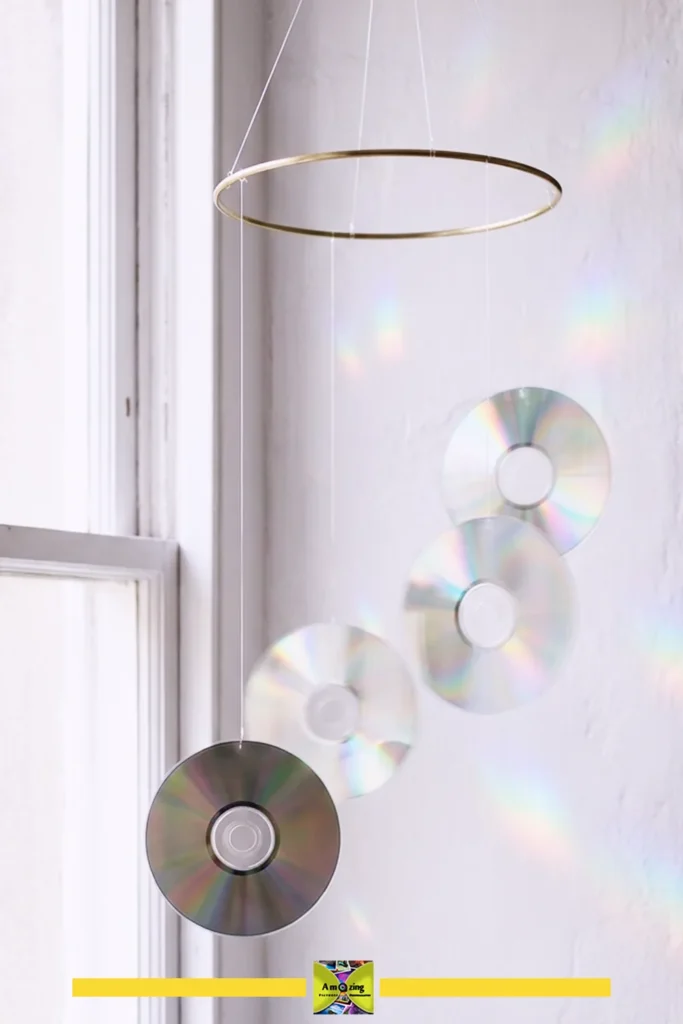
Difficulty: Beginner to intermediate (hanging and balance).
Approximate time: 1–2 hours. This is a hands-on estimate for a small mobile, including threading and initial balancing. Drilling practice and repeated spacing adjustments may extend it; finish the balance and clearance checks before permanent hanging.
Materials:
- Several intact discs
- A hanging ring or rod
- Fishing line, clear cord, or thin nylon
- A central hanging loop
- Optional small beads or spacers
Tools:
- Drill with a small bit (for the disc holes)
- Safety glasses
- Backing board
- Scissors
- Ruler
Steps:
- Mark one or two small holes near each disc’s outer edge, away from cracks, and drill them with the disc supported on a backing board and eye protection worn.
- Thread each disc onto a length of cord and knot it so the disc hangs level; add beads or spacers if you want separation.
- Tie the strands to the ring at varied heights so the discs don’t all cluster at one level.
- Attach the central hanging loop and test over a protected surface before hanging — check that the mobile balances and doesn’t tangle.
- Hang it indoors where it can catch soft, indirect light, and away from strong directed reflections.
Customization:
- Use all-silver discs for a monochrome shimmer
- Alternate discs with beads
- Hang at a slight angle so the discs turn
- Keep it small enough to move easily
Practical tip: Balance is the whole project — test the mobile over a soft surface and adjust knot positions before you trust the hook.
Common mistake: Drilling holes too close to the edge so the cord tears through, or tying the strands at even heights so the discs tangle.
Safety note: This is for indoor use only. Keep it out of direct, concentrated reflections and away from active bulbs, and keep small beads and cord ends away from children and pets.
Worth a try: Keep the strand knots adjustable while balancing the mobile over a padded surface. Start with evenly spaced attachment points, then move one strand at a time until the ring sits level. Gently turn each disc through its full sweep and increase spacing wherever neighboring discs can collide.
Project 14 — Iridescent Cachepot Sleeve
What it looks like: An outer sleeve or decorative wrap made from intact or safely prepared discs that surrounds a plain pot, isolated from soil and drainage water.
Best use: Dressing up a plain plant pot for a dry indoor spot, without putting the discs in contact with soil or water.

Difficulty: Beginner to intermediate.
Approximate time: 1–2 hours. The range estimates hands-on work with a ready-made outer sleeve. Building a custom sleeve adds time, and glued decoration needs the product’s full cure time before the pot is fitted.
Materials:
- Several intact discs (or safely enclosed pieces)
- A plain pot as the inner container
- A rigid outer sleeve or a channel/rail system to hold the discs
- Strong adhesive
- Optional felt pads
Tools:
- Ruler
- Adhesive applicator
- Scissors
Steps:
- Build or obtain an outer sleeve — a rigid ring or a series of channels — that sits slightly larger than the pot, so the discs never touch the soil or drainage water.
- Attach the discs to the sleeve, keeping every edge enclosed or using intact discs so there are no cut edges.
- Set the plain pot inside the sleeve and confirm the discs are fully isolated from the pot’s soil and drainage.
- Water the plant only after removing the inner pot, or with the pot lifted out, so drainage water never reaches the disc decoration.
- Check the sleeve sits stable and the discs don’t catch or scratch nearby surfaces.
Customization:
- A ring of intact discs around a white pot
- A faceted sleeve made from alternating reflective and painted discs
- A single color of discs for a clean look
Practical tip: Keep the decorative discs on a separate outer layer — the moment a disc touches soil or drainage water, its finish and adhesive start to fail.
Common mistake: Attaching discs directly to a pot that then gets watered in place, so drainage water wicks up and damages the decoration.
Safety note: This is decorative and dry-indoor only. Keep the disc surfaces isolated from soil, water, and moisture.
Worth a try: Trial-fit the inner pot before adding the discs. Leave enough clearance to lift it straight out without catching the decoration, and keep its drainage tray inside the separate outer sleeve. After watering elsewhere, let the pot drain and wipe its underside before returning it.
Project 15 — Abstract Light-Reflection Photography Backdrop
What it looks like: A panel of securely attached intact discs used as a controlled backdrop or tabletop styling surface for abstract light-reflection photography — intended for controlled indoor creative use.
Best use: A reusable backdrop for product, still-life, or abstract photography that plays with reflected color and light.

Difficulty: Intermediate (requires secure attachment and light control).
Approximate time: 1.5–3 hours. This is a hands-on estimate for a small panel with the board ready. Add any backing preparation, full adhesive cure time, and a separate session to adjust the lighting and check the reflections.
Materials:
- Several intact discs
- A rigid backing board
- Strong adhesive or mechanical fasteners
- A means to prop or hang the panel
- Optional diffused light sources
Tools:
- Ruler
- Adhesive applicator or drill with a small bit
- Clamps or weights
- Camera or phone
Steps:
- Choose a pattern — a grid, a radiating arc, or a random-but-balanced scatter — and dry-lay the discs on the backing.
- Attach each disc securely, using mechanical fasteners or a well-tested adhesive so none can fall.
- Let it cure, then check that no disc is loose and no edge catches.
- Set up the panel under soft, diffused light and photograph through it or against it, adjusting the angle to control the reflections.
- Store the panel flat and rigid when not in use so the discs stay secure.
Customization:
- Use only the reflective side for a pure shimmer
- Mix in painted discs for color
- Shoot through a gap for layered reflections
- Vary the tilt for different highlight shapes
Practical tip: Control the light before you shoot — soft, diffuse light and a tilted panel give gentle color shifts, while a single harsh light just makes glare.
Common mistake: Securing the discs loosely so they shift mid-shoot, or placing the panel where a concentrated reflection bounces into someone’s eyes or the camera.
Safety note: Keep the panel in controlled indoor use and avoid concentrated or moving reflections that could distract or dazzle. This is a creative tool, not a mirror for bright directed light.
[ORIGINAL PHOTO: Show the finished backdrop panel in use, with a styled object photographed against the reflections.]
Worth a try: Photograph the dry layout before fixing the discs so you can recreate the spacing. Once the attachments are ready, secure the board upright and start with a broad, diffused light to one side. Adjust the panel angle in small steps while watching the camera preview for distracting reflections.
How to Make Old CD Projects Look Intentional
The difference between “shiny scrap” and “iridescent décor” is restraint. A few habits make a mixed collection of discs read as a deliberate design:
- Limit the palette to two to five coordinated finishes. A handful of related silver, white, and one accent color reads as curated; six unrelated colors reads as a disco accident.
- Pair the reflective surface with a matte, neutral backing. Matte black, white, charcoal, natural wood, or muted pastels make the reflections read clearly instead of turning everything to glare.
- Repeat disc sizes and spacing. Even gaps and aligned rows signal intention; random placement signals “glued where they landed.”
- Align circular forms with grids, arcs, radiating patterns, or measured rows. The circle is a strong shape — give it an order to follow.
- Use tonal or rainbow gradients deliberately. A clean red-to-violet progression works; a scrambled rainbow doesn’t.
- Choose one reflective focal point. Let one cluster catch the light and keep the rest quieter, rather than covering every surface.
- Alternate intact discs with negative space. The gaps are part of the design and keep the piece from feeling crowded.
- Orient fragments so reflections follow a planned direction. Tilt pieces to bounce light the same way for a controlled effect.
- Conceal adhesive and mounting hardware. Every glue line and screw goes on the back or under a layer.
- Enclose cut edges. A sealed, framed, or grouted edge is what separates finished work from a sharp hazard.
- Coordinate spacers, frames, case components, cork, felt, paint, and visible fasteners. The backing and the hardware are part of the look.
- Test the piece under daylight and artificial light before installing. Reflections look different in each, and you want to catch a harsh glare before it’s on the wall.
- Edit the embellishment. The iridescent surface is already loud — add glitter, beads, and extra colors only where they earn their place.
- Photograph reflective pieces at an angle that hides the camera, stray room reflections, and severe glare. A white card or a diffuser tames the highlights.
When the discs are ready, the same restraint applies to the wall around them — see this coordinated wall display for a small-room makeover in the same spirit.

Troubleshooting Common Old CD Craft Problems
- A disc cracking when drilled — the bit is dull, the speed is too high, or the hole is too close to the edge. Use a sharp bit at low speed, support the disc on a backing board, keep holes inboard, and start with a pilot hole.
- A disc splitting or shattering during cutting — polycarbonate is brittle, and forcing it breaks it. Cut slowly with a tested method, or switch to an intact-disc design instead of cutting.
- Reflective layers peeling from an edge — the cut exposed the layers, and they’re separating. Enclose or seal the edge, and prefer intact discs for anything that will flex or be handled.
- Labels lifting — the adhesive or paint attacked the label, or the disc got damp. Clean and dry first, test the finish on a sacrificial disc, and avoid harsh solvents.
- Plastic cases cracking near hinges — the hinge is thin and was already stressed. Reject cases with hairline hinge cracks before you build, and keep case contents lightweight.
- Paint beading or scratching off — the slick surface wasn’t prepped. Clean, lightly scuff, and prime before painting, then seal if the piece will be handled.
- Primer reacting poorly with the surface — the primer isn’t compatible with the coating. Test the primer on a sacrificial disc before committing.
- Adhesive failing on a smooth disc — the surface wasn’t cleaned or scuffed, or the adhesive isn’t rated for polycarbonate. Clean, scuff, and use a plastic-rated adhesive or epoxy, or a mechanical fastener.
- Clear plastic becoming foggy around adhesive — a solvent or cyanoacrylate is outgassing against the clear panel. Use a low-fog adhesive and ventilate.
- Glue showing through transparent case panels — the adhesive was over-applied. Use a thin, controlled bead and hide it under the backing or the label.
- Mosaic fragments sitting at uneven heights — the pieces differ in thickness, or the backing is uneven. Sort pieces by thickness and level the backing.
- Sharp corners remaining after assembly — an edge wasn’t enclosed. Grout, seal, or frame every cut edge and run a cloth over the finished piece to check.
- A hanging mobile tilting or tangling — the strands are unevenly weighted or too close together. Adjust knot heights and spacing, and test over a soft surface.
- A wall panel sagging or detaching — adhesive alone can’t hold the weight. Use mechanical fasteners or enclosed framing and hardware rated for the load.
- Clock hands rubbing the disc face — the shaft is too short or the hands are seated too low. Use a mechanism that fits the disc thickness and set the hands with a small gap.
- Coasters sliding, warping, or leaking condensation — the cork back is missing or the finish isn’t moisture-resistant. Add a cork or felt back and test the sealant with a cold glass.
- A jewelry display tipping under uneven weight — the base is too light. Widen and weight the base, and test it loaded before regular use.
- A cachepot decoration damaged by drainage water — the discs touched soil or water. Keep the discs on a separate outer layer and water the pot only when lifted out.
- Reflections appearing harsh or chaotic — too many shiny surfaces with no matte anchor. Limit the palette, add a matte backing, and choose one focal point.
- Finished projects looking like children’s crafts — too many colors, no spacing discipline, and exposed glue. Restrain the palette, repeat spacing, enclose edges, and hide the adhesive.
Safety When Working With Old CDs and Cases
- Wear suitable eye protection when drilling, cutting, punching, or handling damaged discs. Fragments and a disc that slips can fly.
- Use a stable cutting mat, backing board, jig, or clamp to support the disc. Never work on an unstable surface.
- Never hold a small disc fragment in your hand while cutting, drilling, sanding, or puncturing it. Secure it instead.
- Keep fingers away from blades, drill bits, awls, punches, and fracture paths, and cut away from your body.
- Keep the work area clear of children, pets, food, and open containers. Sharp fragments travel.
- Collect chips and fragments promptly, and check clothing and the floor for stray sharp pieces when you’re done.
- Discard cracked components that continue to shed or delaminate. A disc that flakes as you handle it is a hazard.
- Follow tool, paint, primer, adhesive, and coating labels, and provide appropriate ventilation — some products release vapors.
- Prevent skin and eye contact with adhesives, coatings, and plastic dust.
- Avoid open flames, ovens, hot plates, microwave ovens, boiling water, heated tools, and uncontrolled high-temperature modification. Do not heat discs to cut or soften them.
- Keep completed projects away from flames, heat sources, energized equipment, and active lamps. Polycarbonate and its coatings are combustible and can distort under heat.
- Avoid direct food-contact claims. Nothing here is food-safe.
- Keep small hardware, beads, disc fragments, magnets, batteries, and detachable components away from young children and pets.
- Test suspended projects over a protected surface before display, and use anchors rated for the wall material and the finished weight.
- Retire a project if a disc cracks, a coating flakes, an attachment loosens, or an exposed edge develops.
- Avoid jewelry or wearable projects with exposed cut plastic.
- Prevent concentrated or moving reflections from distracting drivers, pedestrians, neighbors, animals, or people using stairs and pathways. Keep reflective pieces in controlled indoor settings.
- Make no unsupported environmental, wildlife-control, data-security, heat-resistance, or structural-strength claims.
What to Do With Discs You Can’t Craft With
Not every disc becomes a project, and that’s fine. Optical discs and their cases combine polycarbonate plastic, reflective metal, dyes or alloys, lacquers, adhesives, labels, and paper inserts — a mix that most municipal curbside programs don’t accept. Acceptance varies by location, so check with your local recycling authority, government program, or an electronics-recovery service before placing anything in a bin. Don’t rely on an old national list to claim that a particular retailer or drop-off program currently accepts discs.
Prioritize donation or resale while a disc still plays, and verify a destination accepts it. For recordable media that may hold personal data, handle destruction before disposal using a method supported by current information-security guidance — and remember that a crosscut shredder designed for optical media is a common practical option where such shredders are available.
Use precise language: these projects reuse, repurpose, or give an unwanted disc another use. They are not automatically zero-waste, sustainable, or environmentally beneficial, and this article doesn’t claim they are.
For more coordinated upcycled project ideas, see this coordinated upcycled décor collection.
Frequently Asked Questions
The most useful old CD crafts are iridescent wall panels, mosaic picture-frame surrounds, layered botanical art, a desk clock, cold-drink coasters, a trinket-tray insert, a tiered jewelry display, a notebook cover, a gift-box medallion, a suspended mobile, a cachepot sleeve, and a photography backdrop — plus jewel-case photo frames, organizers, and shadow boxes. Start by checking for private data and choosing intact discs where you can.
Adult-oriented projects that look polished and stay useful include the framed geometric wall panel, the minimalist desk clock, the cold-drink coaster set, the tiered jewelry display, the refillable notebook cover, and the jewel-case organizer. These favor restraint — a limited palette, a matte backing, and intact discs with enclosed edges — over the child-focused ornaments that dominate many lists.
Cutting polycarbonate can splinter, produce sharp edges, and cause sudden breakage, so it’s only as safe as your method and protection. Wear eye protection, work on a stable surface, collect fragments, and enclose every cut edge. Wherever possible, choose an intact-disc design instead. Do not boil, heat, or soften discs to cut them.
Support the disc fully on a backing board — never hold it in your hand — and wear eye protection. Use a small, sharp bit at low speed with gentle pressure, start with a pilot hole, keep the hole away from cracks and the edge, and let the bit cool. Test bit type, speed, and placement on a sacrificial disc first.
A solvent-based craft adhesive rated for plastics (such as E6000, which the manufacturer lists for polycarbonate) or a two-part epoxy generally bonds after the surface is clean and lightly scuffed. Hot-melt glue can soften under heat and form bulky joints, and cyanoacrylate can fog clear plastic, bond skin rapidly, and create brittle joints. For anything load-bearing or suspended, use a mechanical fastener instead.
Yes. Clean the disc, lightly scuff the surface, and apply a primer (gesso or plastic-specific) for an opaque, durable finish, then build up thin coats of acrylic and seal if the piece will be handled. Test your paint, primer, and finish on a sacrificial disc, and note that aggressive prep or adhesive can lift the reflective layer.
Identify recordable or rewritable discs that may hold personal files before crafting or disposal. Visible scratches don’t prove data is gone, and repainting or decorating a disc is not secure destruction. For sensitive data, follow current authoritative information-security guidance — such as NIST SP 800-88, which treats optical media as requiring physical destruction (crosscut shredding, pulverization, grinding, or incineration). If secure destruction makes the disc unusable for crafting, privacy comes first.
Usually not in curbside recycling, because the layered mix of polycarbonate, metal, dye or alloy, lacquer, and label contaminates the stream. Acceptance varies by location, so check your local recycling authority or an electronics-recovery service. Prioritize donation or resale while a disc still plays, and verify any drop-off program before using it.
Start With One Disc
Old CD crafts reward a small start. Pick one disc you’re ready to let go of, confirm it holds no private data, and clean it. Then choose a single beginner project — a desk clock, a coaster, or a jewel-case frame — and test your paint, adhesive, or drill on a sacrificial disc before touching the good one. One finished piece will teach you more about how that specific disc behaves than any list of fifteen, and it’ll keep the rest of your stash out of the “someday” drawer.
Sources
Data destruction / information security
- NIST Special Publication 800-88 — Guidelines for Media Sanitization
- SANS Internet Storm Center — DIY CD/DVD Destruction
Disposal and recycling
- GreenCitizen — CD Recycling: What to Do With Old Discs
- MAWEB — Can You Recycle CDs and DVDs?
- The Environmental Literacy Council — Where to Recycle CDs and DVDs?
Adhesives and painting
- E6000 product listing — polycarbonate compatibility
- eHow — How to Paint a CD for Decor
Posted by: Med Houssem · In: Upcycling