A clean, empty food can is one of the few craft materials most homes generate for free, week after week. It is sturdy, easy to paint, and already shaped like a container — which is why it shows up in so many upcycling roundups. But most of those roundups skip the part that actually matters: the sharp rim, the unknown coating, and whether the thing you hang on the wall will stay there.
This guide collects 15 projects worth making — desk organizers, planters, lanterns, décor, and gifts — and gives you enough to build each one without opening a second tutorial. It puts edge safety, surface preparation, and honest attachment guidance first, so the result is something you want to keep, not just something you photographed once.
A quick note on the term. People say “tin can,” but the container is usually tinplated steel — steel with a thin tin coating — and sometimes aluminum or a steel-and-aluminum combination. Recycling authorities define these as ferrous or bimetal containers, distinct from pure aluminum cans. The name is a habit, not a material guarantee, and the distinction matters when you choose a primer or test whether a can is magnetic.
What a “tin can” really is — and which cans to use
Steel, tinplate, aluminum, and why the name is misleading
Most food cans are steel, often with a thin tin coating to resist corrosion, and many carry an interior coating to protect the food from the metal and vice versa. Some are aluminum or a mix of the two. A magnet is the fastest rough check: steel cans are magnetic, aluminum cans are not. The distinction matters because steel needs a rust-inhibitive primer for outdoor or damp use, while aluminum benefits from a different primer or a light sanding first.
Which clean food cans to keep
Look for undamaged cans with a stable base, an even rim, and a shape that suits your project. Small tomato-paste and tuna cans make tidy supply cups; medium soup and vegetable cans suit planters and organizers; large coffee cans make caddies and storage. Reject cans that are severely rusted, crushed, punctured, contaminated with anything you can’t wash off, or structurally weakened — a dented side seam can become a tear under load.
Why reused cans are not automatically food-safe
A craft can is not a food container. Its interior coating may be scratched by cleaning or drilling, and the coating’s suitability for direct food contact is unknown once the can is repurposed. Use a separate container or liner for anything that touches food or water directly, and treat the can as a decorative or structural shell.
How to prepare empty food cans for crafts
This section is the foundation for every project below. Do it once, thoroughly, and the rest of the building is straightforward.
Cleaning, label removal, and drying
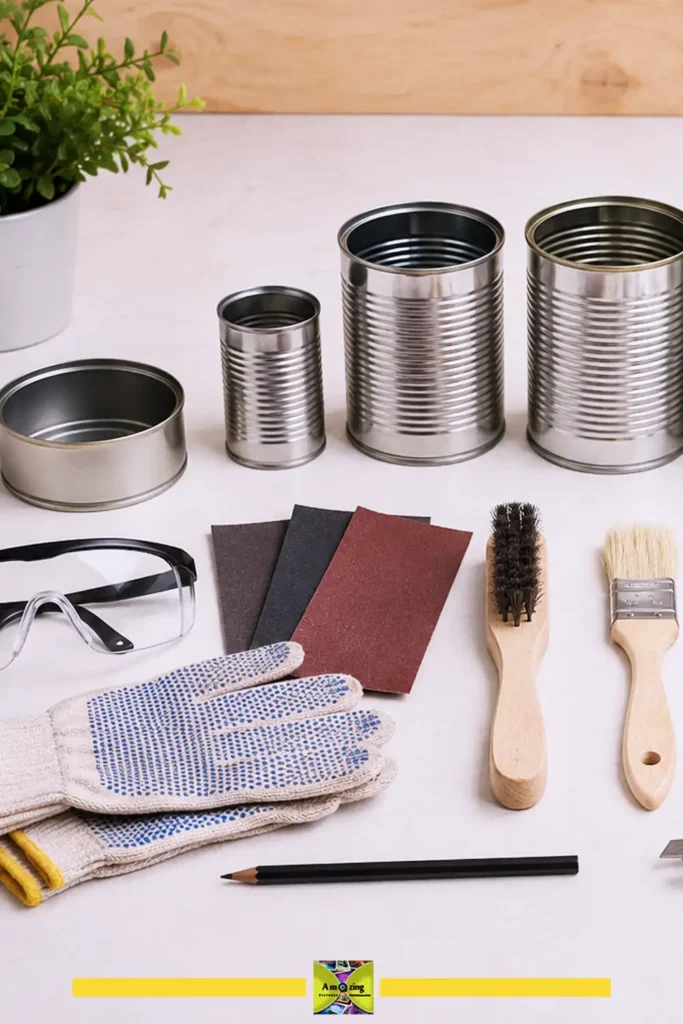
Wash each can inside and out with ordinary dish soap and warm water to remove food residue, then rinse well. To remove a paper label, soak the can in warm water for a few minutes and peel it off; a little vegetable oil or a mild adhesive remover can help with stubborn residue, but you rarely need harsh solvents. Wash off any leftover adhesive and dry the can completely — inside, outside, and along the bottom rim — before painting, gluing, or wrapping. Trapped moisture is what causes rust and paint bubbles later.
Edge inspection and safer edge management
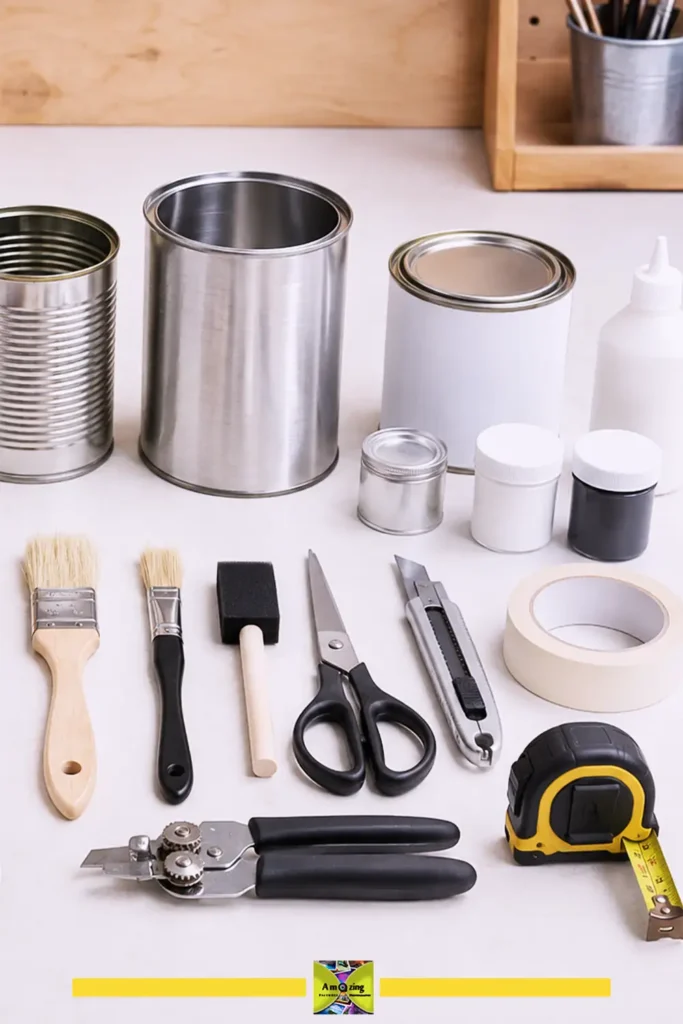
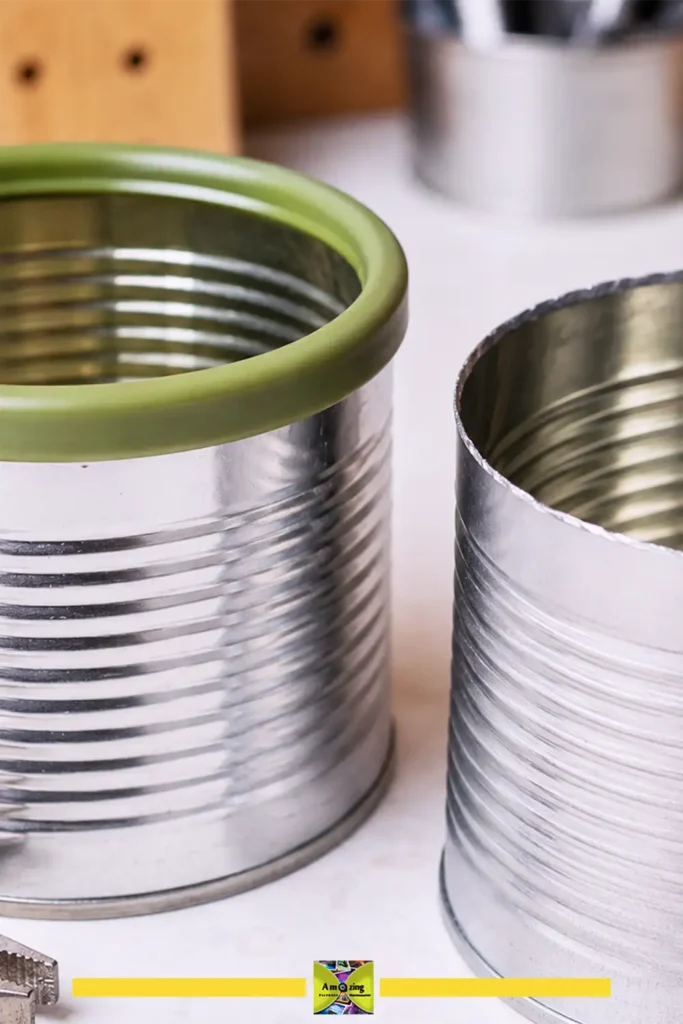
Run a finger (carefully, or better, a folded cloth) around the top rim and the bottom seam of every can. A conventional can opener leaves a sharp top edge, and the lid it cuts off is sharper still. Inspect every rim, cut surface, drilled hole, and punched opening before handling or decorating the can. Smoothing with sandpaper or a file can reduce a burr, but it does not reliably make thin metal safe to grip, and it can create fine metal splinters. The safer route is to fold sharp edges over with pliers, cover them with a commercial edge trim or tape, or use a smooth-edge opener from the start.
Smooth-edge can openers when you collect cans on purpose
A smooth-edge, or side-cut, can opener cuts through the side of the can just below the rim instead of down into the top. That removes the lid in one piece and leaves a smooth, largely burr-free edge on both the can and the lid. If you plan to save cans specifically for crafts, this is the single most useful upgrade — it removes most of the sharp-edge problem before you start. Some models struggle with very small cans, so check the one you buy.
Sorting and matching cans for a coordinated look
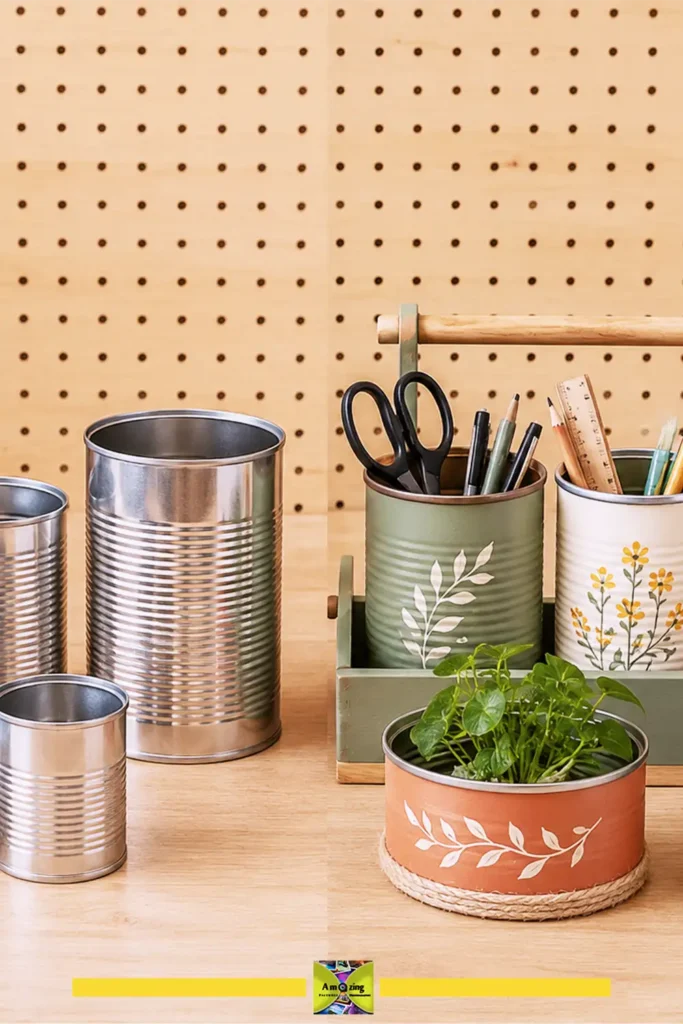
Sort cans by diameter, height, wall construction, opening style, rim condition, coating, and — where relevant — magnetic response. Matching sizes give you modular organizers, caddies, repeated wall displays, and symmetrical projects. Mixed sizes work when they are deliberate, as in a layered plant display, a tiered organizer, or an abstract wall arrangement. A grid of identical cans looks intentional; a random pile of mismatched ones looks like recycling.
Color planning with a limited palette
The fastest way to make unrelated cans read as a set is to limit yourself to two or three colors plus one natural material. Try:
- Industrial: charcoal, gray, muted metal, warm wood.
- Botanical: sage, cream, terracotta, soft yellow.
- Coastal: navy, aqua, pale blue, cream.
- Modern: matte black, white, natural wood.
- Retro: mustard, turquoise, coral, warm cream.
- Monochrome: several tones from a single color family.
Pick one palette and carry it through every can in the collection. Resist the urge to use random leftover colors unless the look you are after deliberately calls for it.
Surface preparation and painting
Paint sticks to clean, lightly scuffed, dry metal — not to grease, dust, or moisture. Wash the can, remove any rust or loose coating with fine sandpaper or steel wool, and lightly scuff glossy surfaces with 120–220-grit paper so the paint has something to grip. Wipe away the dust. For steel cans, a metal primer — self-etching for bare metal, or a rust-inhibitive primer for anything going outdoors — is worth the extra step; for aluminum, sand the surface and consider an etching primer. Apply spray paint in two or three light coats from about 20–35 cm (8–14 inches) away, letting each coat flash before the next. Follow the product label exactly, and remember that dry to the touch is not cured — full curing can take a day or more. Work in a ventilated space and follow the manufacturer’s drying and compatibility instructions, because no single paint or primer bonds to every can coating.
Because steel and aluminum cans can accept coatings differently… I’d test the full primer-and-paint system on one spare can before finishing the whole batch! For bare or lightly rusted steel, use a primer specifically labeled for metal and rust prevention; for aluminum or very slick coated cans, choose a primer that specifically lists aluminum or non-ferrous metal compatibility. Apply two or three thin paint coats rather than one heavy coat, then let the finish cure for the full time stated on the label before handling it heavily or adding adhesive… If the paint scratches off easily with a fingernail after curing, improve the surface preparation or switch to a primer designed for that metal instead of adding more topcoat.
Attachment methods that actually hold
How you join a can to wood, pegboard, fabric, cardboard, or another can depends on the materials and the load:
- Wood and cardboard bases: short wood screws or machine screws with washers, through a pre-drilled hole in the can. Hot glue is fine for a light decorative hold but is not structural for a caddy you will carry.
- Pegboard: small machine screws, washers, and nuts, or purpose-made pegboard hooks through a drilled hole.
- Fabric and jute wraps: glue or double-sided tape for a cover, not for hanging weight.
- Can to can: pop rivets or short machine screws with nuts, which beat glue when cans will be lifted repeatedly.
- Magnets: strong magnets work for light, non-sharp contents on a steel surface, but keep them away from electronics and medical devices, and out of reach of small children.
- Wall mounting: use hardware rated for the wall type and the filled weight, and load-test before you trust it.
Whatever you attach, test the completed project cautiously — load it partway and lift or pull before filling it fully. The rating on the hardware is for the hardware; your finished object is only as strong as its weakest drilled hole, screw, and can wall.
Desk, craft, and sewing organizers
1. Coordinated Painted Desk Supply Cups
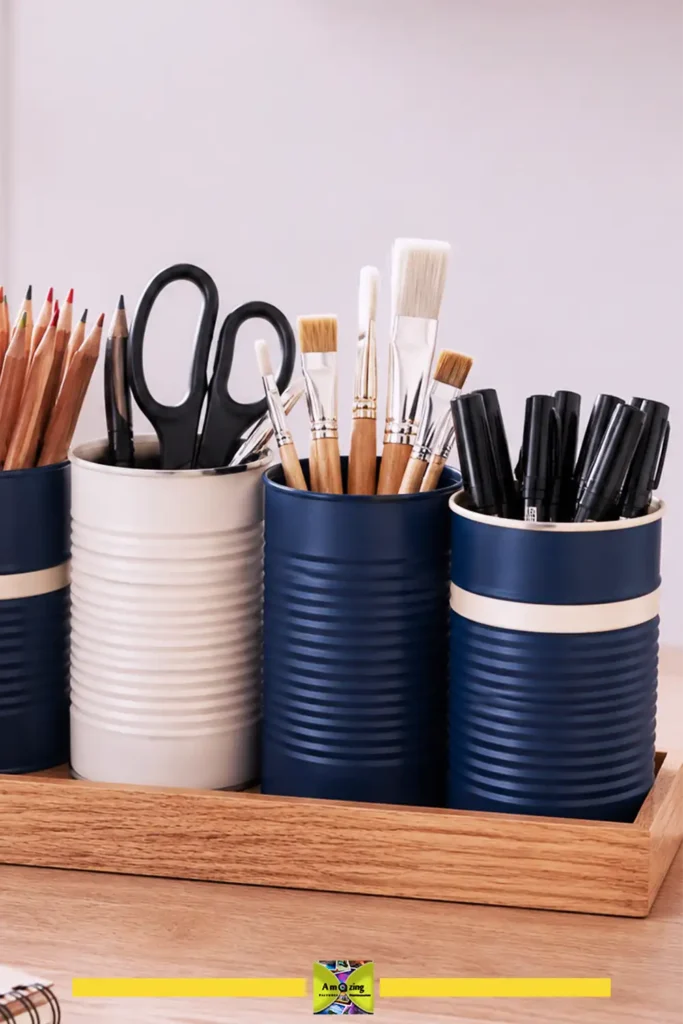
What it looks like: A matched set of cans in one palette — matte navy, cream, and a single wood accent — each holding a different desk tool.
Best use: Home office, classroom, or craft desk. Difficulty: Beginner. Approximate time: 30–40 minutes plus drying and curing time (author to confirm).
Materials:
- Clean cans of matching height
- Metal primer
- Spray paint in your chosen palette
- Optional clear topcoat
Tools:
- Sandpaper or steel wool
- Lint-free cloth
- Drop cloth
- Ventilation
- Prepare the cans per the preparation section, drying them completely.
- Lightly scuff each can and wipe away dust.
- Prime, then spray two or three thin coats of color, letting each flash before the next.
- Leave the cans to cure fully before loading them.
Customization: Paint the inside lip a contrasting color, or mask a stripe with painter’s tape for a two-tone look.
Practical tip: Match the cans’ heights before you paint — identical height reads as a set even if diameters differ slightly.
Common mistake or limitation: Loading a can before the paint is fully cured; the finish will chip and the interior coating may scratch.
Safety: Spray paint and primer release fumes — work outdoors or in a ventilated space, and follow the label.
For a coordinated set, I’d paint all the cans in one session and keep the preparation identical from piece to piece. Even small differences in sanding, primer coverage, or spray distance can make matching colors look slightly different once they dry. I’d also let the cans cure longer than the minimum “dry to touch” time before adding scissors or metal tools, since those are the items most likely to scratch a fresh finish. If you want the set to feel more polished, use one repeated detail — such as the same cream stripe, wood label, or contrasting inside rim — across every can instead of decorating each one differently.
2. Portable Art-Supply Caddy
What it looks like: Four to six painted cans screwed to a small wooden tray with a handle in the center, so the whole set lifts and moves as one unit.
Best use: Craft room, classroom, or a traveling art kit. Difficulty: Beginner-to-intermediate. Approximate time: 60–90 minutes plus curing (author to confirm).
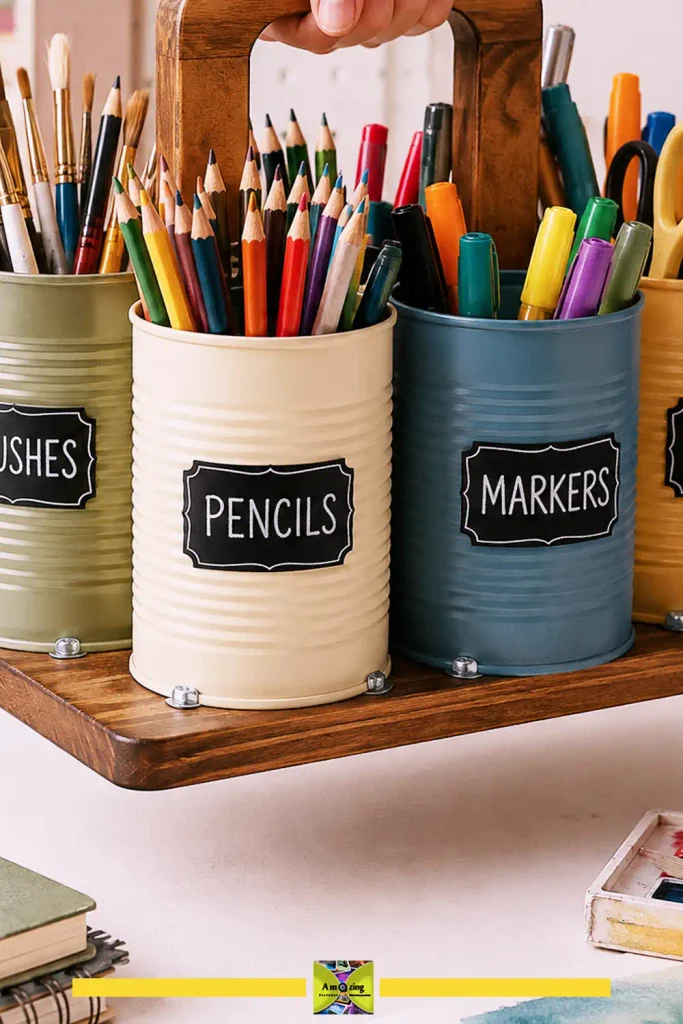
Materials:
- Clean cans
- A small wooden board or tray
- Short machine screws with washers and nuts
- Wood glue or a central dowel for the handle
- Paint or stain
Tools:
- Drill and bits
- Screwdriver
- Wrench
- Sandpaper
- Pencil
- Prepare and paint the cans and the board.
- Mark the can positions on the board, keeping even spacing.
- Pre-drill a hole through the bottom of each can and matching holes in the board.
- Bolt each can to the board with a washer on each side so the screw does not pull through the thin metal.
- Attach the handle, then load the caddy partway and lift it to test before filling.
Customization: Stain the board to match one palette color, or add a chalkboard label strip on each can.
Practical tip: Put the heaviest, sturdiest cans in the center and keep lightweight items at the outer edges.
Common mistake or limitation: Bolting cans with glue alone; a lifted caddy’s weight pulls glue joints apart. Use real fasteners.
Safety: Drilling thin metal creates burrs — deburr each hole and cover sharp edges before handling.
If you already have the cans and a scrap board, the main expenses are usually the machine screws, washers, nuts, paint, and handle material. Add your actual total only after building the caddy, and separate reused materials from newly purchased hardware so readers can understand where the cost came from.
3. Rotating Tabletop Organizer
What it looks like: A ring of cans bolted around a central can on a lazy Susan base, each outer can angled slightly for easy reach.
Best use: Kitchen counter, craft table, or bathroom vanity. Difficulty: Beginner-to-intermediate. Approximate time: 45–75 minutes plus curing (author to confirm).
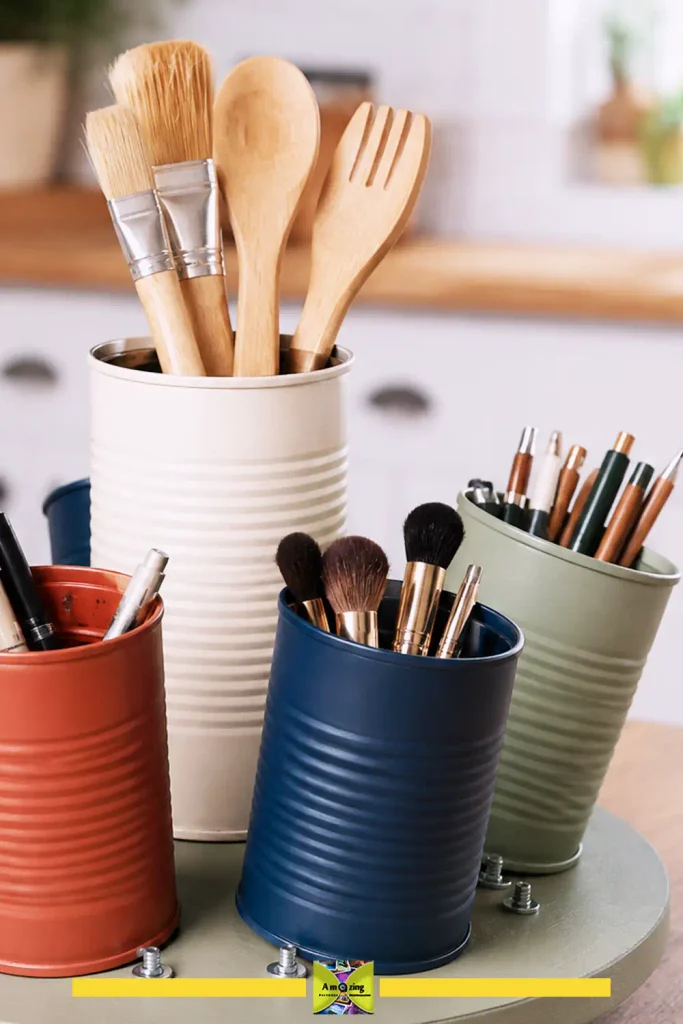
Materials:
- One central can
- Four to six outer cans
- A lazy Susan bearing
- A round wooden disc
- Short machine screws with washers and nuts
- Paint
Tools:
- Drill and bits
- Screwdriver
- Wrench
- Sandpaper
- Prepare and paint all cans and the wooden disc.
- Mount the lazy Susan bearing to the base disc.
- Bolt the central can upright to the disc’s center.
- Bolt the outer cans around it, spaced so the whole set balances as it turns.
- Load lightly and spin to check balance before filling.
Customization: Alternate two colors around the ring, or label each can with a vinyl decal.
Practical tip: Keep the tallest, heaviest items in the center can so the organizer stays balanced as it spins.
Common mistake or limitation: Overloading outer cans so the bearing binds; keep outer contents light.
Safety: A top-heavy rotating organizer tips — test it empty and loaded on the surface it will live on.
4. Pegboard-Mounted Supply Cups
What it looks like: Small painted cans hung from a pegboard by their rims, each holding a single tool or bundle of pens.
Best use: Craft wall, workshop, or garage pegboard. Difficulty: Beginner. Approximate time: 20–35 minutes per can plus curing (author to confirm).
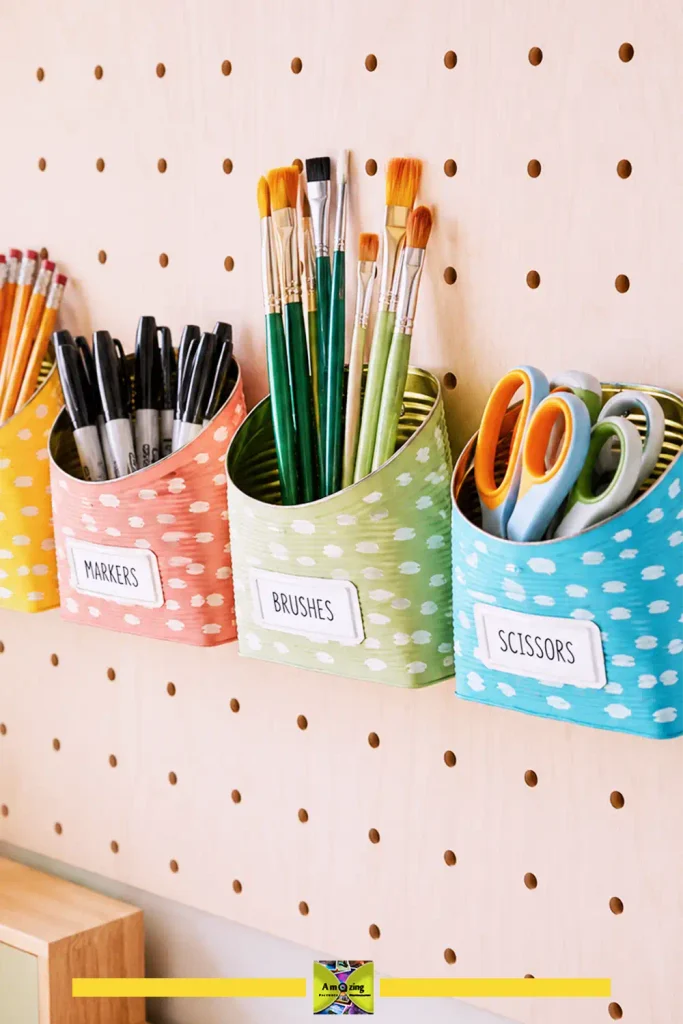
Materials:
- Clean cans
- Paint
- Machine screws with washers and nuts, or pegboard hooks
Tools:
- Drill and bits
- Screwdriver
- Level
- Pliers
- Prepare and paint the cans, and deburr any drilled holes.
- Drill two small holes near the top of each can, spaced to match your pegboard.
- Bolt the can to the pegboard through the holes, or hang it from purpose-made pegboard hooks.
- Load lightly — pegboard and small screws are for light, non-sharp supplies only.
Customization: Paint cans to match the pegboard, or add a strip of edge trim along the rim.
Practical tip: Keep pegboard cans for light items like pens, markers, and brushes; reserve heavy tools for a proper rack.
Common mistake or limitation: Treating a pegboard can as a heavy-duty bin; the board and screws will sag under real weight.
Safety: Drilling creates burrs; fold or trim them before the can goes up at eye level.
5. Magnetic Tins for a Steel Surface
What it looks like: Small steel cans with a magnet on the back, stuck to a magnetic board or refrigerator side, each holding paper clips, pins, or screws.
Best use: Home office, workshop, or kitchen command center. Difficulty: Beginner. Approximate time: 15–25 minutes per tin (author to confirm).
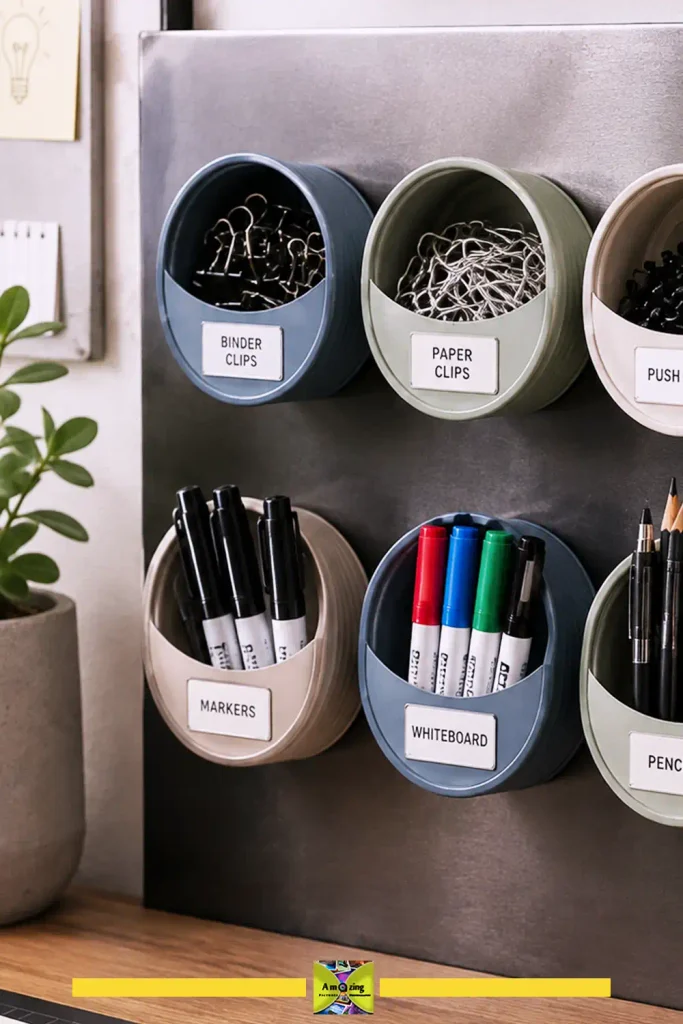
Materials:
- Small steel cans
- Strong disc magnets
- Strong adhesive rated for metal
- Paint or tape
Tools:
- Cloth
- Sandpaper
- Scissors
- Confirm the cans are magnetic steel.
- Prepare the cans, then paint or wrap them.
- Adhere one or two magnets to the back using an adhesive rated for metal, and let it cure.
- Stick the tin to the steel surface and hold only light, non-sharp contents.
Customization: Label each tin with a removable label, or paint them in a single accent color.
Practical tip: Use more magnet surface than you think you need, and test by pulling the loaded tin straight down before leaving it in place.
Common mistake or limitation: Using a weak adhesive or a single small magnet; the tin slides or drops. Strong magnets also damage electronics and credit cards and interfere with pacemakers — keep them away from both.
Safety: Neodymium magnets pinch fingers, can shatter when they snap together, and are a serious swallowing hazard for children. Keep them out of reach, and keep them away from electronics and anyone with an implanted medical device.
For magnetic tins, I’d test the complete setup with the actual contents before putting it into regular use. Load the tin gradually, attach it to the intended steel surface, and leave it in place for a while to check whether it creeps downward or begins twisting away from the wall. If it moves, use a larger magnet or spread two magnets farther apart rather than adding more weight. I’d also roughen and clean the small area where the magnet will be glued so the adhesive bonds to bare, grease-free metal, then give it the full manufacturer-recommended cure time before testing the tin.
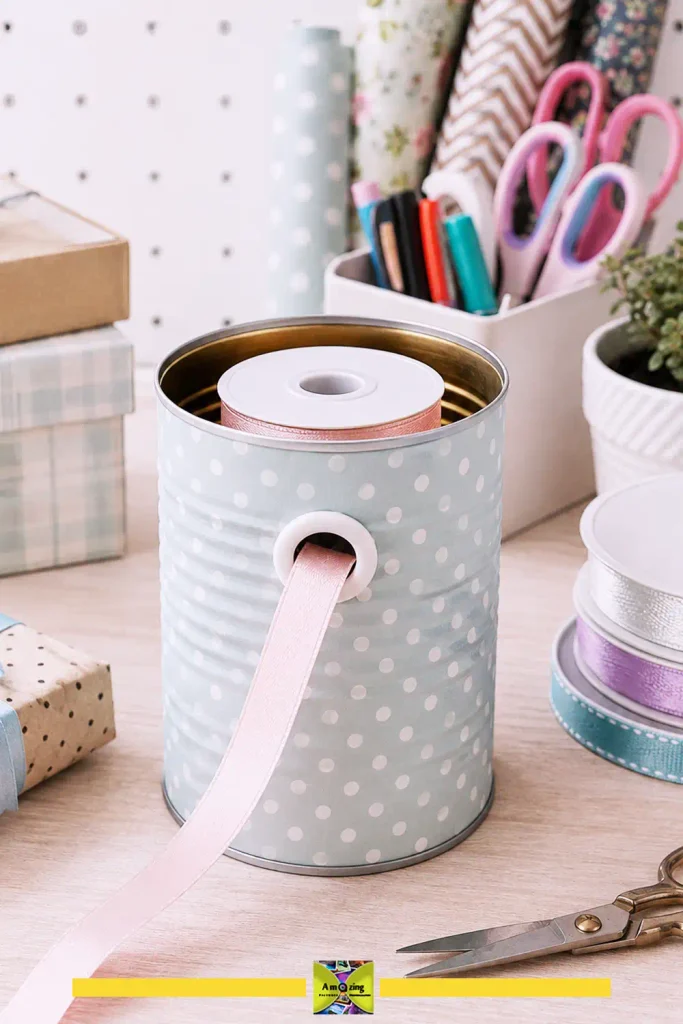
6. Ribbon, Yarn, and Cord Dispenser
What it looks like: A painted can with a smooth-edged slot or grommet at the side, holding a spool of ribbon, yarn, or cord that feeds out through the protected opening.
Best use: Gift-wrapping station or craft room. Difficulty: Intermediate. Approximate time: 45–60 minutes (author to confirm).
Materials:
- A clean can sized to your spool
- Paint or fabric wrap
- A rubber grommet or metal cable-ring for the outlet
- Glue
Tools:
- Drill or tin snips
- Sandpaper or a file
- Pliers
- Cloth
- Prepare the can and decide where the outlet will go — low enough for the spool to turn, high enough to keep the tail from dragging.
- Cut a slot or drill a hole for the outlet, then deburr it thoroughly and fit the grommet or cable-ring so no sharp metal is exposed.
- Paint or wrap the can, keeping the outlet clear.
- Drop the spool in, thread the tail through the outlet, and test that it feeds smoothly.
Customization: Wrap the can in jute for a crafty look, or paint it to match your wrapping-paper station.
Practical tip: A rubber grommet beats a raw drilled hole — it protects both the cord and your fingers.
Common mistake or limitation: Leaving a raw metal slot that frays the cord or cuts fingers; the outlet must be protected.
Safety: Cutting a slot exposes sharp metal — deburr it and cover it with a grommet before use. Wear cut-resistant gloves while cutting.
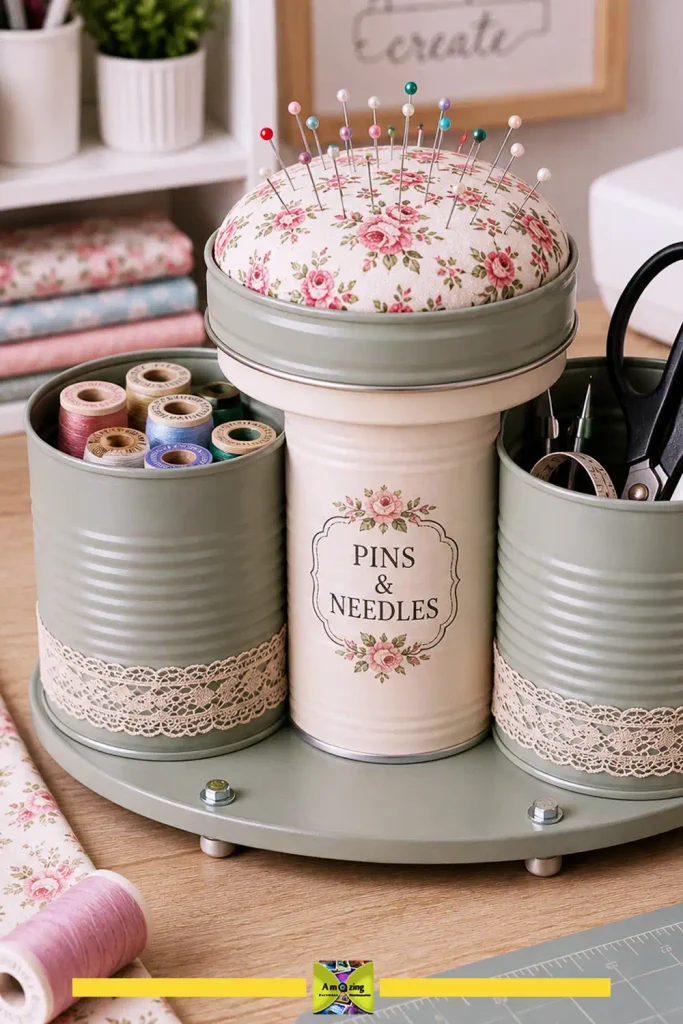
7. Sewing-Station Organizer with Secured Pincushion
What it looks like: A small caddy holding scissors, thread, and a firmly attached fabric pincushion on top, all in one coordinated set.
Best use: Sewing corner or mending kit. Difficulty: Beginner-to-intermediate. Approximate time: 50–70 minutes plus curing (author to confirm).
Materials:
- Two or three small cans
- A shallow can or lid for the pincushion
- Fabric and stuffing
- Strong glue or screws
- Paint
Tools:
- Scissors
- Needle and thread or glue
- Drill (if screwing)
- Prepare the cans and glue or bolt them into a compact cluster.
- Build the pincushion: stuff fabric over a shallow can or lid and secure it underneath so it cannot slide off.
- Attach the pincushion to the top of the cluster with a solid mechanical fastener — the pins should never sit on something held by glue alone.
- Fill the lower cans with thread, scissors, and small tools.
Customization: Match the pincushion fabric to the painted cans for a coordinated set.
Practical tip: Make the pincushion base broad and heavy so pressing a pin in never tips the whole organizer.
Common mistake or limitation: Gluing the pincushion on; it will loosen and scatter pins. Bolt or sew it down firmly.
Safety: Pins and needles are sharp — keep the organizer where they cannot be knocked over, and keep it away from small children.
Home décor, planters, and gifts
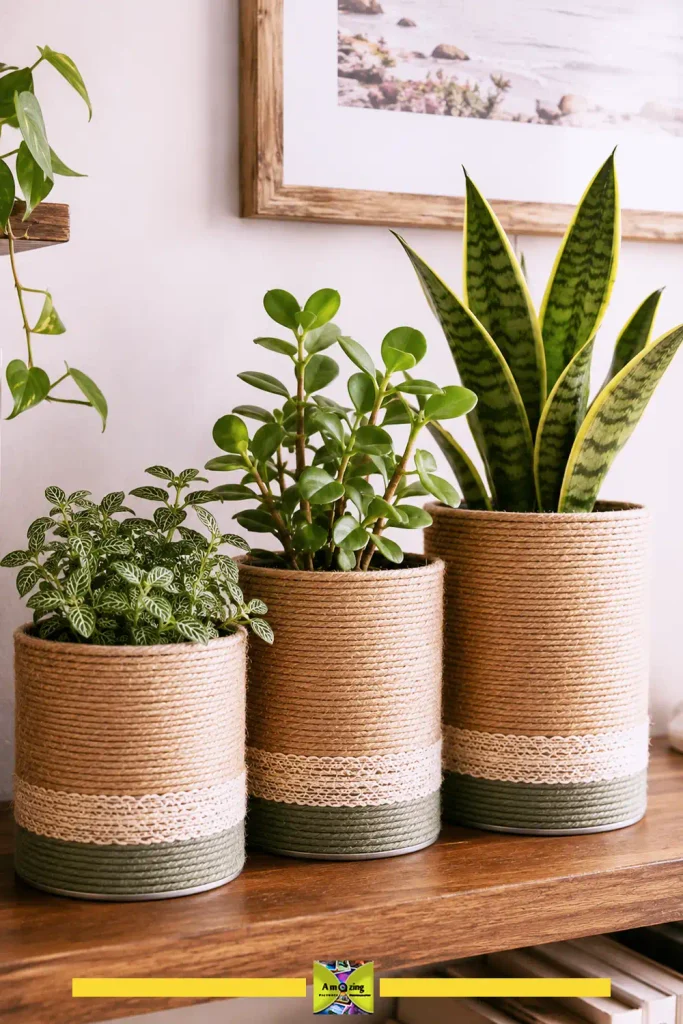
8. Wrapped Decorative Cachepots
What it looks like: Cans wrapped in jute twine or fabric, holding removable nursery pots so the plants lift out for watering.
Best use: Bookshelf, mantel, or covered patio. Difficulty: Beginner. Approximate time: 30–45 minutes each (author to confirm).
Materials:
- Clean cans
- Jute twine or fabric
- Strong craft glue
- One nursery pot per can
Tools:
- Scissors
- Cloth
- Hot glue or tacky glue
- Prepare the cans and dry them fully.
- Starting at the bottom, wrap twine or fabric around each can, gluing as you go and keeping the coils tight.
- Trim and glue the ends down cleanly at the rim.
- Drop a nursery pot inside — never plant directly in the wrapped can, since the wrap will wick and hold water.
Customization: Alternate natural jute with a painted band, or use fabric in your palette for a softer look.
Practical tip: The nursery pot is the real planter; the can is only a cover, so match the pot’s height to the can and leave the rim clean.
Common mistake or limitation: Watering the wrapped can directly, which soaks the twine and invites mildew and rust.
Safety: None beyond the usual clean-edge check, since the can is not cut.
If you like turning a discarded container into home storage, you might also enjoy a handmade macramé basket from an old plastic bucket.
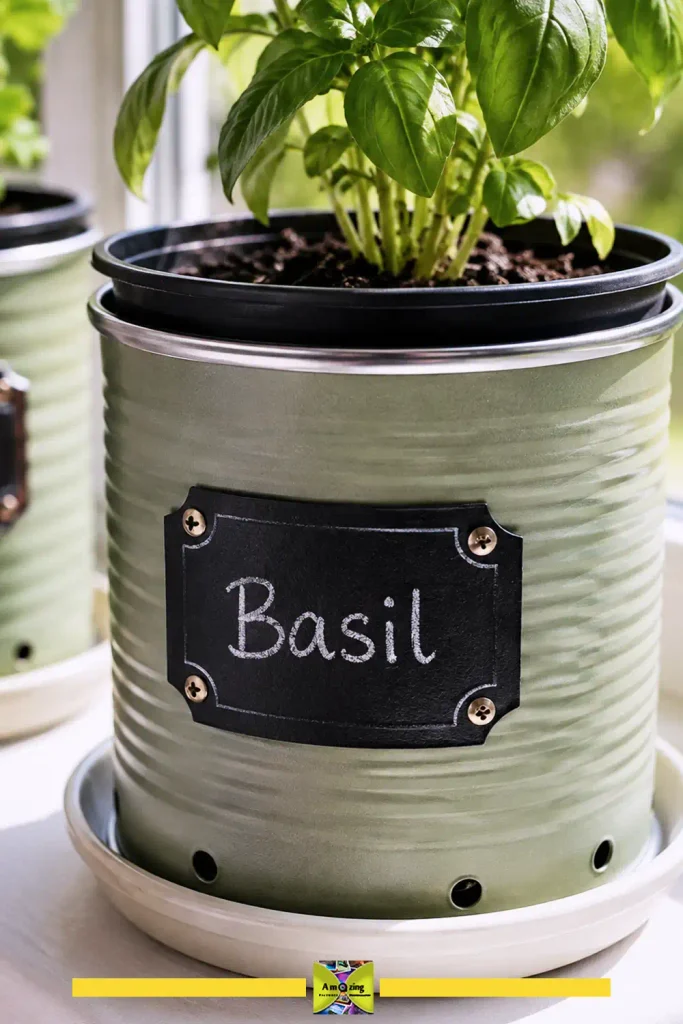
9. Painted Windowsill Herb-Pot Sleeves
What it looks like: A row of painted can sleeves, each holding a separate small planting container with a drainage dish underneath.
Best use: A sunny kitchen windowsill. Difficulty: Beginner. Approximate time: 40–60 minutes plus curing (author to confirm).
Materials:
- Cans sized to your nursery pots
- Metal primer and paint
- Nursery pots and small drainage saucers
Tools:
- Sandpaper
- Cloth
- Ventilation
- Prepare and paint the cans, inside and out, so no bare metal touches the damp pots.
- Drill one or two small drainage holes in the bottom of each can, then deburr them.
- Set a nursery pot inside each sleeve and a saucer beneath to catch runoff.
- Water the inner pots, never the sleeves.
Customization: Paint each sleeve in a botanical palette and add a small chalkboard label for the herb name.
Practical tip: The sleeve and saucer catch drips so the painted metal and the windowsill stay dry.
Common mistake or limitation: Planting directly in a coated can; the unknown interior coating should not hold edible-plant soil, and the can will rust from trapped water. Use a separate container.
Safety: Drilling creates burrs — deburr the holes and keep the rims smooth.
10. Punched-Pattern LED Lanterns
What it looks like: A can with a punched geometric pattern that glows when a battery-operated LED light is placed inside.
Best use: Covered patio, mantel, or evening table. Difficulty: Intermediate. Approximate time: 60–90 minutes each (author to confirm).

Materials:
- Clean cans
- Paint (optional)
- A battery-operated LED tea light or string light
Tools:
- Drill, or a hammer and nail
- Sandpaper or a file
- Pencil
- Clamps
- Cut-resistant gloves
- Eye protection
- Draw your pattern on paper first, then transfer it to the can with pencil.
- Clamp the can to a stable surface — never hold it in your hand while drilling or punching.
- Drill or punch the pattern, working from the inside outward where you can, and deburr every hole.
- Paint the can if you like, keeping the holes clear.
- Place a battery LED light inside; never use a real candle or flame.
Customization: Punch a repeating star, dot, or constellation pattern; paint the can matte black for the sharpest glow.
Practical tip: Smaller, evenly spaced holes read better than a few large ones, and they let less light spill unevenly.
Common mistake or limitation: Punching from the outside leaves burrs that catch fingers; deburr every hole on both sides.
Safety: Use battery-operated LED lights only — no flames, no mains electricity, no heated bulbs against a painted can. Wear eye protection and gloves, and clamp the can before drilling or punching.
For punched-pattern lanterns… I’d keep the first design simple and test it on a spare can before committing to a detailed pattern. Closely spaced holes can weaken thin metal and make the can flex, so leave enough solid material between openings and work gradually around the design instead of punching one area all at once. After drilling, run a folded cloth carefully over the inside and outside surfaces to catch any remaining burrs, then inspect every hole by hand while wearing gloves… I’d also test the finished lantern in a dark room before painting it… Uneven spacing is much easier to spot once the LED is glowing through the pattern!
11. Decorative Vase Sleeves
What it looks like: Painted or wrapped cans that dress up a plain glass jar or bottle holding fresh flowers.
Best use: Entryway, dining table, or gift. Difficulty: Beginner. Approximate time: 25–40 minutes plus curing (author to confirm).
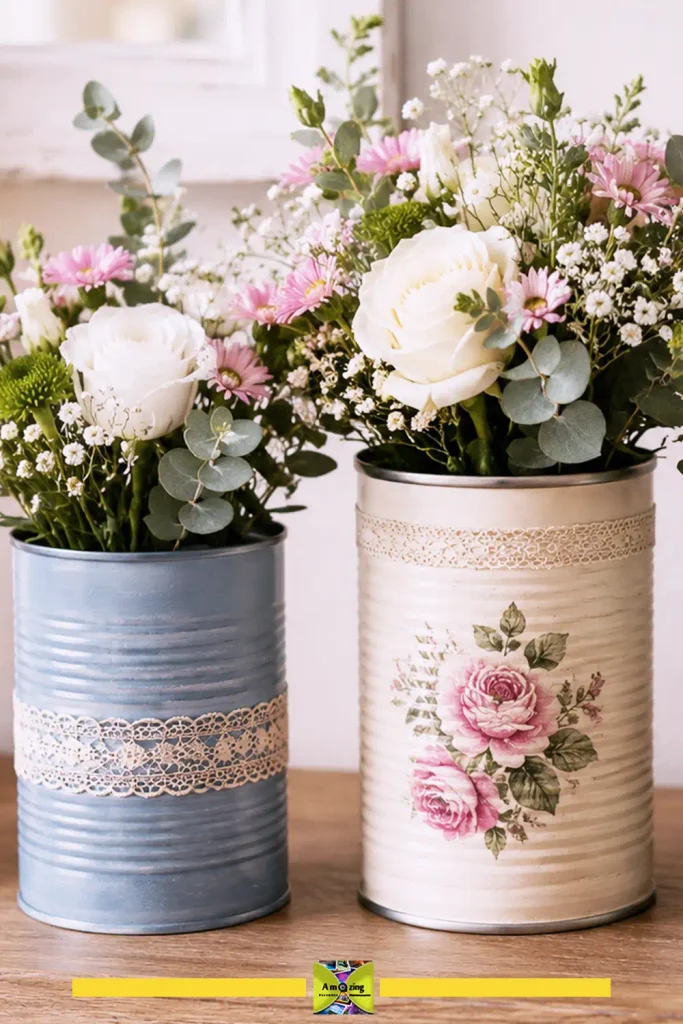
Materials:
- Cans sized to fit a watertight inner jar or bottle
- Paint or wrap
- The inner vessel
Tools:
- Sandpaper
- Cloth
- Ventilation (if painting)
- Prepare and finish the cans.
- Choose a watertight glass jar or bottle that fits snugly inside each can.
- Place the inner vessel in the can, and add water and stems to the inner vessel only.
Customization: Match a set of three vases in graduated heights, or wrap one in a ribbon for gifting.
Practical tip: The glass vessel is what holds water; the can is a jacket, so size the opening so the jar lifts out easily.
Common mistake or limitation: Pouring water into the can itself, which rusts the metal and stains the surface beneath.
Safety: None beyond a clean rim, since the can is not cut.
12. Coordinated Dry-Flower Wall Display
What it looks like: A small grid of matching painted cans, each holding a bundle of dried flowers, mounted in a tidy wall arrangement.
Best use: Hallway, bedroom, or a cottage-style wall. Difficulty: Beginner-to-intermediate. Approximate time: 75–120 minutes for the full display (author to confirm).
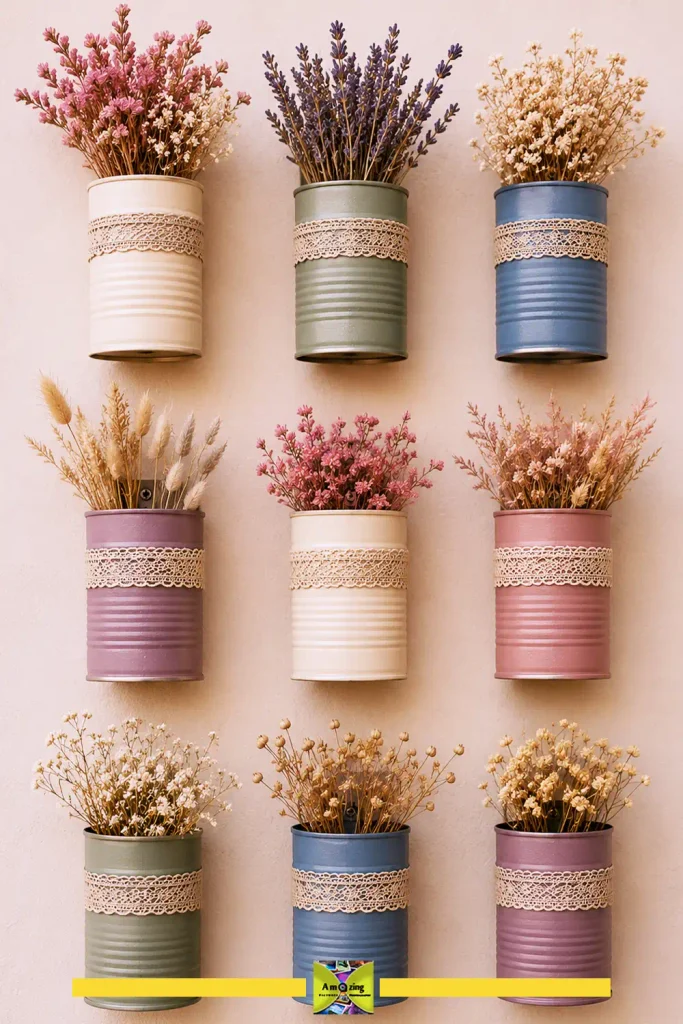
Materials:
- Several matching cans
- Paint
- Wall anchors and screws rated for the wall type
- Dried flowers
Tools:
- Drill and bits
- Screwdriver
- Level
- Sandpaper
- Prepare and paint the cans in one palette.
- Decide the wall layout and mark it with a level.
- Drill a small hole in each can near the top and deburr it, or use a removable wall hook behind each can.
- Mount each can with hardware rated for the wall — light, dry flowers keep the load small, but use real anchors, not adhesive strips.
- Fill each can with a bundle of dried stems.
Customization: Use one flower type per can for rhythm, or a gradient of tones across the grid.
Practical tip: Dried flowers are light, so the mounting is easy — but a grid only looks intentional if the spacing and heights are even.
Common mistake or limitation: Hanging cans from decorative string or unverified hooks; use rated hardware even for light loads.
Safety: Wall mounting needs the right anchor for the wall type; check before drilling.
For more ways to dress a wall with reclaimed materials, see this collection of recycled-material wall décor.
For a lightweight dried-flower display… I’d mount each can with a screw and small washer so the thin metal around the drilled hole cannot pull through! When a wall stud is available, fastening directly into it is the simplest option! For hollow drywall between studs, use a properly sized drywall anchor whose manufacturer rating comfortably exceeds the finished can and flower weight… for brick or concrete, switch to a masonry-specific anchor and screw! Test one fully loaded can first and leave it hanging for a while before installing the rest of the grid! If the anchor shifts, the screw loosens, or the can begins tilting forward… change the mounting method before completing the display.
13. Vertical Mini Planter Wall
What it looks like: A column of painted cans, each holding its own removable plant pot, attached to a wooden board with proper fasteners.
Best use: Covered porch, balcony, or a sunny interior wall. Difficulty: Intermediate. Approximate time: 2–3 hours plus curing (author to confirm).
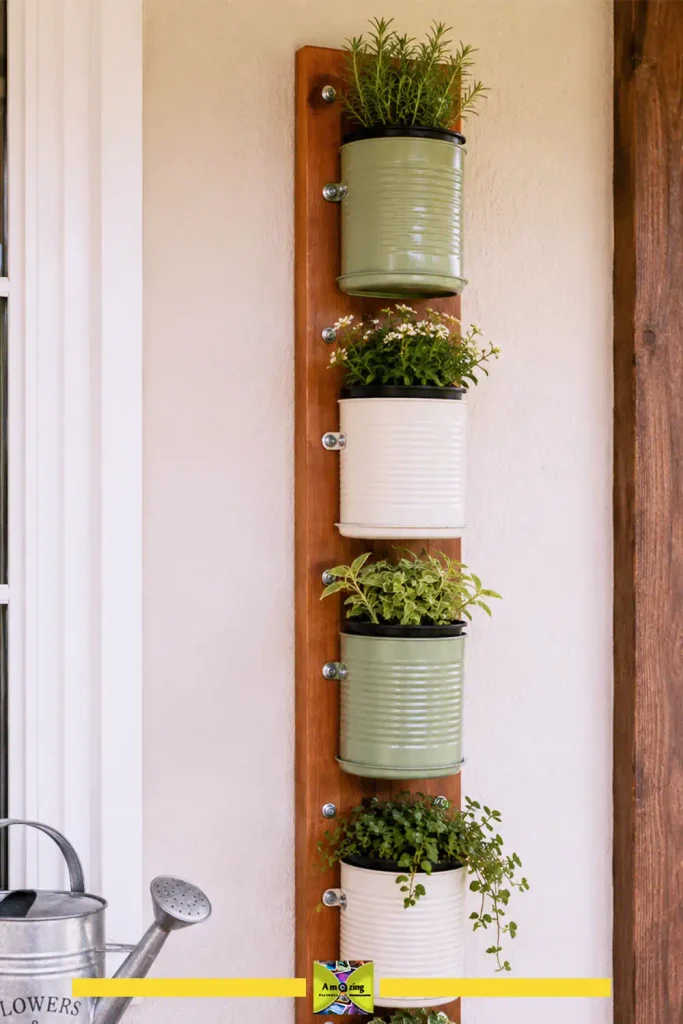
Materials:
- Cans of one diameter
- A wooden board or two vertical battens
- Machine screws with washers and nuts
- Wall anchors
- Nursery pots
- Drainage saucers
Tools:
- Drill and bits
- Screwdriver
- Wrench
- Level
- Stud finder
- Prepare and paint the cans, and drill drainage holes in each bottom.
- Mark and drill two holes in the back of each can.
- Bolt each can to the wooden board in a column, spacing them for the plants’ mature height.
- Mount the board to the wall into studs or with anchors rated for the full, watered weight.
- Set a nursery pot in each can and water carefully so runoff falls into the saucers or the pot below’s saucer.
Customization: Alternate two colors down the column, or add a drip tray at the bottom.
Practical tip: Each plant sits in its own removable pot, so you can lift one out to water it without drenching the cans below.
Common mistake or limitation: Hanging a full planter from unverified hardware or drilling into drywall without a stud; the watered weight is far more than the empty cans suggest. Load-test before mounting over people or furniture.
Safety: Use anchors rated for the surface and the wet weight; wear eye protection when drilling metal; keep sharp edges covered.
If you already have clean cans and a suitable scrap board… the main expenses will usually be the machine screws, washers, nuts, wall-mounting hardware, paint, nursery pots, and saucers! Track reused materials separately from purchased items… and include the plants only if you bought them specifically for this project! Because anchors and fasteners vary by wall type… record the actual hardware used rather than estimating a universal project cost.
Garden and household projects
14. Garden-Tool and Seed-Packet Caddy
What it looks like: A larger can or can cluster, painted and sealed, that holds hand tools, gloves, and seed packets by the back door or potting bench.
Best use: Garden shed, potting bench, or covered porch. Difficulty: Beginner-to-intermediate. Approximate time: 45–70 minutes plus curing (author to confirm).
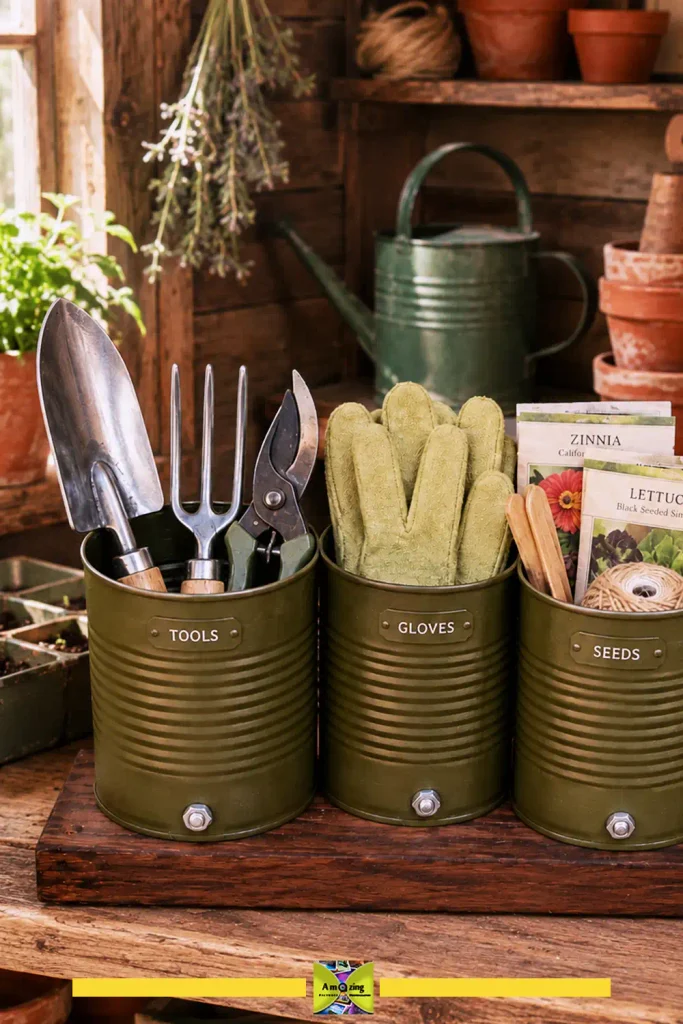
Materials:
- A large coffee can or several medium cans
- Rust-inhibitive primer and outdoor paint
- Clear topcoat
- Optional wooden base
Tools:
- Drill and bits
- Sandpaper
- Cloth
- Ventilation
- Prepare the cans and drill drainage holes if they will sit outside and collect water.
- Prime with a rust-inhibitive primer, then paint and seal with a clear topcoat.
- For a caddy, bolt the cans to a wooden base so the cluster stays together.
- Keep the caddy under cover; steel rusts faster in constant rain.
Customization: Paint the caddy in a botanical or industrial palette and label each can for tools, gloves, and seeds.
Practical tip: Even with a sealant, keep the caddy under cover — coated steel handles a splash, not a season of standing water.
Common mistake or limitation: Assuming paint alone makes a can weatherproof; without a rust-inhibitive primer and topcoat, outdoor cans rust from the inside out.
Safety: Drilling and primer/paint both need care — deburr holes and work in a ventilated space.
15. Cookout Cutlery Caddy
What it looks like: A clean, painted caddy that holds wrapped or clean utensils, napkins, and straws for a buffet or cookout.
Best use: Backyard gathering or picnic table. Difficulty: Beginner. Approximate time: 30–50 minutes plus curing (author to confirm).
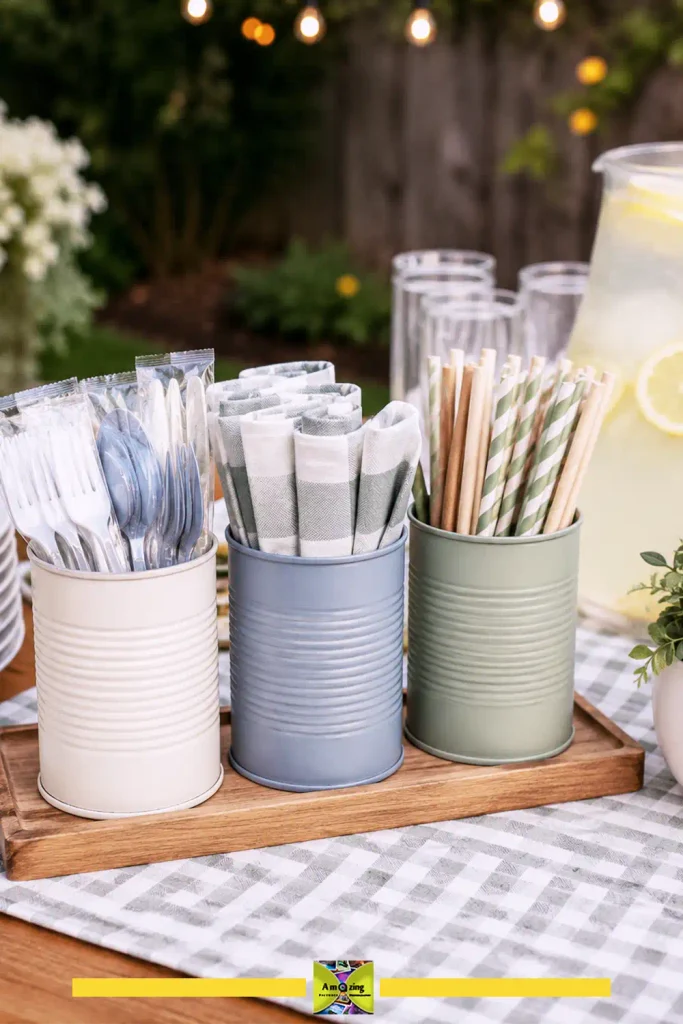
Materials:
- Two or three clean cans
- Paint and a food-safe-rated clear coating (if desired)
- A small tray or board to hold them
Tools:
- Sandpaper
- Cloth
- Ventilation
- Prepare the cans thoroughly, inside and out.
- Paint the outside; leave the interior either unpainted or lined with a removable, washable insert.
- Set the cans in a tray or board so they stay upright.
- Store only clean or individually wrapped utensils, napkins, and straws — never unpackaged food.
Customization: Paint the caddy to match your table settings, or wrap the cans in a washable, removable fabric sleeve.
Practical tip: A removable insert or liner is the clean, cautious way to hold loose napkins and straws without relying on the can’s unknown interior coating.
Common mistake or limitation: Putting unpackaged food directly into a craft can, whose interior coating may be scratched or unknown. Keep the can for utensils and wrapped items only.
Safety: Do not treat a reused can as a food-contact surface; use liners and keep the rim smooth.
For a cookout cutlery caddy, I’d keep the setup simple and easy to clean rather than treating the decorated can itself as a food-contact container. A removable liner works well because you can wash or replace it after the gathering without disturbing the paint or finish. I’d also place the cans in a shallow tray or fix them to a small board so they do not tip when guests pull out utensils. If the caddy will sit outdoors for several hours, keep it under shade or a covered area so the finish, napkins, and wrapped utensils are not exposed to direct sun, moisture, or wind.
Making a mixed set of cans look intentional
The difference between a pile of painted cans and a collection is repetition. Repeat the same finish, the same palette, and the same rim treatment across every can in a set. Keep rims clean and covered, line up labels or leave them all unlabeled, and space a wall grid with a level rather than by eye. When cans of different sizes must coexist, use the size difference on purpose — tallest in back, shortest in front — rather than letting it happen by accident.
Safety guidelines for tin can crafts
- Sharp rims and burrs. Inspect every edge before handling. Fold, trim, or cover sharp edges; do not assume a smooth-looking rim is safe to grip.
- Metal splinters. Deburr drilled or punched holes, and wear eye protection when cutting, drilling, or punching.
- Cutting and drilling. Clamp the can; never hold it in your hand. Cut away from your body, and reserve cutting, drilling, punching, and edge finishing for a capable adult.
- Paint, primer, and adhesives. Work in a ventilated space, follow the label, and let finishes cure fully before use.
- Hot glue. Fine for light decorative holds; not structural for anything you carry or hang.
- Magnets. Strong magnets pinch, shatter, damage electronics and cards, interfere with implanted medical devices, and are a swallowing hazard for children. Keep them away from all four.
- Lighting. Use battery-operated LED lights only. No real candles, no open flames, no heated bulbs against a painted can.
- Rust and weather. Coated steel is not weatherproof; use rust-inhibitive primer and a topcoat, and keep outdoor pieces under cover.
- Mounting. Use hardware rated for the wall type and the filled weight, and load-test before hanging or filling.
- Children and pets. Keep cut metal, small parts, magnets, and sharp tools out of reach.
Do not use a reused can as direct cookware, store unpackaged food in a craft can, plant edibles directly in an unknown interior coating, or hang heavy cans from decorative string.
Frequently asked questions
They are safe when the sharp rim is dealt with first. Inspect every edge, fold or cover sharp metal, and wear cut-resistant gloves for any cutting or drilling. A smooth-edge can opener removes most of the hazard before you begin.
Most are tinplated steel — steel with a thin tin coating — though some are aluminum or a steel-and-aluminum combination. Recycling authorities describe them as ferrous or bimetal containers, not pure tin.
Usually yes. For steel, a self-etching or rust-inhibitive primer helps paint bond and resists rust; for aluminum, sand first and consider an etching primer. No single paint bonds to every coating, so follow the product label.
It is safer to use the can as a decorative sleeve around a separate planting container. The interior coating is unknown, coated cans rust when they hold wet soil, and drainage is harder to manage. Use a nursery pot inside.
No. Use battery-operated LED lights only. A real flame can overheat the painted or coated can and release fumes, and it is a fire hazard.
They are useful for light items but risky: they pinch fingers, shatter, damage electronics and credit cards, interfere with pacemakers and other implanted devices, and are a serious swallowing hazard for children. Keep them away from all of these.
Use hardware rated for your wall type and the filled weight, and load-test before trusting it. Never hang cans from decorative string or unverified hooks, even for light contents.
Coated steel rusts when it stays damp. Use a rust-inhibitive primer and a clear topcoat, add drainage holes where water collects, and keep the piece under cover rather than in constant rain.
Conclusion
A clean food can becomes something worth keeping when you treat the sharp edge, the coating, and the fastener as seriously as you treat the paint job. Pick a palette and a purpose, prepare the cans properly, and choose attachments that match the real load. Build one coordinated set before expanding to fifteen, and you will have organizers, planters, and décor that read as intentional — not as recycling waiting to go back to the bin.
If you enjoy turning discarded materials into practical projects, you might also like this collection of recycled garden projects made from bottle caps.
Sources
- Krylon — Proper Spray Paint Surface Preparation and How to Spray Paint Metal
- Rust-Oleum — clean-metal primer and rust-inhibitive primer guidance
- Municipal recycling authorities (Wheeling, WV and Pennsylvania municipal codes) — definitions of tinplate and bimetal containers
- OXO, Pampered Chef, and Williams Sonoma — smooth-edge (side-cut) can opener product documentation
- Swiss Federal Office of Public Health — magnet fact sheet
- Goudsmit Magnetics and Magnet Expert — permanent-magnet safety guidelines
Posted by: Med Houssem · In: DIY, Tin Can & Metal Crafts, Upcycling