Why Recycled-Material Wall Decor Makes Sense Right Now
Bare walls do not need an expensive fix. With basic tools most people already own — scissors, a ruler, a pencil, craft glue, and acrylic paint — everyday throwaway materials turn into wall art that costs very little and looks genuinely attractive.
This article covers more than a dozen projects built from cardboard, plastic bottles, yarn, old bangles, bottle caps, fabric scraps, and pieces of salvaged furniture. Every project has been chosen because it can be completed at a kitchen table with tools you probably have within reach.
For readers who want more general wall decor inspiration, the site also has a budget-friendly wall makeover ideas tutorial that covers a different approach to refreshing a room.
The projects below are organized by material so you can jump straight to whatever you have on hand.
The Basic DIY Wall Decor Toolkit
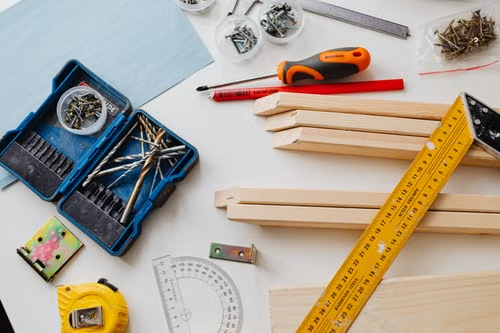
You do not need a dedicated craft room. Most of these projects use a modest set of supplies. Below is what you will reach for across nearly every project.
Tools Almost Everyone Owns
- Scissors — sharp household scissors work for paper, thin cardboard, yarn, and fabric. Keep a separate pair for cutting plastic bottles; the blades dull faster on rigid plastic.
- Ruler or measuring tape — a metal ruler doubles as a straight edge for craft knife cuts.
- Pencil and eraser — for tracing shapes and marking cut lines.
- Craft glue (PVA or white school glue) — suitable for paper, cardboard, fabric, and porous surfaces. Dries clear.
- Paintbrushes — one flat brush (½ to 1 inch wide) for base coats and one small round brush for detail work.
- Acrylic paint — a starter set of basic colors (white, black, red, blue, yellow) lets you mix almost any shade. Acrylics adhere well to cardboard, wood, plastic (with light sanding), and metal.
Inexpensive Supplies Worth Adding
- Hot glue gun — indispensable for bonding plastic, fabric, yarn, and mixed materials. Low-temperature guns are safer for beginners and when working with children. High-temperature guns create stronger bonds but pose a burn risk.
- Craft knife with snap-off blades — cleaner cuts on cardboard and plastic than scissors can achieve. Always use a sharp blade; dull blades require more force and are more likely to slip.
- Self-healing cutting mat — protects your table and extends blade life. A piece of thick corrugated cardboard works as a temporary substitute.
- Sandpaper (120 and 220 grit) — for smoothing cut plastic edges, rough wood, and cardboard layers.
- Needle-nose pliers — helpful for bending bottle caps, pulling wire, and gripping small parts during assembly.
Optional Tools That Make Projects Easier
- Compass or circle template — for drawing accurate circles on cardboard.
- Mod Podge or matte acrylic sealer — adds a protective finish to paper and cardboard projects.
- Staple gun — useful for attaching fabric and canvas to wood frames.
- Stud finder and level — for securely mounting heavier pieces.
How to Prepare and Clean Recycled Materials
Raw recycled materials need preparation. Skipping this step leads to paint that peels, glue that will not hold, and projects that look shabby faster than they should.
Cardboard
Remove tape, labels, and staples. Wipe with a barely damp cloth to remove dust; do not soak cardboard, because water weakens the corrugated layers and causes warping. Flatten boxes under heavy books overnight if they are curled. For wall art, use double-layer corrugated cardboard whenever possible — it holds its shape better than single-layer cereal-box stock.
Plastic Bottles
Rinse thoroughly with warm soapy water to remove residue, sugars, and oils. Peel off labels; stubborn adhesive comes off with a little cooking oil rubbed in and wiped away, followed by soapy water. Let bottles dry completely inside and out before cutting — wet plastic is slippery and harder to control with scissors or a craft knife. Remove bottle-cap rings and recycle caps separately or keep them for bottle-cap projects.
Fabric and Yarn
Wash fabric scraps before crafting to remove dust, odors, and sizing. Old T-shirts, pillowcases, and linens work well. For yarn from thrift stores or old projects, gently hand-wash in cool water with mild detergent, rinse thoroughly, and hang to dry. Untangle skeins before starting; working with knotted yarn leads to frustration and uneven tension.
Old Furniture Pieces
This is the most important preparation step in the article.
Test for lead paint before sanding any furniture made before 1978. Lead test kits are available at hardware stores and home centers for under $15. If a piece tests positive, do not sand it — use a liquid deglosser instead, or consult a professional. If the piece tests negative or is confirmed post-1978, proceed with the steps below.
Remove hardware (knobs, hinges, handles). Clean surfaces with a degreasing cleaner or mild dish soap and water. Let dry fully. Sand with 120-grit sandpaper to remove gloss and give paint a surface to grip. Wipe sanding dust away with a tack cloth or damp rag. Fill dents and holes with wood filler, let dry, and sand smooth. Apply primer before painting. Work in a ventilated area and wear a dust mask during sanding.
Cardboard Wall Decor Projects
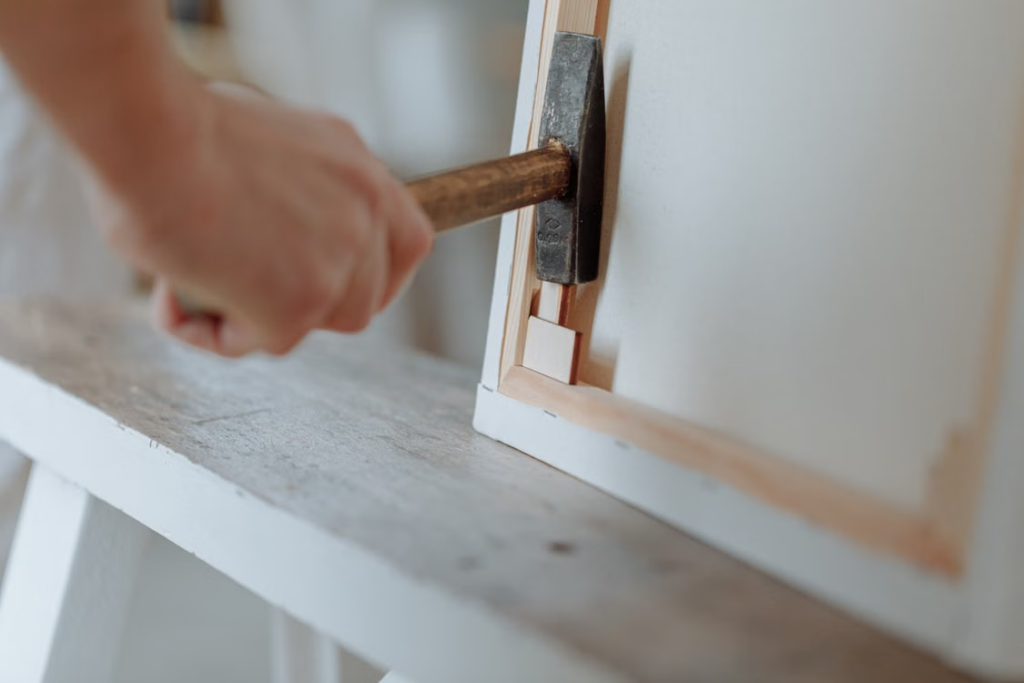
Cardboard is free, easy to cut, and surprisingly sturdy when layered. Below are three projects that produce very different looks from the same starting material.
Project 1: Layered Cardboard Flower Wall Art
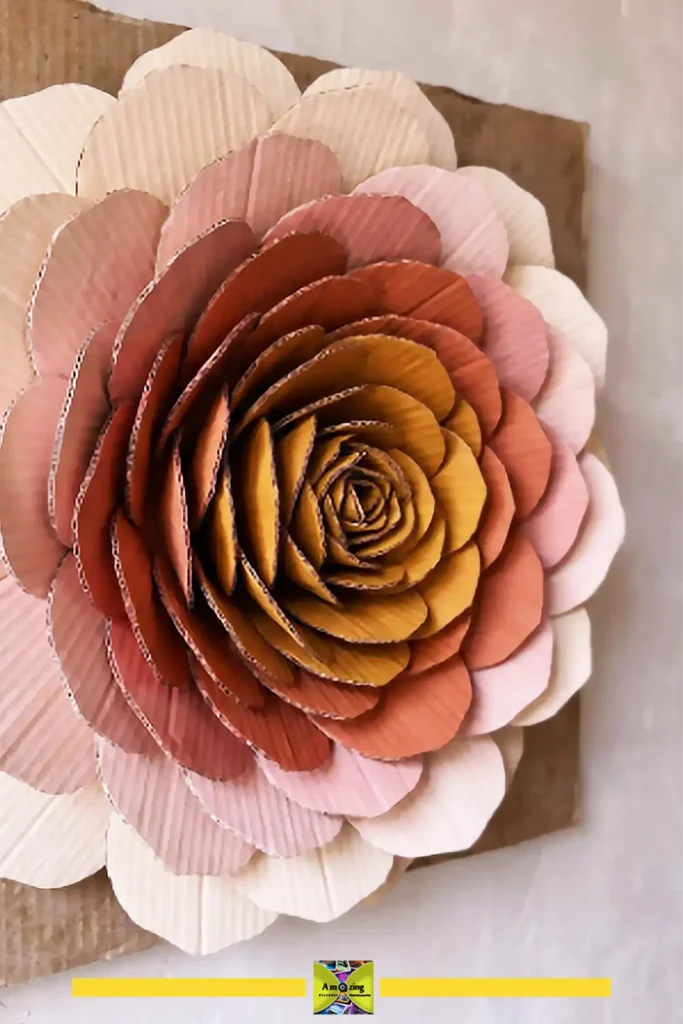
Finished design: A dimensional flower made from stacked cardboard petal layers, painted in graduated tones and mounted on a simple cardboard backing. It reads as sculptural wall art rather than a kid’s craft.
Difficulty: Beginner
Approximate time: 1 to 1.5 hours, plus paint drying time
Materials:
- Corrugated cardboard (one medium shipping box yields enough material)
- Acrylic paint in two or three shades of one color plus a green for leaves
- PVA glue or hot glue
- Small piece of cardboard for the backing (about 8 × 8 inches)
Tools:
- Scissors or craft knife
- Pencil
- Ruler or compass
- Paintbrushes
Steps:
- Draw and cut five to six petal templates in graduated sizes, starting with a large petal about 4 inches long and working down to a small center petal about 1.5 inches long. Draw one of each size on paper first, cut them out, and trace them onto the cardboard.
- Cut three or four petals at each size. You will have roughly 15 to 20 petals total.
- Paint the petals in your chosen shades. For a realistic look, paint the largest petals in the darkest shade and each smaller size in a progressively lighter tone. Let dry completely.
- Cut a simple leaf shape or two from cardboard and paint them green.
- On the backing board, lightly sketch a circle to mark where the flower will sit. Arrange the largest petals around the outer edge and glue them down one at a time.
- Work inward, layering each ring of petals so they overlap the previous ring slightly. Glue the smallest petals in the center.
- Attach leaves behind the outer petals so they peek out from underneath.
- Let the glue dry fully before hanging.
Customization: Use metallic paint for an elegant finish. Add a real button, bead, or bottle cap in the center instead of the smallest cardboard petals. Arrange multiple flowers of different sizes on a larger backing board for a bouquet effect.
Suitable rooms: Living room, bedroom, entryway, nursery
Common mistakes: Cutting petals too thin — cardboard petals narrower than about ¾ inch at the widest point look flimsy. Using wet glue too heavily — it soaks through thin cardboard and causes buckling; use small dots of hot glue instead.
Hanging: Lightweight. Use a adhesive picture-hanging strip or a small sawtooth hanger hot-glued to the back.
Project 2: Cardboard Sunburst Mirror Frame
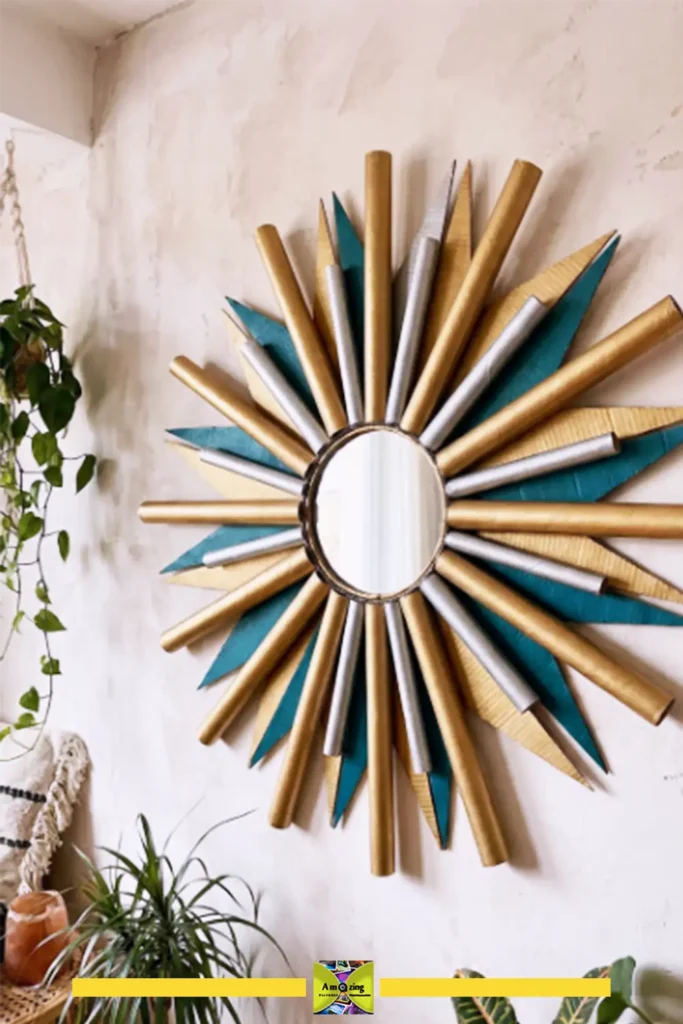
Finished design: A sunburst frame made from rolled cardboard tubes or flat triangular rays radiating out from a small round mirror. Painted in gold, silver, or a bold solid color. The mirror in the center makes it functional wall decor.
Difficulty: Beginner
Approximate time: 1 to 2 hours, plus paint drying time
Materials:
- Corrugated cardboard (enough to cut approximately 24 rays)
- One small round mirror (4 to 6 inches in diameter, available at craft or dollar stores)
- Acrylic paint (metallic gold, silver, or a color matching your room)
- Hot glue
Tools:
- Craft knife or heavy scissors
- Ruler
- Pencil
- Paintbrush
- Compass or circular object for tracing
Steps:
- Place the mirror on a piece of cardboard and trace around it. Cut out this circle — it will be the backing disc.
- Cut 24 to 30 cardboard strips, each about 1 inch wide and 6 to 8 inches long. For a more polished look, taper each strip so it is slightly narrower at one end (the end that will point outward).
- For each strip, score a line about ½ inch from the wider end and fold it to create a small tab for gluing.
- Paint all rays on both sides. Metallic paint often needs two coats for full coverage. Let dry.
- Paint the backing disc to match.
- Starting with four rays at the 12, 3, 6, and 9 o’clock positions, glue each ray’s tab to the back of the backing disc. The ray should extend outward past the edge of the disc.
- Fill in the remaining rays evenly around the circle. When you look from the front, the rays should fan out in all directions.
- Glue the mirror to the center front of the backing disc. Let the glue cure fully (at least 2 hours for heavy-duty glue) before hanging.
Customization: Use two different lengths of rays for a more dynamic starburst. Wrap some rays with twine or yarn before attaching for added texture. Paint half the rays one color and half another.
Suitable rooms: Entryway, bathroom, above a dresser, living room accent wall
Common mistakes: Rays spaced unevenly — the four-cardinal-direction method above prevents this. Attaching the mirror with white school glue — use hot glue, epoxy, or a strong adhesive; school glue will not hold glass.
Hanging: Medium weight. Use a mirror hanging kit or a wall anchor rated for at least 5 to 10 pounds depending on the mirror size.
Project 3: Cardboard Geometric Panel Art
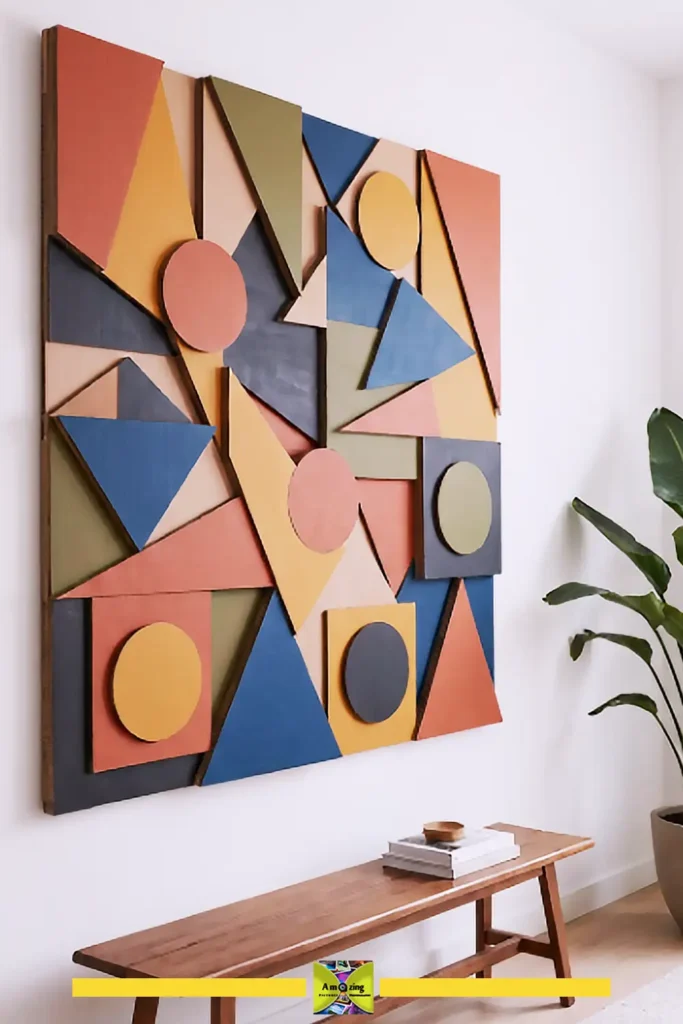
Finished design: A modern, abstract wall panel made by cutting geometric shapes from cardboard, painting them in a coordinating palette, and mounting them in a layered composition on a larger cardboard backing or directly on the wall with removable adhesive.
Difficulty: Beginner
Approximate time: 45 to 60 minutes
Materials:
- Corrugated cardboard
- Acrylic paint in three to five colors
- Craft glue or hot glue
- One larger cardboard rectangle for the backing (12 × 16 inches is a good starting size)
Tools:
- Craft knife
- Ruler
- Pencil
- Paintbrushes
Steps:
- Paint the backing board in your lightest or most neutral color. Let dry.
- Cut geometric shapes from cardboard — circles, half-circles, triangles, rectangles, and organic curves all work. Vary the sizes: some large (6 to 8 inches across), some medium, some small accent pieces.
- Paint each shape in your chosen palette. Three to five colors that share a similar undertone create a intentional, cohesive look.
- Arrange the shapes on the backing board before gluing. Try clustering shapes near one corner, creating a diagonal flow, or centering one large shape and surrounding it with smaller ones.
- Once satisfied with the layout, glue each piece down. For extra dimension, use small cardboard spacers (stacked ¼-inch squares of cardboard) under a few shapes to lift them off the backing.
- Let dry and hang.
Customization: Paint a simple pattern (stripes, dots, color-block) on one or two shapes for added interest. Use the color palette of the room where the panel will hang. Cut shapes from differently textured cardboard — the smooth side versus the corrugated side — and let the texture differences show through the paint.
Suitable rooms: Living room, home office, bedroom, hallway
Common mistakes: Using too many colors — stick to three to five. Crowding shapes — leave breathing room between them; negative space is part of the composition.
Hanging: Lightweight. Adhesive strips or a simple nail will hold this piece.
For readers interested in more cardboard project techniques, the site has a roundup of cardboard home decor projects with additional finishing ideas.
Plastic Bottle Wall Decor Projects
Plastic bottles are the most abundant free craft material in most households. The trick is cutting and shaping them so the finished piece looks intentional, not like trash on a wall. Paint, careful cutting, and heat-shaping (with caution) make the difference.
Project 4: Plastic Bottle Flower Wall Arrangement
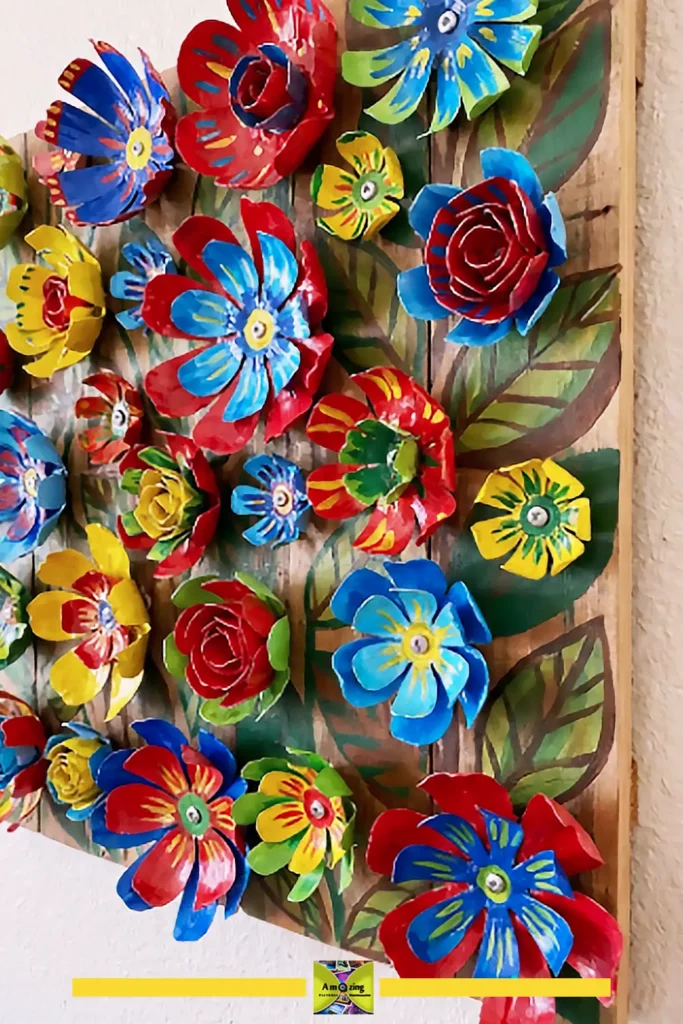
Finished design: A cluster of painted flowers cut from plastic bottle walls, shaped with gentle heat or manual curling, and mounted in an arrangement on a painted backing board or directly on the wall.
Difficulty: Intermediate (due to cutting and shaping plastic)
Approximate time: 1.5 to 2 hours
Materials:
- 3 to 4 clean plastic bottles (soda or water bottles, any size; larger bottles yield larger petals)
- Acrylic paint or spray paint
- Hot glue
- Cardboard or thin plywood backing board (about 12 × 12 inches)
- Small beads, buttons, or bottle caps for flower centers
Tools:
- Scissors (dedicated craft pair, not fabric scissors)
- Craft knife
- Sandpaper (220 grit)
- Paintbrush
- Pencil
- Candle or heat gun (optional — see safety note)
Steps:
- Cut the top and bottom off each bottle so you are left with a cylinder. Cut the cylinder open lengthwise to create flat plastic sheets. Sand the edges lightly — freshly cut plastic is sharp.
- Draw petal shapes onto the plastic sheets with a pencil. For a flower about 5 inches across, cut petals roughly 2 to 2.5 inches long and 1 to 1.5 inches wide at the widest point.
- Cut five to seven petals per flower. For a fuller look, cut two sizes of petals — larger for the outer ring, smaller for the inner ring.
- To curve the petals: Hold each petal several inches above a lit candle — just close enough that the plastic warms and begins to curl slightly, but not so close that it melts or scorches. Move the petal continuously. Alternative method without heat: Bend each petal by hand and crease it gently; plastic bottles hold a curl reasonably well without heat.
- Paint all petals and let dry. Spray paint gives the smoothest finish on plastic; brush-on acrylic works but may need two coats.
- Paint the backing board in a background color.
- Arrange the flowers on the board, largest petals forming the outer ring of each flower. Glue down each petal at its base so the curled tip lifts away from the board for dimension.
- Glue a bead, button, or bottle cap in the center of each flower.
- Let dry fully before hanging.
Safety note on heating plastic: Work in a well-ventilated area. Do not let plastic touch the flame. Keep a bowl of water nearby. Never leave a candle or heat gun unattended. This step is for adults only — children can paint and arrange petals, but the heating step requires an adult.
Customization: Paint the petals in ombré shades — darker at the base, lighter at the tips. Add painted plastic leaves cut from green bottles. Arrange multiple smaller flowers around one large central flower.
Suitable rooms: Bathroom (plastic resists humidity better than paper), kitchen, kids’ room, covered patio
Common mistakes: Cutting petals too small — small petals are harder to shape and look sparse. Skipping edge sanding — sharp plastic edges are a real hazard when handling and hanging. Overheating plastic — it goes from curved to melted in seconds; warm slowly and pull back often.
Hanging: Lightweight. Adhesive strips or small nails. If using a plywood backing, add a sawtooth hanger.
If you enjoy this project, the site has more plastic bottle craft ideas and a tutorial for making delicate plastic bottle butterfly decorations.
Project 5: Plastic Bottle Leaf Wall Hanging
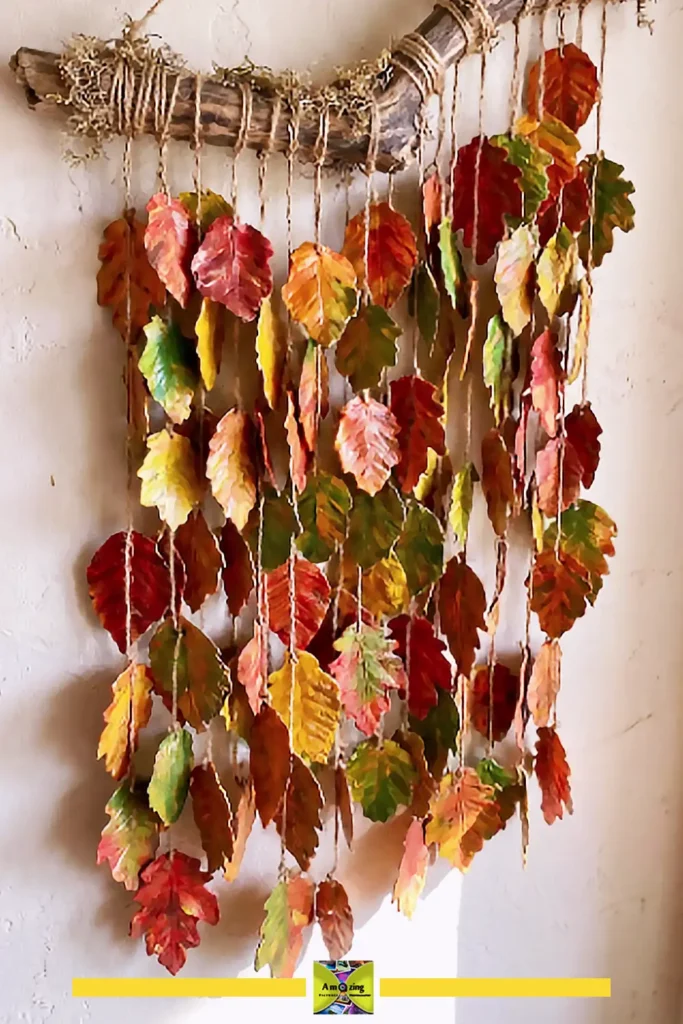
Finished design: A cascade of painted plastic leaves strung along twine or cord and hung vertically from a branch or dowel, creating a nature-inspired wall hanging.
Difficulty: Beginner
Approximate time: 1 to 1.5 hours
Materials:
- 2 to 3 green plastic bottles (or clear bottles painted green)
- Acrylic paint in green tones (if using clear bottles)
- Twine, jute cord, or thick thread
- One straight branch or wooden dowel (about 12 to 18 inches long)
- Hot glue
Tools:
- Scissors
- Pencil
- Sandpaper
Steps:
- Cut the bottles into flat sheets as described in Project 4.
- Draw leaf shapes — vary the sizes from about 2 to 4 inches long. Real leaf shapes (oval with pointed tips, or lobed shapes like oak leaves) look better than generic teardrops.
- Cut 15 to 25 leaves, depending on how full you want the hanging.
- Lightly sand the surface of each leaf so paint adheres better. Paint both sides in green shades or leave some leaves transparent for variety. Let dry.
- Using the tip of your scissors or a craft knife, poke a small hole near the stem end of each leaf.
- Cut three to five lengths of twine in staggered lengths (the longest perhaps 30 inches, the shortest about 18 inches).
- Thread leaves onto each twine strand, spacing them a few inches apart. Secure each leaf in place with a small dot of hot glue on the back.
- Tie each strand to the branch or dowel at even intervals. Tie a longer piece of twine to both ends of the branch for the main hanging loop.
- Optionally, add a few small plastic flowers or beads between leaves.
Customization: Use autumn colors (orange, red, yellow, brown) for a fall hanging. Mix in real dried leaves or pressed flowers strung alongside the plastic ones. Paint leaf veins with a thin brush and darker paint for a more realistic look.
Suitable rooms: Living room, bedroom, bohemian-style nursery, covered patio
Common mistakes: Stringing leaves too densely — space them so each leaf is visible. Making all leaves the same size — variety in size and shape reads as more natural.
Hanging: Very lightweight. A small nail, adhesive hook, or even a removable hook will hold this easily.
Project 6: Painted Plastic Bottle Geometric Wall Art
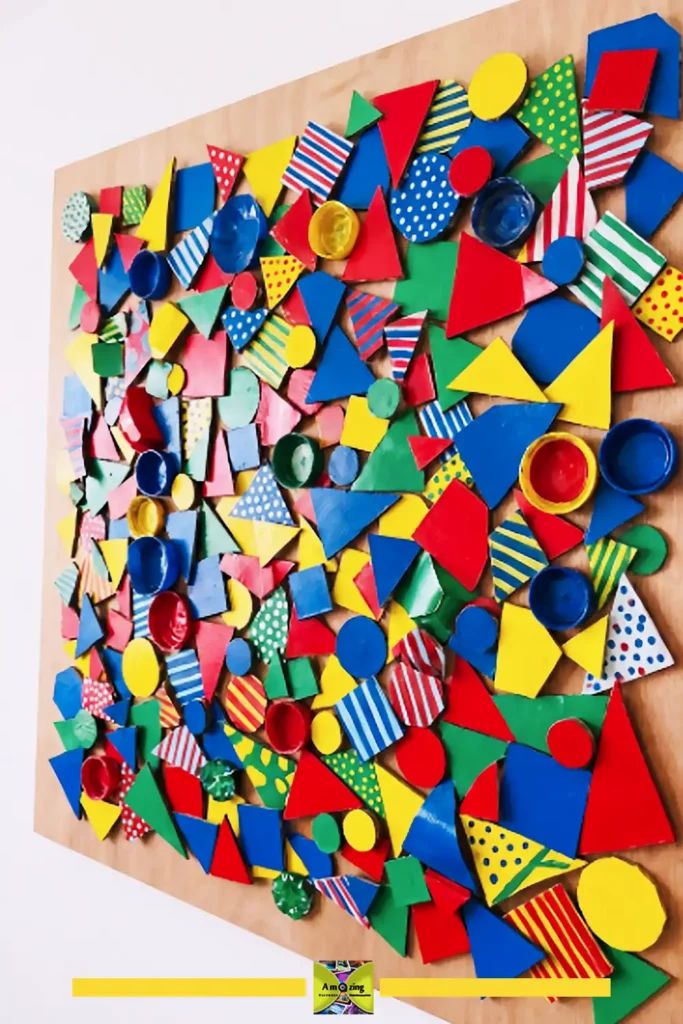
Finished design: Plastic bottle pieces cut into geometric shapes, painted in bold solid colors or patterns, and glued in a modern arrangement on a backing board.
Difficulty: Beginner
Approximate time: 45 to 60 minutes
Materials:
- 1 to 2 plastic bottles
- Acrylic or spray paint in two to four colors
- Cardboard or foam board backing (10 × 10 inches or larger)
- Hot glue
Tools:
- Scissors or craft knife
- Ruler
- Pencil
- Sandpaper
Steps:
- Prepare flat plastic sheets from bottles as described earlier. Sand the surface lightly.
- Cut the plastic into geometric shapes: triangles, squares, rectangles, hexagons, and half-circles.
- Paint each piece in your chosen colors. Let dry.
- Paint or cover the backing board (acrylic paint, fabric, or decorative paper all work).
- Arrange the geometric pieces on the board. A grid-based layout with some pieces rotated creates a modern look. A scattered, overlapping arrangement reads more playful.
- Glue pieces down. Some pieces can be glued directly flat; others can be mounted on small cardboard risers for a floating effect.
- Let dry and hang.
Customization: Use metallic spray paint for an Art Deco look. Paint some pieces with contrasting edges (paint the edge in a different color than the face). Overlap transparent unpainted pieces with painted ones for depth.
Suitable rooms: Home office, living room, modern-style bedroom
Common mistakes: Cutting plastic geometric shapes freehand without a ruler — uneven lines look sloppy at this scale. Arranging pieces that are all the same size — variety in scale makes the composition work.
Hanging: Lightweight. Adhesive strips.
Wool and Yarn Wall Decor Projects
Yarn and wool are forgiving materials. If you make a mistake in a woven piece, you pull it out and redo that section. These three projects range from instant-gratification to meditative weaving.
Project 7: Wool-Wrapped Geometric Wall Decor
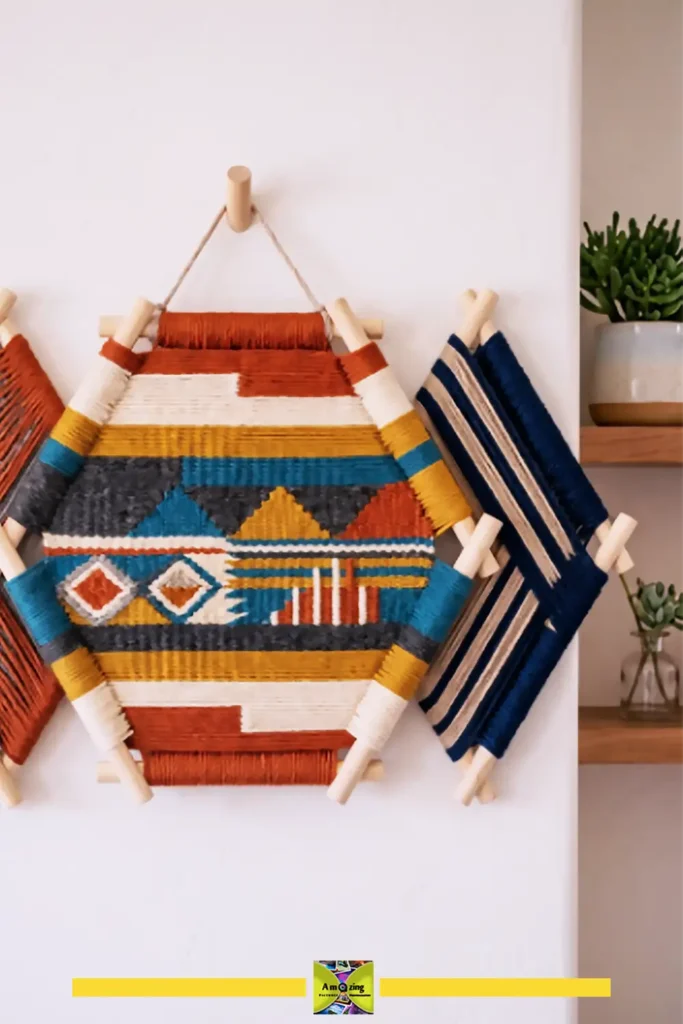
Finished design: Wooden dowels or sticks formed into a geometric frame (triangle, diamond, hexagon) and wrapped tightly with colored wool to create a clean-lined, modern textile wall piece.
Difficulty: Beginner
Approximate time: 1 to 2 hours
Materials:
- 3 to 6 thin wooden dowels (¼-inch diameter), cut to length for your chosen shape; or use straight sticks from the yard
- Wool or chunky yarn in two to four colors
- Hot glue
- Cotton twine for structural knots
Tools:
- Small saw or heavy scissors (for cutting dowels)
- Ruler
- Scissors
Steps:
- Decide on your frame shape. A triangle uses three dowels; a diamond uses four. Cut dowels to size. For a triangle roughly 12 inches per side, cut three dowels to 12 inches.
- Bind the corners together with cotton twine, wrapping tightly around the joint in a figure-eight pattern. Add a dot of hot glue to secure the twine knot.
- Starting at one corner, apply a small dot of hot glue to anchor the yarn, then begin wrapping the yarn around the dowel. Wrap tightly and evenly, pushing each wrap snug against the previous one.
- To change colors, cut the yarn leaving a 2-inch tail, glue the tail to the back of the frame, and start the next color the same way.
- You can wrap each side of the frame in a different color, or wrap sections — for example, one color on the lower half of all three sides and a second color on the upper half.
- To create internal geometric divisions, tie a length of yarn from one side of the frame to another, pulling it taut and gluing the ends. Repeat with additional strands to create overlapping geometric lines inside the frame.
- Tie a hanging loop to the top corner and trim any visible glue strings.
Customization: Wrap sections with metallic thread or thin ribbon mixed in with the wool. Attach a small tassel to the bottom corner. Use variegated yarn that changes color automatically as you wrap.
Suitable rooms: Living room, bedroom, nursery, reading nook
Common mistakes: Wrapping too loosely — gaps between wraps look messy; keep tension firm and push wraps together as you go. Dowels too thin — they bend under tight wrapping tension; use at least ¼-inch dowels.
Hanging: Lightweight. A small nail or adhesive hook.
Project 8: Yarn Tassel Wall Hanging
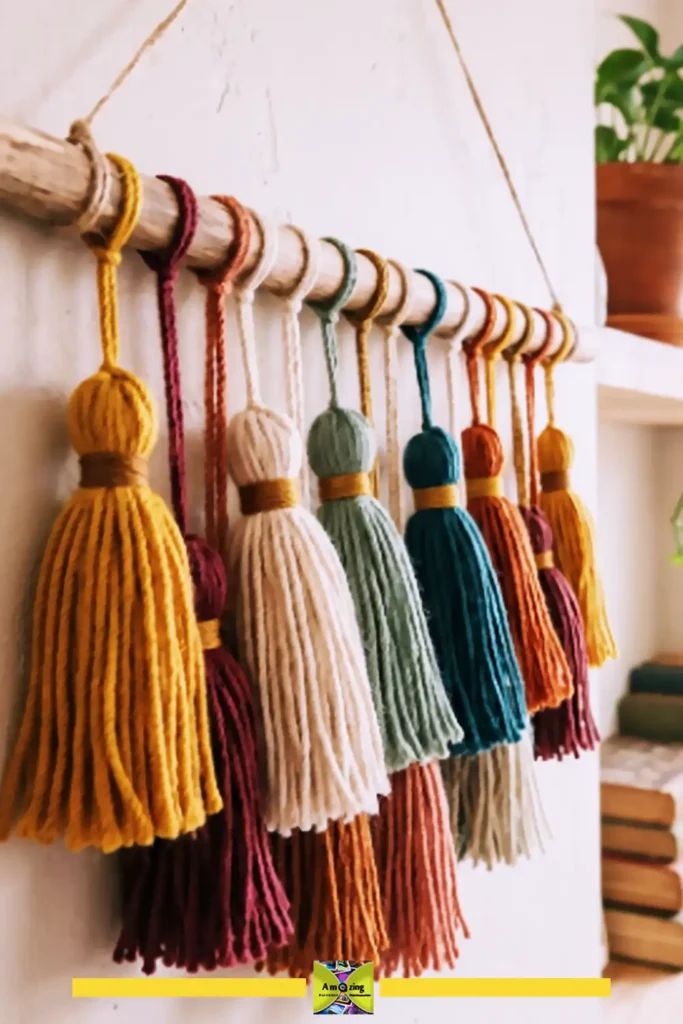
Finished design: A row or cluster of colorful yarn tassels hung from a wooden dowel or branch. One of the fastest projects in this article, and one of the most popular for bohemian-style rooms.
Difficulty: Beginner
Approximate time: 45 to 60 minutes
Materials:
- Yarn in three to five colors
- One wooden dowel or branch (12 to 18 inches)
- Cotton twine or strong thread for hanging
Tools:
- Scissors
- A small book, piece of cardboard, or your hand (for wrapping tassels)
Steps:
- Decide on your tassel size. A piece of cardboard about 5 inches wide makes tassels roughly 10 inches long (folded in half). A standard smartphone is about 3 inches wide for smaller tassels.
- Wrap yarn around your chosen width 20 to 30 times for a medium-density tassel. More wraps make a fuller tassel.
- Slide a separate 8-inch piece of yarn under the wraps at one edge (this will be the tie that holds the tassel together and attaches it to the dowel).
- Slide the wrapped yarn off the cardboard and tie the 8-inch piece tightly in a double knot at the top.
- Cut through the loops at the opposite end so the yarn hangs free.
- Cut another piece of yarn and wrap it around the tassel about ½ to 1 inch below the top knot to create the tassel head. Tie tightly and hide the knot inside the tassel body.
- Trim the bottom ends evenly.
- Repeat to make seven to nine tassels in varying colors and possibly varying sizes.
- Tie each tassel to the dowel at even intervals. Vary the hanging lengths slightly for a relaxed look. Tie a longer piece of twine to each end of the dowel for the main hanging loop.
Customization: Dip-dye the bottom inch of pale yarn tassels in diluted acrylic paint or fabric dye for an ombré effect. Add small beads to some tassel strands. Use chunky roving yarn for a few extra-thick tassels mixed in with standard ones.
Suitable rooms: Bedroom, nursery, dorm room, bohemian living room, above a bed
Common mistakes: Tassels cut unevenly — trim them after hanging for the cleanest line. Too few wraps — skinny tassels look sparse; 20 wraps is a good minimum for worsted-weight yarn.
Hanging: Very lightweight. A small nail or adhesive hook.
Project 9: Cardboard-Loom Woven Wall Art
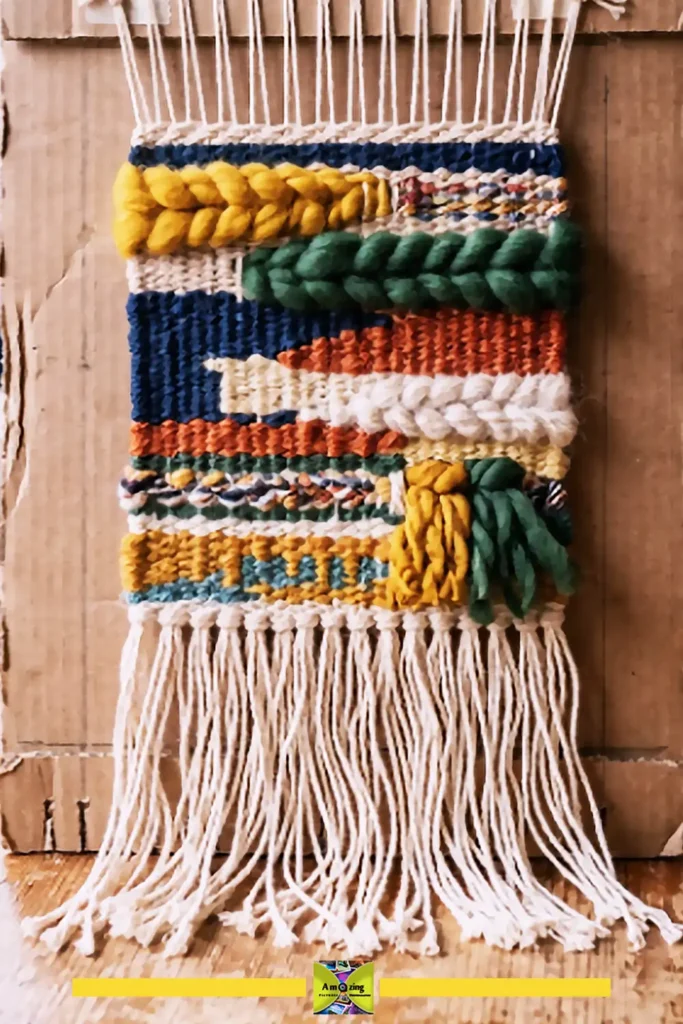
Finished design: A small woven tapestry made on a homemade cardboard loom, using yarn in various textures and colors. The finished piece has visible warp threads at the bottom that become fringe.
Difficulty: Beginner
Approximate time: 1.5 to 2.5 hours
Materials:
- Sturdy corrugated cardboard for the loom (about 10 × 14 inches)
- Cotton twine or thin cotton yarn for warp threads
- Yarn in several colors and textures for weft (weaving)
- One straight stick or thin dowel (optional, for hanging the finished piece)
Tools:
- Scissors
- Ruler
- Pencil
- Fork or wide-tooth comb (for packing rows down)
- Tapestry needle or large blunt needle
Steps:
- Make the loom: On the 10-inch edge of the cardboard, mark ¼-inch intervals. Cut a ¼-inch-deep notch at each mark. Do the same on the opposite edge. You should have roughly 18 to 22 notches per side.
- Warp the loom: Starting at the first notch on one side, run cotton twine through the notch, across the front of the cardboard, and through the corresponding notch on the opposite side. Continue back and forth until all notches have warp thread running through them. Tie the ends at the back of the cardboard. The warp should be taut but not stretched tight enough to bend the cardboard.
- Cut a length of yarn about 3 feet long and thread it through the tapestry needle.
- Start weaving at the bottom: Go over the first warp thread, under the next, over the next — alternating across the row. At the end of the row, go back the other direction, reversing the pattern (where you went over, now go under).
- After every two or three rows, use the fork to gently push (pack) the rows downward so they sit snugly against each other. Do not pull the weft yarn tight — leave it slightly relaxed or arch it gently before packing to prevent the sides from pulling inward (a common beginner problem called draw-in).
- To create geometric shapes within the weaving (a triangle, for example), weave only the center warp threads for a section, stepping inward by one warp thread on each side every two rows.
- Change colors by leaving a 2-inch tail on the back side and starting the new color the same way. Weave tails into the back later.
- Once you reach the top, tie off the weft. Carefully cut the warp threads along the back of the loom, freeing the weaving.
- Pair up adjacent warp threads at the top and bottom and knot them together to secure the weaving. The remaining warp length at the bottom becomes fringe — trim it evenly or in a V pattern.
- If desired, slide a thin dowel or stick through the top warp loops for hanging.
Customization: Add rya knots for textured fringe sections. Incorporate fabric strips or thin ribbon alongside the yarn. Leave some warp threads exposed for a airy, open-weave look.
Suitable rooms: Living room, bedroom, reading corner, nursery
Common mistakes: Pulling weft too tight (draw-in) — the woven piece will bow inward at the sides. Warp tension uneven — some threads are slack while others are guitar-string tight; redo the warp if needed before weaving. Skipping the packing step — rows that are not packed down leave visible gaps.
Hanging: Very lightweight. Small nails, adhesive strips, or hung from the dowel on a single nail.
Old Bangle Wall Decor Projects
Old bangles — whether plastic, wood, or metal — are one of the most underused materials in DIY wall decor. They already come in a perfect circular frame, which solves the hardest part of many wall-decor projects: getting a clean shape to build on.
Project 10: Bangle Flower Wreath
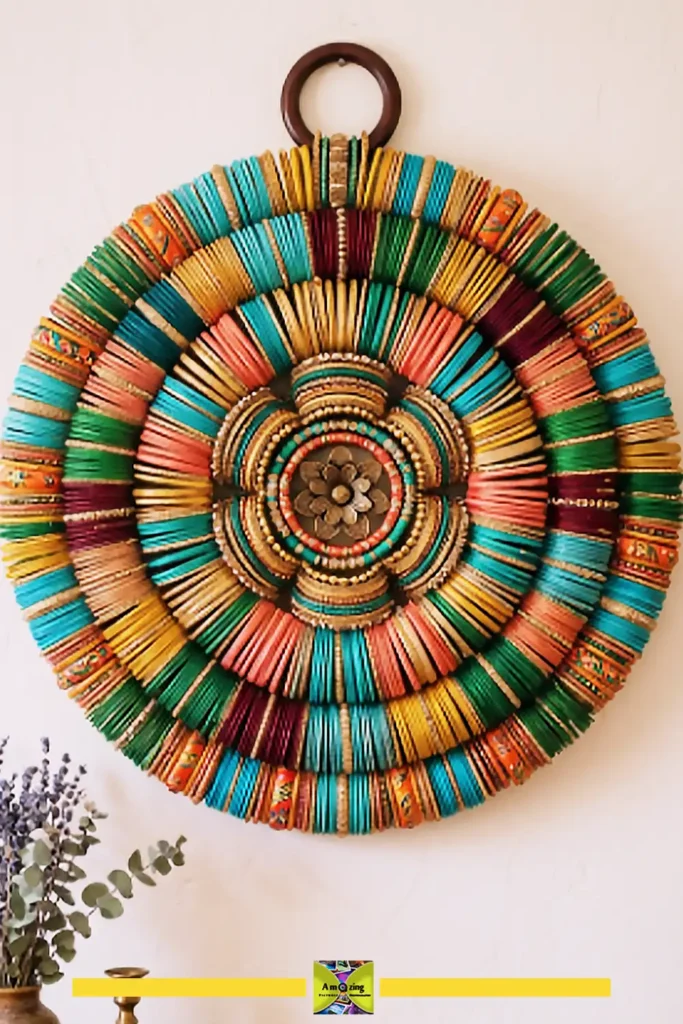
Finished design: Bangles arranged in a flower or wreath pattern, wrapped or painted in coordinating colors, and mounted as a permanent wall accent.
Difficulty: Beginner
Approximate time: 1 to 1.5 hours
Materials:
- 5 to 8 old bangles in various sizes (plastic, metal, or wood all work)
- Yarn, embroidery floss, or thin fabric strips for wrapping
- Hot glue
- Felt or craft foam (for backing and leaves)
- Small beads or buttons (optional center detail)
Tools:
- Scissors
- Pencil
Steps:
- Clean the bangles and check for rough edges. Sand any sharp spots on plastic or wood bangles.
- Decide on the layout. A simple arrangement: one bangle in the center, surrounded by five or six others in a ring. Or arrange bangles in a cascading vertical cluster.
- Wrap each bangle: Anchor the yarn end with a dot of hot glue on the inside of the bangle. Wrap tightly, covering the entire bangle. Change colors partway around for a striped effect, or wrap each bangle in a different color. Glue the yarn end on the inside when done.
- Cut leaf shapes from green felt or craft foam.
- On your work surface, arrange the wrapped bangles in your chosen pattern. Slide felt leaves under the outer bangles so they extend outward. Once happy with the arrangement, glue the bangles together where they touch.
- For a wreath-like arrangement with a hollow center, arrange bangles in a ring leaving the middle open. For a flower-like arrangement, place one bangle in the center and surround it.
- Add a felt loop to the back of the top bangle for hanging.
Customization: Instead of wrapping, spray-paint the bangles in metallic finishes. Attach small artificial flowers or dried botanicals tucked between bangles. Wrap some bangles partially, leaving sections of the original bangle visible for a mixed-texture look.
Suitable rooms: Bedroom, entryway, above a vanity, girls’ room, bohemian living spaces
Common mistakes: Using bangles that are too heavy for the hanging method — metal bangles in particular add up; use a wall anchor if the finished piece has noticeable weight. Wrapping too loosely — yarn that shifts after hanging looks untidy.
Hanging: Usually lightweight. A small nail or adhesive hook works for plastic bangles. For an arrangement of metal bangles, use a picture hanger rated for the total weight.
Project 11: Woven Wall Hanging on a Bangle Frame
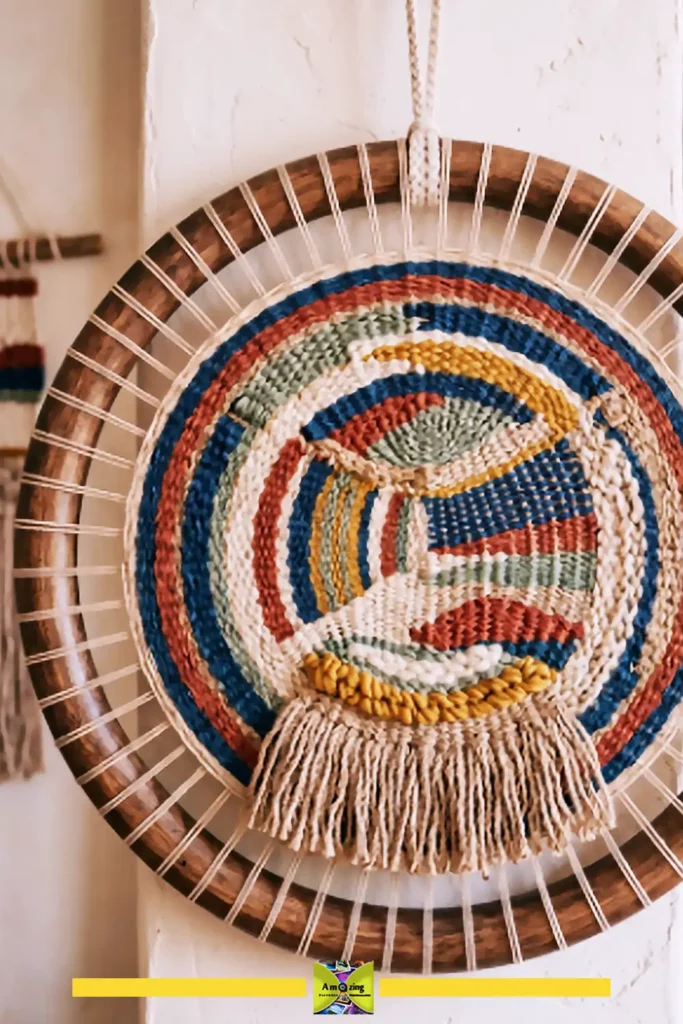
Finished design: A large bangle used as a weaving frame — warp threads stretched across the circle and woven with yarn to create a circular woven wall hanging.
Difficulty: Beginner
Approximate time: 1 to 2 hours
Materials:
- One large bangle (at least 4 to 5 inches in diameter; an embroidery hoop also works)
- Cotton twine or thin yarn for warp
- Yarn in several colors for weaving
- Optional: small beads, feathers, or tassels
Tools:
- Scissors
- Tapestry needle or large blunt needle
- Fork or comb for packing rows
Steps:
- Warp the bangle: Tie one end of cotton twine to the bangle. Run the twine across the circle to the opposite side, wrap it around the bangle, and come back. Continue until you have an odd number of warp threads stretched across the frame (11 to 15 works well). Tie off.
- All the warp threads will cross near the center of the circle. Gather them at the center point and tie them together snugly with a separate piece of twine so they radiate out like spokes.
- Starting near the center, begin weaving over and under the warp threads in a spiral, working outward. Use a tapestry needle for control.
- Change colors in concentric rings, or weave in wedge-shaped sections of different colors (weave back and forth within one wedge, then move to the next).
- As you work outward, the spacing between warp threads increases. Add extra warp threads by tying new pieces of twine to the bangle between existing spokes if gaps become too wide.
- When you reach the bangle edge, tie off the weft. You can leave the bangle rim partially visible as a frame, or wrap it in yarn afterward to finish the edge.
- Add dangling tassels, beads, or small feathers to the bottom of the bangle.
- Tie a hanging loop to the top.
Customization: Weave with fabric strips for a chunkier texture. Leave some wedge sections unwoven for negative space. Wrap the bangle rim in a contrasting color after weaving is complete.
Suitable rooms: Bohemian bedroom, nursery, living room, dorm room
Common mistakes: Warp threads not evenly spaced — this leads to a lopsided weave. Starting with too few warp threads — the center becomes crowded and the outer edge has gaps; 11 to 15 is a practical range.
Hanging: Lightweight. A small nail or adhesive hook.
Old Furniture Wall Decor Projects
Old drawers and cabinet doors are structural pieces disguised as junk. They come with built-in framing, flat surfaces, and often decent wood underneath peeling paint. These two projects turn them into functional or decorative wall pieces.
Project 12: Decorative Wall Shelf from an Old Drawer
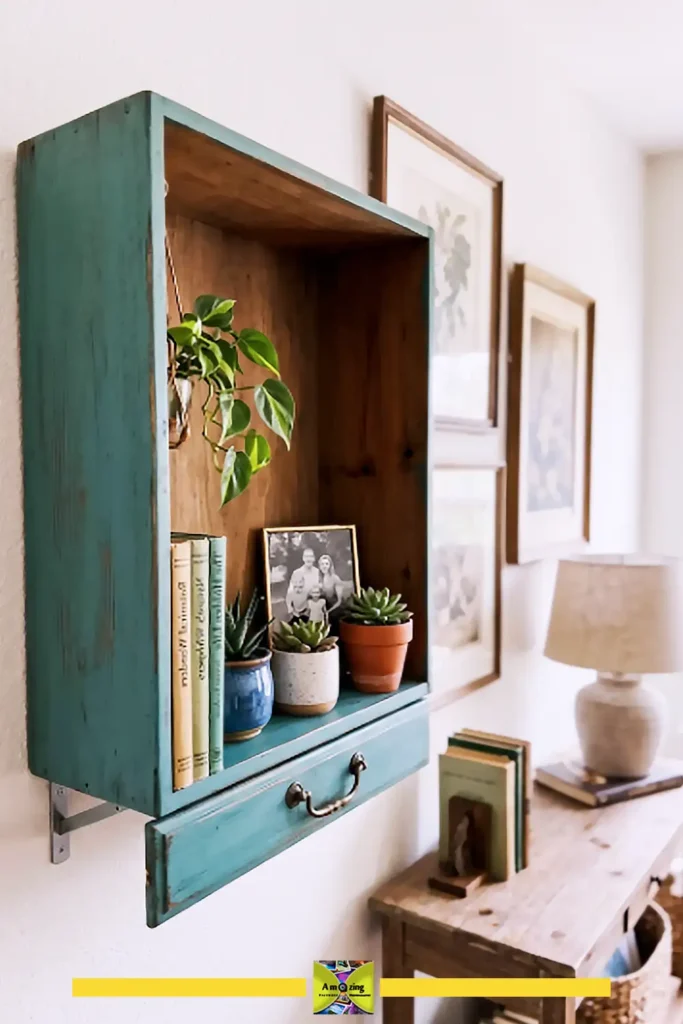
Finished design: A wooden drawer mounted vertically (opening facing outward) or horizontally (opening facing upward) on the wall to create a display shelf for small plants, photos, or decorative objects.
Difficulty: Intermediate (requires basic drilling, sanding, and potentially paint prep)
Approximate time: 2 to 3 hours, not including paint drying time
Materials:
- One old wooden drawer (thrift stores, Habitat for Humanity ReStore, curbside finds)
- Wood screws and wall anchors appropriate for your wall type
- Wood filler (if the drawer has holes or cracks)
- Primer and paint or wood stain
- Sandpaper (120 and 220 grit)
Tools:
- Screwdriver or drill
- Stud finder
- Level
- Paintbrush
- Dust mask
- Lead paint test kit (for pre-1978 furniture)
Steps:
- Test for lead paint if the drawer is old. If positive, do not sand — use a liquid deglosser and paint over the existing finish.
- Remove old hardware. Clean the drawer thoroughly with a degreaser or mild soap.
- Sand all surfaces — start with 120-grit to remove gloss and old finish, then smooth with 220-grit. Wear a dust mask. Wipe away all dust with a tack cloth.
- Fill holes, dents, or cracks with wood filler. Let dry and sand smooth.
- Apply primer if painting. Let dry. Apply two coats of paint or one to two coats of stain, sanding lightly between coats.
- Decide on orientation. For a horizontal shelf (opening up), the drawer interior becomes the display area. For a vertical shadow box (opening forward), the drawer back becomes the mounting surface.
- Mark mounting points on the wall. Use a stud finder — if you can hit at least one stud, use a wood screw directly into it. For the other mounting points without studs, use drywall anchors rated for the drawer’s weight.
- Drill pilot holes through the back of the drawer (or the side that will sit against the wall). Use a level to mark corresponding holes on the wall.
- Mount the drawer. Check with a level before tightening screws fully.
- Style the shelf with small items. Do not overload — check the weight limits of your anchors.
Customization: Add a decorative paper or fabric lining to the inside back of the drawer before mounting. Paint the interior a contrasting color. Add small adhesive LED strip lights inside for a lit display. Mount two or three matching drawers in a row or column.
Suitable rooms: Bathroom (toiletries display), kitchen (spice or small-plant shelf), bedroom (jewelry or photo display), entryway (keys and mail)
Common mistakes: Skipping the stud finder — a drawer loaded with items can weigh several pounds; drywall alone will not hold it. Over-sanding veneered drawers — many drawers are particle board with a thin wood veneer; sanding through the veneer ruins the surface. Mounting without a level — a crooked shelf is obvious and hard to fix after screws are in.
Hanging: Mount with screws into wall studs or use toggle bolts/drywall anchors rated for the total loaded weight. For a standard small drawer (under 5 pounds empty), two anchors each rated for 10 pounds in drywall should suffice. Heavier drawers need at least one stud-mounted screw.
Project 13: Painted Cabinet-Door Wall Sign
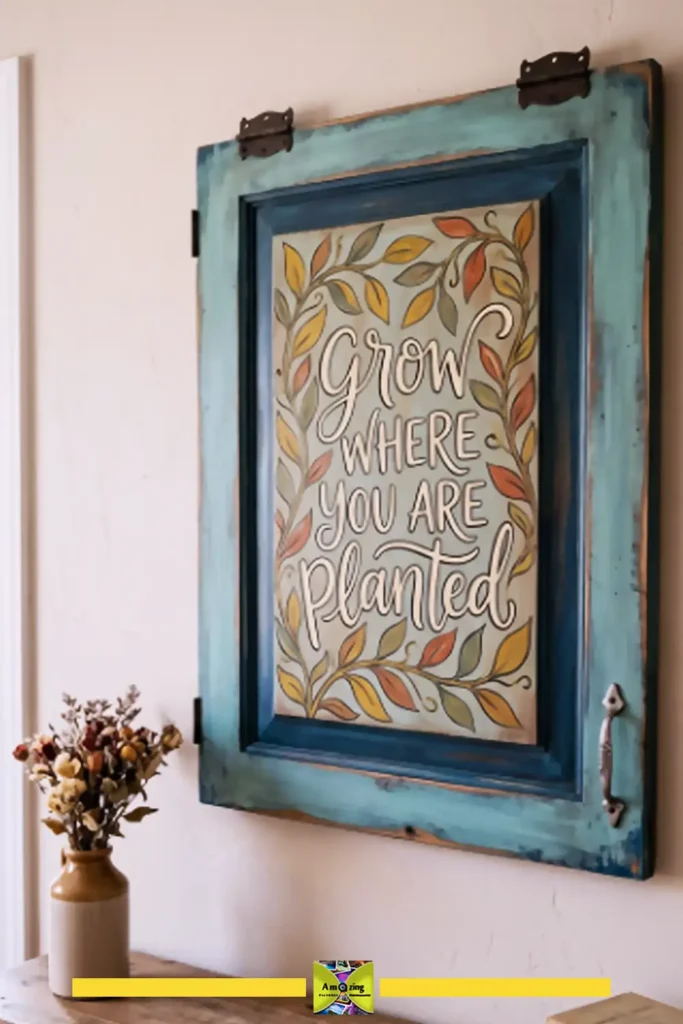
Finished design: An old cabinet door refinished and painted with a decorative design, quote, or abstract pattern, then hung as wall art. The raised panel detail that most cabinet doors have provides a natural frame-within-a-frame.
Difficulty: Intermediate
Approximate time: 1.5 to 2.5 hours, not including paint drying time
Materials:
- One old cabinet door (flat-panel or raised-panel both work)
- Primer
- Acrylic or chalk paint in base color plus accent colors
- Painter’s tape (for geometric designs)
- Clear matte sealer (optional)
- Sandpaper (120 and 220 grit)
- Picture hanging hardware (D-ring hangers or a sawtooth hanger)
Tools:
- Screwdriver (to remove hinges and hardware)
- Paintbrushes (flat brush for base, small round brush for detail)
- Pencil (for sketching designs)
- Ruler
- Drill
- Stud finder
- Dust mask
- Lead paint test kit (for pre-1978 pieces)
Steps:
- Remove all hinges, knobs, and hardware. Fill the screw holes with wood filler if the hinge placement is visible from the front. Let filler dry and sand smooth.
- Test for lead paint. Proceed accordingly.
- Clean thoroughly. Sand with 120-grit, then 220-grit. Wipe away dust.
- Apply primer. Let dry. Apply your base coat (two thin coats usually gives the best finish). Let dry completely.
- Decide on your design. Options:
- Color-block geometric: Use painter’s tape to mask off triangles, stripes, or diagonal sections. Paint each section a different color. Remove tape while paint is still slightly tacky for the crispest lines.
- Hand-painted quote or floral design: Sketch the design lightly in pencil first, then paint with a small brush.
- Landscape or abstract: Paint the recessed panel one scene and the raised frame a contrasting color.
- Chalkboard panel: Paint the recessed center with chalkboard paint for a writable surface.
- Let the design dry completely. Apply one coat of clear matte sealer if desired.
- Attach D-ring hangers to the back, one on each side about 2 to 3 inches from the top. Use screws short enough that they do not poke through the front.
- Hang from wall screws driven into studs or into drywall anchors rated for the door’s weight. A standard cabinet door weighs 5 to 15 pounds; use appropriate hardware.
Customization: Stencil a repeating pattern (damask, geometric tile, botanical) across the whole door. Use gold leaf or metallic paint on the raised frame edges for an elegant contrast. Attach small hooks to the bottom rail for a dual-purpose key and mail hanger.
Suitable rooms: Kitchen, entryway, home office, living room, pantry
Common mistakes: Forgetting to remove hinge hardware — it looks unfinished even with beautiful paint. Using cheap painter’s tape — paint bleeds under low-quality tape and ruins crisp lines; use a brand rated for delicate surfaces and press the edges down firmly before painting. Hanging with a single nail — cabinet doors are heavier than they look; use two D-ring hangers and screws.
Hanging: Medium to heavy. Use two screws in studs or two drywall anchors rated for 20+ pounds each. Always use a level.
Mixed-Material Wall Decor Projects
Some of the most interesting wall pieces combine materials. These three projects pull together several of the recycled materials covered above.
Project 14: Bottle Cap Mosaic Wall Art
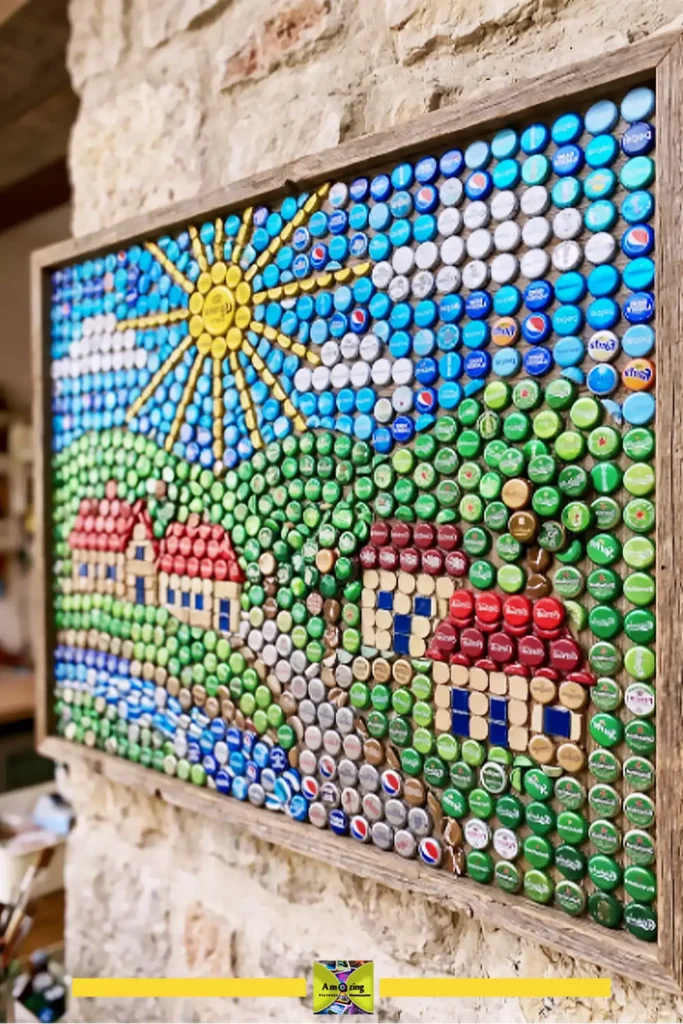
Finished design: A mosaic picture or pattern made by arranging and gluing painted or natural bottle caps onto a rigid backing board, creating a pixel-art or stained-glass effect.
Difficulty: Beginner
Approximate time: 1.5 to 3 hours depending on size
Materials:
- 40 to 100+ bottle caps (collect from drinks, jars; ask friends to save theirs)
- Rigid backing board — plywood, MDF, or a stretched canvas (12 × 12 inches is a good starter size)
- Acrylic paint or spray paint for the caps (optional; natural cap colors work too)
- Strong adhesive (E6000, construction adhesive, or hot glue for lightweight caps; do not use school glue)
- Pencil
Tools:
- Needle-nose pliers (for flattening caps if desired)
- Paintbrush or spray paint setup
- Ruler
Steps:
- Clean all bottle caps — wash in warm soapy water, remove any inner plastic liners that are loose, and dry thoroughly.
- Decide whether to use caps in their original colors or paint them. If painting, spray-paint or brush-paint the caps in batches. Let dry.
- Lightly sketch your design on the backing board. Simple pixel-style designs work best: a flower, a heart, a star, geometric stripes, a rainbow, initials, or an abstract color-block composition. Each bottle cap is essentially one pixel.
- Lay caps out on the board before gluing. Adjust placement until you are satisfied.
- Glue caps one by one, pressing each down firmly. Work from the center outward if the design is symmetrical; work from one edge across if it is a pattern. Let the glue cure according to the product instructions (E6000 needs 24 hours for full strength).
- Optionally, spray with a clear sealant for a uniform finish.
- Attach hanging hardware to the back of the board.
Customization: Bend some caps slightly with pliers for dimension. Mix in other small round objects — buttons, large beads, metal washers. Paint the background board a dark color so gaps between caps are less noticeable. Alternate two close colors (red caps next to white caps) to create an optical blend that reads as a third color from a distance.
Suitable rooms: Kitchen backsplash area, kids’ room, game room, covered patio, laundry room
Common mistakes: Underestimating how many caps are needed — a 12 × 12-inch board with 1-inch caps arranged in a tight grid needs about 144 caps. Using insufficient glue — caps that pop off later are frustrating; use a adhesive meant for metal-to-wood or metal-to-canvas bonding. Skipping the pre-arrangement step — once caps are glued with strong adhesive, repositioning is difficult or impossible.
Hanging: Medium weight (the board plus 100+ caps adds up). Use a picture hanger and wall anchor rated for the total weight.
Project 15: Mixed-Material Recycled Wall Collage
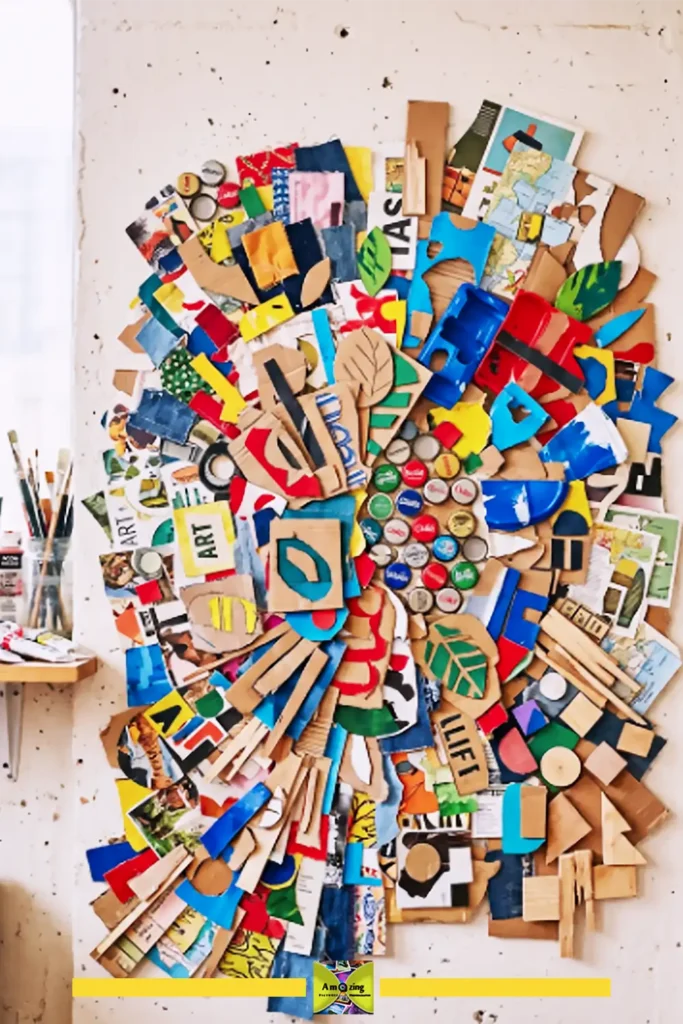
Finished design: A free-form wall collage combining small pieces from several recycled materials — cardboard shapes, fabric scraps, painted plastic pieces, paper cutouts, bottle caps, and small wood offcuts — into a single composition on a backing board or directly on the wall.
Difficulty: Beginner
Approximate time: 1 to 2 hours
Materials:
- A mix of recycled materials (use what you have from previous projects)
- Sturdy backing board (foam board, plywood, or large piece of cardboard, 16 × 20 inches or larger)
- Acrylic paint
- Hot glue or strong craft glue
- Optional: Mod Podge or sealant
Tools:
- Scissors
- Paintbrush
- Pencil
Steps:
- Paint the backing board in a neutral base color. Let dry.
- Gather your materials: small cardboard cutouts, painted plastic scraps, fabric patches, paper pieces, bottle caps, buttons, yarn scraps, small twigs, pressed leaves — anything flat enough to glue to a board.
- Choose a unifying principle so the collage does not look chaotic: a limited color palette (all blues and whites, or all earth tones), a single shape repeated in different materials, or a theme (botanical, geometric, abstract landscape).
- Arrange everything on the board before gluing. Move pieces around. Photograph arrangements you like so you can compare. Step back and look from a distance — a collage reads differently from 6 feet away than from 6 inches.
- Glue pieces down, starting with the largest background elements and layering smaller pieces on top.
- For added cohesion, dry-brush a very small amount of one unifying color (white, gold, or a muted tone) lightly across some elements — this ties disparate materials together visually.
- Let dry completely. Seal with Mod Podge or matte spray sealant if desired.
- Hang using hardware appropriate for the backing board weight.
Customization: Add a hand-painted quote or single word across part of the collage. Create a family collage — each family member contributes one section using their own material choices within the same color palette. Incorporate photos or printed text for a mixed-media feel.
Suitable rooms: Living room, creative workspace, kids’ room, hallway
Common mistakes: No unifying theme — a collage without a color or shape constraint looks like a scrap pile glued to a board. Overcrowding — leaving some empty space lets individual pieces breathe. Gluing everything flat — varying heights with spacers creates shadows and depth.
Hanging: Depends on backing board. Plywood needs anchors; foam board or cardboard can use adhesive strips.
The site also features a newspaper wall art project that uses a similar collage approach with a guitar-shaped design — a good alternative if you want a more structured mixed-media project.
Bonus Quick Project: Fabric-Scrap Rag Garland
Finished design: Strips of fabric from old clothing, linens, or fabric scraps tied onto a length of twine to create a textured, colorful garland that can be hung horizontally or draped.
Difficulty: Beginner
Approximate time: 30 to 45 minutes
Steps in brief: Tear or cut fabric into strips roughly 1 inch wide and 8 to 10 inches long. Cut a length of twine to your desired span plus extra for hanging. Tie each fabric strip onto the twine with a simple knot. Push the strips together for a dense look or space them out. Hang with small nails or adhesive hooks at both ends.
Best for: Kids’ rooms, party decor, bohemian bedroom accents, or draping across a blank wall above a bed or desk.
How to Choose Colors and Finishes
Match the room, not the project in isolation. Before painting, note the dominant and accent colors already in the room where the piece will hang. A project does not need to match exactly — complementary or analogous colors usually work better than a match that is slightly off.
Stick to a limited palette. Three to five colors plus a neutral (white, cream, or gray) produce a intentional, pulled-together result across almost any project in this article.
Finish matters as much as color. Matte finishes hide surface imperfections and read as modern and understated. Gloss and semi-gloss highlight texture and are easier to wipe clean — useful for kitchen and bathroom pieces. Metallic finishes on raised details or edges add polish to cardboard and plastic projects that might otherwise look flat.
Test on scrap first. Acrylic paint looks different dry than wet. Colors also shift depending on the material underneath. Paint a test swatch on the same material and let it dry before committing.
Seal projects that will be touched or exposed to humidity. A spray matte acrylic sealer adds a protective layer without changing the look significantly. Bathroom and kitchen pieces benefit from sealing.
How to Mount Handmade Wall Decor Safely
Mounting is the step most DIY wall-decor articles skip. Here is what you need to know.
Match the hardware to the weight.
| Weight | Recommended Hardware |
|---|---|
| Under 1 lb (paper art, tassel hangings, small cardboard pieces) | Removable adhesive strips, mounting putty, small adhesive hooks |
| 1–5 lbs (most cardboard and plastic projects, yarn hangings) | Adhesive picture-hanging strips (rated for the weight), small nails, monkey hooks |
| 5–15 lbs (mirror frames, loaded drawer shelves, cabinet doors) | Drywall anchors, toggle bolts, or screws directly into studs. Use two hanging points, not one. |
| 15+ lbs (large furniture pieces) | Screws into at least one stud, or toggle bolts rated for the load. Use D-ring hangers and picture wire. |
For renters: Removable adhesive strips and hooks made by 3M (Command brand) and similar products are the safest bet for anything under about 5 pounds. Clean the wall with rubbing alcohol before applying, press firmly for 30 seconds, and wait at least one hour before hanging anything on the strip. When removing, pull the tab straight down slowly — do not pull the strip away from the wall.
For all walls: Use a level. Eyeballing it produces a crooked result almost every time. Mark screw holes with a pencil through the hanging hardware, not by measuring and hoping.
On textured or brick walls: Adhesive strips do not hold well. Use brick clips for masonry or small masonry screws. For heavily textured drywall, use nails or screws rather than adhesive.
If hanging over a crib, bed, or sofa: Secure the bottom corners of the piece with adhesive strips so it cannot be pulled or knocked off the wall. This is especially important in children’s rooms and earthquake-prone areas.
Safety Guidelines for Recycled-Material Crafts
Several projects in this article involve tools and materials that require caution. Here are the key safety points organized by hazard.
Craft Knife Safety
- Always cut away from your body, with your free hand behind the cutting path.
- Use a sharp blade. Dull blades need more force and slip more easily.
- Cut on a self-healing mat or thick scrap cardboard — never directly on a table surface.
- Retract or cap the blade when not actively cutting.
- Craft knives are adult tools. Children should use scissors instead.
Hot Glue Gun Safety
- Hot glue gun nozzles reach approximately 350°F (175°C). The glue itself is around 250°F (120°C) when dispensed. Both cause serious burns on contact with skin.
- If burned, hold the affected area under cool running water. Do not try to peel molten glue off the skin — it can remove tissue. Seek medical attention for large or deep burns.
- Use a low-temperature glue gun when working with children.
- Place the glue gun on its stand with the nozzle facing down. Put a piece of scrap cardboard underneath to catch drips.
- Unplug the gun when not in use. Let it cool completely before storing.
Cutting Plastic Bottles
- Freshly cut plastic edges are sharp. Sand every cut edge with 220-grit sandpaper before handling the piece further.
- Cut plastic bottles over a table — not in your lap — so a slipping blade goes into the work surface, not your leg.
- When heating plastic to shape it, work in a ventilated area. Hold the plastic well above the heat source. Do not let plastic touch a flame. Keep a bowl of water nearby.
Sanding and Dismantling Old Furniture
- Test for lead paint before sanding any furniture piece made before 1978. Lead test kits cost under $15 at hardware stores.
- Wear a dust mask (N95 or better) when sanding any old painted surface.
- Work outdoors or in a well-ventilated space.
- Remove old nails, staples, and screws completely before sanding. A protruding fastener can tear sandpaper and skin.
- Wear gloves when dismantling old furniture — hidden nails and splinters are common.
Working with Children
- Children can participate in painting, arranging, wrapping yarn, and gluing with school glue.
- Adults should handle all craft knife cutting, hot glue application, plastic heating, and sanding.
- Supervise scissor cutting — plastic bottles are harder to cut than paper and require more hand strength.
- Keep small items (buttons, beads, bottle caps) away from children under three due to choking risk.
- Wash hands after handling recycled materials and after painting.
Common Mistakes to Avoid
Skipping material preparation. Greasy plastic, dusty cardboard, or waxy furniture surfaces reject paint and glue. Clean everything first.
Using the wrong glue for the material. School glue does not bond plastic to cardboard. Hot glue does not hold metal bottle caps to wood reliably. Check the glue label for material compatibility.
Rushing paint drying time. Acrylic paint may feel dry to the touch in 10 to 20 minutes but needs longer to fully cure. Stacking or handling pieces too soon leaves fingerprints and smudges.
Ignoring weight when choosing hanging hardware. A project that feels light in your hands can still pull an undersized adhesive strip off the wall over time.
Painting without primer on slick surfaces. Plastic bottles and glossy furniture finishes need primer or light sanding before paint will adhere properly.
Making every project the same size and color palette. A wall full of small, beige, same-sized pieces looks cluttered and timid. Vary scale and include at least one larger statement piece.
Overworking recycled materials to hide what they are. The best recycled-material decor embraces the material’s character — the corrugation lines in cardboard, the slight curve of a bottle surface, the patina on old wood. Trying to make cardboard look like ceramic usually fails and looks like overworked cardboard.
Not photographing your layout before gluing. Take a phone photo of any arrangement you like before reaching for the glue. It is much easier to refer back to a photo than to remember where each piece was.
Frequently Asked Questions
What are the best recycled materials for DIY wall decor?
Cardboard, plastic bottles, yarn or wool, fabric scraps, and old wood pieces are the most versatile starting materials. They are easy to find at home, simple to cut and shape with basic tools, and take paint well. Bottle caps, old bangles, and paper add variety for smaller projects or mixed-media work.
How do I clean plastic bottles before crafting?
Wash bottles in warm soapy water, remove labels, and use a little cooking oil on a cloth to dissolve stubborn adhesive residue. Rinse and dry completely inside and out before cutting. Residual moisture makes plastic slippery and harder to control during cutting.
Can I make wall decor without damaging my rental walls?
Yes, for most lightweight projects. Adhesive strips and removable hooks rated for the item’s weight are the safest option. Always follow the removal instructions — pull the adhesive tab straight down, not outward. For pieces heavier than about 5 pounds, you will likely need nails or screws; check with your landlord before drilling.
Are these recycled-material crafts safe for children?
Painting, arranging, wrapping yarn, and gluing with school glue are appropriate for children with adult supervision. Adults should handle all cutting with craft knives, hot glue gun use, plastic heating, and any sanding of old painted surfaces. Keep small items like buttons and beads away from children under three.
What kind of paint works best on cardboard?
Acrylic paint is the best all-purpose choice. Apply it in thin coats — heavy, wet applications soak into cardboard and cause warping. Spray paint also works but should be applied in light coats outdoors or in a well-ventilated area. Watercolors and tempera paints tend to buckle cardboard and produce dull, washed-out colors.
How do I hang heavier DIY wall decorations securely?
For anything over about 5 pounds, use a stud finder to locate a wall stud and drive a screw into it. If no stud is available at the right spot, use toggle bolts or heavy-duty drywall anchors rated for the item’s weight. Always use two hanging points for stability. For pieces over 15 pounds, at least one screw should go into a stud.
How long do handmade recycled-material wall decorations last?
Indoors, away from direct sunlight and humidity, most projects last several years. Cardboard and paper pieces last longest when sealed and kept in dry rooms. Plastic bottle projects resist humidity well but can fade in direct sun over time. Fabric and yarn pieces may need occasional dusting or gentle vacuuming. Outdoor or bathroom pieces made from paper or cardboard will degrade within months unless thoroughly sealed.
Where can I find old furniture pieces to upcycle?
Thrift stores (Goodwill, Salvation Army), Habitat for Humanity ReStore locations, garage sales, Facebook Marketplace free listings, curbside finds on bulk-trash collection days, and from family or neighbors who are redecorating. Always ask permission before taking curbside items.
Do I need a craft knife or can I use regular scissors?
Heavy-duty household scissors work for most cardboard, thin plastic, fabric, and yarn. A craft knife makes cleaner, more precise cuts on thicker cardboard and rigid plastic, but it is not essential for beginners. If you only use scissors, invest in a pair with strong blades and keep them sharp.
How do I keep cardboard wall art from warping?
Use double-layer corrugated cardboard rather than thin cereal-box stock. Apply paint in thin coats and let each coat dry fully before the next. Seal both sides of the piece — not just the front — with a matte acrylic sealer to equalize moisture absorption. Store flat, not leaning against a wall.
Final Decorating and Display Tips
Group small pieces together. Three or four small projects hung as a gallery wall have more visual impact than the same pieces scattered across different walls. Keep the spacing consistent — 2 to 3 inches between pieces reads as intentional.
Vary height. A common mistake is hanging everything at eye level in a straight row. Mix heights and orientations. Hang one piece slightly higher, one lower, one vertical, one horizontal.
Lean, do not hang. Large framed cardboard panels and painted cabinet doors can lean on a mantel, console table, or shelf instead of being mounted. This requires no hardware and makes rearranging easy.
Use what you actually have. The best project is the one you have materials for right now. If you have a stack of cardboard boxes, start with the cardboard flower or geometric panel. If you have a bag of yarn from a past hobby, make the tassel hanging tonight. Do not wait until you have the perfect supplies.
Document what you make. Photograph your finished pieces — even quick phone photos — before you hang them. Good photos let you share your work, print it for a portfolio, or submit it to craft communities. They also help you remember paint colors and techniques if you want to make another one later.
Leave room to add more. Hang your first few pieces with the expectation that you will make more. A gallery wall that grows over months looks more personal than one assembled in a weekend from store-bought prints.