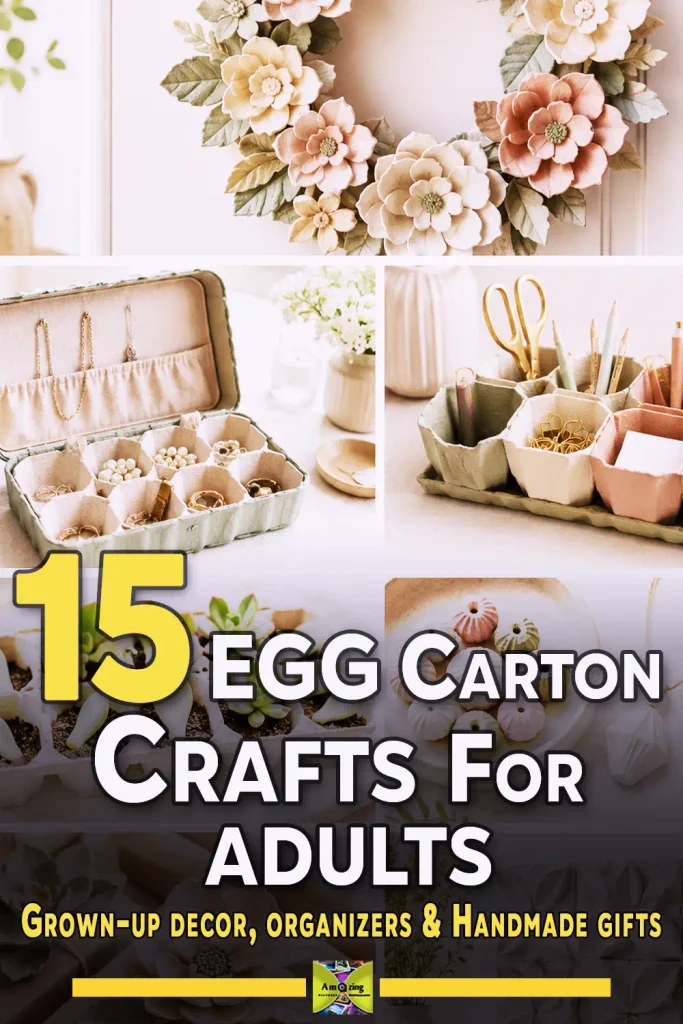
Egg cartons have a reputation as a kid’s craft supply, but they are also a quietly excellent material for grown-ups. The molded-paper cups, dividers, and flat lids of a clean paper-pulp carton can become a desk organizer, a jewelry tray, a seed-starting system, a textured wall panel, or a set of handmade beads — without looking like a preschool project.
The trick is treating the material with respect. Paper-pulp cartons are porous, absorbent, and easy to cut, but they also tear, warp, and soften when they get too wet, and they are not reliably cleanable once they have held eggs. This guide covers the material itself first, then gives you fifteen complete projects you can actually finish, grouped so you can jump straight to what you need.
A note on the numbers. Every completion time here is an estimate based on a typical crafting pace, and your drying time will shift with your climate and the thickness of your carton. Where a claim depends on real-world testing — an adhesive bond, a finish’s durability, a shipping test, a load limit — it is labeled clearly so you know it needs firsthand confirmation before you rely on it.
Before you start: choosing and preparing egg cartons
Which cartons are worth saving — and which to reject
A carton is only worth considering for a non-food craft if it stayed clean, dry, and structurally sound. Inspect every carton before you start. Look for intact cups, dry fibers, and no visible residue, staining, mold, insect damage, or unusual odor.
Be conservative here. Molded paper is porous, and once raw egg has leaked into the fibers, cleaning the surface does not necessarily mean the material itself has been effectively cleaned. The USDA Food Safety and Inspection Service advises treating egg cartons as single-use food packaging, noting that bacteria from the food they originally contained may remain on the packaging and can potentially contaminate hands or other foods.
CDC guidance also recommends washing items and surfaces that may have contacted potentially contaminated shell eggs with hot, soapy water, with sanitizing appropriate in food-handling settings.
For craft purposes, the safest practical rule is simple: do not try to rescue a carton that has been contaminated by a cracked or leaking egg. Reject cartons with visible egg residue, damp or deeply stained pulp, mold, strong odors, or questionable storage history. If you choose to repurpose a carton that remained visibly clean and dry, keep the finished project strictly for non-food use.
Do not use a repurposed egg carton for serving food, storing ingredients, planting edible crops that will remain in direct contact with the carton, or any other application where it returns to food-contact use.
Paper pulp, foam, and clear plastic: what’s different
Egg cartons come in three main materials, and they are not interchangeable.
- Paper pulp (molded fiber): the classic gray-brown carton made from recycled paper. It is absorbent, porous, easy to cut and paint, and recyclable where local programs accept it. This is the material this guide is built around.
- Foam (polystyrene, #6): smooth, light, and non-absorbent. It will not take water-based paint or PVA glue the same way, needs different adhesives, and is rarely accepted curbside.
- Clear plastic (#1 PET): rigid and washable, often recyclable where #1 plastic is accepted. It behaves more like a plastic container than craft paper.
For the projects below, use paper-pulp cartons. If you only have foam or plastic cartons, most of these instructions will not transfer cleanly — the cutting, gluing, and painting all work differently.
Cleaning and drying without saturating the fiber
For a carton that already looks clean and odorless, a dry wipe with a clean cloth or a soft brush is usually all you need. If a carton has light dust, a barely damp cloth works, but avoid soaking the paper. Molded fiber loses strength when it is wet; if you saturate it, it will warp as it dries and the cups may soften permanently. If you must damp-wipe, blot rather than scrub, and let the carton dry completely — up to a full day in a humid space — before cutting or painting.
Taking the carton apart into usable pieces
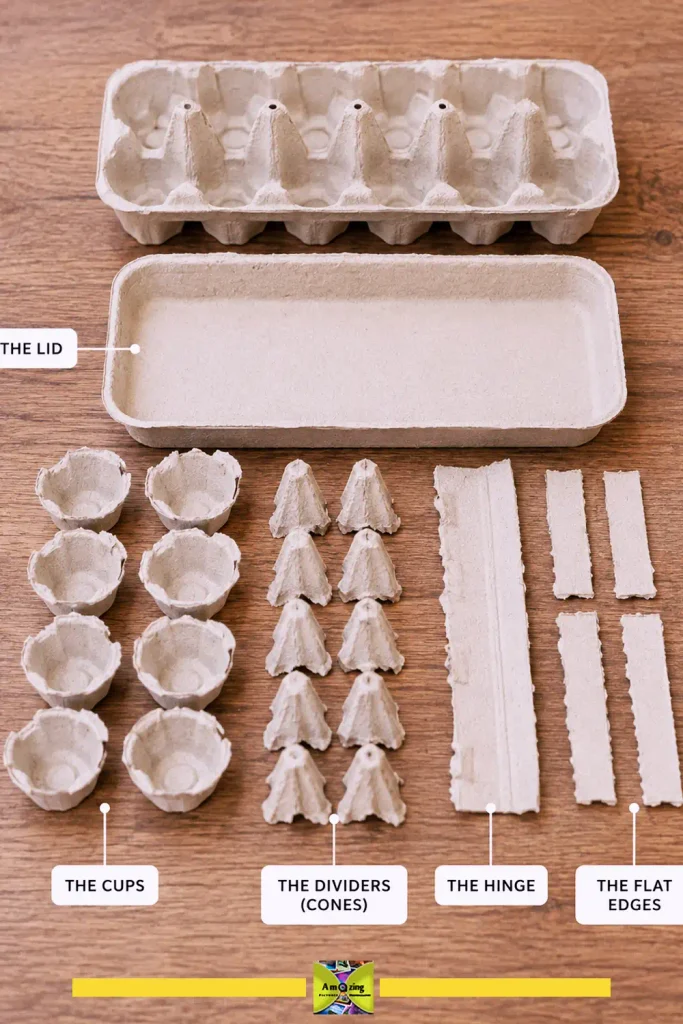
Almost every project below uses the carton as a kit of parts. Learn what you are working with:
- The lid is a shallow tray with a flat bottom and raised edges — a ready-made organizer base or a blank canvas.
- The cups are the individual egg holders — the building blocks for flowers, trinket dishes, beads, and organizers.
- The dividers (cones) are the pointed peaks between cups — useful for relief textures, game pieces, and sculptural shapes.
- The flat edges and hinge connect the lid to the base — good for tabs, labels, and reinforced corners.
Separate pieces with scissors along the creases. If you plan to use a cup and its rim together, cut carefully just outside the rim rather than through it.
Planning a coordinated palette before you cut
The fastest way to make molded-paper projects look deliberate instead of scrappy is to decide on a limited palette before you start. Choose two or three colors that repeat across the project — a neutral base with one accent, or a tonal gradient of a single hue — and stick to it. When the rough carton texture is covered in a controlled, repeated finish, it reads as intentional design rather than random recycling. Resist the urge to use every leftover paint you own.
Storing cartons safely and knowing when to recycle
Stack clean, dry cartons in a closed box away from heat sources. Because they are paper, a pile of cartons is a fire load if stored near a furnace, heater, or exposed bulb — keep them in a cool, dry spot. If you are not going to use a carton, recycle it: paper-pulp cartons are generally accepted in curbside recycling where programs take mixed paper, but local rules vary, and some facilities reject them because the fibers are too short after many recycling cycles. Check your local program, and only recycle cartons that are clean and dry.
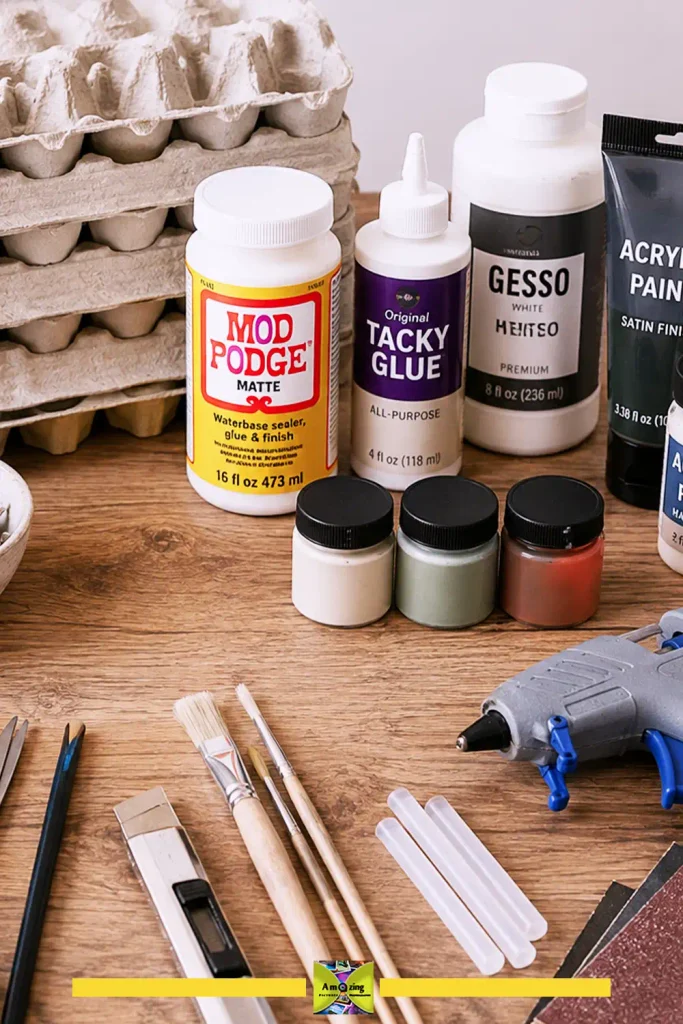
Tools, adhesives, and finishes that work on molded paper
Scissors versus craft knives
Use sharp scissors for most cuts — separating cups, trimming rims, and shaping flat pieces. Scissors crush the fiber less than a dull blade and are safer for freehand work. Reach for a craft knife only for long straight cuts or precise interior shapes, and always use it with a cutting mat and a metal straightedge. Cut away from your hand, keep your other hand clear of the blade path, and replace a dull blade — a dull knife needs more force and is more likely to slip.
Choosing the right glue
Molded paper is porous, so water-based glues soak in and form a strong bond as they dry:
- PVA glue (white glue or school glue) is the workhorse — good for paper-to-paper joins and anything you can clamp or weight while it dries.
- Tacky glue grips faster than thin PVA and stays put on vertical surfaces, which helps when assembling cups into a wreath or wall panel.
- Hot glue sets in seconds, but the bond is weaker under heat and stress and can peel from smooth or laminated surfaces — use it for tacking and decorative elements, not load-bearing joins.
- Wood glue works on paper fiber but is overkill for most projects and harder to clean up.
For laminated labels, glossy stickers, or fabric, test first: glossy or coated surfaces often need a different adhesive than raw paper. Whatever you choose, follow the manufacturer’s curing time, and do not load a join before the glue has fully set.
Painting, priming, and sealing
Acrylic craft paint covers molded fiber well in thin coats. Because the paper is absorbent, the first coat will soak in — that is normal. Apply two or three thin coats, letting each dry fully, rather than one heavy coat that saturates and warps the carton. A primer or a first coat of white or neutral acrylic hides the gray-brown fiber and makes colors read brighter. A water-based sealer adds a light barrier and a more finished look, but it does not make a project waterproof. Always test your paint, primer, and sealer on a spare offcut before committing to a whole project — combinations of paint and sealer can interact unpredictably.
For molded paper… I’d test the full finishing system on a scrap section before committing to the project. PVA glue is a good first choice for clean paper-to-paper joins because it soaks slightly into the fiber and dries firm… While tacky glue is more useful when the pieces need to stay in position without slipping. For color! start with a thin coat of white acrylic or water-based primer… let it dry completely! then add two light coats of acrylic paint. Finish with a thin water-based clear sealer only after the paint has cured. If the carton begins to soften, curl, or warp, the coats are going on too wet… use less product and allow more drying time between layers! The finished surface should feel dry and firm rather than spongy before the next coat is added.
Reinforcing the weak points
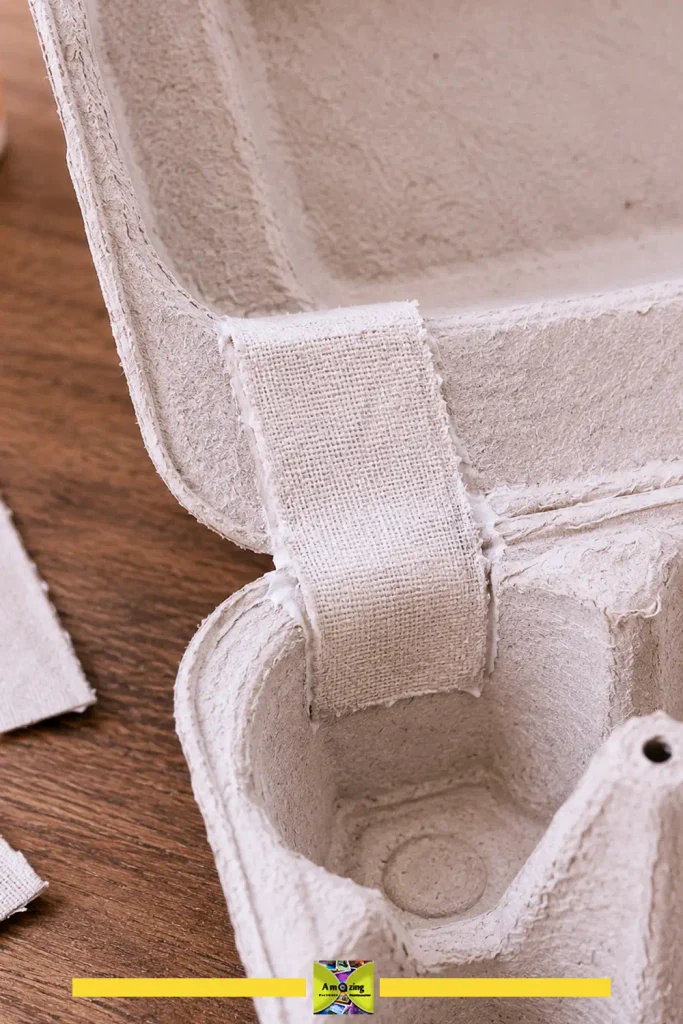
Egg cartons are weakest at their hinges, corners, and thin edges. Before painting, reinforce these spots with a strip of paper or fabric glued over the join, or an extra layer of carton behind a hanging point or a loaded compartment. A few extra minutes of reinforcement is the difference between a project that lasts and one that tears on day two.
What molded paper cannot do (and what to avoid)
Paper pulp is not structural material. Do not use it for anything load-bearing, do not put it near heat or open flame, do not use it as a food-contact surface, and do not use it near powered electrical connections. It softens when wet, fades and degrades outdoors, and burns readily. Treat it as a lightweight craft and organizational material, and the projects below will behave.
Organization and storage projects
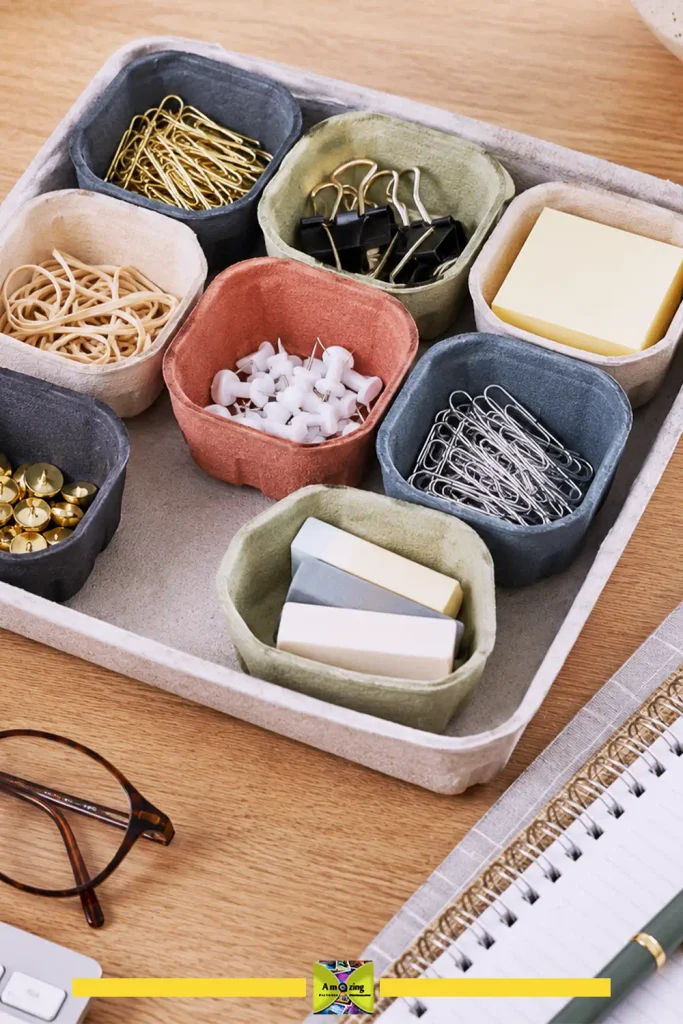
1. Modular Desk-Supply Organizer
What it looks like: A shallow lid-tray base holding removable painted cups that each hold a different desk item, sized to slide into a drawer or sit on a shelf.
Best use: Sorting paper clips, rubber bands, pushpins, sticky notes, and small office supplies on a desk or in a drawer. Difficulty: Beginner. Approximate time: 1–2 hours plus drying time (author to confirm).
Materials:
- One paper-pulp carton with a lid
- Acrylic paint
- PVA or tacky glue
- Optional self-adhesive felt or cork for the base
Tools:
- Scissors
- Craft knife and cutting mat (optional, for trimming)
- Small paintbrush
- Ruler
- Inspect and dry-clean the carton. Cut the lid free from the base along the hinge.
- Trim the lid’s edges so it sits flat and neat; this becomes the tray.
- Cut the base into individual cups, leaving a clean rim on each. Cut six to twelve cups depending on the items you are sorting.
- Test-fit the cups inside the lid. Trim rims as needed so they sit side by side without forcing.
- Paint the tray and cups in your chosen palette — a neutral tray with accent-colored cups reads cleanest. Let dry fully.
- Glue each cup to the tray with a thin line of tacky glue, or leave them removable for flexible sorting.
- Optionally line the tray bottom with felt or cork so it grips the desk without sliding.
Customization: Paint cups in a tonal gradient for a coordinated look, or label each cup with a small paper tag. A matte black tray with one metallic accent cup feels intentionally adult.
Practical tip: Leave a few cups unglued so you can lift them out and dump the contents — a fixed organizer is harder to use than a modular one.
Common mistake or limitation: Gluing the cups before test-fitting, so the tray ends up overcrowded and the cups buckle against each other.
Safety: None beyond ordinary scissors use; if you trim with a craft knife, cut on a mat and away from your hand.
This organizer works best for small supplies that are annoying to keep loose in a drawer… paper clips, binder clips, pushpins, rubber bands, erasers, beads, and other lightweight pieces… I’d keep the most frequently used cups removable so they can be lifted out and emptied directly onto the desk when needed! If the cups shift around too much… a thin felt or cork liner under them usually adds enough grip without permanently gluing everything in place! Avoid overfilling the cups with heavier metal items… since molded paper can soften or distort under concentrated weight over time!
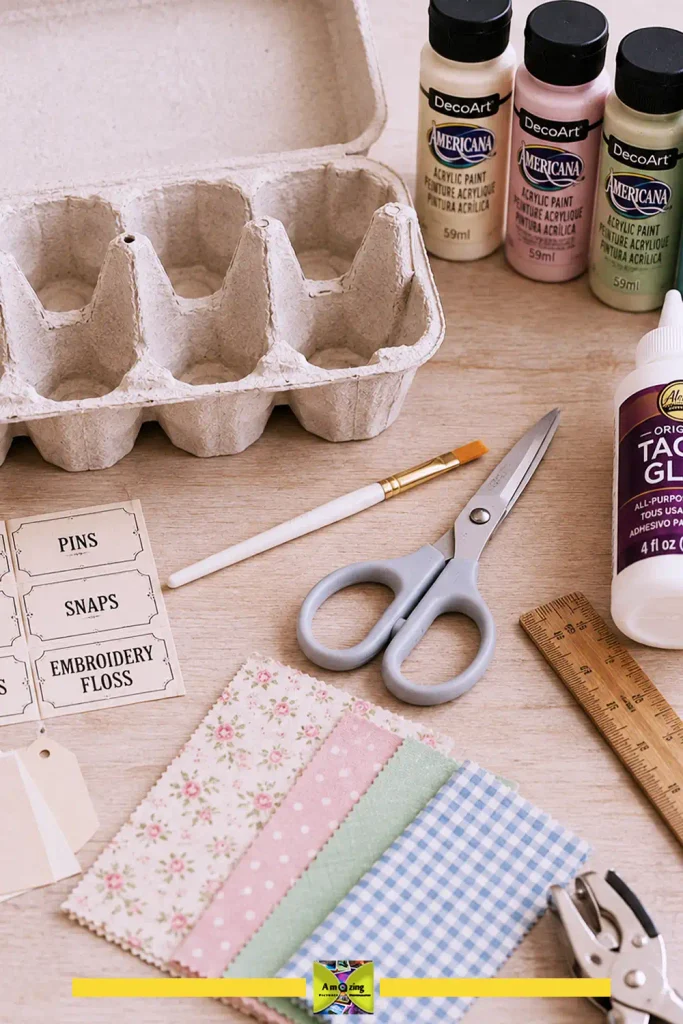
2. Sewing Notions and Floss Sorting Tray
What it looks like: A painted carton base with each cup holding a different sewing supply, labels marking the contents, and the lid used as a flat work surface for threading needles.
Best use: Sorting pins, snaps, buttons, needles, thimbles, and embroidery-floss bobbins by color or type. Difficulty: Beginner. Approximate time: 1–2 hours plus drying time (author to confirm).
Materials:
- One paper-pulp carton
- Acrylic paint
- Tacky glue
- Small paper labels or a fine-tip marker
- Optional fabric scraps to line cups
Tools:
- Scissors
- Paintbrush
- Ruler
- Hole punch (optional, for labels)
- Clean and dry the carton. Separate the base cups, keeping their rims intact.
- Sort your notions first so you know how many compartments you need; paint the cups accordingly.
- Line the inside of each cup with a small fabric scrap if you want a softer surface for pins — glue it in with a thin, even coat and let it dry.
- Paint the outside of the cups and the base. Label each cup with its contents.
- Use the lid, painted to match, as a flat tray for holding loose threads and needles while you work.
Customization: Assign each cup a color by floss family, or paint the tray to match your sewing kit. A cream base with muted pastel cups suits a craft room.
Practical tip: Sort by “what you grab at the same time” rather than by category alone — keep the needles, threader, and small scissors in adjacent cups.
Common mistake or limitation: Lining cups with wet fabric that saturates the paper and warps the cup — wring the fabric nearly dry or use self-adhesive felt instead.
Safety: Pins and needles stay sharp — keep the tray away from young children and pets, and pick up spilled pins immediately.
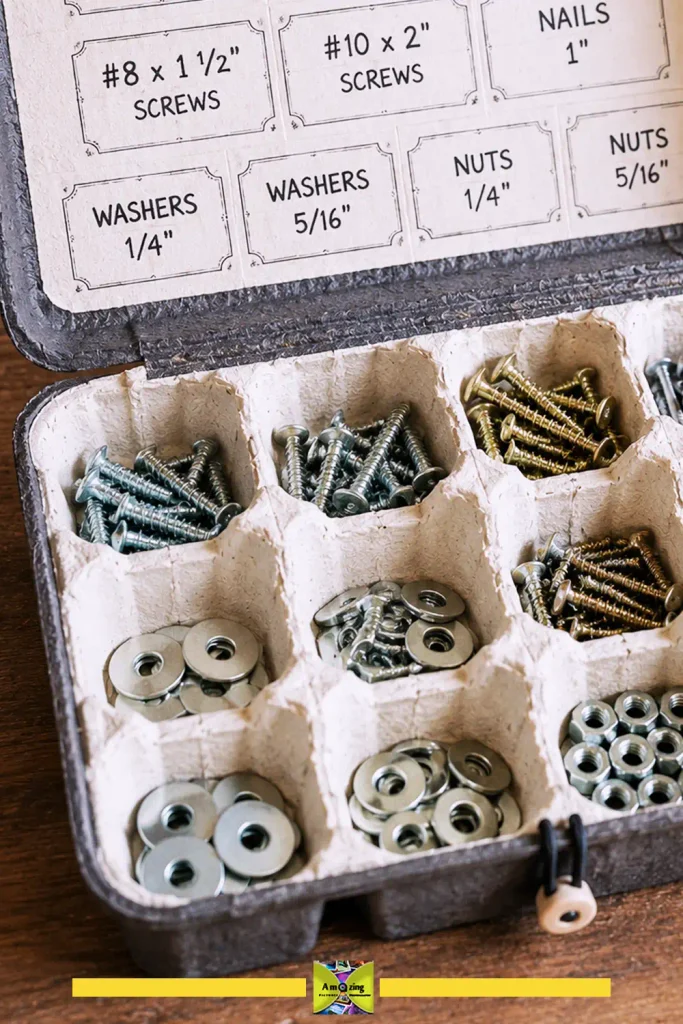
3. Labeled Hardware Sorting Case
What it looks like: A closing carton with a labeled lid and divided interior compartments, used like a small flat tackle box for screws, nuts, and washers.
Best use: Sorting small hardware by size and type so it stays organized and portable. Difficulty: Beginner-to-intermediate. Approximate time: 1–2 hours plus drying time (author to confirm).
Materials:
- One paper-pulp carton with a sturdy hinge
- Acrylic paint
- Tacky or PVA glue
- Self-adhesive labels or paper and glue
- A small elastic band or tie to keep it closed
Tools:
- Scissors
- Craft knife and cutting mat (optional)
- Paintbrush
- Marker or label printer
- Clean and dry the carton. Reinforce the hinge by gluing a strip of fabric or heavy paper across the fold, inside and out.
- Decide which compartments you need. If one row of cups is too fine for your hardware, cut the base down to fewer, larger cells.
- Paint the exterior and interior in a light color so small parts are easy to see against it.
- Label each compartment — and the lid, if the case will sit closed on a shelf — with the size and type of hardware it holds.
- Add a simple elastic band or fabric tie around the closed case so it will not pop open when moved.
Customization: A workshop-style finish — matte charcoal exterior, bright interior, stenciled labels — makes it look like a bought case.
Practical tip: Keep heavier items (nuts and washers) in the lower cells and lighter ones (screws and nails) on top if the case will stand upright, so the weight is distributed evenly.
Common mistake or limitation: Overfilling the case so the hinge tears under the weight — these cases are for small, light hardware, not a full socket set.
Safety: Hardware is heavy for its size; keep the closed case flat and out of reach of young children.
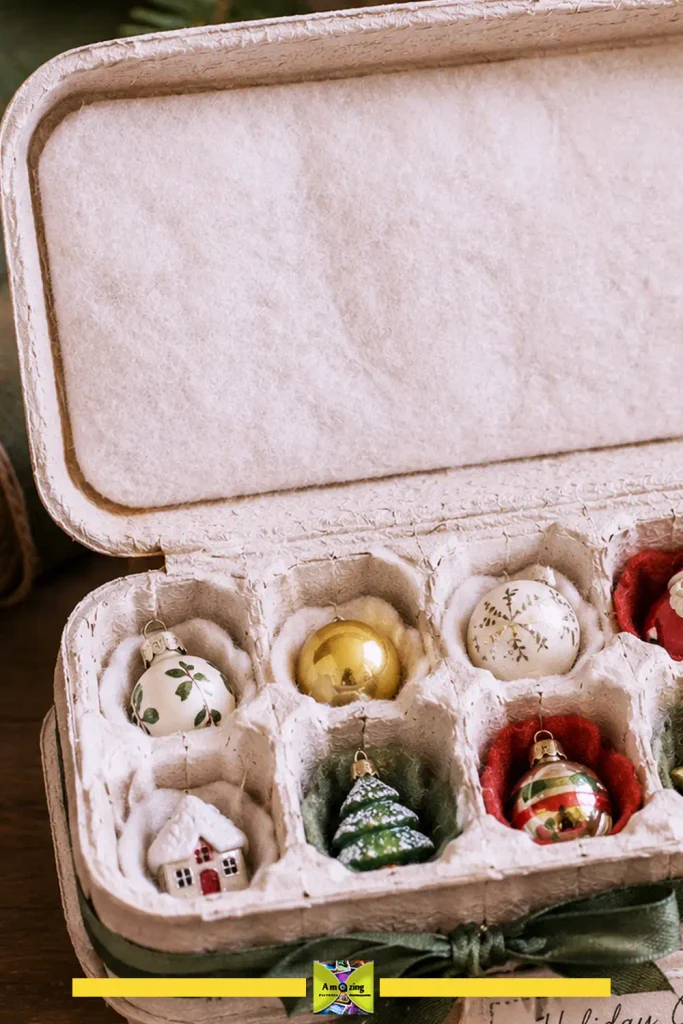
4. Protective Ornament Storage Case
What it looks like: A lined carton base whose cups cradle individual lightweight ornaments, with a padded lid that closes over them.
Best use: Storing small, lightweight seasonal ornaments — not heavy glass — through the off-season. Difficulty: Beginner. Approximate time: 1–2 hours plus drying time (author to confirm).
Materials:
- One paper-pulp carton
- Soft lining material (felt, cotton batting, or fabric scraps)
- Tacky glue
- Paint (optional)
- A tie or elastic to secure the lid
Tools:
- Scissors
- Paintbrush (optional)
- Clean and dry the carton. Line each cup with a soft material so the ornament sits without touching raw fiber.
- Pad the lid’s interior with a flat layer of batting or felt so it cushions the tops of the ornaments when closed.
- Test that the lid closes without crushing the tallest ornament — trim lining or switch to a taller lid if needed.
- Secure the case with a fabric tie or elastic band, and label the outside with the contents and the season.
Customization: A neutral linen or kraft-paper finish with a simple handwritten label keeps it from looking like leftover packaging.
Practical tip: Store only lightweight items — paper, felt, or light plastic ornaments. A carton cannot protect heavy or fragile glass from impact.
Common mistake or limitation: Assuming the carton provides crush protection — it does not. If you need real protection for fragile pieces, a rigid box is the better choice.
Safety: None specific, but do not stack heavy objects on a paper ornament case.
For this kind of storage case… I’d use a soft lining that stays flexible rather than anything stiff or scratchy! Felt is the easiest option because it cuts cleanly and does not fray much… while thin cotton batting adds more cushioning if the ornaments have delicate raised details. A small amount of tacky glue around the outer edge of each lining piece is usually enough… too much adhesive can soak through the fabric and create hard spots! Before storing the case for the season, I’d close it for a day with the ornaments inside! then reopen it to check whether any lining has shifted, lifted, or compressed… If it has, reinforce only those problem areas rather than adding more glue everywhere.
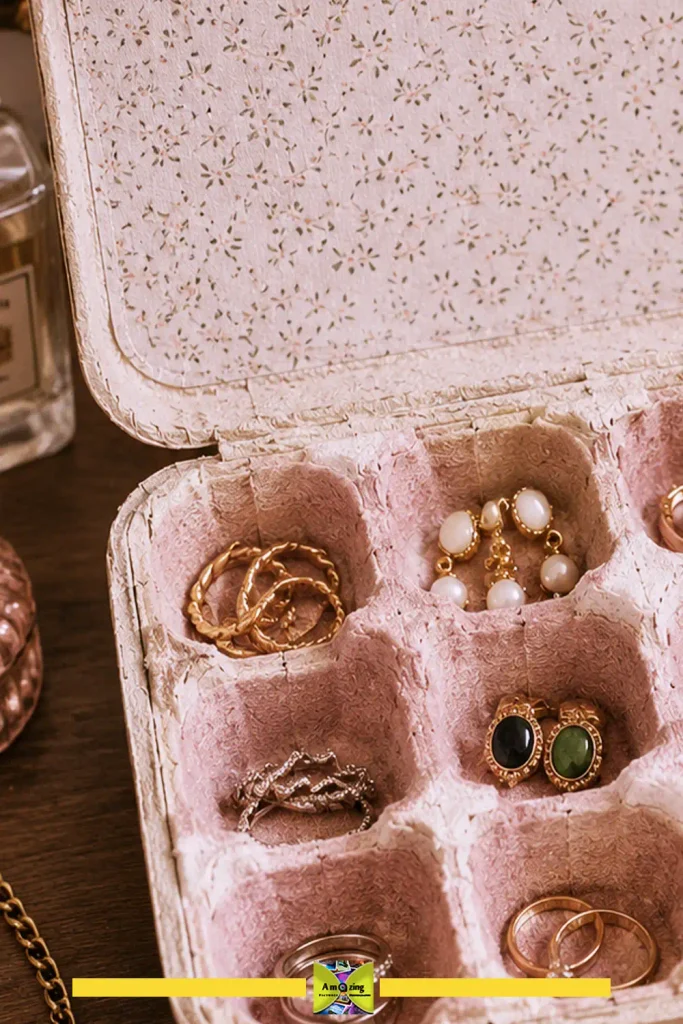
5. Lined Jewelry and Accessory Box
What it looks like: A painted carton with soft-lined compartments for rings, earrings, and small accessories, sized to sit on a dresser.
Best use: Organizing everyday jewelry and small accessories so pairs stay together and items are visible at a glance. Difficulty: Beginner-to-intermediate. Approximate time: 1.5–2.5 hours plus drying time (author to confirm).
Materials:
- One paper-pulp carton
- Fabric or felt for lining
- Acrylic paint
- Tacky glue
- Optional small dividers cut from the lid
Tools:
- Scissors
- Craft knife and cutting mat
- Paintbrush
- Clean and dry the carton. Decide whether you need the full cup layout or fewer, larger compartments; trim the base if needed.
- Paint the exterior. For the interior, cut fabric or felt to fit each cup and glue it in with a thin, even layer, smoothing out air bubbles.
- Cut extra dividers from the lid’s flat areas if you want to split larger compartments for earring pairs or rings.
- Let everything dry fully before placing jewelry — residual glue moisture can tarnish some metals.
Customization: A velvet or faux-suede lining in a deep tone against a neutral exterior gives a jewelry-box feel. Add a small mirror tile to the lid’s interior if you like.
Practical tip: Use adhesive-backed felt for the lining if you want to skip the drying and bubbling of wet glue.
Common mistake or limitation: Using a glue that stays tacky, so fine chains catch and pull — let the lining cure completely and press it flat before use.
Safety: None specific, but keep fine jewelry and small pieces away from young children and pets.
If you like turning waste paper into a box that closes and stores things, you might also enjoy this treasure chest made from waste paper.
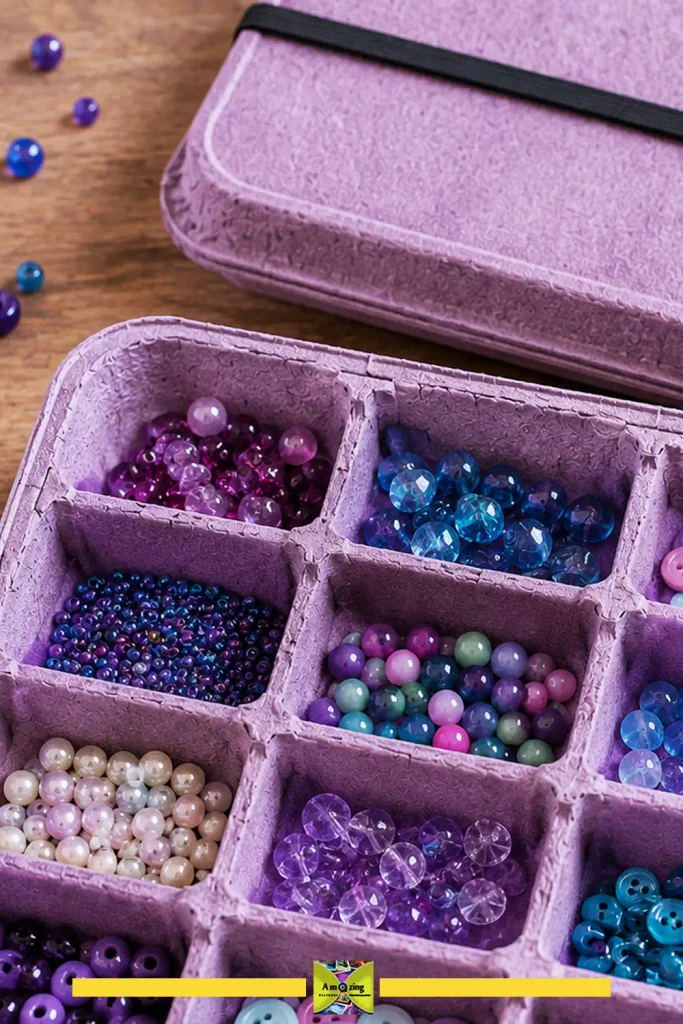
6. Portable Bead-and-Button Sorting Tray
What it looks like: A shallow, flat sorting tray — often just the lid plus a few low dividers — with a press-on cover so it can travel to a class or craft meetup.
Best use: Sorting beads, buttons, screws, seeds, or other small components on the go. Difficulty: Beginner. Approximate time: 30–60 minutes plus drying time (author to confirm).
Materials:
- One paper-pulp carton lid (and base, if you want a cover)
- Acrylic paint
- Tacky glue
- Optional felt or textured liner to stop beads from rolling
Tools:
- Scissors
- Paintbrush
- Clean and dry the lid. It is already a shallow tray — use it as-is or trim the sides down for a flatter profile.
- If you need compartments, cut short dividers from the base and glue them into the lid at even spacing.
- Paint the tray and line the bottom with felt or a slightly textured paper so round beads do not roll around.
- If you want a cover, use the carton base as a loose-fitting lid and secure it with an elastic band.
Customization: A compact, single-color tray with a matching elastic band looks clean and travels well in a tote bag.
Practical tip: Keep dividers low — a half-inch (about 12 mm) is enough to separate beads without making them hard to pick up.
Common mistake or limitation: Building a deep tray where small beads get stuck in corners — shallow and flat beats tall and boxy for sorting.
Safety: Beads and buttons are choking hazards for young children and pets; store the tray and its contents out of reach.
Home décor and gift projects
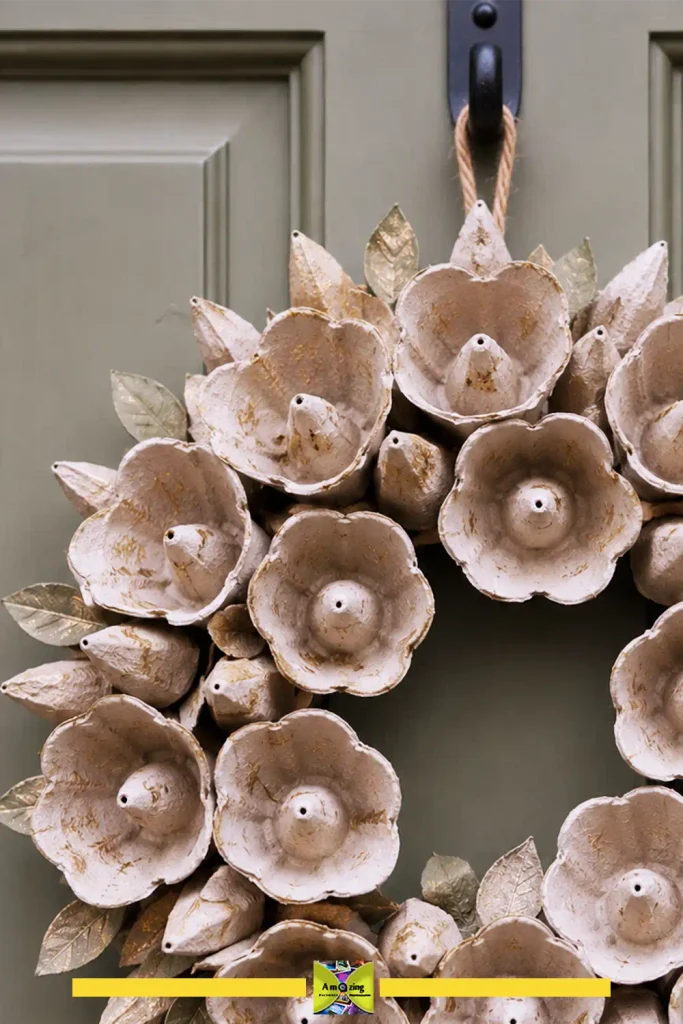
7. Geometric Molded-Pulp Wreath
What it looks like: A circular or faceted wreath made from repeated cup and divider shapes, finished in a neutral, botanical, or metallic palette and sized for a door or wall.
Best use: A year-round wall or door accent with an adult, architectural feel — not a seasonal holiday wreath. Difficulty: Intermediate. Approximate time: 2–4 hours plus drying time (author to confirm).
Materials:
- Several paper-pulp cartons (cups and dividers only)
- A cardboard ring or strong wire frame for the base
- Tacky or hot glue
- Acrylic paint
- Optional metallic spray paint or rub-on finish
Tools:
- Scissors
- Craft knife and cutting mat
- Paintbrush or spray area
- Clean and dry all cartons. Cut a supply of cups and pointed dividers, keeping the shapes consistent in size.
- Build a sturdy ring from a cardboard box or a wire wreath frame. Cut a ring from two layers of corrugated cardboard for strength.
- Arrange the cups and dividers in a repeating, symmetrical pattern around the ring before gluing anything, so the rhythm looks even.
- Glue each piece down, working in sections and letting the tacky glue set before rotating.
- Paint the finished wreath in a single palette. A matte neutral with one metallic accent reads most sophisticated; spray paint gives an even finish but needs ventilation.
- Add a hanging loop on the back, reinforced with an extra strip of cardboard.
Customization: All-white or charcoal for a modern look; a botanical green gradient for a subtle nod to nature; a brushed-metallic finish for a statement piece.
Practical tip: Repeat the same shape in the same orientation — repetition and symmetry are what make the rough texture look deliberate.
Common mistake or limitation: Gluing pieces to a flimsy base that flexes and sheds cups — build the ring rigid first, and this failure disappears.
Safety: If you use spray paint or metallic finishes, work outdoors or in a well-ventilated space and follow the label’s warnings.
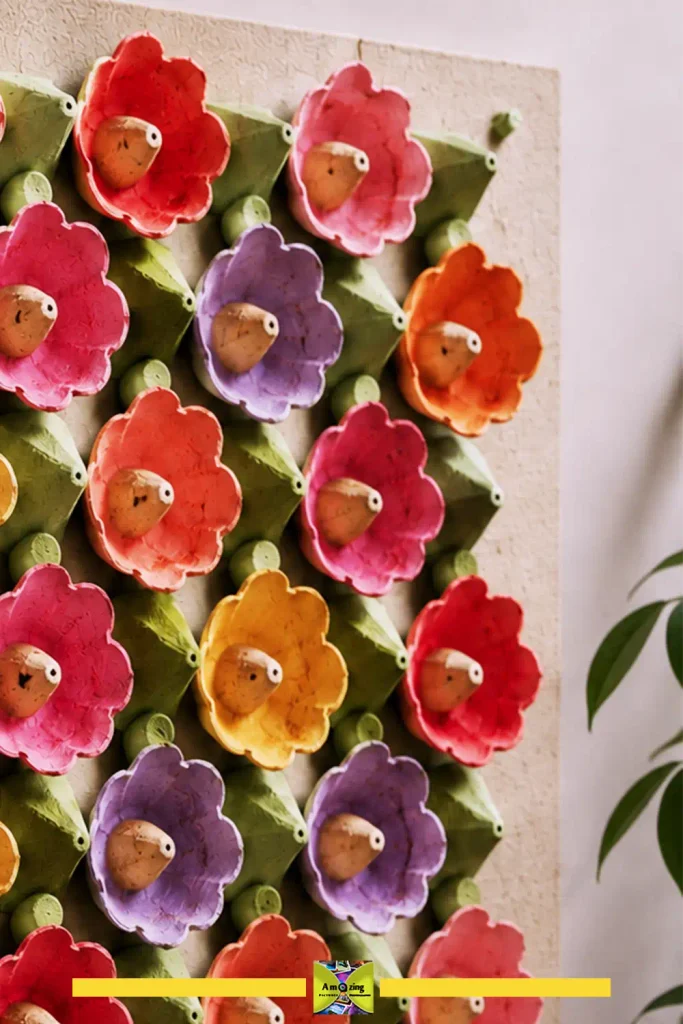
8. Textured Relief Wall Panel
What it looks like: A flat panel built from repeated cup and divider shapes arranged into a geometric relief, painted in a single tone so the shadows do the work.
Best use: A large-scale, inexpensive piece of sculptural wall art. Difficulty: Intermediate. Approximate time: 3–5 hours plus drying time (author to confirm).
Materials:
- Many carton cups and dividers
- A rigid backing board (foam board, MDF, or thick cardboard)
- Tacky glue
- Acrylic paint in one or two tones
Tools:
- Scissors
- Craft knife and cutting mat
- Ruler
- Paintbrush
- Clean and dry the cartons. Cut a large batch of identical cup or divider shapes.
- Plan a repeating layout on the backing board — a grid, a radial pattern, or diagonal rows. Sketch or dry-fit it first.
- Glue the shapes down in tight, even spacing. Let each section set before moving to the next.
- Fill gaps or rough edges with small offcuts so the surface reads as continuous texture.
- Paint the whole panel in one flat color. The relief pattern, lit from the side, creates the visual interest.
Customization: A single deep tone for drama, or a two-tone finish with a lighter top color lightly dry-brushed over the raised edges.
Practical tip: Paint from the side to confirm the relief is even — shadows will show you any misaligned pieces before the paint dries.
Common mistake or limitation: Leaving uneven gaps between shapes, which reads as patchy rather than patterned — dry-fit and adjust before you glue.
Safety: Mount a heavy panel with hardware rated for the wall type; a paper panel is not load-bearing, so keep it light and well-anchored.
For more ways to dress a wall with reclaimed materials, see this collection of recycled-material wall décor ideas.
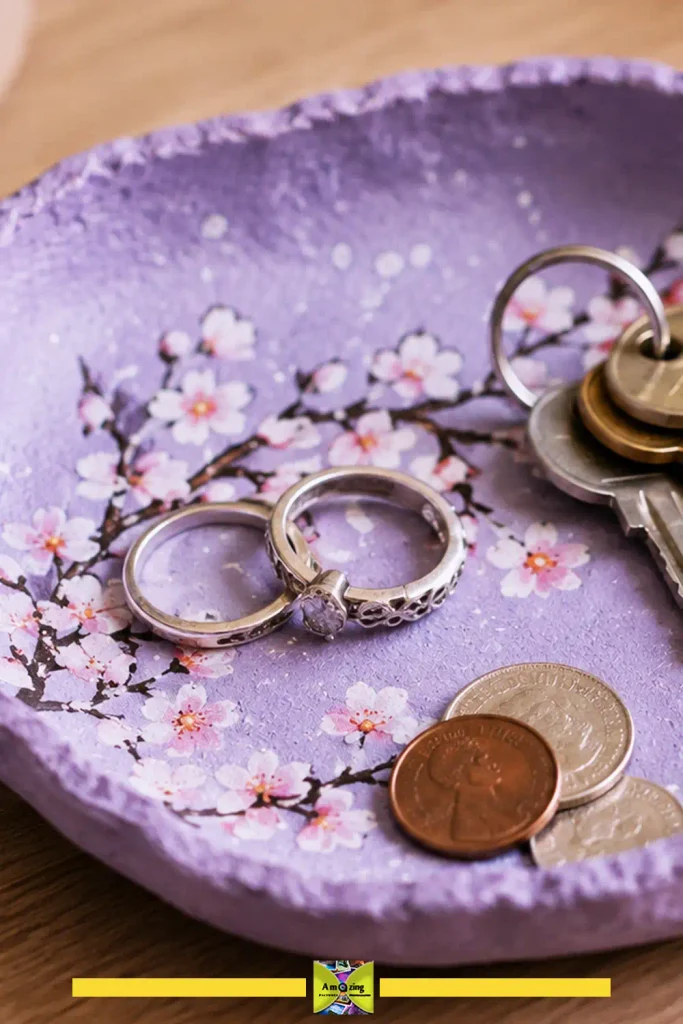
9. Decorative Trinket Dish (Non-Food Use)
What it looks like: A small, smooth dish molded from reprocessed carton pulp, painted and sealed, used to hold keys, rings, or loose change.
Best use: A catch-all dish for a nightstand, entryway, or desk — clearly for non-food items only. Difficulty: Intermediate. Approximate time: 2–3 hours of active work, plus 1–2 days of drying time (author to confirm).
Materials:
- Paper-pulp cartons
- Warm water
- PVA glue
- A small bowl or mold to shape against
- Acrylic paint
- Water-based sealer
Tools:
- Blender or food processor (used only for craft, never food afterward)
- Fine mesh strainer or cloth
- Bowl
- Plastic wrap
- Clean and dry the cartons. Tear them into small pieces.
- Blend the pieces with warm water and a spoonful of PVA glue into a thick pulp. Add glue gradually — too much makes the dish brittle, too little makes it crumbly.
- Squeeze the excess water from the pulp through a strainer or cloth until it is like damp clay.
- Line a small bowl with plastic wrap and press the pulp evenly over the inside, about a quarter-inch (6 mm) thick.
- Let it dry completely — this can take a day or more. Rushing it causes cracking and uneven shrinkage.
- Remove the dish, trim the rim, sand any rough spots, and paint and seal it.
Customization: A smooth matte finish in a single color, or a marble effect by mixing two pulp colors before pressing.
Practical tip: Press the pulp in a thin, even layer and squeeze out as much water as possible — uneven thickness is the main cause of cracking.
Common mistake or limitation: Drying too fast, which makes the pulp crack and shrink unevenly — dry slowly at room temperature, away from direct heat.
Safety: This dish is porous even when sealed. It is for dry, non-food items only — never use it for food, drinks, or anything that will be eaten from.
Most of the expense in this project comes from the PVA glue, paint, and sealer rather than the carton itself! If you already have those supplies… the extra material cost can be minimal! but record the actual amount used before publishing a project total… I’d also measure the pulp and glue during the test batch instead of relying on “a spoonful”… for example, note how many grams or cups of squeezed pulp you had and exactly how much PVA was added. That gives you a repeatable glue-to-pulp ratio for future dishes and makes it much easier to adjust if the first piece dries too crumbly or too rigid.
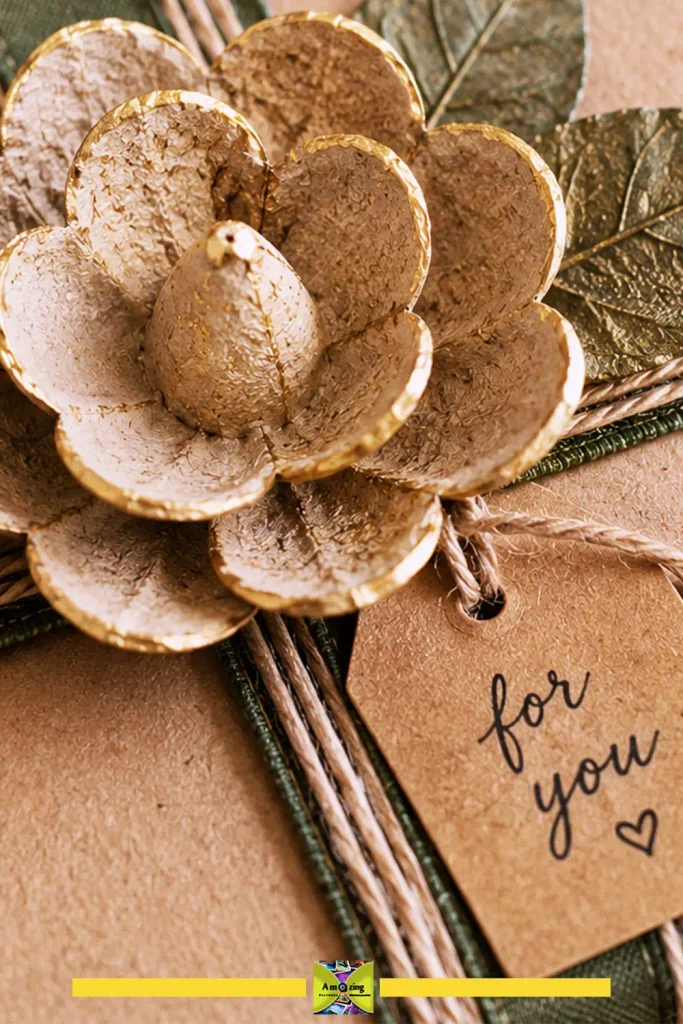
10. Sculptural Gift Toppers
What it looks like: Small layered carton shapes — rosettes, fans, or geometric stacks — painted and mounted on a toothpick or clip to top a wrapped gift.
Best use: Adding a reusable, handmade accent to gift wrapping. Difficulty: Beginner. Approximate time: 30–60 minutes per topper plus drying time (author to confirm).
Materials:
- Carton cups and dividers
- Acrylic paint
- Tacky or hot glue
- Toothpicks, small clips, or wire for mounting
Tools:
- Scissors
- Craft knife (optional)
- Paintbrush
- Clean and dry the cartons. Cut cups and dividers into petals, fans, or stacked rings.
- Layer two or three shapes with glue, building a small sculptural form — a rosette, a starburst, or a stacked cone.
- Paint the topper and let it dry.
- Glue a toothpick, clip, or short wire to the back so it can be pressed onto a ribbon or tucked under a bow.
Customization: Match the topper to the wrapping paper, or go contrasting for a deliberate pop. A matte gold or silver finish reads as an intentional detail.
Practical tip: Keep the topper lightweight and low-profile so it sits flat against the gift rather than toppling.
Common mistake or limitation: Building a heavy, tall topper that tips the moment the gift is moved — small and layered beats tall and wobbly.
Safety: Toothpick or wire mounts are sharp; keep finished toppers away from young children.
For another paper-based way to dress up a gift, try this easy paper flower box.
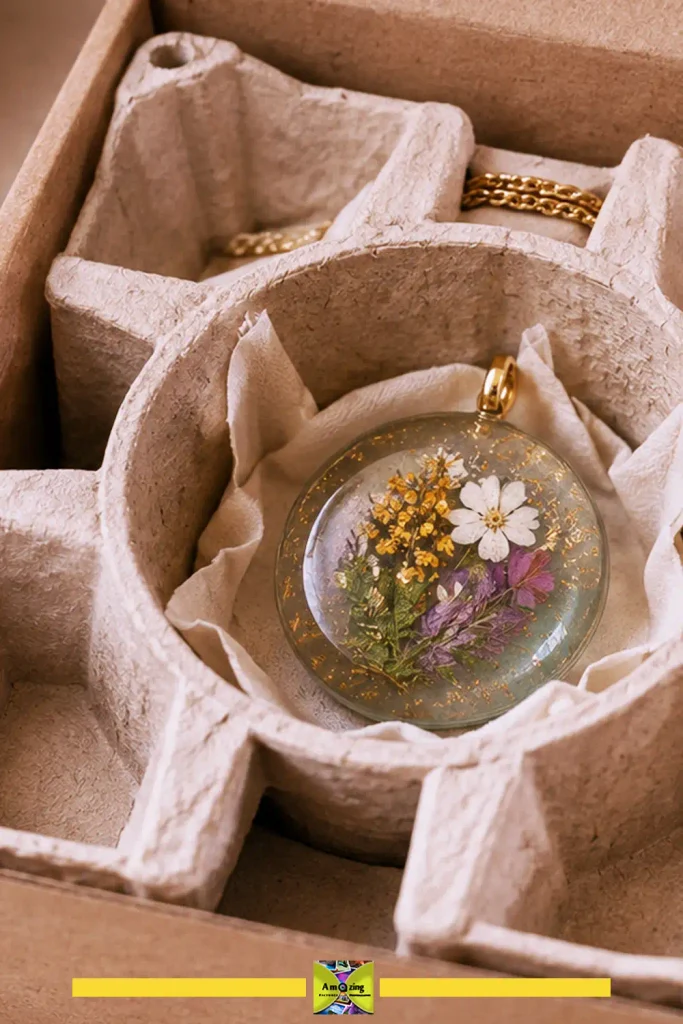
11. Custom Gift Insert for Presenting or Mailing
What it looks like: A fitted insert, shaped from a carton’s cups and dividers, that holds a small handmade item steady inside a presentation box or mailing box.
Best use: Presenting or shipping a lightweight handmade gift — jewelry, a small ornament, a resin piece — so it does not rattle around. Difficulty: Intermediate. Approximate time: 1–2 hours plus drying time (author to confirm).
Materials:
- Paper-pulp carton
- The gift and its box
- Tacky or hot glue
- Optional tissue or fabric to line
Tools:
- Scissors
- Craft knife and cutting mat
- Ruler
- Clean and dry the carton. Measure the box and the item you are sending.
- Cut cups or dividers to create a cradle that holds the item in place — a single cup for a ring, a cut divider for a flat pendant.
- Line the cradle with tissue or fabric so the raw fiber does not scuff the item.
- Test that the insert holds the item without it moving, then glue the insert into the box.
Customization: A soft, neutral liner that matches the gift’s wrapping keeps the presentation cohesive.
Practical tip: Build in a little give — an insert that is slightly cushioned protects better than a rigid, tight one.
Common mistake or limitation: Assuming a paper insert provides real shipping protection. It prevents rattling but does not cushion against impact — if the item is fragile, use proper padded packaging and treat the carton insert as presentation only.
Safety: For mailing, verify the packaging meets your carrier’s requirements for the item’s fragility and value. Shipping suitability should be confirmed with a real test before you rely on it.
For a gift insert… I’d test the packaging with the actual item before trusting it for mailing! Close the box, gently shake it in several directions, then reopen it and check whether the item shifted! rubbed against the sides, or compressed the liner… For a real shipping test… send one sample package through the same carrier and service you plan to use, then inspect the item and insert on arrival! If the gift moved more than a few millimeters, add soft padding around the cradle rather than making the paper insert tighter. For fragile pieces, the carton insert should keep the presentation neat, while proper cushioning around it handles impact during transit.
Garden projects
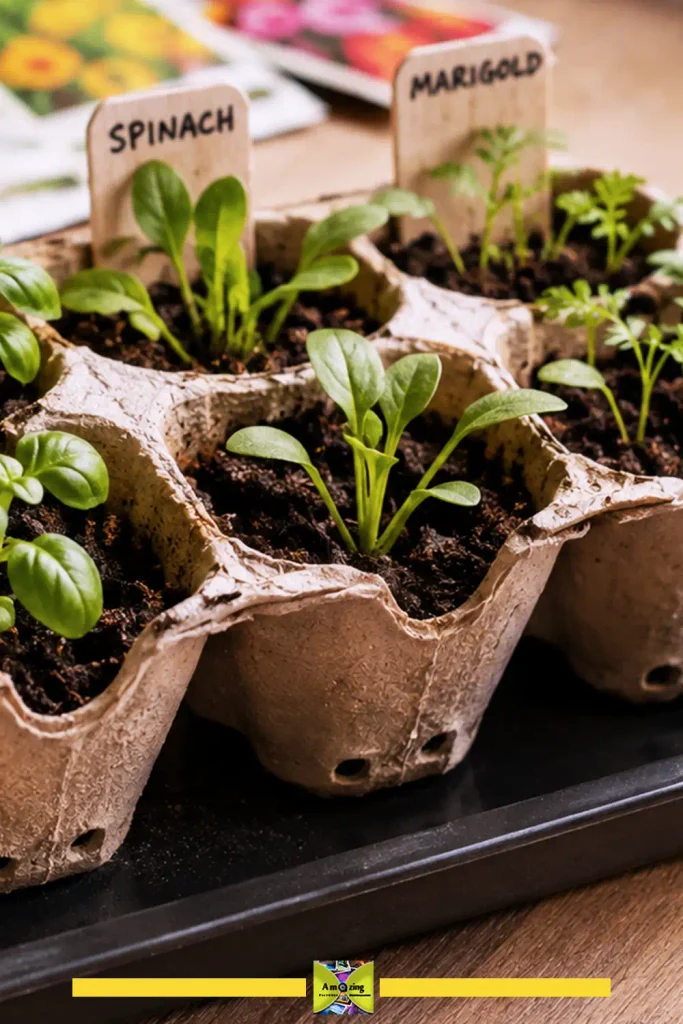
12. Seed-Starting Tray with Proper Drainage
What it looks like: A paper-pulp carton with drainage holes punched in each cup, nested over a drip tray, and filled with seed-starting mix.
Best use: Starting fast-growing seeds indoors — salad greens, many annual flowers, and quick herbs — not long-season crops. Difficulty: Beginner. Approximate time: 30–45 minutes to prepare, plus the growing season (author to confirm).
Materials:
- A clean paper-pulp carton
- Seed-starting mix
- Seeds
- A drip tray or the carton lid
Tools:
- Scissors
- An awl, skewer, or pen for punching holes
- A spray bottle or small watering can
- Clean and dry the carton. Poke several small drainage holes in the bottom of each cup.
- Set the carton over a drip tray (the lid, lined with a plastic bag or tray, works) to catch excess water.
- Fill each cup with a soilless seed-starting mix — not garden soil, which drains poorly and can carry pathogens.
- Plant seeds at the depth recommended on the packet and water gently from the top with a fine spray.
- Place in a warm spot and keep the mix moist but not saturated. Remove any plastic cover once seeds sprout.
- Transplant when seedlings have their first true leaves, hardening them off gradually over about a week before moving them outside.
Customization: Label each cup with a wooden stick or marker so you know what sprouted where.
Practical tip: Bottom-watering is tricky with curved cups — if you see standing water, tip the tray out so the roots do not sit in it, which encourages damping-off.
Common mistake or limitation: Starting tomatoes, peppers, or other crops that need six to eight weeks indoors. The cups are too small for those, and seedlings will outgrow them and circle their roots — reserve egg-carton trays for fast crops, and move seedlings to larger pots promptly.
Safety: University Extension guidance (Mississippi State, Ohio State, Missouri, Iowa State) is consistent on drainage and soilless mix; follow it and do not overwater.
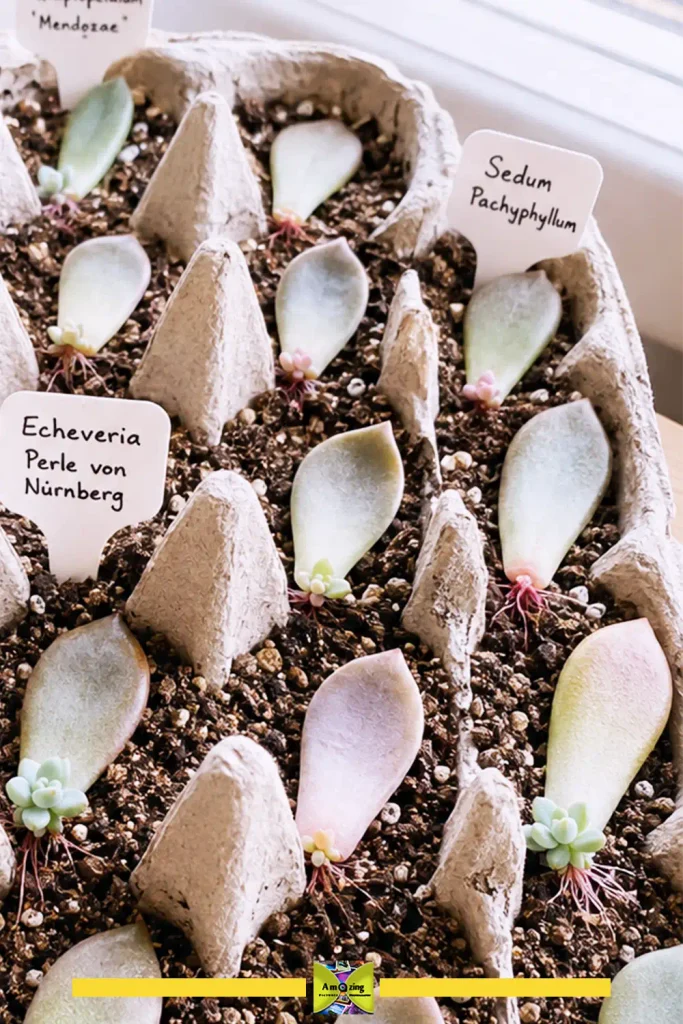
13. Succulent-Leaf Propagation Station
What it looks like: A shallow, dry tray of carton cups holding individual succulent leaves so each can root without crowding, kept dry and out of direct harsh sun.
Best use: Propagating succulent leaves — the kind that root from a single leaf on dry soil — in a clean, organized tray. Difficulty: Beginner. Approximate time: 15–30 minutes to set up; rooting takes weeks (author to confirm).
Materials:
- A clean paper-pulp carton
- Cactus/succulent mix
- Succulent leaves with a clean break at the base
Tools:
- Scissors
- Spray bottle (optional)
- Clean and dry the carton. Fill each cup with a fast-draining succulent mix.
- Lay one healthy leaf in each cup with the cut end resting on the soil — do not bury it.
- Keep the tray in bright, indirect light and water sparingly. Succulent leaves rot when kept wet, so let the mix dry between light waterings.
- Once roots and a small plant form, transplant each into its own small pot.
Customization: Use a shallow tray with wide cups so each leaf has room; label cups if you are propagating multiple varieties.
Practical tip: Because paper cartons stay damp in the cup, use the driest mix you can and water from the surface only — a wet paper cup will rot a succulent leaf quickly.
Common mistake or limitation: Treating this like a seed tray and keeping it constantly moist — succulents want dryness, and a soggy paper cup will kill the leaf.
Safety: This is for decorative propagation only. Do not use a reused carton as a water reservoir or food surface, and confirm any finish you add is safe around plants.
For a paper-carton propagation tray… I’d be especially conservative with moisture because the molded fiber holds dampness longer than a plastic nursery tray! Start with dry succulent mix and place each intact leaf on the surface rather than burying the cut end… Check the carton as well as the soil before adding water… if the paper still feels cool or damp underneath! wait longer… Once roots and a small new rosette begin developing, increase moisture only gradually and transplant before the carton starts softening or losing its shape. If you test several succulent varieties… record which ones rooted reliably and how many days passed between light waterings so you can replace the estimate with your own repeatable results.
Creative activities
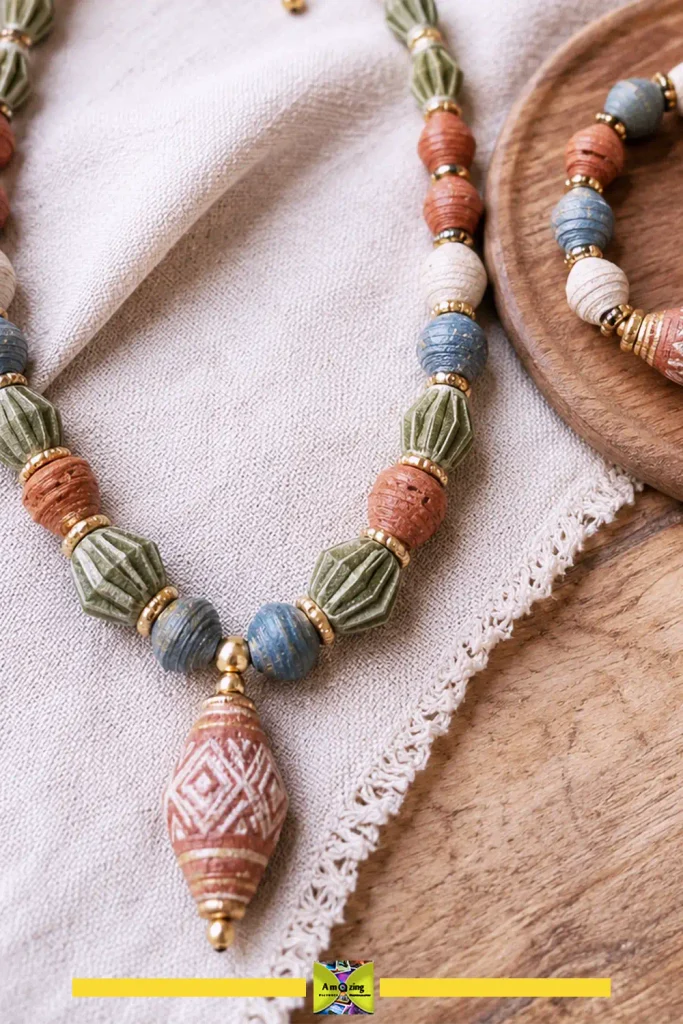
14. Handmade Paper-Pulp Beads and Pendants
What it looks like: Rolled or molded beads in repeating shapes and colors, strung into a necklace, bracelet, or garland.
Best use: Lightweight statement jewelry or decorative garlands — with the wear limitations clearly understood. Difficulty: Intermediate. Approximate time: 1–2 hours to shape, plus a day to dry, plus finishing (author to confirm).
Materials:
- Carton cups and dividers
- PVA glue
- Acrylic paint
- Sealer
- Cord, elastic, or jump rings
Tools:
- Scissors
- Skewer or toothpick for rolling
- Paintbrush
- Optional drill or awl for holes
- Clean and dry the carton. Cut cups and dividers into triangles or strips for rolling.
- Roll each piece tightly around a skewer, gluing as you go, to make a bead. Leave a hole through the center by shaping around the skewer.
- Let the beads dry completely, then paint and seal them. Sealing adds a little durability but does not make them waterproof.
- String the beads onto cord or elastic, or attach pendants with jump rings.
Customization: A monochrome set of graduated bead sizes, or a two-tone pattern. A matte sealer keeps the papery texture; a gloss sealer reads as a lacquered finish.
Practical tip: Roll tightly and glue the final edge down firmly — loose ends catch and unravel once the bead is strung.
Common mistake or limitation: Expecting sealed paper beads to survive water or daily wear. They are lightweight and porous; seal them, keep them dry, and avoid sleeping or showering in them. Wear durability requires firsthand testing before any claim.
Safety: Beads are small parts — keep them away from young children and pets, and do not use an unverified paint or sealer on a piece meant for skin contact.
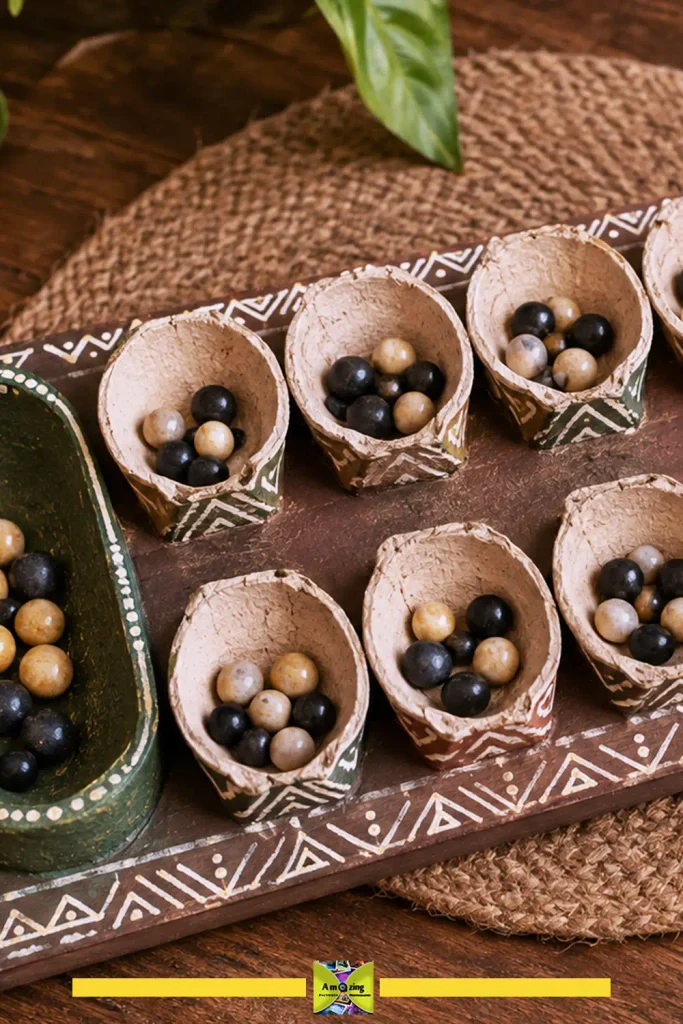
15. Tabletop Mancala-Style Game
What it looks like: A two-row game board built from twelve carton cups plus two larger end cups, with stable painted playing pieces, sized for a table or lap.
Best use: A portable, low-cost version of the classic counting-and-capture game. Difficulty: Beginner-to-intermediate. Approximate time: 2–3 hours plus drying time (author to confirm).
Materials:
- One or two paper-pulp cartons
- A flat board base (cardboard or wood)
- Tacky glue
- Acrylic paint
- Playing pieces (painted pebbles, beads, or dried beans — 48 pieces for the standard setup)
Tools:
- Scissors
- Craft knife and cutting mat
- Paintbrush
- Ruler
- Clean and dry the cartons. Cut twelve cups for the two rows of six pits, and shape two larger cups for the end stores.
- Glue the twelve cups in two facing rows of six on the board, with a store at each end.
- Paint the board and pieces. Paint the pieces in a single color, or give each player a set of 24.
- To play the standard Kalah-style rules: place four pieces in each of the twelve pits. On a turn, pick up all the pieces from one of your six pits and sow them one at a time counterclockwise, including your store but skipping your opponent’s store. If your last piece lands in your own empty pit across from a non-empty opponent’s pit, capture those pieces into your store. Play ends when one side’s six pits are empty; the other player sweeps their remaining pieces into their store, and the player with the most pieces wins.
Customization: Paint the board a deep single color and the pieces a contrasting tone, or decorate the stores as decorative end caps.
Practical tip: Use pieces with enough weight and grip — painted pebbles or wooden beads — so they do not scatter when a cup is picked up.
Common mistake or limitation: Using pieces too small to pick up cleanly, which makes the game frustrating — choose pieces around a half-inch (12 mm) or larger.
Safety: Small pieces are a choking hazard — keep the game and its pieces away from young children and pets, and count the pieces after play so none go missing.
For a game board like this… I’d test the cups before painting the whole project by gluing a few spare ones to the same backing and handling them repeatedly! If the cups begin lifting at the rim… reinforce the base with a thin bead of tacky glue around the outside edge rather than adding a heavy blob underneath! For the playing pieces… choose something large enough to pinch easily but small enough that four pieces fit comfortably in each pit without spilling over the sides. Pebbles or wooden beads around 12 to 15 mm usually feel more manageable than tiny dried beans, especially during faster turns. Once the board is finished… play several full games and check whether any cups loosen or distort before calling the design complete!
How to make molded-carton projects look polished
The raw carton has a rough, lumpy texture that can read as either charming or cheap depending on how you handle it. Control the finish and it tips toward the first:
- Limit the palette. Two or three coordinated colors beat a rainbow of mismatched leftovers.
- Repeat shapes and orientation. A grid of identical cups looks intentional; a jumble of random shapes looks cluttered.
- Symmetry wins. Centered layouts, even spacing, and mirrored arrangements give an adult, architectural feel.
- Finish the edges. Sand or trim fuzzy cut edges, and paint them as carefully as the surfaces.
- Conceal the joins. Glue edges cleanly, wipe away squeeze-out, and cover raw seams with a strip of paper or trim.
- Use tonal gradients. A single hue stepped from light to dark across a wreath or panel looks deliberate and modern.
- Add coordinated accents. A fabric lining, a neat label, or a metallic edge in the same family as the base color elevates the whole piece.
- Edit, don’t add. A restrained design with clean lines looks more finished than one covered in detail.
Troubleshooting common egg-carton problems
- Cups splitting while separated — cut slowly with sharp scissors just outside the rim; a dull blade crushes and splits the fiber.
- Fuzzy or crushed cut edges — trim again with sharp scissors, or sand lightly; do not yank pieces apart.
- Cartons warping after painting — use thin coats and let each dry fully; a heavy wet coat saturates and warps the fiber.
- Glue soaking in or failing on laminated surfaces — porous paper drinks thin glue; use a slightly thicker tacky glue, and test any coated or glossy surface first.
- Painted pieces sticking to the work surface — let the bottom dry before flipping, and work on a non-stick mat or wax paper.
- Shapes looking uneven when assembled — dry-fit the whole layout before gluing, and check it from a few angles.
- Hinged lids tearing — reinforce the hinge with a fabric or paper strip before it gets heavy use.
- Organizers tipping or flexing — widen the base and keep heavy items low; glue the cups to a rigid tray rather than leaving them free.
- Pulp mixtures cracking or drying unevenly — keep the thickness even and dry slowly at room temperature.
- Seed trays too wet, too dry, or breaking at transplant — drainage holes plus a drip tray fix wetness; for transplanting, cut cups apart and plant them whole only if the carton is plain paper pulp.
- Outdoor projects softening, fading, or attracting pests — paper pulp is not weatherproof; keep outdoor pieces sheltered, sealed, and off the ground.
- Projects looking juvenile or cluttered — cut the palette, repeat one shape, and leave negative space.
Safety when working with egg cartons
- Reject dirty, moldy, pest-contaminated, or strongly odorous cartons. Paper pulp is porous and cannot be reliably cleaned; do not try to rescue a contaminated carton.
- Never treat a reused carton as food-safe. Raw egg residue can harbor Salmonella, and paper cartons do not clean up well. Use reused cartons for non-food items only.
- Keep paper-carton projects away from flame, burners, heaters, hot bulbs, and other ignition sources. Molded paper burns readily.
- Cut away from your hand, and never hold a small piece while drilling or puncturing it. Use a cutting mat and a sharp blade.
- Keep craft knives, drills, and hot tools out of children’s reach. These are adult tools; supervise closely if a child is nearby.
- Store small pieces securely. Beads, game pieces, magnets, pins, and seeds are choking hazards for young children and pets.
- Verify finishes before skin contact or plant use. Do not use an unverified paint, adhesive, or sealer on something meant for skin contact, plant propagation, animal feeding, or prolonged outdoor exposure.
- Do not present a lightweight carton project as structural unless you have tested it. A paper organizer is not a load-bearing shelf.
- Keep carton components away from powered electrical connections and never use them as protection for energized devices.
- Do not make unsupported environmental claims. Say “reuse” or “repurpose,” and explain that carton construction and recycling acceptance vary by location — do not label every project zero-waste or biodegradable without basis.
Frequently asked questions
The most useful ones lean on the carton’s built-in structure: desk organizers, jewelry trays, hardware sorters, seed-starting trays, and molded-pulp décor like wreaths and wall panels. They reuse the cups and dividers as ready-made compartments and shapes, so they finish fast and actually get used.
Yes. Acrylic craft paint covers molded fiber well in thin coats. Because the paper is absorbent, expect the first coat to soak in; apply two to three thin coats and let each dry fully to avoid warping.
PVA glue (white glue) and tacky glue both bond well to porous paper. Hot glue works for quick, decorative tacking but is weaker under heat and stress. Test any glue on an offcut, especially for glossy or laminated surfaces.
For a clean, odorless carton, a dry wipe or soft brush is usually enough. Avoid soaking the paper, which weakens and warps it. Reject any carton with egg residue, staining, mold, or a strong odor rather than trying to clean it.
Plain paper-pulp cartons work for fast-growing seeds when you add drainage holes and use a soilless mix, per university Extension guidance. They are not ideal for long-season crops, and they should not be reused for food afterward. Foam and plastic cartons do not biodegrade and must have seedlings removed before planting.
Only in a limited way. Paper pulp softens when wet, fades in sun, and degrades over time. Keep outdoor pieces sheltered, sealed, and off the ground, and accept that they will not last like wood or plastic.
Limit the palette, repeat a single shape, keep spacing even, finish raw edges, and conceal joins. A controlled finish turns the rough texture into an intentional design feature.
Usually not. Painted or glued cartons are often rejected by recycling programs as contamination. Check your local rules; an un-painted, clean, dry paper carton is far more likely to be accepted.
Conclusion
Start with the desk organizer or the seed tray — they use the carton’s structure exactly as it comes and give you a working result in an afternoon. From there, the wreath, wall panel, and trinket dish show what the material can do when you are willing to cut, shape, and finish it with care. The through-line in every project is the same: a clean carton, tested materials, a limited palette, and honest expectations. Molded paper is not wood and not plastic — it is lightweight, porous, and temporary, but in the right hands, and for the right job, it is also surprisingly capable.
If you enjoy turning small discarded materials into practical projects, you might also like this bottle-cap upcycling guide, which applies the same adult-oriented, carefully sourced approach to another everyday material.
If I were choosing a first project from this collection… I’d start with one that uses the carton’s existing shape instead of rebuilding it completely! A desk organizer or seed tray lets you learn how the molded paper cuts, absorbs paint, and responds to glue without investing much time or material… That first test is also a good chance to note how long the carton takes to dry! whether the cups soften under moisture, and which finish gives you the look you want… Once you know how the material behaves! the more decorative projects become much easier to plan and refine.
Sources
- Centers for Disease Control and Prevention (CDC) — egg handling and Salmonella guidance; cleaning and disinfecting surfaces that contact raw egg
- U.S. Food and Drug Administration (FDA) — Egg Safety Rule and guidance on carton reuse and Salmonella survival
- Regmi et al., Journal of Applied Poultry Research (2021) — peer-reviewed study on Salmonella cross-contamination between eggshells and egg cartons
- Mississippi State University Extension — “Start Seeds Indoors Using Egg Cartons”: drainage, soilless mix, transplanting, and biodegradable-carton guidance
- Ohio State University Extension (Morrow County) — seed starting in repurposed containers; first-true-leaf transplant timing; hardening off
- Missouri University Extension — indoor seed starting and hardening-off guidance
- Iowa State University Extension — drainage-hole requirement for repurposed containers
- Treehugger — egg-carton recyclability by material type and the short-fiber limitation
- StopWaste (Alameda County, CA) and OCRRA (Onondaga County, NY) — local recycling acceptance for paper-pulp egg cartons (clean and dry requirement)