Creative Plastic Bottle Cap Crafts and Useful DIY Hacks You’ll Actually Want to Make
Plastic bottle caps have an unusual advantage as a craft material: they arrive already formed into consistent circles, in an impressive range of colors and sizes, from tiny water-bottle caps to wide detergent lids. That built-in uniformity makes them surprisingly well suited to geometric patterns, mosaic arrangements, flower motifs, game pieces, labels, and small organizing projects — no cutting or shaping required.
Unlike many scrap materials that demand heavy modification before they look intentional, caps can be sorted, cleaned, and arranged into something attractive with minimal transformation. The projects in this article focus on ideas that adults and teens would genuinely want to display, use, or give as gifts — not another preschool ladybug.
You will find detailed instructions, honest material guidance, color-palette suggestions, and safety information for every project. If a glue only works on certain plastics, that is noted. If a project needs a drill rather than scissors, that is stated clearly. The goal is a resource you can work from, not just scroll through.
What Can You Make With Plastic Bottle Caps?
Here is a quick orientation. This article covers seventeen projects organized into five categories:
- Home Decor and Wall Art — mosaics, flower decor, mirror frames, photo frames
- Garden Projects — plant markers, a pollinator water station, garden art
- Organizers and Useful Hacks — paint palettes, drawer labels, coasters
- Accessories and Small Projects — magnets, keychains, pincushions
- Games and Creative Activities — tic-tac-toe, stamps
Plus a full preparation guide, adhesive reference, color-palette ideas, and safety section. Beyond decor, a cap can even solve small household problems — you can turn a single cap into a functional closet rod bracket.
Feel free to jump to the category that interests you most. Every project includes a materials list, tools list, step-by-step instructions, customization ideas, a practical tip, and a common mistake to avoid.
How to Prepare Plastic Bottle Caps for Crafts
A little preparation makes the difference between a project that looks polished and one that looks like — well, garbage glued together. Spend thirty minutes prepping your cap collection before you start and every project will go more smoothly.
Sorting
Sort caps by these characteristics before choosing a project:
- Diameter: Caps from water and soda bottles are typically around 28–30 mm. Milk jug caps are wider. Detergent caps are larger still. Matching diameters matters for mosaics, coasters, and any project requiring an even surface.
- Height: Some caps are shallow, others are deeper. Mixed heights can create interesting texture in freeform art but cause problems in projects that need a flat surface.
- Shape: Most caps are round, but some have flattened sides, ridges, or grip textures. Smooth-sided caps are easier to glue edge-to-edge.
- Color: Group caps by color family even if you plan to paint them later. Knowing what you have helps you plan a palette.
- Plastic flexibility: Soft, flexible caps often behave differently from hard, brittle ones when drilled or pierced.
- Intended project: Once sorted, you can quickly pull the right caps for each project rather than digging through an unsorted bin.
Cleaning
Caps that have been stored in a garage bin or kitchen drawer need cleaning before any adhesive will bond reliably:
- Fill a basin with warm water and a few drops of ordinary dish soap.
- Submerge the caps and scrub each one briefly with a sponge or old toothbrush to remove drink residue, food particles, and surface dirt.
- For caps with sticky label adhesive, soak them in warm soapy water for 15–20 minutes, then rub the residue off with a cloth. A small amount of rubbing alcohol on a cotton ball can remove stubborn stickiness, but avoid harsh solvents — some can degrade or cloud certain plastics.
- Rinse thoroughly and spread caps in a single layer on a towel.
- Let them dry completely — at least a few hours or overnight. Trapped moisture under glue prevents a proper bond and can cause paint to bubble.
Matching Cap Sizes
For projects that need a uniform surface — mosaics, frames, coasters — use caps of the same diameter and similar height. Even a 2 mm difference in cap height becomes obvious when caps sit side by side on a flat surface.
For projects that benefit from varied sizes — flowers, abstract art, sculptural decorations, layered designs — mix cap diameters intentionally rather than randomly. A larger center cap surrounded by smaller petal caps reads as a flower. Randomly mixed sizes in a mosaic read as messy.
Color Planning
A collection of mismatched bottle caps — red soda caps, blue water caps, green juice caps, white milk caps — can look chaotic. Limiting your palette makes the difference between “craft project” and “something you would actually hang on a wall.”
Try one of these palettes or create your own:
- Coastal: navy, aqua, pale blue, white, cream
- Botanical: sage green, olive, cream, pale yellow, terracotta
- Retro: orange, turquoise, coral pink, mustard yellow
- Mediterranean: cobalt blue, white, sky blue, sand
- Monochrome: three to four shades of a single color
- Rainbow gradient: red → orange → yellow → green → blue → purple, arranged in order rather than scattered randomly
If you do not have enough caps in your chosen palette, that is when painting becomes useful.
Painting Plastic Bottle Caps
Not all paint sticks to all plastic. Most bottle caps are made from polyethylene, PE, resin code #2, or polypropylene, PP, resin code #5 — both are low-surface-energy plastics that paint and glue struggle to grip.
For the best results:
- Clean and dry the caps thoroughly first.
- Lightly sand the surface you plan to paint using fine-grit sandpaper, 220–400 grit. This scuffs the glossy surface and gives paint something mechanical to grip. Wipe away dust with a dry cloth.
- Apply a plastic-specific primer available as spray or brush-on from brands like Pintyplus, Rust-Oleum, or Krylon. Standard all-surface primer may not adhere to PE or PP. Follow the manufacturer’s instructions for drying time.
- Paint in thin coats — acrylic craft paint with a brush for small caps and detail work, or spray paint for larger batches. Multiple thin coats produce a smoother finish than one thick coat.
- Seal painted caps with a clear acrylic spray sealant if the project will be handled frequently or placed outdoors.
Test your paint-and-primer combination on one sacrificial cap before committing to a batch. If the paint peels off easily after drying, the adhesion is insufficient and the project will not last.
Author tip: PE and PP caps can be stubborn surfaces, so do not paint an entire batch at once. Prepare one spare cap exactly as you plan to prepare the rest — clean it, lightly sand it, apply a plastic-specific adhesion primer, then add two thin coats of paint. After the finish has cured, scratch a hidden area gently with a fingernail. If the coating lifts or peels, change the primer or paint system before continuing.
Tested-material note: Cap formulations vary even when they look identical, so use a spare cap as a test sample for every new paint combination. Let the primer and paint cure fully before checking adhesion. A finish that survives light scratching and flexing without flaking is a much better candidate for the final project than paint that looks dry but peels from the glossy plastic surface.
Gluing Plastic Bottle Caps
This deserves its own section because getting it wrong ruins projects. Skip ahead to “Best Adhesives for Plastic Bottle Cap Crafts” near the end of the article for a full surface-by-surface reference.
The short version: standard craft glue and many super glues do not bond reliably to PE or PP plastic caps. Hot glue works for lightweight decorative projects. For projects that need a permanent bond, choose an adhesive specifically rated for polyolefin plastics, or use a mechanical attachment method such as screws, wire, or drilled holes with cord.
Plastic Bottle Cap Home Decor and Wall Art
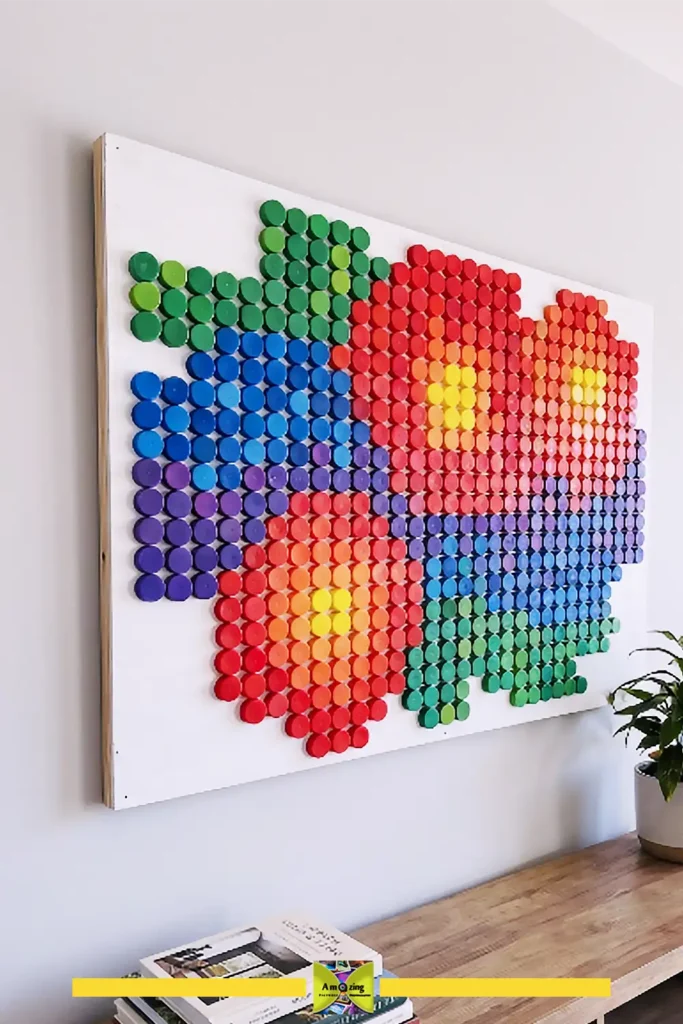
1. Plastic Bottle Cap Mosaic Wall Art
What it looks like: A colorful, textured wall panel made from dozens or hundreds of bottle caps arranged into a geometric, floral, abstract, coastal, or botanical design on a painted backing board. The finished piece has a pixel-art quality with a tactile, three-dimensional surface. If you enjoy this style, it pairs well with other recycled-material wall decor projects.
Best use: Statement wall decor for a craft room, hallway, patio, or living space.
Difficulty: Intermediate
Approximate time: 3–6 hours, not including drying time, depending on design complexity
Materials:
- 40–150+ plastic bottle caps, sorted by color
- Plywood, MDF board, or stretched canvas, minimum 12 × 18 inches recommended
- Acrylic paint for the background
- Plastic-compatible adhesive
- Clear acrylic sealant spray, optional
Tools:
- Pencil and ruler for geometric designs or chalk for freeform designs
- Sandpaper if using plywood
- Paintbrush for background
- Glue gun or adhesive applicator
Step-by-step instructions:
- Prepare the backing board. If using plywood, sand the surface smooth and wipe away dust. Paint the board with your chosen background color — this shows through the gaps between caps. White, black, or a color that complements your cap palette works well. Let it dry completely.
- Plan your design. Lightly sketch the design onto the board with pencil. For geometric patterns, use a ruler to draw clean guide lines. For organic shapes such as flowers, waves, or leaves, sketch the outlines freehand. For complex images, you can project a reference photo onto the board and trace the main shapes with chalk.
- Test your arrangement. Place caps onto the board following your sketch. Do not glue yet. Adjust colors, spacing, and placement until the design reads clearly from a few steps back. Take a photo with your phone — the small-screen view helps you spot color-balance problems your eyes might miss at full size.
- Glue the caps. Working from the center outward, or from one edge to the other for geometric designs, glue each cap in place. Apply adhesive to the underside rim of the cap, press firmly onto the board, and hold for a few seconds. If using a slow-setting adhesive, you can adjust placement slightly after setting the cap down.
- Fill gaps if desired. Small spaces between caps are part of the look. If you prefer a filled appearance, apply a thin layer of decoupage medium like Mod Podge into the gaps, or paint the visible background areas with a detail brush before sealing.
- Seal and hang. Once the adhesive has fully cured, check the product instructions, apply a clear acrylic sealant spray if desired. Attach picture-hanging hardware to the back of the board.
Customization ideas:
- Mediterranean coastal: navy, cobalt, aqua, white caps on a white or pale-blue background — abstract wave pattern
- Floral: pink and green caps arranged into a large flower shape on a cream background
- Abstract geometric: triangles, diamonds, or chevrons using three to four colors
- Butterfly or bird silhouette: outline a recognizable shape with dark caps and fill with bright caps on a light background
- Mandala: use a compass to draw concentric circles and radiating guide lines, then fill with symmetrical cap arrangements
Practical tip: If you are short on a particular color, paint the inside surface of a few caps rather than the outside — the recessed color catches light differently and adds depth to the mosaic.
Common mistake: Gluing caps before checking the full arrangement. Once caps are glued down with a strong adhesive, they are difficult or impossible to reposition without damaging the board. Always do a full dry layout first and take a reference photo.
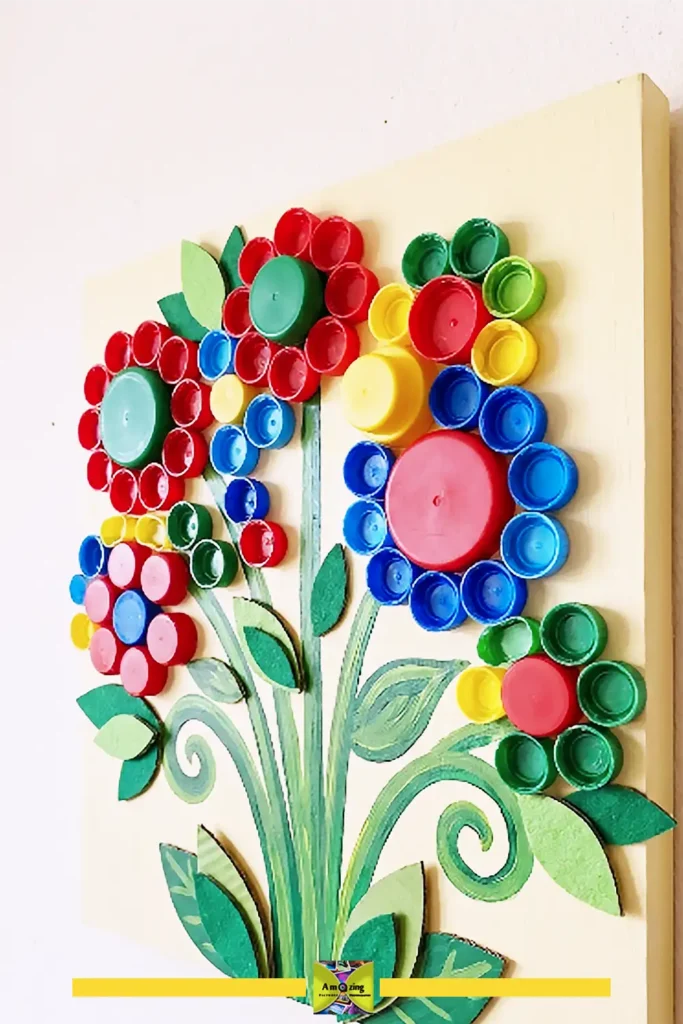
2. Bottle Cap Flower Wall Decor
What it looks like: A three-dimensional flower or bouquet made from caps of different sizes arranged as centers and petals, combined with painted stems, leaves, and a backing board or canvas. The finished piece has a playful, colorful, pop-art feel.
Best use: Craft-room wall decor, patio art, gallery-wall accent, gift.
Difficulty: Beginner to intermediate
Approximate time: 1.5–3 hours
Materials:
- Plastic bottle caps in multiple sizes
- Backing board, canvas, or sturdy cardboard
- Acrylic paint for stems, leaves, and background
- Plastic-compatible adhesive
- Optional wooden craft sticks, wire, or thick cardstock for dimensional leaves
Tools:
- Paintbrushes
- Pencil for sketching
- Scissors or craft knife for optional leaf cutouts
Step-by-step instructions:
- Paint the background board in a solid color and let it dry. A soft contrast — pale yellow, light gray, or warm cream — makes flower colors stand out.
- Sketch the flower placement: a few large blooms, several smaller ones, and simple curved stems connecting them. Do not overcomplicate the composition.
- Paint the stems and leaves directly onto the board.
- For each flower, arrange caps: one large cap or cluster of small caps as the center, surrounded by five to seven same-sized caps as petals. Play with placement before gluing.
- Glue caps in place and let the adhesive cure.
- Optional: add dimensional leaves cut from painted cardboard, felt, or thin wood, glued slightly overlapping the stems.
Customization ideas:
- Single large statement flower in bold colors on a dark background
- Three-flower cluster in pastels on white for a nursery or craft room
- Tropical palette: hot pink, orange, lime green, yellow
- Use only white, cream, and pale-blue caps on a navy background for a tonal look
Practical tip: Caps with ridged or scalloped edges, common on sports-drink bottles, make especially good flower petals because the texture reads as organic rather than industrial.
Common mistake: Making all flowers the same size and evenly spaced — this looks like a wallpaper repeat rather than a composition. Vary flower size and placement.
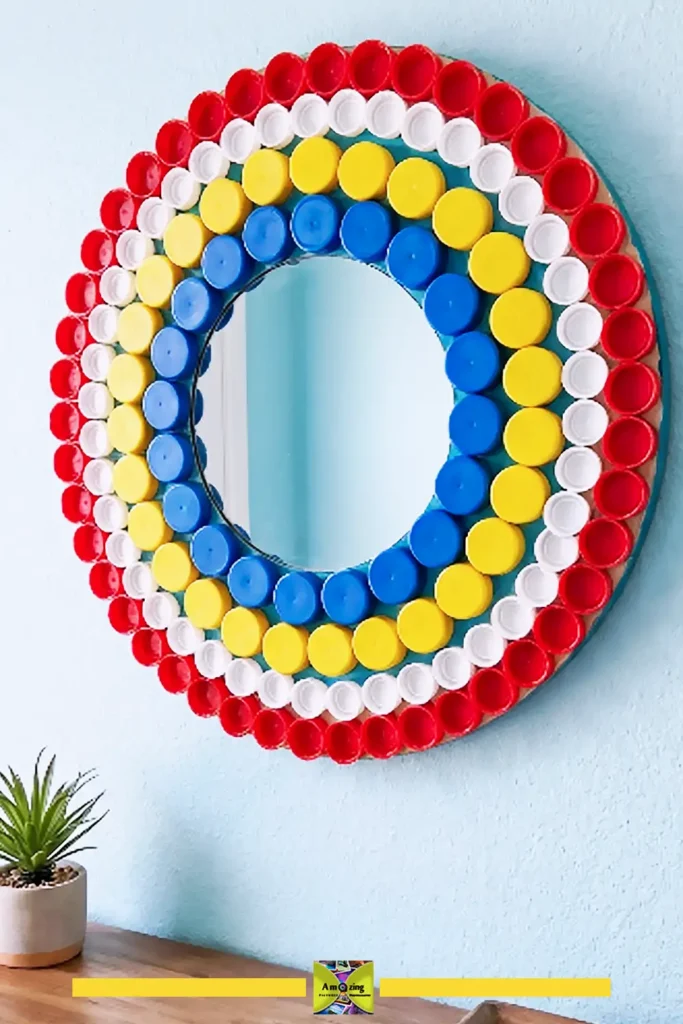
3. Bottle Cap Sunburst Mirror Frame
What it looks like: A small round mirror surrounded by radiating rings of bottle caps arranged in a sunburst or flower pattern. The caps create a bold, graphic frame.
Best use: Wall mirror for an entryway, bathroom, craft room, or patio.
Difficulty: Intermediate
Approximate time: 2–4 hours
Materials:
- Small round mirror, 8–12 inches diameter recommended
- 30–80 plastic bottle caps in two to three coordinated colors
- Sturdy backing board, plywood or MDF, cut larger than the finished mirror frame
- Plastic-compatible adhesive
- Mirror adhesive or heavy-duty mounting tape
- Optional spray paint for caps
Tools:
- Pencil and ruler or compass
- Sandpaper
Step-by-step instructions:
- Prepare the backing board. Sand and paint it if desired — the color will be largely hidden by caps but may show at the outermost edges.
- Mark the mirror position in the center of the board. Draw concentric circles radiating outward at intervals matching your cap diameter. These guide lines help you place caps symmetrically.
- Arrange caps in rings around the mirror position. For a sunburst look, use larger caps closest to the mirror and smaller caps toward the outer edge — or vice versa for a flower effect. A two-color alternating pattern creates strong graphic impact.
- Glue caps in place ring by ring, checking symmetry as you go.
- Attach the mirror to the center using mirror adhesive or heavy-duty mounting tape. Do not use hot glue for the mirror — it can fail and the mirror will fall.
- Let all adhesive cure fully before hanging. Attach heavy-duty picture hardware to the back.
Customization ideas:
- All-white or all-metallic spray-painted caps for a more refined look
- Alternating navy and white caps in concentric rings
- Random rainbow caps for a kids’ bathroom or playroom
- Gold-sprayed outer ring, white inner ring, mirror center
Practical tip: Cut a paper template the size of your mirror and tape it to the board while arranging caps. Remove it to glue the mirror at the end — this prevents adhesive smudges on the glass.
Common mistake: Forgetting to account for the mirror’s thickness. The caps should sit flush or nearly flush with the mirror surface, not protrude far beyond it or sit recessed behind it. Test-fit before gluing.
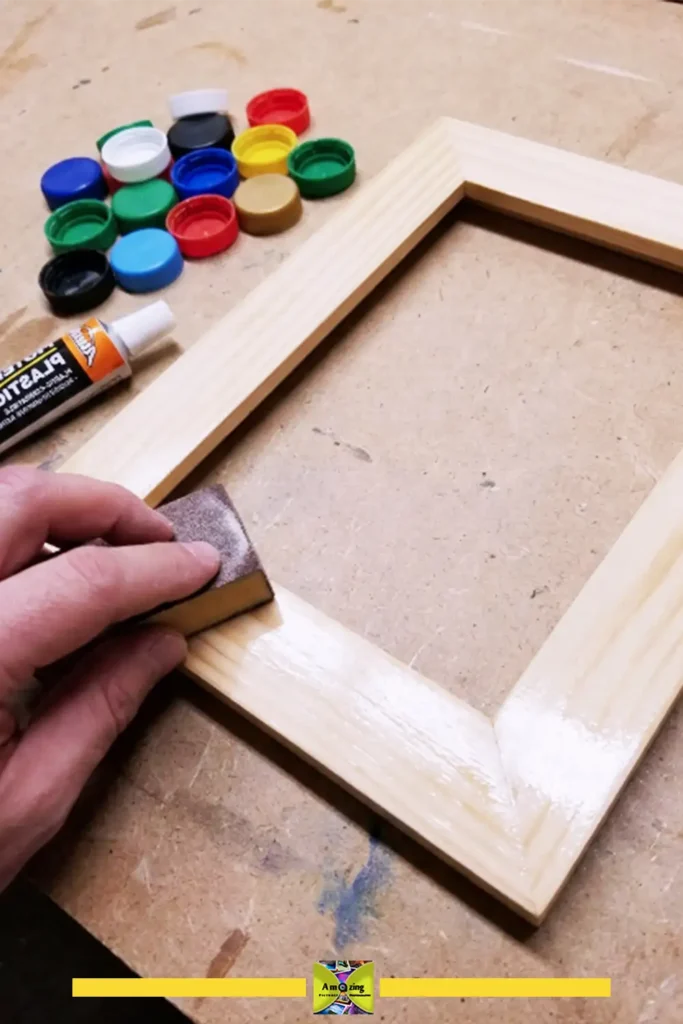
4. Bottle Cap Photo Frame
What it looks like: A plain photo frame, store-bought or cardboard DIY, covered with coordinated bottle caps, transforming it into a colorful, textured statement frame.
Best use: Framing a favorite photo, gift for a friend, craft-room decor.
Difficulty: Beginner
Approximate time: 1–2 hours
Materials:
- Plain photo frame, wood, MDF, or sturdy cardboard
- 20–50 plastic bottle caps
- Plastic-compatible adhesive
- Acrylic paint for the frame base, optional
Step-by-step instructions:
- If the frame has a glossy surface, lightly sand it so adhesive grips better. Paint the frame a base color if desired.
- Decide on cap placement: fully covering the frame surface, arranged as corner clusters, or alternating along the edges. Caps can face outward, showing their tops, or inward, showing their interior, which can be painted.
- Glue caps in place. For a full-coverage frame, start at the inner edge closest to the photo opening and work outward so caps align cleanly.
Customization ideas:
- Coastal: white, aqua, and navy caps on a white frame
- Floral: pastel caps arranged as flower clusters at two opposite corners
- Monochrome: all caps spray-painted one color
- Rainbow ombre: arrange caps from red to purple around the frame
Practical tip: If caps overhang the inner edge of the frame opening, they will block the photo. Keep the inner row of caps aligned with or slightly outside the frame’s inner border.
Common mistake: Using caps that are too tall for narrow frames. Check that the caps do not protrude so far forward that the frame cannot sit flat against a wall.
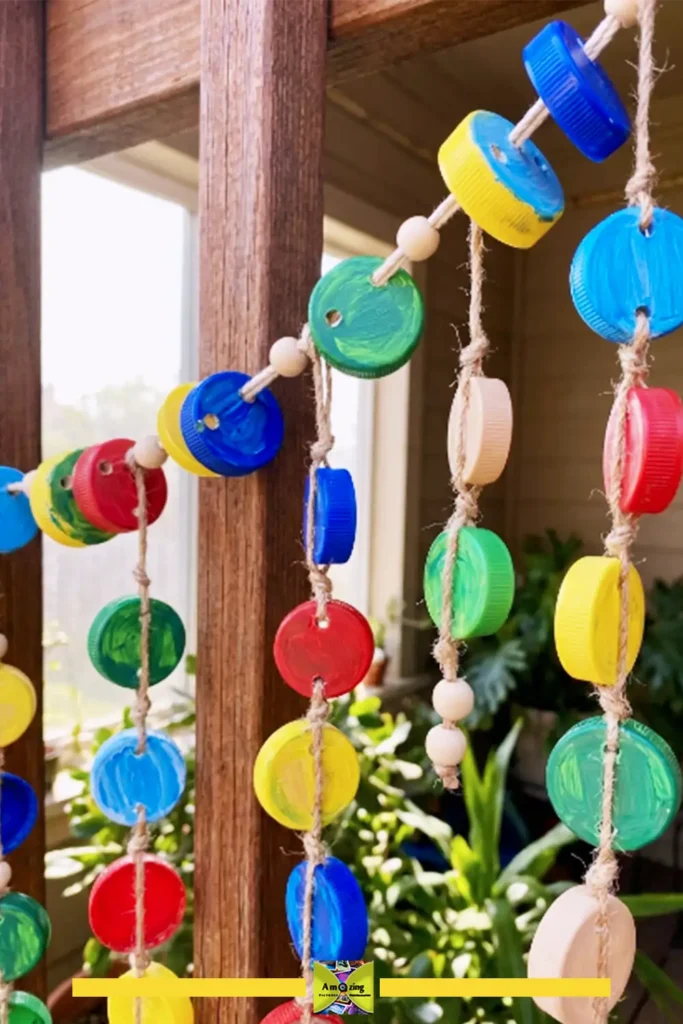
5. Bottle Cap Garland
What it looks like: A colorful hanging decoration made from drilled caps strung on twine, yarn, or cord. The caps can hang vertically like a beaded curtain or horizontally like bunting. A garland like this fits right in with other upcycled summer craft ideas.
Best use: Patio decor, craft-room decoration, party decor, seasonal display.
Difficulty: Beginner
Approximate time: 1–2 hours
Materials:
- 30–60 plastic bottle caps
- Sturdy twine, cotton cord, or thick yarn
- Acrylic paint, optional
- Wooden beads, optional
Tools:
- Drill with a small bit, approximately 3–4 mm, or a hammer and nail
- Scissors
- Safety glasses
- Scrap wood block
Step-by-step instructions:
- If painting caps, do this first and let them dry completely. Sealed painted caps last longer, especially outdoors.
- Decide on your garland style:
- Vertical strands: Caps hang one below another like a beaded curtain. Drill one hole in the center of each cap. String caps onto cord, knotting above and below each cap to hold it in place.
- Horizontal bunting: Drill two holes on opposite sides of each cap’s rim. Thread cord through both holes so caps sit flat facing forward along the cord.
- To drill safely: Place the cap top-down on a scrap wood block. Hold it firmly or clamp it. Drill straight down through the marked spot. Go slowly — plastic can catch and spin.
- String caps onto your cord. Add wooden beads between caps for spacing and extra visual interest.
- Knot the ends and hang.
Customization ideas:
- Rainbow gradient: arrange caps red to purple
- Summer brights: aqua, coral, yellow, white
- Natural: unpainted green, cream, and blue caps with wooden beads
- Painted ombre: spray caps in a gradient from light to dark in one color
Practical tip: If drilling many caps, make a simple drilling jig: drill a cap-sized recess into a thick scrap wood block, add a guide hole through the center. Drop each cap into the recess and drill through the guide hole — consistent placement, faster work, safer fingers.
Common mistake: Drilling without a backing block. The drill bit grabs the plastic and spins the cap — and your fingers are holding it. Always drill into a scrap wood surface with the cap secured.
Bottle Cap Garden Projects
6. Bottle Cap Plant Markers
What it looks like: A larger plastic cap attached to a wooden stick or stake, labeled with a plant name and decorated to resist weather. Practical and cheerful in a vegetable bed or herb garden.
Best use: Labeling herbs, vegetables, flowers, or seedlings.
Difficulty: Beginner
Approximate time: 15–30 minutes per marker
Materials:
- Larger plastic bottle caps
- Wooden craft sticks, bamboo stakes, or small dowels
- Weather-resistant paint or paint markers
- Clear outdoor sealant spray
- Plastic-compatible adhesive or small screws
Tools:
- Paintbrush or paint markers
- Drill with small bit if using screws
- Sandpaper
Step-by-step instructions:
- Paint the outside of each cap with a light base color if you want a background for written labels. Let it dry.
- Write or paint the plant name on the cap face. A paint marker gives cleaner results than a brush for text. Alternatively, write on weatherproof label paper and adhere it inside the cap, sealing over it.
- Seal the painted cap with two light coats of clear outdoor sealant, letting each coat dry. This step makes the difference between markers that last one season and markers that last several.
- Attach the cap to the stick:
- Glue method: Apply a generous amount of plastic-compatible adhesive to the back of the cap, press the stick into it, and clamp or prop until cured.
- Screw method: Drill a small pilot hole through the back of the cap and into the stick, then insert a short screw. This holds up better through rain and watering.
- Place in the garden near the corresponding plant.
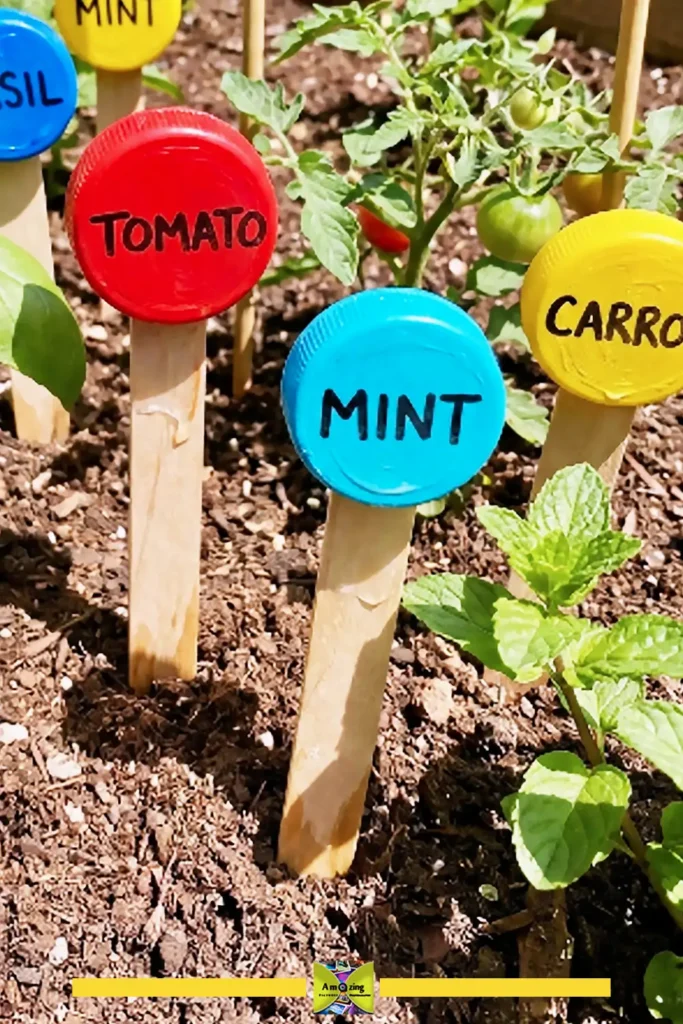
Customization ideas:
- Paint each cap a different color and create a matching color key on a garden map
- Use chalkboard paint on the cap face and write with a chalk marker
- Decorate caps with simple painted vegetable or herb illustrations next to the name
- Add the planting date on the back or underside of the cap
Practical tip: Screw attachment survives rain, wind, and curious squirrels far better than glue alone. If you are making more than five markers, the extra time spent drilling and screwing is worth it.
Common mistake: Using water-soluble markers or unsealed acrylic paint. One rainstorm washes the label away. Always seal outdoor projects.
7. Bottle Cap Pollinator Water Station
What it looks like: A small wooden stake with shallow bottle caps attached horizontally, each filled with a thin layer of water and small pebbles. Bees, butterflies, and other pollinators can safely land and drink without drowning.
Best use: Garden pollinator support, educational garden feature, eco-friendly outdoor project.
Difficulty: Beginner
Approximate time: 30–45 minutes
Materials:
- 3–5 larger plastic bottle caps
- One wooden stake or board
- Small pebbles, glass gems, or coarse sand
- Exterior-grade small screws
- Optional outdoor paint or sealant for the stake
Tools:
- Drill with a bit slightly smaller than your screw diameter
- Screwdriver
- Safety glasses
Step-by-step instructions:
- Paint or seal the wooden stake if desired and let it dry.
- Mark positions along the stake where caps will attach — spaced 3–4 inches apart so pollinators can move between them easily.
- Drill a small pilot hole through the center of each cap, from the inside face outward, and a corresponding pilot hole into the stake at each marked position.
- Screw each cap to the stake. The cap should sit horizontally like a tiny shelf, open side facing up. Do not overtighten or the plastic will crack.
- Place a few small pebbles or glass gems in each cap. These give pollinators something to stand on while drinking — without them, bees can slip into the water and drown.
- Add a thin layer of fresh water — just enough to wet the pebbles without submerging them completely.
- Push the stake into the ground in a garden bed near flowering plants, ideally in a spot with partial shade so water does not evaporate too quickly.
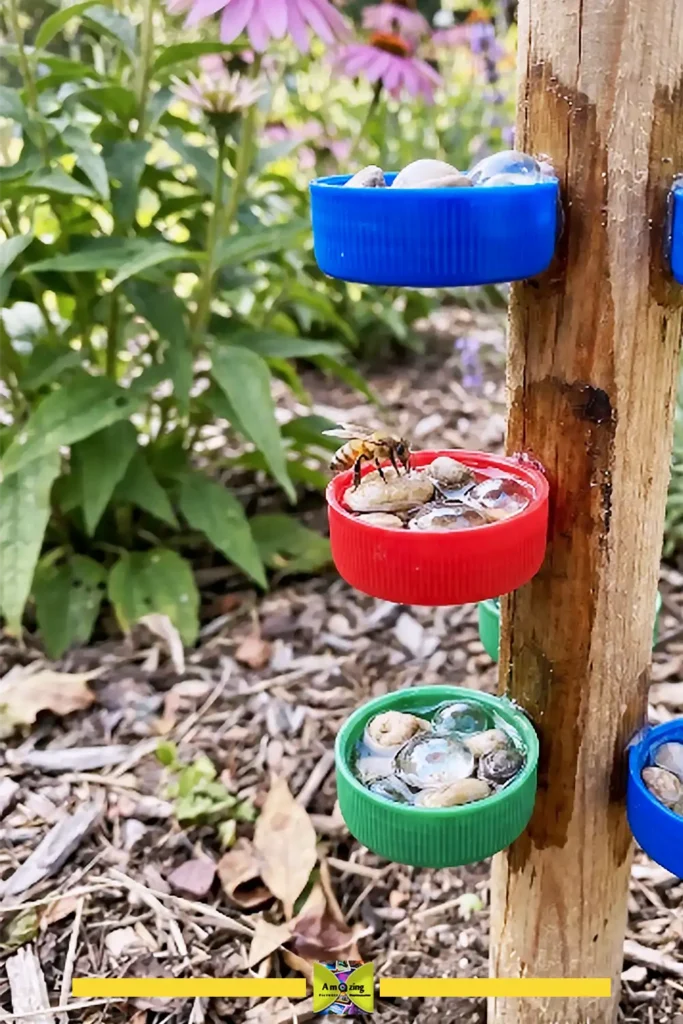
Customization ideas:
- Paint the stake a bright color to make the station visible while you work in the garden
- Decorate the cap exterior with small painted flowers
- Make a larger version with detergent caps and a wider board for a dedicated pollinator garden corner
Practical tip: Refill the caps with fresh water every day or two during hot weather. Standing water that sits too long can breed mosquitoes — small, frequent refills avoid this problem.
Common mistake: Skipping the pebbles. A cap filled with plain water is a drowning hazard for small insects. The pebbles or stones are essential, not decorative.
8. Bottle Cap Garden Art Flowers
What it looks like: Colorful bottle caps glued into flower shapes and attached to metal or wooden stakes, creating permanent “blooms” that add color to garden beds, pots, or balcony planters. For more outdoor upcycling, see these plastic-waste garden art projects or build a vertical garden made from plastic bottles.
Best use: Adding color to shaded spots where real flowers struggle, decorating pots, child-friendly garden decoration.
Difficulty: Beginner
Approximate time: 30–60 minutes for a set of three to five flowers
Materials:
- Plastic bottle caps in bright colors, 5–7 caps per flower
- Sturdy metal wire, wooden dowels, or bamboo stakes
- Exterior-grade adhesive or small screws
- Outdoor acrylic paint and sealant
- Optional waterproof buttons, plastic gems, or small caps for flower centers
Tools:
- Drill with small bit
- Paintbrush
- Wire cutters
Step-by-step instructions:
- For each flower, select one center cap and five to seven petal caps. Petal caps should be the same diameter as each other, with the center cap ideally a different size or color.
- Paint caps if needed and seal with outdoor sealant. Let everything dry thoroughly.
- Arrange caps into a flower shape on a flat surface: center cap in the middle, petal caps evenly spaced around it. Check spacing and symmetry.
- Glue petal caps to the center cap one at a time. For added strength on the back, glue a small piece of scrap plastic or a flattened cap across the joints where petals meet the center. This reinforces the flower against wind.
- Attach the completed flower to the stake:
- For wire stakes: wrap the wire around the back of the flower and twist tightly, then push the wire end into the ground.
- For wooden stakes: drill a small pilot hole through the back of the center cap and screw the flower to the top of the stake.
- For an angled display: attach the flower at a slight tilt so it faces upward and outward.
- Push the finished flower stakes into garden beds or pots.
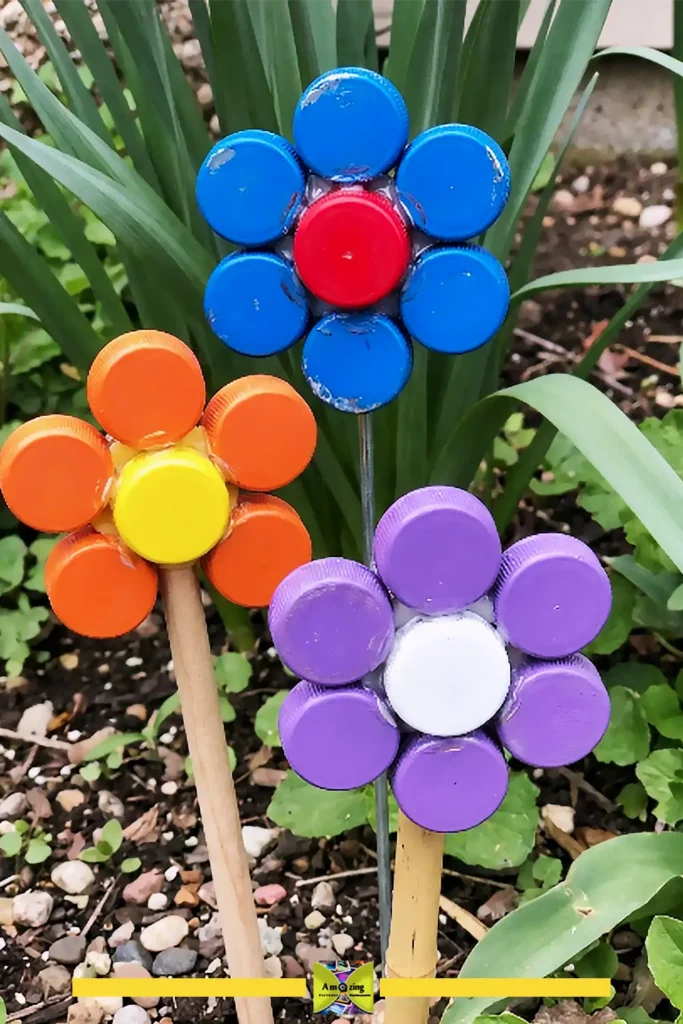
Customization ideas:
- Create a “bouquet” of five to seven flowers in graduated heights for a container
- Paint flower centers with contrasting dots or patterns
- Mix cap sizes — small caps as bud flowers, large caps as full blooms
- Add painted wooden leaves attached lower on the stake
Practical tip: Plastic caps fade in direct sun over time. Place cap flowers in spots that get morning sun and afternoon shade, or expect to refresh the paint every season or two.
Common mistake: Underestimating wind. A flower glued only at the center-cap contact points can snap apart in a storm. Reinforce joints on the back and use screws rather than glue for the stake attachment.
Useful Plastic Bottle Cap Hacks and Organizers
9. Bottle Cap Mini Paint Palette
What it looks like: Several clean plastic caps glued to a small board or an old CD/DVD, functioning as individual wells for small amounts of craft paint, preventing colors from mixing.
Best use: Holding small quantities of acrylic, watercolor, or craft paint during detailed work. For craft materials only — not food.
Difficulty: Beginner
Approximate time: 15–20 minutes
Materials:
- 6–12 matching plastic bottle caps
- A small rigid base — an old CD, small piece of cardboard sealed with tape, or a flat plastic lid
- Strong adhesive
Step-by-step instructions:
- Arrange caps evenly around the edge of the base. If using a CD, caps can circle the outer edge with one larger cap in the center hole for water or a mixing area.
- Glue caps in place and let the adhesive cure completely.
- Test that the palette sits flat and stable before using.
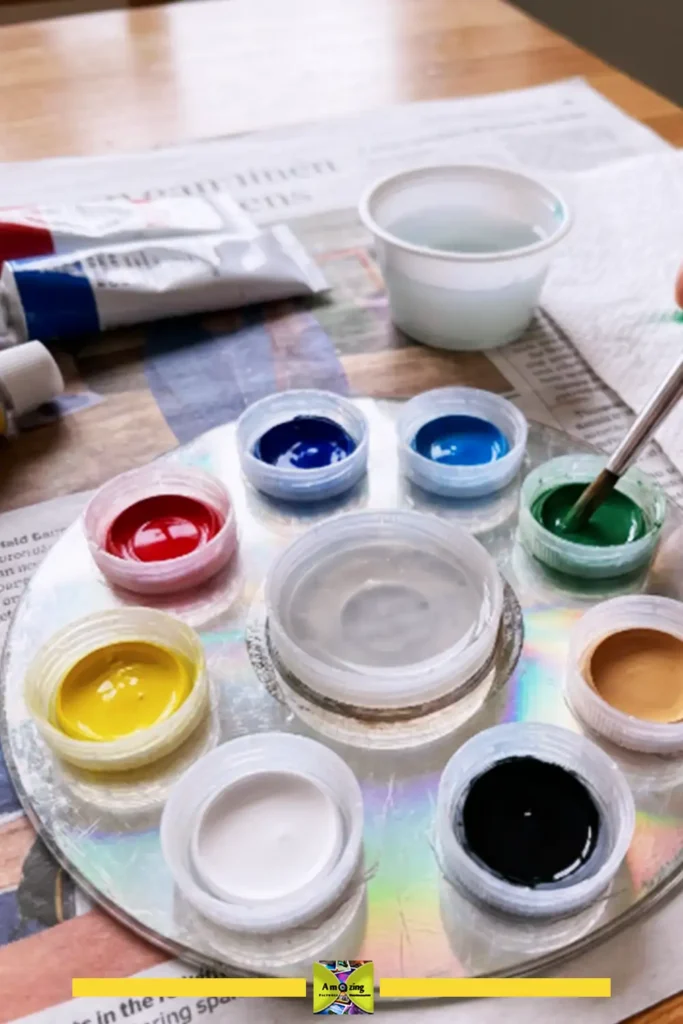
Practical tip: Shallow caps like water-bottle caps work better than deep caps for paint — you can see the color easily and the brush reaches the bottom.
Common mistake: Assuming the caps are food-safe because they were washed. Used bottle caps can harbor bacteria in micro-scratches. Label the palette clearly for craft use only.
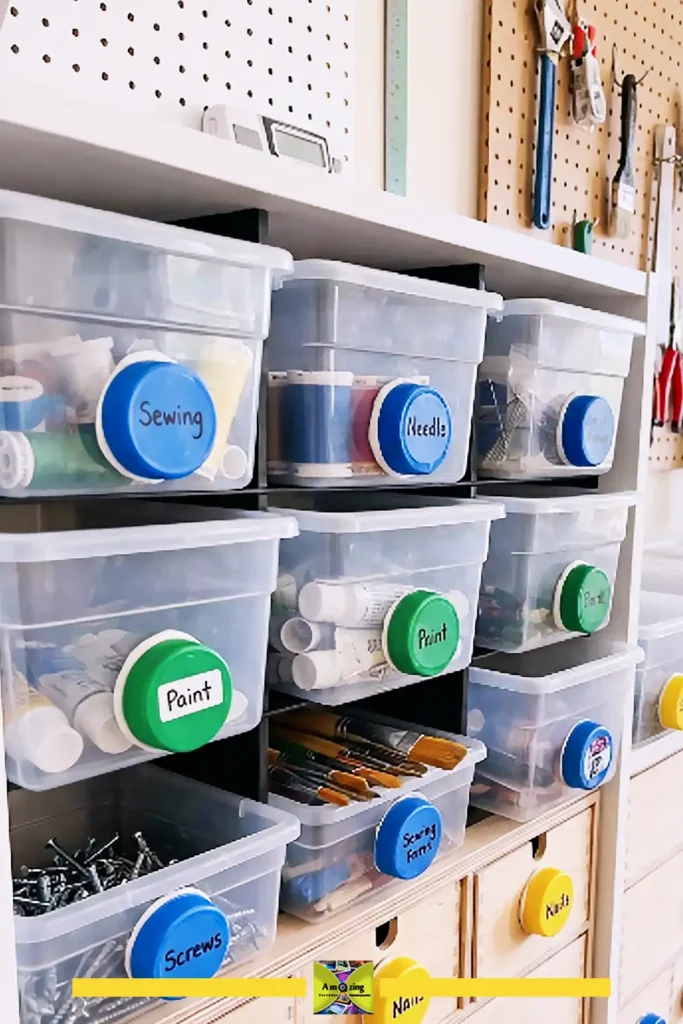
10. Bottle Cap Drawer and Storage Labels
What it looks like: Clean, attractive caps attached to the front of craft-room drawers, bins, or storage boxes, each labeled with its contents. More durable than paper labels and reattachable when you reorganize.
Best use: Craft-room organization, classroom supply bins, hardware storage, pantry labeling.
Difficulty: Beginner
Approximate time: 15–30 minutes for a set
Materials:
- Plastic bottle caps
- Adhesive putty, hook-and-loop dots, or small screws
- Paint markers or label paper
- Clear sealant
Step-by-step instructions:
- Paint the caps in a uniform color for a clean look, or leave them unpainted if the colors match your storage system.
- Write or print the contents label and attach it to the face or inside of each cap. For handwritten labels, paint markers on a solid cap color work well.
- Seal the label surface with clear sealant so it does not smudge with handling.
- Attach caps to drawers or bins:
- Adhesive putty: removable, leaves no residue, good for lightweight caps and easy reorganization
- Hook-and-loop dots: more secure than putty, still removable
- Small screw through the cap center: permanent and durable — best for workshop or garage storage
Customization ideas:
- Color-code caps by category: blue for sewing supplies, green for painting supplies, yellow for hardware
- Use larger detergent caps for bigger bins and small water-bottle caps for tiny drawers
- Add a small image or icon next to the text for quick visual scanning
Practical tip: Adhesive putty is the best starting choice for most craft rooms. It holds caps securely, removes cleanly, and lets you reorganize without scraping off glue or filling screw holes.
Common mistake: Attaching caps before finalizing your organization system. Live with the bins for a week, confirm what goes where, then attach labels.
11. Bottle Cap Coasters
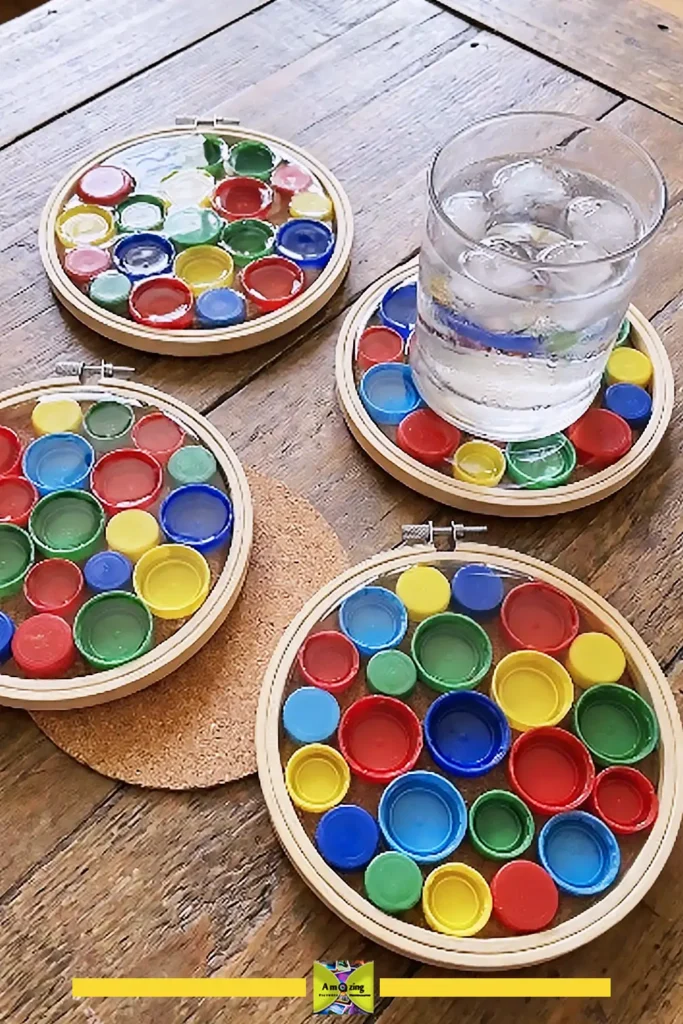
What it looks like: A set of small, colorful coasters made from bottle caps arranged inside a simple circular or square frame, creating a flat-enough surface to hold a glass.
Best use: Protecting tables from condensation, adding color to a coffee table or desk.
Difficulty: Beginner to intermediate
Approximate time: 1–2 hours for a set of four
Materials:
- Plastic bottle caps, all the same diameter
- A frame or ring to contain the caps
- Sturdy backing material
- Plastic-compatible adhesive
- Cork sheet or felt for the underside
Step-by-step instructions:
- Create or source your frame. A 4-inch wooden embroidery hoop works well. Cut a backing circle of the same diameter from thin plywood or cork.
- Arrange caps inside the frame on the backing. Tight packing creates a more even surface. Fill gaps with the smallest caps from your collection or leave them as part of the design.
- Glue caps to the backing, pressing each one down firmly. Let the adhesive cure.
- Glue a layer of cork or felt to the underside. This protects furniture, hides the backing, and prevents the coaster from sliding.
- Check the surface. Run your hand across the caps — if any sit significantly higher than their neighbors, the coaster will feel uncomfortable to use. For the most even surface, use caps of identical height and flatten any raised edges with light sanding before assembly.
Customization ideas:
- Arrange caps in a spiral or concentric-circle pattern for visual interest
- Paint all caps one color with metallic gold or copper edges
- Use clear caps with colored paper or fabric inserted inside each one before gluing
Practical tip: Cap height uniformity matters more than color uniformity for coasters. A wobbly glass is more annoying than a mismatched color. Sort by height first, color second.
Common mistake: Leaving the backing material exposed to moisture. Drinks sweat. Use a sealed or moisture-resistant backing, or the coaster will warp after a few uses.
Bottle Cap Accessories and Small Projects
12. Bottle Cap Mini Flower Magnets
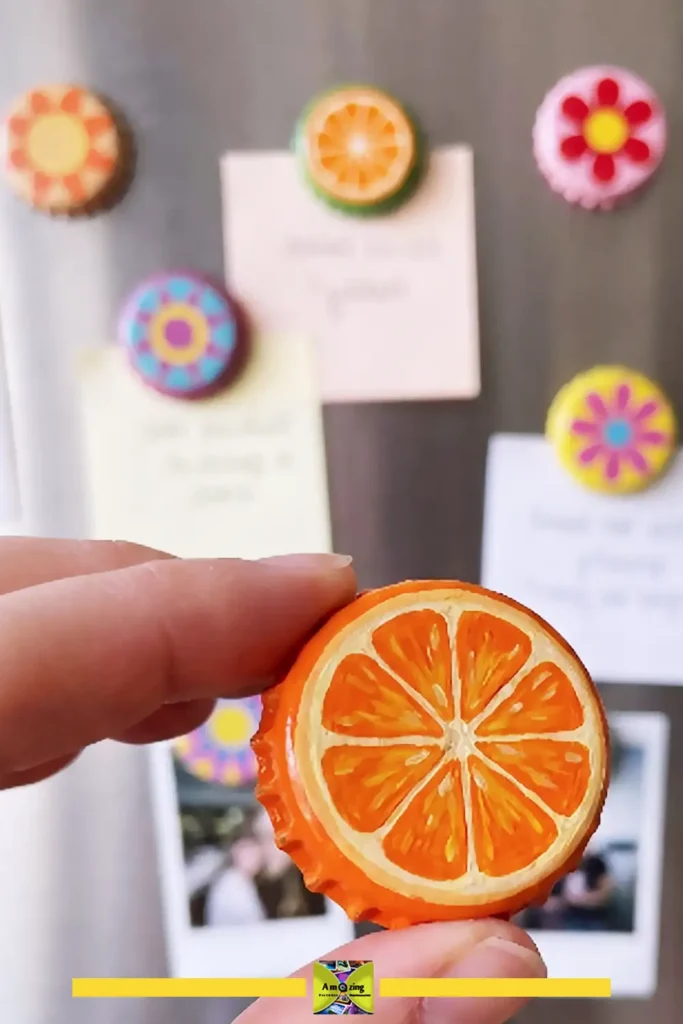
What it looks like: Small bottle caps painted as flowers, fruit slices, or geometric designs, with a magnet securely attached to the back. Bright, cheerful, and small enough to decorate a fridge without taking over.
Best use: Fridge decor, magnetic memo holders, small gifts, craft-fair items.
Difficulty: Beginner
Approximate time: 20–30 minutes for a set of five to six
Materials:
- Plastic bottle caps
- Acrylic paint and fine brushes
- Strong disc magnets
- Strong plastic-compatible adhesive or two-part epoxy
- Clear sealant spray
Step-by-step instructions:
- Paint the caps with your chosen designs. Let them dry completely.
- Seal painted caps with clear spray sealant and let that dry.
- Attach a magnet to the back of each cap using epoxy or a strong adhesive rated for both plastic and metal. A magnet that is too weak will let the cap slide down the fridge — test one before making a full set.
- Let the adhesive cure fully before using.
Customization ideas:
- Simple flowers: five painted petals radiating from the center
- Fruit slices: orange, lemon, lime, watermelon
- Geometric: painted triangles, dots, or stripes in two to three colors
- Solid colors with a single metallic dot in the center
Practical tip: If the magnet is thicker than the cap is deep, it will sit proud of the cap rim and scratch surfaces. Recess the magnet by gluing it inside the cap cavity or use magnets thin enough to sit flush.
Common mistake: Using weak craft magnets. A bottle cap plus paint plus sealant weighs more than a sheet of paper. Undersized magnets will not hold — neodymium disc magnets are worth the small additional cost.
13. Bottle Cap Keychain or Bag Charm
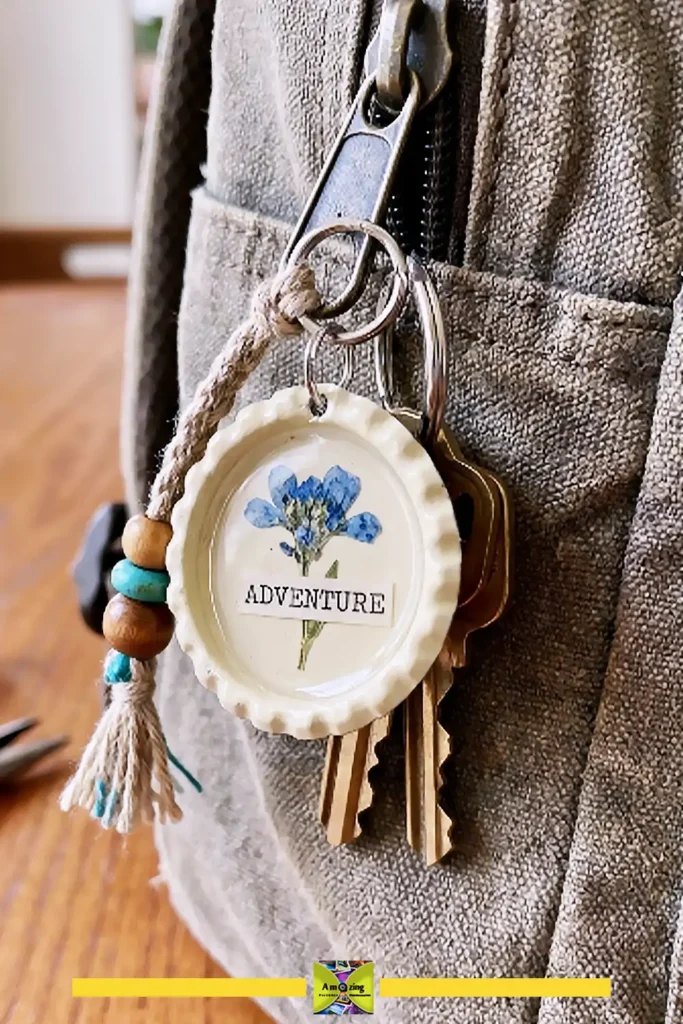
What it looks like: A decorated bottle cap with a jump ring or cord loop, personalized with paint, fabric, beads, or a tiny photo insert. Small, lightweight, and easy to customize.
Best use: Personal keychain, backpack charm, gift, party favor.
Difficulty: Beginner
Approximate time: 20–30 minutes
Materials:
- One plastic bottle cap
- Small jump ring or keychain finding
- Acrylic paint, decorative paper, or fabric for the insert
- Strong adhesive or epoxy
- Optional small beads, yarn tassel, or charm dangle
- Clear sealant or resin
Tools:
- Drill with small bit or hammer and small nail
- Needle-nose pliers
- Safety glasses
- Scrap wood block
Step-by-step instructions:
- Decorate the cap: paint the outside, or create a decorative insert using patterned paper, fabric, or a tiny photo and glue it inside the cap. For a glossy professional finish, fill the cap interior with a thin layer of clear craft resin and let it cure.
- Drill a small hole near the edge of the cap rim. Place the cap on a scrap wood block, hold it securely, and drill slowly. The hole only needs to be large enough for a jump ring to pass through.
- Smooth any sharp edges around the drilled hole with fine sandpaper or a nail file. A rough hole can snag fabric or scratch skin.
- Open the jump ring with pliers, pass it through the hole, and close it securely. Attach the keychain ring or cord loop to the jump ring.
- Add optional dangles: a small yarn tassel, a few beads on a head pin, or a tiny charm attached to the same jump ring.
Customization ideas:
- Press a small dried flower inside the cap under a layer of clear resin
- Paint the cap in a friend’s favorite colors for a personalized gift
- Use a photo or initial for a personalized keychain
- Add a beaded tassel in a matching color for a boho look
Practical tip: Always smooth drilled edges. Even a small plastic burr can catch on clothing, scratch a phone screen, or snag inside a bag. Thirty seconds of sanding prevents this.
Common mistake: Drilling the hole too close to the very edge of the cap — it can tear through. Stay at least 2–3 mm inside the rim.
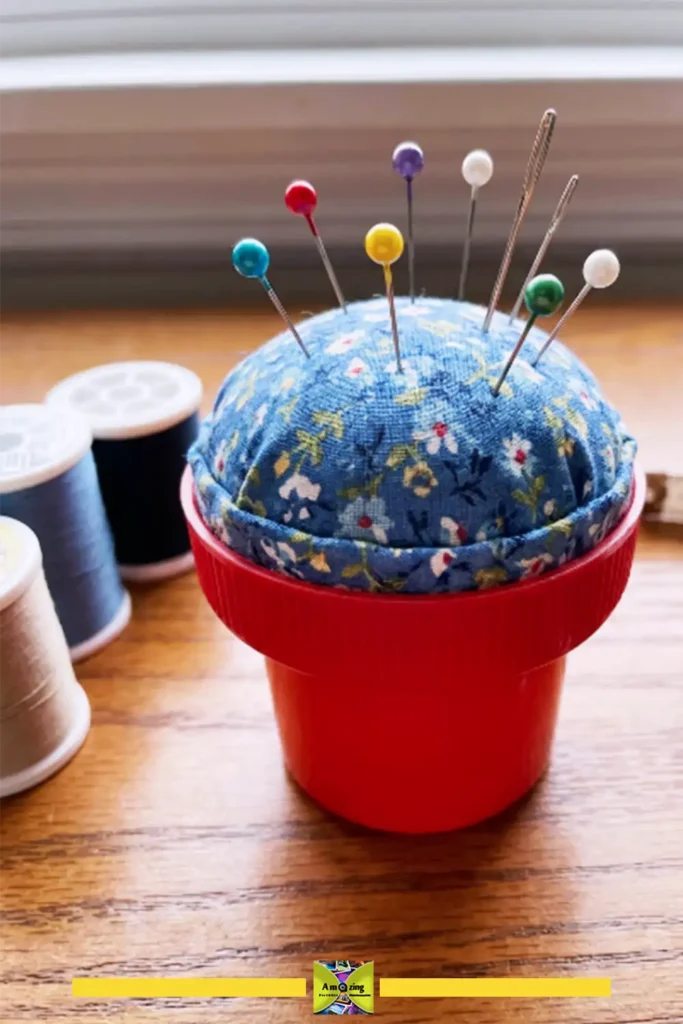
14. Bottle Cap Mini Pincushion
What it looks like: A larger bottle cap filled with a firmly secured fabric-topped cushion, small enough to sit on a desk, sewing table, or craft shelf.
Best use: Holding sewing pins and needles at a workstation, small gift for a sewist.
Difficulty: Beginner
Approximate time: 20–30 minutes
Materials:
- One wide, deep plastic bottle cap
- Small circle of fabric
- Polyester fiberfill stuffing or cotton balls
- Strong adhesive
- Optional narrow ribbon, lace, or trim
Tools:
- Scissors
- Needle and thread
- Craft knife, optional
Step-by-step instructions:
- Cut a fabric circle roughly three times the diameter of your cap. A circle about 4–5 inches across works for a typical detergent cap.
- Place a small handful of stuffing in the center of the fabric circle. Gather the fabric edges up around the stuffing to form a domed cushion. Secure with a few hand stitches or a tight knot in the fabric itself.
- Test-fit the cushion in the cap. The fabric should fill the cap interior completely without gaps, and the cushion should sit slightly proud of the rim.
- Apply epoxy or strong adhesive around the inside rim of the cap. Press the fabric cushion firmly into place and hold for the time specified by the adhesive instructions.
- Once the adhesive has cured, trim any excess fabric around the outside of the cap with sharp scissors or a craft knife for a clean edge. Glue a narrow ribbon or trim around the cap rim to hide the fabric edge if desired.
Customization ideas:
- Match the fabric to sewing-room decor
- Use velvet or linen for a more finished look
- Add a loop of ribbon to the back for hanging on a pegboard
- Decorate the cap exterior with paint or washi tape
Practical tip: Do not overstuff. A cushion that is too firm makes it difficult to insert pins, and the pressure can gradually push the fabric out of the cap. Aim for firm but yielding.
Common mistake: Skipping the stitch or knot in the gathered fabric and relying on glue alone to hold the cushion in place. Over time, pins being pulled out can tug the fabric loose. A few hand stitches create mechanical security that glue alone cannot provide.
Bottle Cap Games and Creative Activities
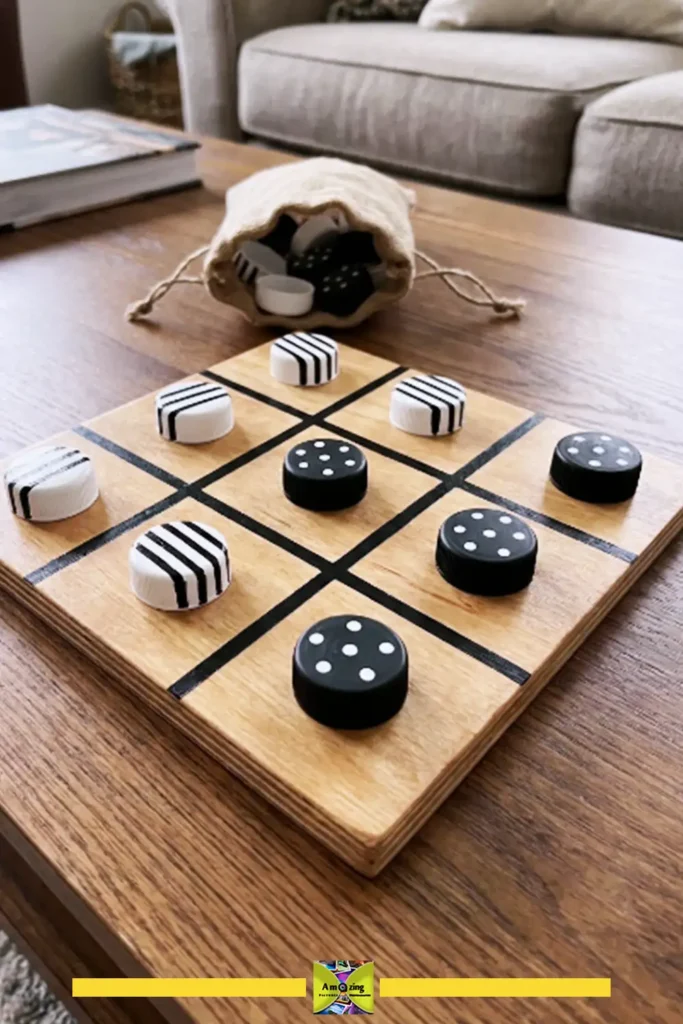
15. Bottle Cap Tic-Tac-Toe Game
What it looks like: A clean, portable tic-tac-toe set with two sets of five painted caps as playing pieces and a simple board made from cardboard, fabric, or wood. Designed to look intentional rather than like a children’s craft.
Best use: Coffee-table game, travel game, gift, family activity.
Difficulty: Beginner
Approximate time: 45–60 minutes
Materials:
- 10 matching plastic bottle caps
- Acrylic paint in two contrasting colors
- A game board
- Ruler and paint or tape for the grid lines
- Optional small drawstring bag for storage
Step-by-step instructions:
- Paint five caps with one design and five caps with a contrasting design. Keep the designs simple and graphic. Let them dry and seal with clear spray.
- Create the game board. A tic-tac-toe board is a 3 × 3 grid. On a cardboard square, draw the grid lines with a ruler and paint them with a paint marker, or use narrow washi tape for clean edges without painting. On fabric, sew or draw the grid.
- Optional: glue felt to the underside of the board for a finished look, and cover the board edges with decorative tape.
- Store pieces and board together. A small drawstring bag or a rubber band around the board holds everything neatly.
Customization ideas:
- Geometric: one set painted with stripes, the other with dots
- Nature-inspired: one set leaf-green with a painted vein pattern, the other cream with a small flower
- Monochrome: one set matte black, the other glossy white, on a gray board
- Fabric board: sew a tic-tac-toe grid onto a square of canvas or linen for a softer look
Practical tip: Choose piece designs that are instantly distinguishable from across a table. If you have to squint to tell whose cap is whose, the design is not contrasting enough.
Common mistake: Painting the grid lines freehand without a ruler. Crooked lines make the finished game look sloppy — take the extra minute to measure and draw straight guides.
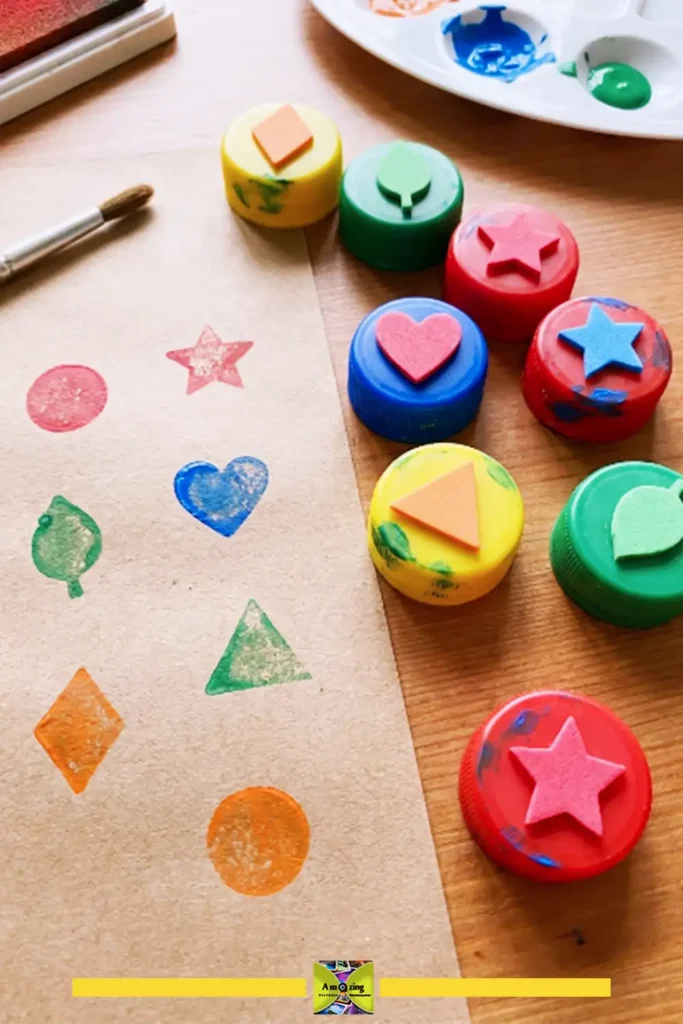
16. Bottle Cap Stamps
What it looks like: Clean bottle caps with simple foam shapes attached to the flat top, creating easy-to-hold stamps that produce clear prints on paper or fabric.
Best use: Card-making, gift wrap, fabric printing, craft activity with supervision.
Difficulty: Beginner
Approximate time: 20–30 minutes for a set
Materials:
- Plastic bottle caps
- Craft foam sheets
- Acrylic paint or stamp pad
- Strong adhesive
Tools:
- Scissors
- Pencil for tracing shapes onto foam
Step-by-step instructions:
- Cut simple shapes from craft foam: circles, triangles, stars, hearts, leaves, diamonds. Keep shapes small enough to fit within the cap diameter.
- Glue one foam shape to the flat top of each cap. Press firmly and let the adhesive cure.
- To use: press the foam side onto a stamp pad or into a thin layer of acrylic paint spread on a flat surface, then press onto paper or fabric. The cap acts as a comfortable handle.
Customization ideas:
- Make a set of geometric stamps for creating repeating patterns on gift wrap
- Cut letter shapes for simple initial stamps
- Use adhesive foam and leave the backing on — instant stamp, no gluing needed for basic shapes
Practical tip: Thin, even layers of paint produce cleaner prints than thick, goopy layers. If using acrylic paint, spread it on a flat plate or palette and dab the stamp into it lightly.
Common mistake: Cutting foam shapes with soft, rounded edges. Sharp, clean cuts produce crisp stamp impressions. Use sharp scissors and cut in one continuous motion for each edge.
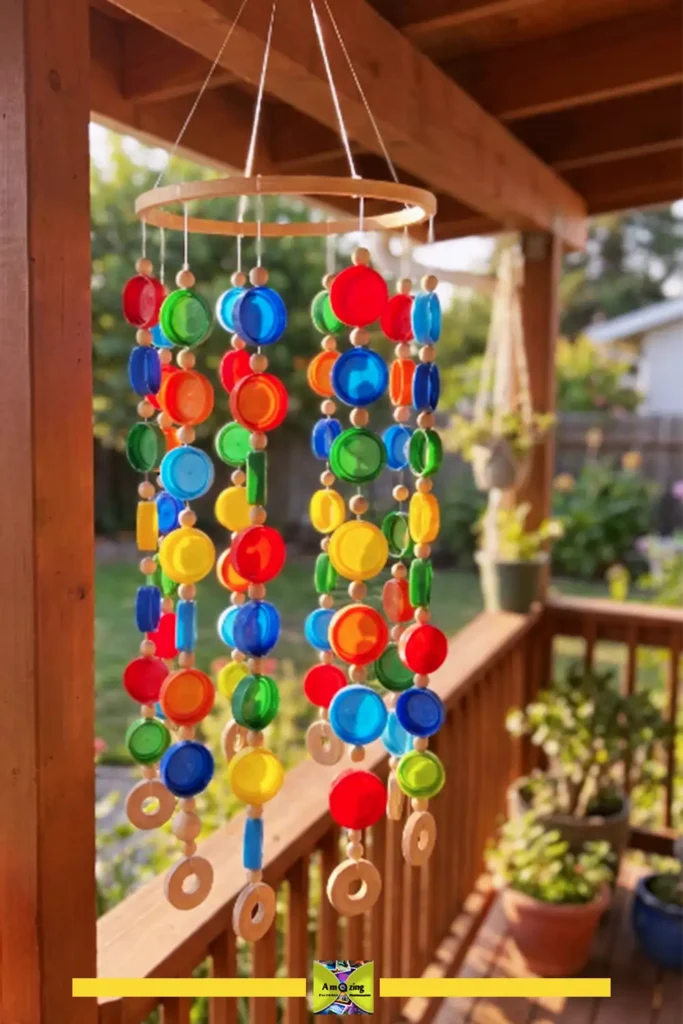
17. Plastic Bottle Cap Wind Chime
What it looks like: A hanging mobile-style chime made from colorful plastic caps strung at varying heights from a central ring or branch. Unlike metal-cap chimes, this version produces a soft, gentle clacking sound and works as primarily visual outdoor or indoor decor.
Best use: Patio or porch decoration, garden art, balcony accent, craft-room decor.
Difficulty: Intermediate
Approximate time: 2–3 hours
Materials:
- 25–50 plastic bottle caps in assorted colors
- A center ring — wooden embroidery hoop, metal craft ring, or a sturdy forked branch
- Sturdy cord, fishing line, or thin nylon string
- Small wooden or plastic beads
- Acrylic paint and outdoor sealant, optional
- Strong hanging cord for the top
Tools:
- Drill with small bit
- Scissors
- Safety glasses
- Measuring tape or ruler
Step-by-step instructions:
- Decide on a color scheme and paint caps if desired. Seal with outdoor sealant if the chime will hang outside.
- Plan the strand arrangement: five to nine strands hanging from the center ring, each strand holding four to eight caps. Vary the strand lengths for visual interest.
- Drill a hole near the edge of each cap — one hole per cap for vertical-hanging strands, or two holes on opposite sides if you want caps to hang horizontally and catch more breeze.
- String caps onto each cord. Tie a knot below each cap to hold it in place at the desired position. Add a bead above or below each cap as a spacer and for extra color.
- Attach each completed strand to the center ring. Tie securely and trim excess cord.
- Attach three or four suspension cords evenly spaced around the top ring, join them above the center, and tie to a hanging loop. Check that the ring hangs level — adjust knot positions if it tilts.
- Hang the chime where it catches a breeze — on a porch, balcony, or from a garden hook.
Customization ideas:
- Rainbow gradient across the strands — each strand a single color
- Monochrome with metallic-painted accents
- Coastal: white, aqua, and pale-blue caps with natural wooden beads
- Add small bells between caps for a true wind-chime sound to supplement the visual effect
Practical tip: Plastic caps are lightweight and may not move much in a light breeze. Adding a few heavier beads or small metal washers at the bottom of each strand increases movement and the gentle clacking sound.
Common mistake: Drilling holes too close to the cap edge for the cord weight. Caps strung near their rims can tear through over time, especially outdoors where plastic becomes more brittle with sun exposure. Drill at least 3 mm from the rim edge.
How to Make Bottle Cap Crafts Look More Intentional
The difference between “pile of glued trash” and “creative upcycled decor” usually comes down to a few decisions:
Choose a limited color palette. Random multicolor caps read as scrap material. Three to five related colors read as a design choice.
Repeat shapes and spacing. Even spacing, aligned rows, and symmetrical arrangements signal intention. Random placement signals “I glued these where they landed.”
Paint the background or base. A painted board, frame, or backing in a considered color elevates the whole project. Raw cardboard or unpainted wood pulls it back toward unfinished.
Hide the glue. Excess adhesive squeezed out around cap edges looks messy. Apply glue to the inner rim rather than the outer edge, and clean up any squeeze-out while it is still wet.
Finish the piece. A clear sealant, a neat backing, proper hanging hardware, or a trimmed edge signals that the project is complete rather than abandoned.
Edit your cap collection. Not every cap needs to be used in every project. A mosaic with 40 carefully chosen caps looks better than one with 80 caps jammed in to use them up.
Best Adhesives for Plastic Bottle Cap Crafts
This section is important. Most plastic bottle caps are made from polyethylene, PE, #2, or polypropylene, PP, #5 — two plastics that many common glues do not bond to reliably. Choosing the wrong adhesive is the single most common reason bottle cap projects fail.
Quick Reference
| Surface You Are Gluing To | Recommended Adhesive | Notes |
|---|---|---|
| Cap to cap, plastic-to-plastic, decorative, lightweight | Hot glue, low-temp gun | Works for lightweight decorative projects. Bonds are not permanent. Can soften in high heat. |
| Cap to cardboard or paper | Hot glue or Tacky Glue | Both work well because the porous surface provides mechanical grip. |
| Cap to wood, plywood, MDF, stakes | Polyurethane construction adhesive or two-part epoxy | Sand the wood surface first. Clamp or weight until cured. |
| Cap to fabric | Hot glue or fabric glue | Hot glue works for quick attachment. Fabric glue remains flexible and survives washing better. |
| Cap to metal | Two-part epoxy | Sand the metal surface to create grip. Epoxy bonds both materials reliably. |
| Cap to plastic surface, not PE/PP | E6000 or cyanoacrylate | E6000 bonds well to ABS, PVC, polycarbonate, and acrylic but NOT to PE or PP. |
| Cap to PE/PP surface | Polyolefin-specific epoxy or plastic welding | Few adhesives bond PE/PP reliably. When in doubt, use a mechanical attachment. |
Important Caveats
- E6000 explicitly states it is not recommended for polyethylene, polypropylene, or polystyrene. If you are bonding caps to each other, PE/PP to PE/PP, E6000 is the wrong choice for structural projects, though it may work for very lightweight decorative pieces that will not bear any load.
- Hot glue creates a mechanical bond — it grips the surface texture and the rim shape rather than chemically bonding to the plastic. It works for caps glued to cardboard, wood, or other caps in lightweight arrangements. It is not suitable for load-bearing projects or anything that will live outdoors in hot sun.
- Test before committing. Adhesive performance varies with the specific plastic formulation, surface texture, and environmental conditions. Test your chosen adhesive on two spare caps before starting any project that requires a strong bond.
Tested-material note: Before committing to a large project, make a small bond test using the exact cap, adhesive, and backing material you plan to use. Lightly scuff and clean both bonding surfaces, apply the adhesive as directed, allow the full cure time, then try to twist or pull the cap free by hand. If the bond releases cleanly from the plastic, switch to an adhesive rated for that plastic or use a mechanical attachment such as a screw, wire, or drilled cord.
Common Bottle Cap Crafting Mistakes
- Skipping the dry layout. Gluing as you go without testing the full arrangement first leads to regret — especially with strong adhesives that cannot be undone. Always place all caps, step back, and check before reaching for the glue.
- Using the wrong adhesive. Standard craft glue and many super glues peel right off PE and PP caps. Match your adhesive to your materials using the reference above.
- Gluing dirty caps. Dust, grease, drink residue, and moisture all prevent adhesive from bonding. Clean caps thoroughly and let them dry completely.
- Ignoring cap-height differences in flat projects. A coaster with caps of different heights creates a wobbly surface. Sort caps by height for any project that needs to sit flat.
- Drilling without securing the cap. A drill bit catches the plastic and spins the cap — along with the fingers holding it. Always drill into a scrap wood block with the cap held firmly.
- Using indoor materials outdoors. Unsealed paint, non-waterproof glue, and untreated wood all degrade quickly outside. Use exterior-rated materials for garden projects.
- Leaving sharp drilled edges unsanded. A drilled hole in plastic often leaves a sharp burr. Sand every drilled edge until smooth.
- Trying to use every cap in one project. A collection of 200 random caps does not need to become one massive mosaic. Smaller projects with carefully chosen caps produce better results than trying to use everything at once.
Safety Tips for Bottle Cap Crafts
Hot glue guns: The nozzle reaches approximately 180°C or 360°F. Always use the gun’s stand — never lay a hot glue gun on its side. Unplug when not actively gluing. Keep a bowl of cold water nearby in case of skin contact. Do not pull solidified glue off skin; run the area under cold water and seek medical attention for serious burns.
Drilling plastic caps: Wear safety glasses. Place the cap on a scrap wood block and hold it firmly — ideally with a clamp or pliers rather than fingers. Drill at a moderate speed; too fast and the bit can grab and spin the cap. Let the drill bit cool between caps if drilling many.
Piercing caps with a nail: Place the cap on scrap wood, hold the nail with pliers, and tap gently with a hammer. Do not hold the cap in your hand while hammering toward it.
Craft knives and scissors: Always cut away from your body. When trimming small pieces, secure the workpiece rather than holding it in your hand.
Paints and primers: Work in a well-ventilated area, especially with spray paint and spray primer. Read and follow the manufacturer’s safety instructions.
Small parts: Finished projects that include small caps, magnets, beads, or detachable pieces can be a choking hazard for children under three. Keep small projects out of reach of young children.
Children and crafting: Projects in this article vary in difficulty and tool requirements. Children should be supervised by an adult, and any step involving a hot glue gun, drill, craft knife, hammer and nail, or spray paint should be performed by an adult.
Outdoor projects: Sunlight, rain, and temperature changes degrade plastic, paint, adhesive, and wood over time. Outdoor bottle cap projects may need repainting or repair after a season or two. Check garden stakes and hanging projects periodically for weakened attachments.
Sharp edges: Drilled, cut, or pierced plastic can leave sharp edges and burrs. Sand or file every modified edge until smooth before handling.
Do not use an open flame to melt holes in plastic caps. Heating unknown plastics indoors can release harmful fumes. Use drilling or mechanical piercing methods instead. If you must use heat, such as a heated tool designed for the purpose, work outdoors with proper ventilation.
Do not repurpose used bottle caps as food containers, even after washing. Plastic caps can harbor bacteria in micro-scratches and are not designed for reuse with food.
Frequently Asked Questions
What can you make with plastic bottle caps?
Plastic bottle caps can be turned into mosaic wall art, flower wall decor, mirror and photo frames, garlands, coasters, garden plant markers, pollinator water stations, garden art flowers, paint palettes, drawer labels, fridge magnets, keychains, pincushions, tic-tac-toe games, stamps, and wind chimes. This article covers all seventeen of those projects with step-by-step instructions.
How do you glue plastic bottle caps together?
For lightweight decorative projects, a low-temperature hot glue gun works. For permanent bonds, choose a polyurethane construction adhesive or two-part epoxy rated for plastics. Most standard craft glues and many super glues do not bond reliably to polyethylene, PE, or polypropylene, PP — the plastics most bottle caps are made from. E6000, a popular craft adhesive, is explicitly not recommended for PE or PP by its manufacturer. Always test your adhesive on spare caps before starting a project.
What glue works best on plastic bottle caps?
Hot glue works for lightweight crafts where a mechanical bond is sufficient. Polyurethane construction adhesive bonds well to wood and provides a stronger attachment for caps glued to backing boards. Two-part epoxy bonds caps to metal and other non-porous surfaces. For cap-to-cap bonding where strength matters, look for an adhesive specifically labeled for polyolefin, PE/PP plastics.
Can you paint plastic bottle caps?
Yes, but preparation matters. Lightly sand the surface with fine-grit sandpaper, 220–400 grit, apply a plastic-specific primer, then paint in thin coats with acrylic craft paint or spray paint. Seal painted caps with clear acrylic sealant. Without sanding and priming, paint may peel off PE and PP caps easily. Test your paint system on a spare cap before committing to a batch.
How do you make holes in plastic bottle caps safely?
Use a drill with a small bit, 2–4 mm, a hammer and small nail, or a heated tool designed for the purpose. Always place the cap on a scrap wood block — never hold it in your hand. Wear safety glasses when drilling. Sand any sharp edges around the hole before handling. For consistent holes across many caps, build a simple drilling jig from a scrap wood block.
How can I use bottle caps for home decor?
The most impactful home decor projects in this article are plastic bottle cap mosaic wall art, bottle cap flower wall decor, a bottle cap sunburst mirror frame, and a bottle cap photo frame. These projects use caps to create textured, colorful statement pieces that can match a room’s existing color palette.
Can plastic bottle caps be recycled?
It depends on where you live. Recycling rules for plastic caps vary significantly by jurisdiction. Some programs accept caps only when screwed tightly onto their bottles; others require caps to be removed and discarded separately. Loose caps are often too small for sorting machinery to process. Several U.S. states are considering legislation to require tethered caps, caps that stay attached to bottles, following the European Union’s 2024 mandate. Check your local recycling program’s current guidelines — do not assume caps are accepted.
Are plastic bottle cap crafts suitable for children?
Some projects in this article are suitable for children with adult supervision — the tic-tac-toe game, stamps, and garden art flowers can be adapted for family crafting. However, many projects require hot glue guns, drills, craft knives, or small parts that present hazards for young children. An adult should handle any step involving heat, sharp tools, or power tools. Finished projects with small detachable parts, magnets, keychains, pincushions, should be kept away from children under three due to choking risk.
Final Thoughts: Start With One Project
A full bin of collected bottle caps can feel overwhelming. The best approach is to pick one project that matches the caps you already have and the time you have available today.
If you have an hour and want something decorative, start with the bottle cap flower magnets or the photo frame. If you have an afternoon and want something for the garden, try the plant markers or the pollinator water station. If you are ready for a weekend project, the mosaic wall art is worth the effort.
Once you complete one project successfully — and learn how your caps respond to paint, primer, glue, and drilling — the rest become easier. You will also develop a better eye for which caps are worth saving and which are better off in the recycling bin if your local program accepts them.
The goal is not to use every plastic cap that passes through your household. It is to create a few things you genuinely like having in your home or garden — using a material that otherwise would have been discarded. For more in this spirit, browse our more plastic bottle craft ideas or try a plastic bottle candle holder next.
Author tip: If this is your first bottle-cap project, begin with something small such as the magnets, photo frame, or tic-tac-toe pieces. A small project lets you learn how your particular caps react to sanding, paint, primer, and glue without risking a large batch. Once you know which preparation method gives you a clean, durable finish, scale the same process up to the mosaic, garden pieces, or wind chime.
Posted by: Med Houssem · In: Decoration, DIY, Gardening, Tips and Tricks, Upcycling